Security Zones of Crystal Eye
Crystal Eye supports management of four typical security zones, namely, LAN, Hot LAN, External and DMZ. Security zones play an important role in grouping virtual and physical interfaces on the Crystal Eye network. Services based out of these zones are protected using various security controls providing a holistic approach in implementing a comprehensive defense in-depth strategy.
Note: All LAN interfaces of Crystal Eye are a part of the LAN Zone by default. Likewise all wireless interfaces of CE falls under the LAN Zone and the external interface of CE falls under the external zone of CE. These settings can be adjusted as well using relevant access controls of CE.
Each security zone on the Crystal Eye network caters to a specific security requirement. A CE administrator can deploy hosts and servers in a particular security zone of the CE network based on the criticality of the data dealt by it. For example, storage of financial data and personal identifiable information (PII) may require greater degree of security than less critical information.
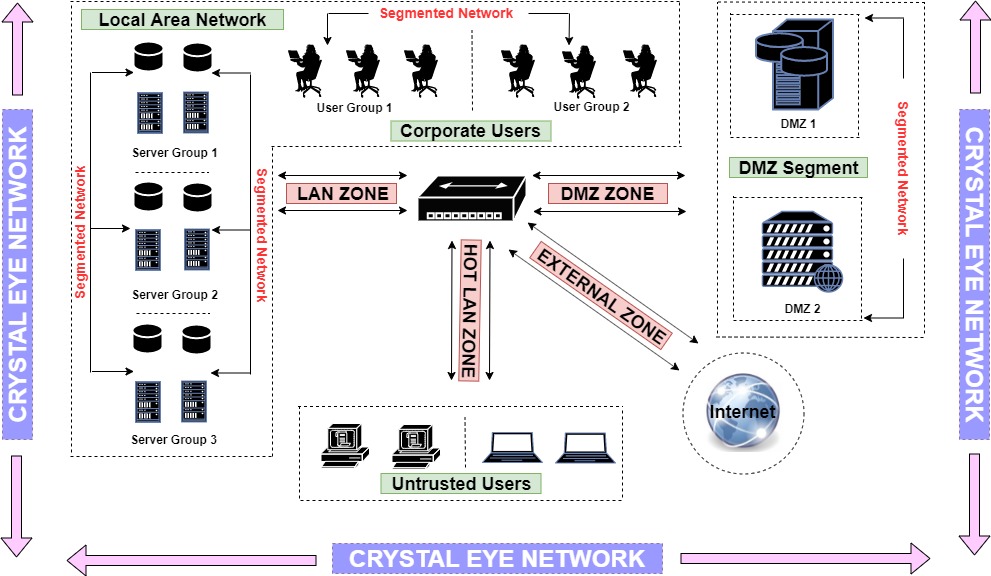
The following network diagram depicts a Crystal Eye network with the four typical security zones:
Before creating security zones on your Crystal Eye network it’s important to define the network mode on which the appliance is intended to run.
The three network modes of Crystal Eye are:
- Standalone Mode (No firewall): for a standalone server without a firewall (for example, a file server or a pcap server on a span port)
- Standalone Mode: for a standalone server with a firewall (for example, a public web server)
- Gateway: for connecting your LAN, DMZ, and/or HotLAN to the Internet
Let’s understand how to create security zones with the help of the following illustrative example.
In this illustration we shall deploy various servers and user devices in the Crystal Eye network. This essentially means that we will be using a Crystal Eye appliance to create various security zones. According to the example, these servers and user devices are segmented into 4 security zones namely, LAN Zone, HotLAN Zone, External Zone and DMZ Zone.
Crystal Eye’s LAN Zone has been designed to incorporate internal networks such as corporate workstations and servers which can be accessed using NAT rules and port forwarding. In our illustration, we have segmented the LAN Zone to have 2 user groups and 3 server groups. The user group has 3 users each and the server group has 4 servers each. Refer to the highlighted part of the network diagram below to know the details of the assets deployed in the LAN Zone.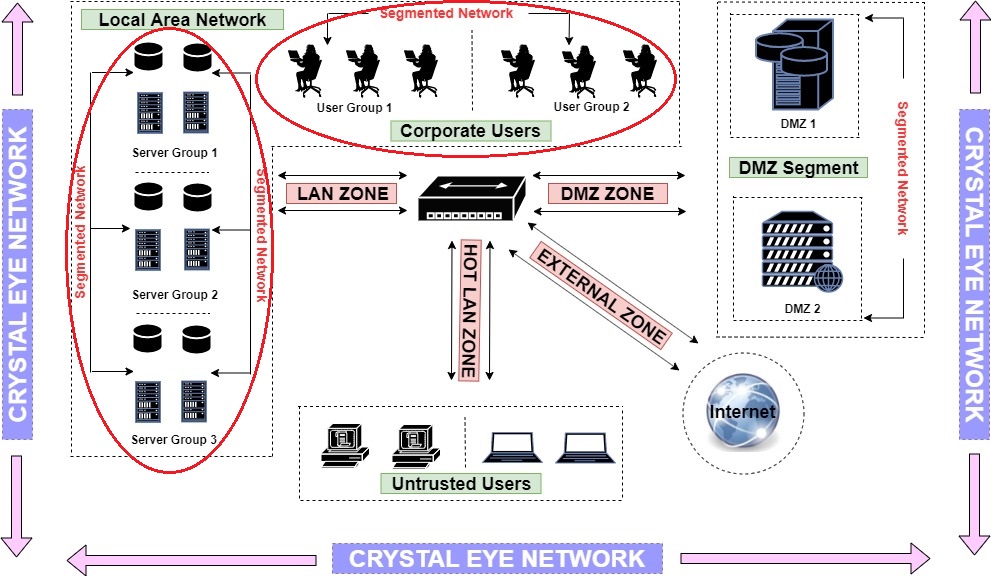
Note: We are assuming that the corporate users (user group1 and user group2) and the three server groups in LAN are connected to LAN1 port of the Crystal Eye appliance. This also points out to the fact that all the user groups and server groups in LAN (refer to the highlighted part of the diagram above) are connected to LAN1 interface of CE.
How to Create a LAN Zone on the Crystal Eye network?
All LAN interfaces of CE are pre-configured to be the part of the LAN Zone by default and so is LAN1 interface of CE in our illustrative example. However, read the steps below to know what configurations must be selected in order to create a LAN Zone.
Step 1: Go to Network Controls > Infrastructure > IP Settings application
Step 2: You will now see the IP Settings application page. Click the Edit button next to LAN1 Interface under the Network Interfaces section. 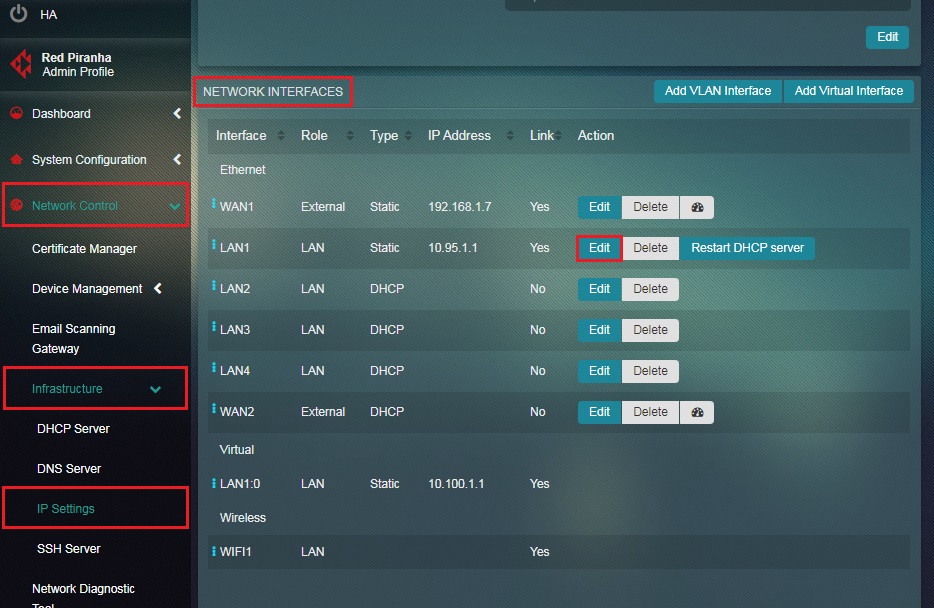
Note: Here we will assume that all the user groups and server groups in the LAN network are connected to LAN1 port of the CE appliance.
Step 3: You will now see the LAN1 interface page. Select the Role as LAN from the dropdown.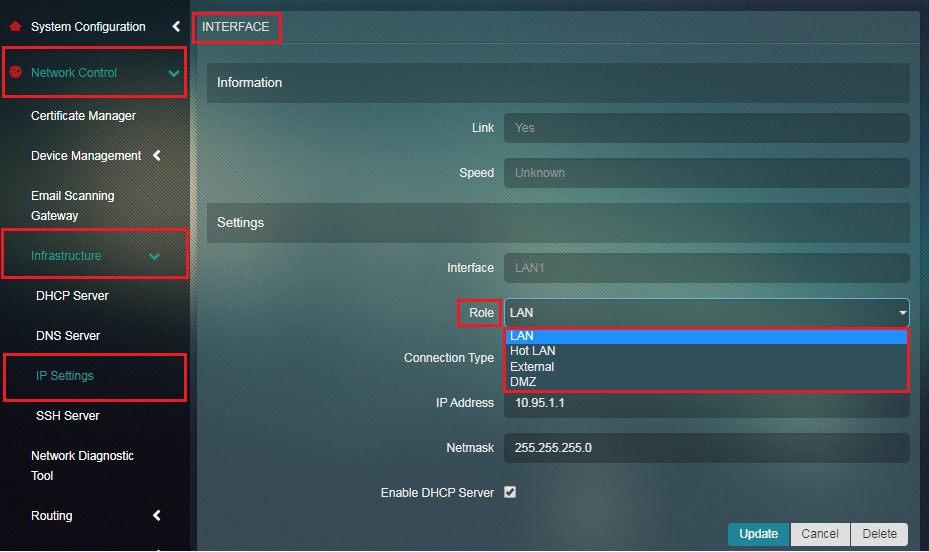
Note: The Role here is LAN by default. This also sheds light on the fact that all LAN interfaces of CE are in the LAN Zone by default and this can be changed to other roles as well.
Step 4: Click the Update button.
Step 5: You will now be directed to the IP Settings application page. LAN1 interface details will be visible under the Network Interfaces section.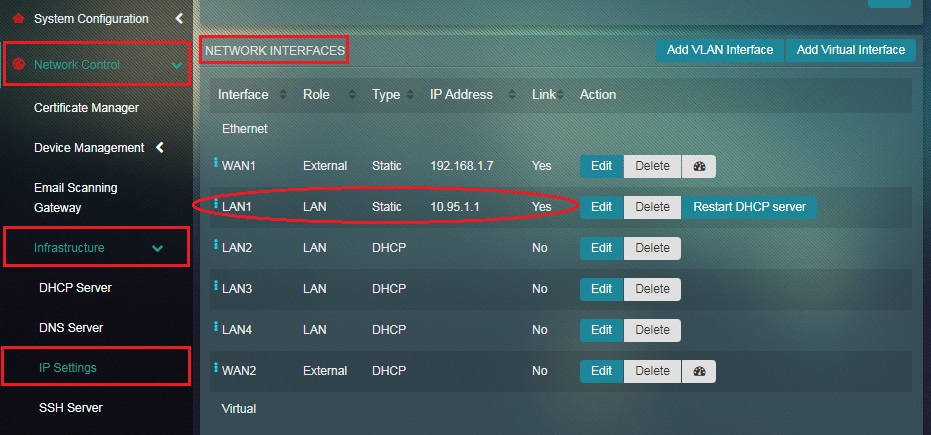
Note: The Role column in the Network Interfaces section above shows which security zone the interface LAN1 belongs to. Since we have configured LAN1 interface to be a part of the LAN Zone all users connected to the LAN1 port of the CE appliance will be in the LAN Zone of the CE network.
HotLAN Zones are designed to cater to the untrusted users in the Crystal Eye network. In our illustration, we have 4 untrusted users connected to the Crystal Eye appliance in its Hot LAN Zone. These untrusted users will not have access to all the other security zones apart from the external zone which essentially means that they will only have access to the internet. Refer to the highlighted part of the network diagram below to know the details of the assets deployed in the HotLAN Zone.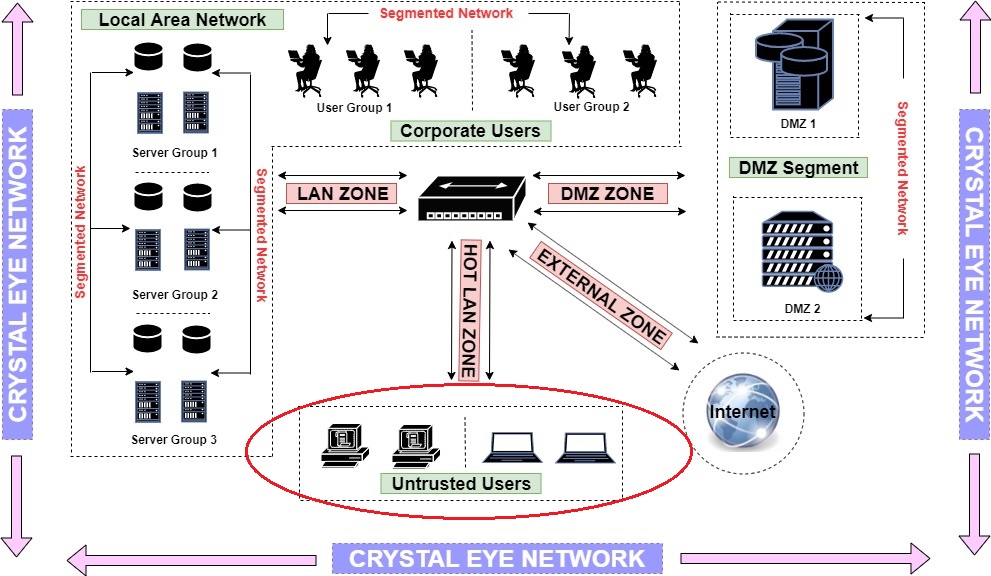
Note: In the network diagram above, we have assumed all the untrusted users are a part of the HotLAN zone. All the un-trusted users are connected to wireless interface as well. But we must take note of the fact that by default all the user devices connected to the wireless interface of CE belong to the LAN Zone. Nevertheless, we can modify the wireless interface to be a part of the HotLAN Zone. Follow the steps given below to create a HotLAN Zone.
How to Create a HotLAN Zone on your Crystal Eye appliance?
The wireless interface of the CE falls under the LAN Zone by default. But we will change this and have the wireless interface WIFI1 to be a part of the HotLAN Zone so that all users connected to WIFI1 is roped under HotLAN Zone. Follow the steps below.
Step 1: Go to Network Controls > Infrastructure > IP Settings application
Step 2: You will now see the IP Settings application page. Click the Edit button next to WIFI1 interface under the Network Interface section.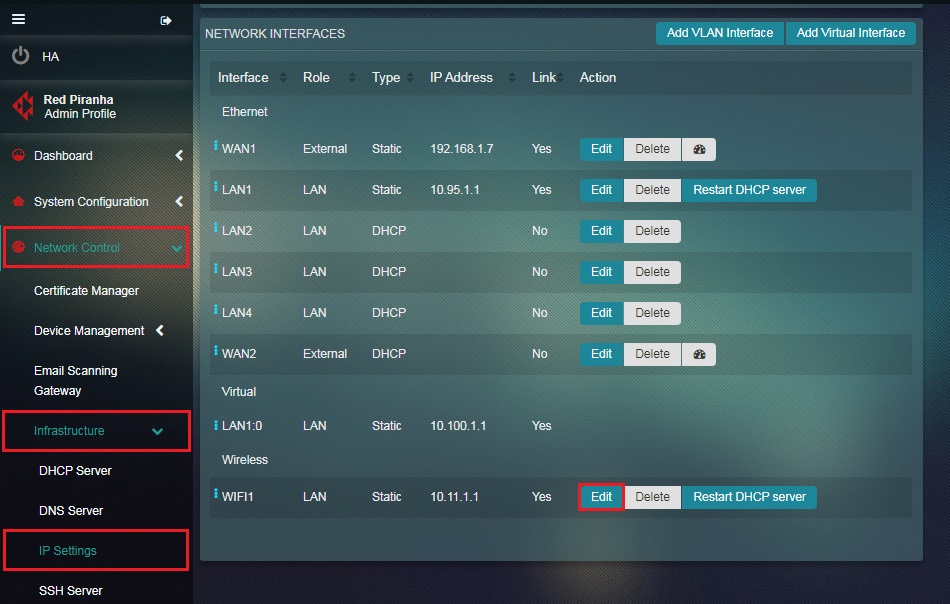
Note: As highlighted in the screenshot below, the Role column shows that the wireless interface is a part of the LAN Zone.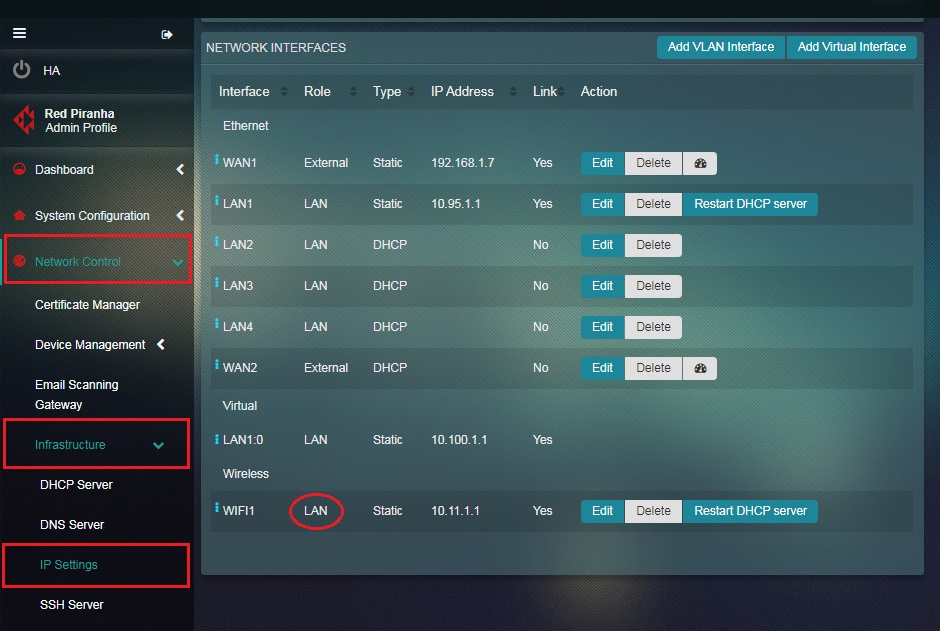
Step 3: You will now see the WIFI1 Interface page. Select HotLAN from the Roles dropdown and click the Update button.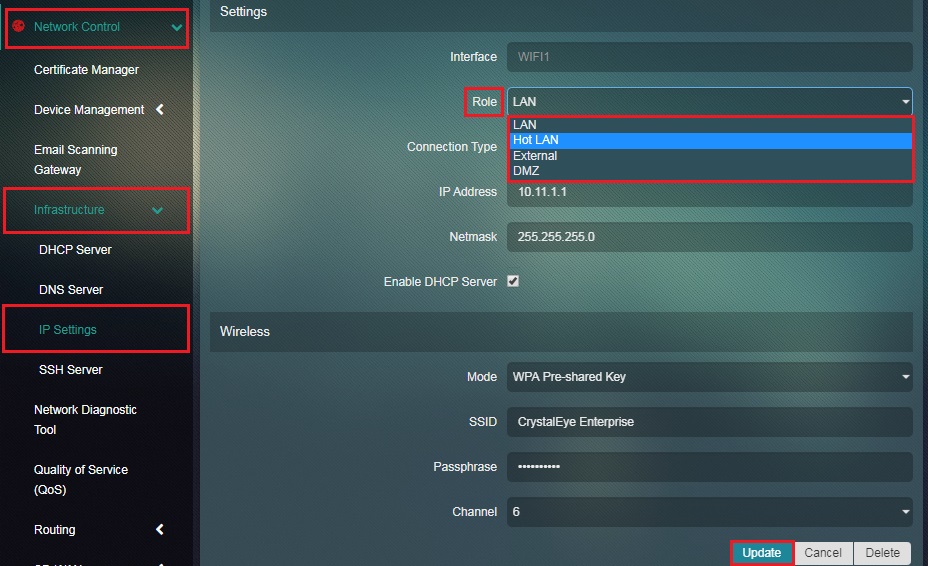
Step 4: You will be directed to the IP Settings application page. The zone of WIFI1 interface will now be changed to HotLAN Zone under the Roles column.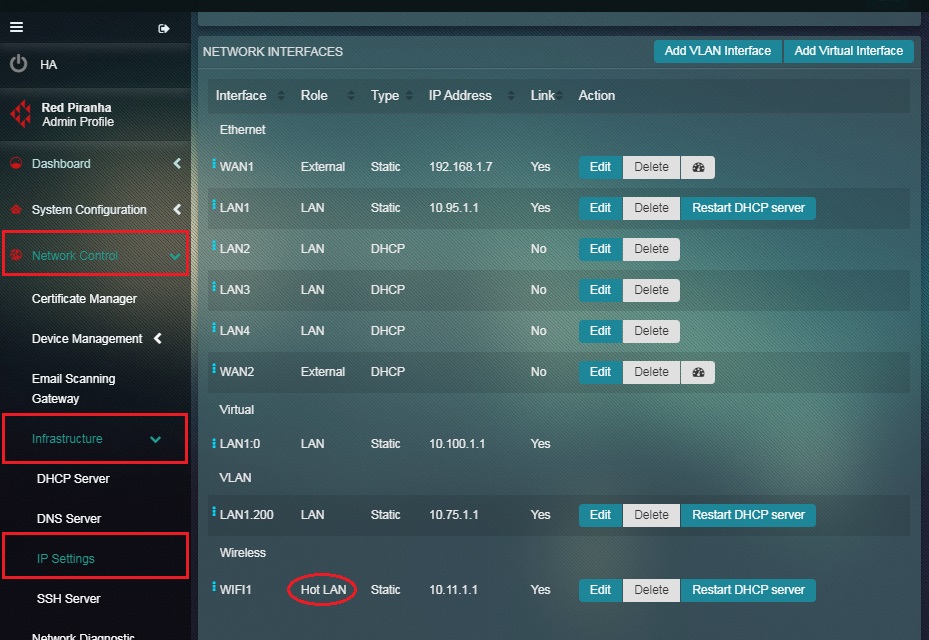
Note: According to our illustration WIFI1 is now in hotlan zone, all the users that connect to the CE WIFI will fall in this zone and will have only basic internet access According to our illustration WIFI1 is now in hotlan zone, all the users that connect to the CE WIFI will fall in this zone and will have only basic internet access
This zone of the Crystal Eye appliance accommodates external facing interfaces. The external interface provides link to the upstream and Internet access. Refer to the highlighted part of the network diagram below to know the details of External Zone.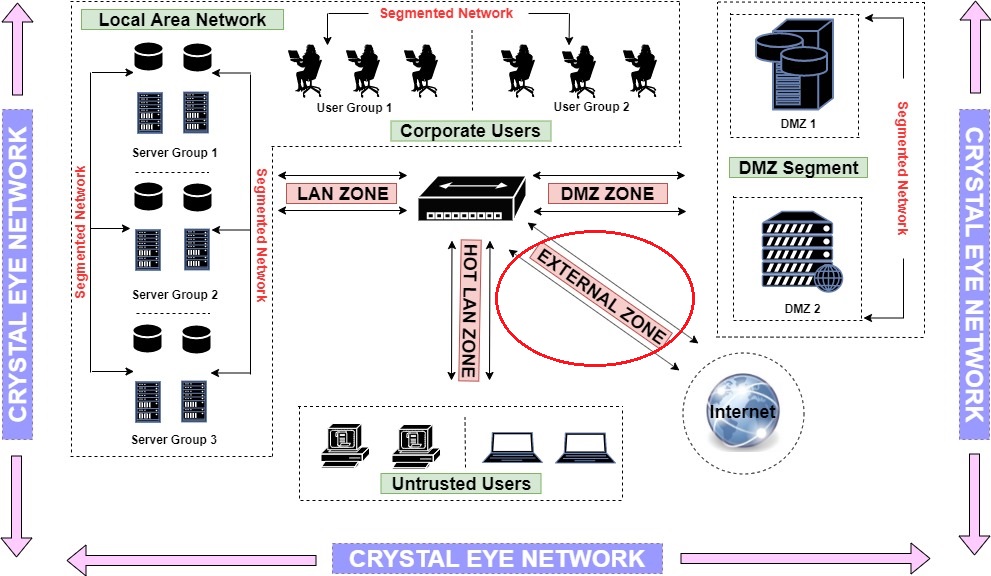
Note: We can consider devices physically connected to WAN1 port of CE as a part of the external zone. This could be a router.
The Demilitarized Zone (DMZ) Firewall provides an advanced security realm to a network zone that lies between the LAN and WAN. The DMZ is an isolated network laid between private networks and the internet. It plays a vital role in creating a buffer zone and buys more time for the incident response team in case of a breach.
In our illustration we have two public facing servers in the DMZ Zone labeled as DMZ 1 and DMZ 2. Refer to the highlighted part of the network diagram below to know the details of DMZ Zone. 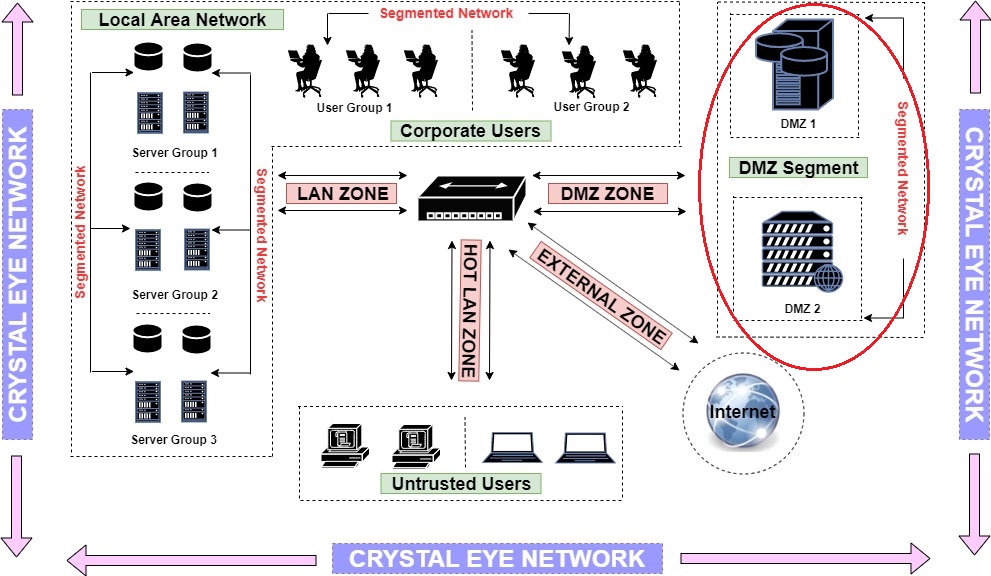
Note: Please be advised that the DMZ Zone is not configured in CE by default. However, one may create a DMZ Zone on the CE and deploy DMZ servers to it. Follow the steps below to know how to create a DMZ Zone in the CE network.
How to create a DMZ Zone on the Crystal Eye network?
In our illustrative example we will turn LAN2 interface as a part of Crystal Eye’s DMZ Zone.
Step 1: Go to Network Controls > Infrastructure > IP Settings application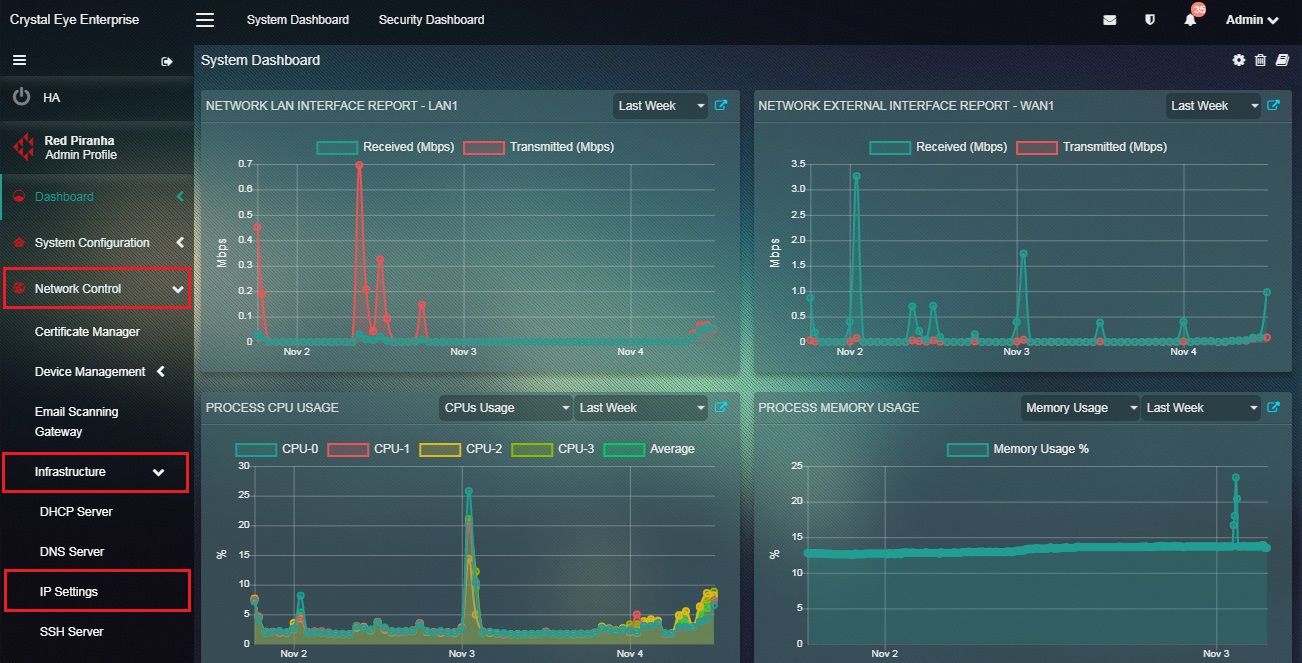
Step 2: You will now see the IP Settings application page. Click the Edit button next to LAN2 under the Network Interface section.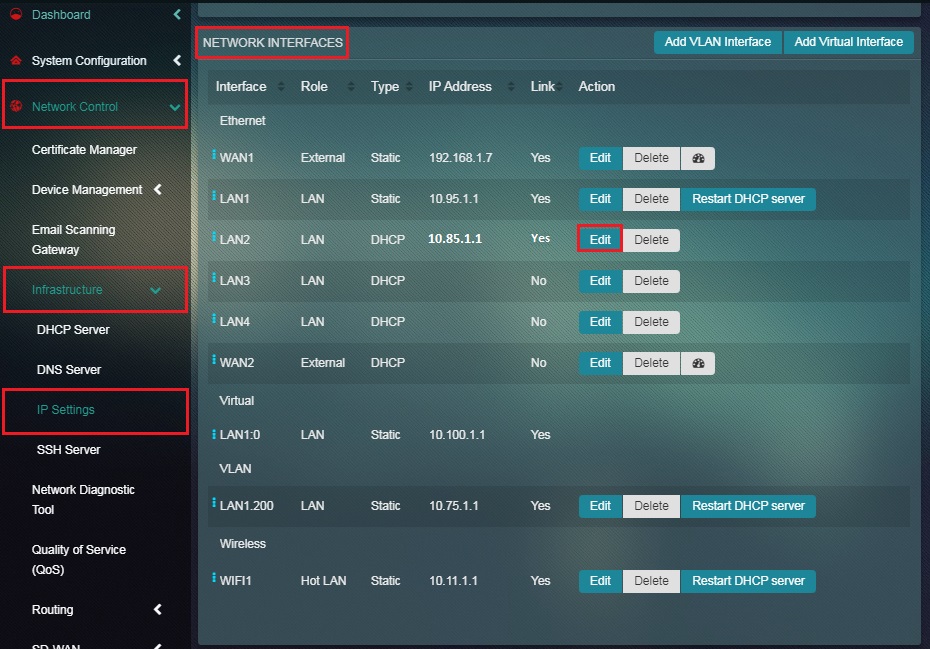
Note: You will notice in the screenshot below that the security zone mentioned under the Roles column is LAN Zone.
Step 3: You will now be directed to the LAN2 Interface page. Select DMZ from the Roles dropdown and click the Update button.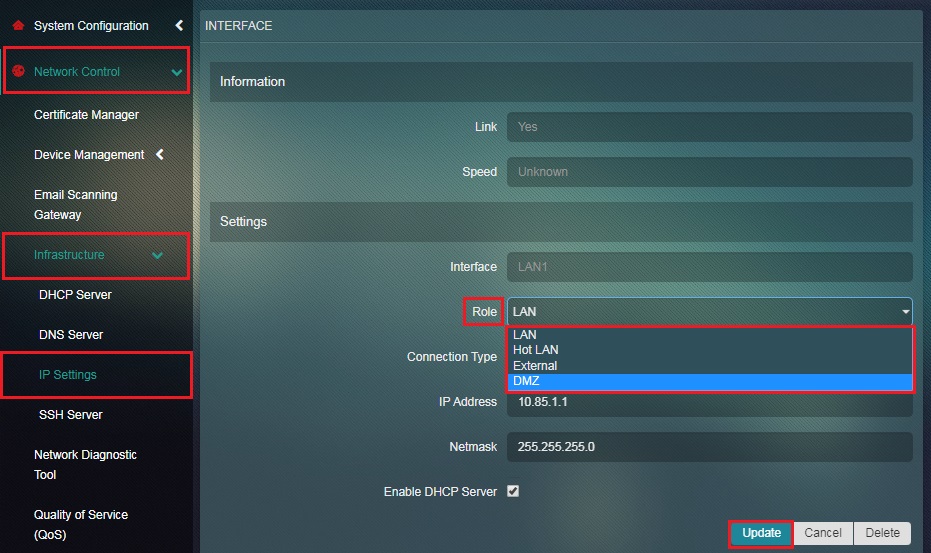
Step 4: Select Static from the Connection Type dropdown and enter the IP Address.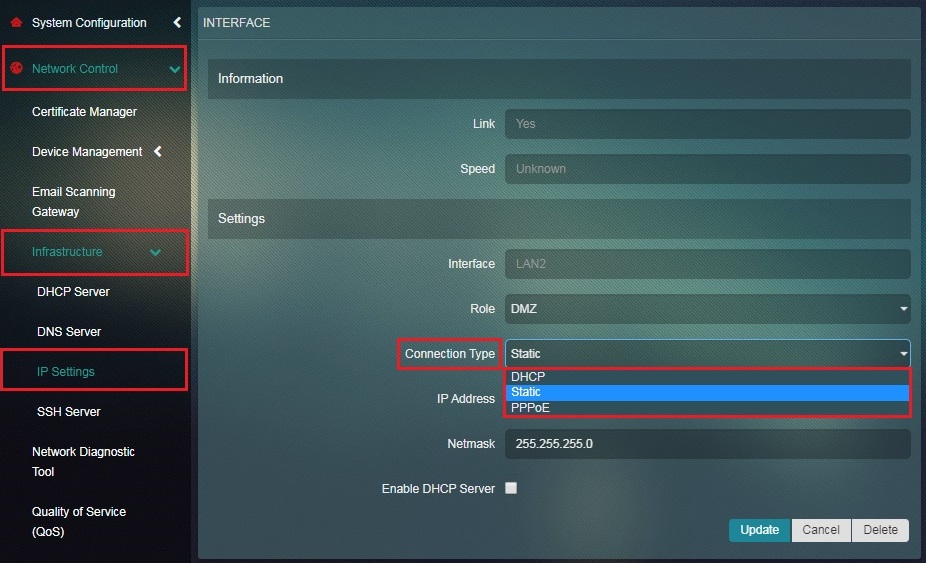
Step 5: Enter the IP Address in the text box and click the Update button.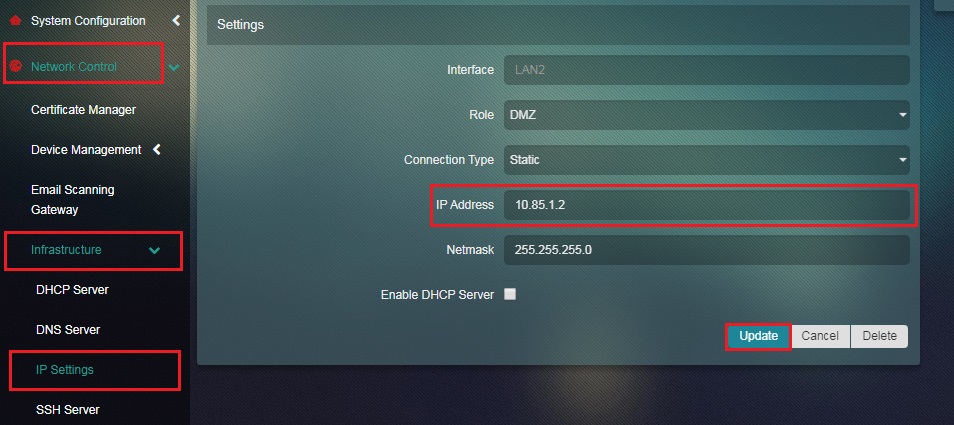
Step 6: You will be directed to the IP Settings application page. The zone of LAN2 interface will now be changed to DMZ Zone under the Roles column.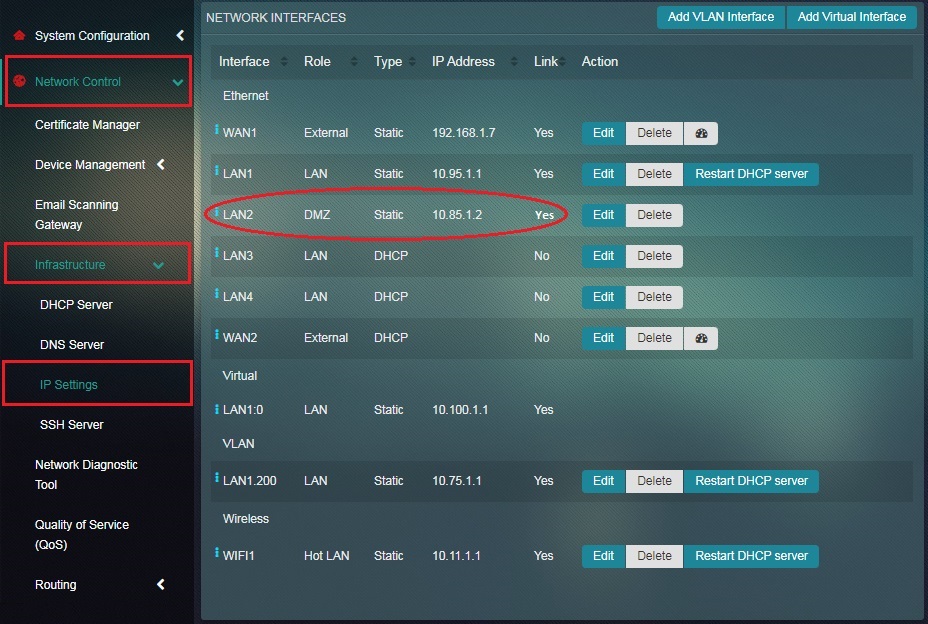
Note: You will also observe that the Connection Type has changed to Static
The Crystal Eye network can be configured to accommodate multiple default access policies so that the flow of traffic can take place between different security zones such as LAN Zone, HotLAN Zone, External Zone and DMZ Zone.
The 4 security zones of Crystal Eye and its interaction with each other are discussed below:
Note: Click the learn more link below next to each communication path of CE security zones to know how to create the relevant access policies.
| LAN Zone Related Access Policies & its Communication Details with Other Security Zones |
|---|
- All communications from LAN Zone to External Zone are permitted by default.
- All communications between network assets within the LAN Zone are permitted by default.
- All communications from the LAN Zone to Hot LAN Zone are permitted by default.
- All communications from LAN Zone to DMZ Zone are blocked by default but Crystal Eye’s DMZ Firewall application can be used to create access policies. Learn more about DMZ Firewall application
| Hot LAN Zone Related Access Policies & its Communication Details with other Security Zones |
|---|
- All communications from HotLAN Zone to External Zone are permitted by default.
- All communications from HotLAN Zone to LAN Zone are blocked by default.
- All communications between network assets within the HotLAN Zone are permitted by default.
- All communications from HotLAN Zone to DMZ Zone are blocked by default but Crystal Eye’s DMZ Firewall application can be used to create access policies. Learn more about DMZ Firewall application
| External Zone Related Access Policies & its Communication Details with other Security Zones |
|---|
- All communications from External Zone to LAN Zone are blocked by default but Crystal Eye applications like Firewall, Port Forwarding and NAT Firewall can be used to create access policies. Learn more about Firewall, Port Forwarding and NAT Firewall application
- All communications from External Zone to Hot LAN Zone is blocked by default but Crystal Eye applications like Firewall, Port Forwarding and NAT Firewall can be used to create access policies. Learn more about Firewall, Port Forwarding and NAT Firewall application
- All communications from External Zone to DMZ Zone are blocked by default but Crystal Eye’s DMZ Firewall application can be used to create access policies. Learn more about DMZ Firewall application
| DMZ Zone Related Access Policies & its Communication Details with other Security Zones |
|---|
- All communications between the DMZ Zone to the External Zone are permitted by default.
- All communications between DMZ Zone to LAN Zone are blocked by default but DMZ Firewall application can be used to create access policies. Learn more about DMZ Firewall application
- All communications between DMZ Zone to HotLAN Zone are blocked by default but Crystal Eye’s DMZ application can be used to create access policies. Learn more about DMZ Firewall application
- All communications between network assets within the DMZ Zones are permitted by default.
The above mentioned default access policies of the Crystal Eye can be summarized using the following table:
| From | To | Default Access Policies | Crystal Eye Applications Used For Creating Access Policies |
|---|---|---|---|
| LAN Zone | External Zone | Permitted | Not Applicable |
| LAN Zone | LAN Zone | Permitted | Not Applicable |
| LAN Zone | HotLAN Zone | Permitted | Not Applicable |
| LAN Zone | DMZ Zone | Blocked | DMZ Firewall application can be used to create access policies |
| HotLAN Zone | External Zone | Permitted | Not Applicable |
| HotLAN Zone | LAN Zone | Blocked | Not Applicable |
| HotLAN Zone | HotLAN Zone | Permitted | Not Applicable |
| HotLAN Zone | DMZ Zone | Blocked | DMZ Firewall application can be used to create access policies |
| External Zone | LAN Zone | Blocked | CE's Firewall, Port Forwarding and NAT Firewall applications can be used to create access policies |
| External Zone | HotLAN Zone | Blocked | CE's Firewall, Port Forwarding and NAT Firewall applications can be used to create access policies |
| External Zone | DMZ Zone | Blocked | DMZ Firewall application can be used to create access policies |
| DMZ Zone | External Zone | Permitted | Not Applicable |
| DMZ Zone | LAN Zone | Blocked | DMZ Firewall application can be used to create access policies |
| DMZ Zone | HotLAN Zone | Blocked | DMZ Firewall application can be used to create access policies |
| DMZ Zone | DMZ Zone | Permitted | Not Applicable |