DNS Server
The basic functionality of a DNS server is to map the IP addresses with its hostname (or the reverse) and provide a caching DNS server for your local area network. Crystal Eye XDR’s DNS server acts as any modern DNS server and plays a vital role in ensuring user access to network resources.
This solution makes life easy for the end users since they don’t have to remember IP addresses and not store various domain names mapped to IP addresses on the end point devices. The DNS Server application’s core functionality is based on the concept of DNS client/server model where a DNS request sent by an end-client is resolved by the designated DNS server.
Note: The Crystal Eye XDR can be used as a DNS server to resolve DNS queries from the end-clients in the network or some other dedicated DNS server can be deployed to act as a DNS resolver.
The DNS server application can be used to perform the following networking activities:
- Configure global DNS settings such as RFC1918 Protection, Localise Queries to received interface, Domain Required, Filter Private, No negative cache, mDNS, DNS Amplification Protection, Max Concurrent Queries, Cache Size and All Servers.
- Assign a DNS server using the Domain Forwarding feature.
- Add DNS Zones for managing subnet-based DNS policies.
- Add Banned Domains
- DNS Sinkholing
- View DNS reports related to the CE XDR network such as DNS requests over time(graph), Top request RRNAMES (table), Top Response Data (table), Top DNS servers (table). Top DNS Clients (table), Top Request Types (table), and Top Response Codes (table).
The DNS Server application is installed by default and can be accessed from the left-hand navigation panel.
Network Control > Infrastructure > DNS Server 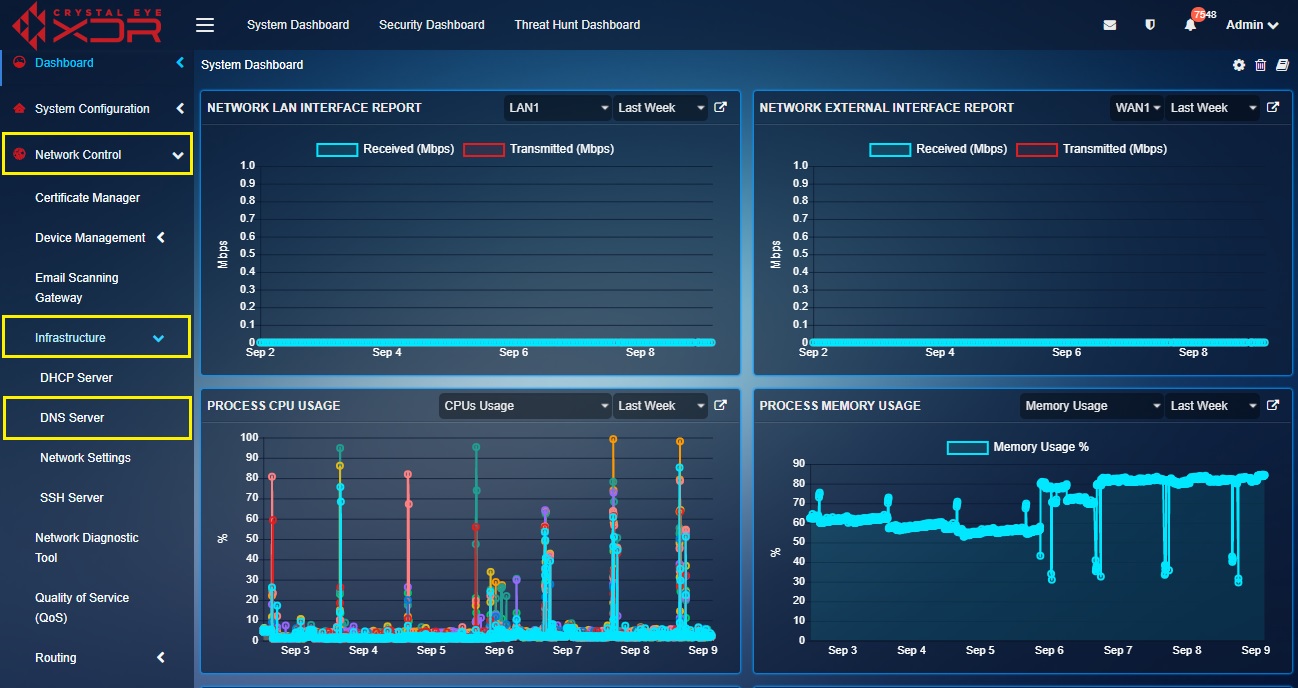 |
|---|
This section allows CE XDR administrators to configure global DNS settings such as:
- RFC1918 Protection: RFC 1918 addresses are blocks of network IP addresses reserved for private use. As a default feature the CE XDR prevents RFC 1918 Traffic from exiting a WAN Interface.
- Localise Queries to received interface: This feature is enabled by default. As a default feature the localise queries sends host entry replies that are local to the interface of the incoming request.
- Domain Required: This feature is enabled by default. As a default feature a domain is always required for resolution. Plain names are not forwarded to upstream servers.
- Filter Private: This feature is enabled by default. As a default feature when the Filter private feature is enabled it allows filter reverse address lookups for private IP addresses.
- No negative cache: This feature is enabled by default. When the No Negative Cache box is checked it does not cache negative responses.
- mDNS: This feature is a multicast DNS reflector for Bonjour. As a default feature it is disabled in the global DNS configurations. mDNS requests can be controlled by allowing /blocking traffic for port 5353 in the advanced firewall.
- DNS Amplification Protection: This feature is disabled by default. As a default feature, the disabled DNS Amplification Protection feature ensures that the DNS requests are accepted only from the local subnets.
- Max Concurrent Queries: By default, the max concurrent DNS requests are 1024
- Cache Size: By default, the feature allows 1024 cached DNS responses.
- All Servers: This feature is enabled by default. It ensures that the server locality and redundancy is handled. As a default feature, the DNS requests are sent to all servers instead of just a single server.
The Crystal Eye XDR is programmed to act as the default DNS server to resolve all internal and external DNS queries. However, CE XDR administrators can avail the option to configure custom DNS servers using the Domain Forwarding feature. This configuration is needed when there is an existing DNS server to resolve domains local to the user network.
Either ways, the user may configure the local domain with the internal server address and assign the Crystal Eye as the default DNS server or configure a custom internal DNS server for all internal DNS resolutions.
Let’s learn more about this feature of the Crystal Eye XDR with the help of the following use cases.
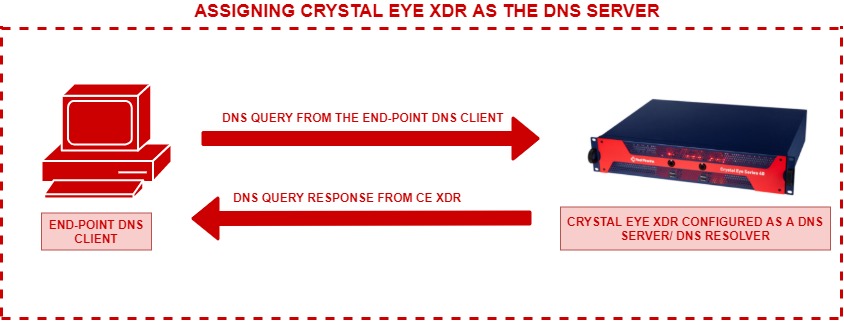
Use Case 1: CE XDR acts as the DNS Server to Resolve DNS queries from the end-clients in the CE XDR network.
Note: The Crystal Eye XDR is programmed to act as the default DNS server to resolve all internal and external DNS queries.
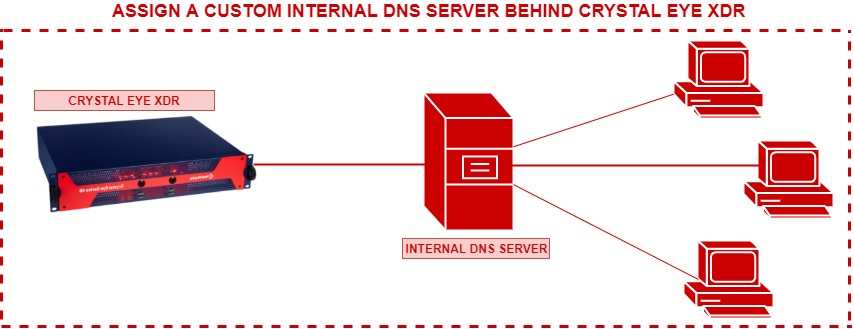
Use Case 2: A custom DNS Server is assigned to resolve all internal DNS queries using the Domain Forwarding feature of the CE XDR.
Note: Its not recommended to create a custom DNS server. The best protection is to use the Crystal Eye XDR as a DNS server.
How to Add a custom DNS Server to resolve DNS queries from end-client devices in the CE XDR network?
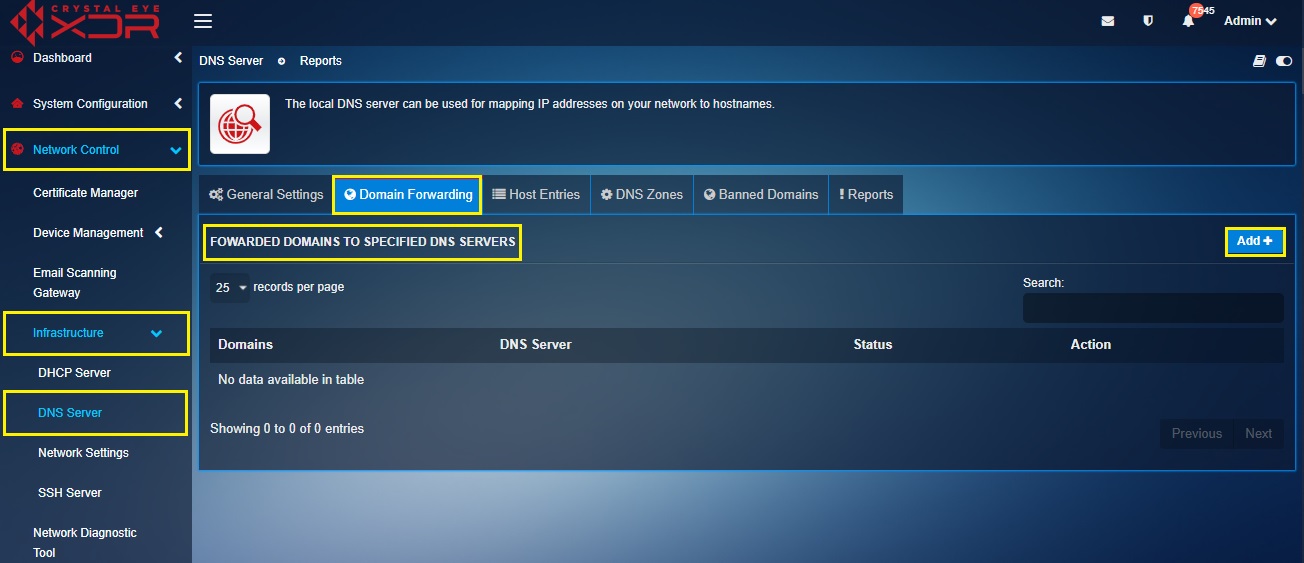
Step 1: In the DNS Server application page, click the Domain Forwarding tab and then click the Add button on the top right corner of the Forward Domains to Specified DNS Servers section.
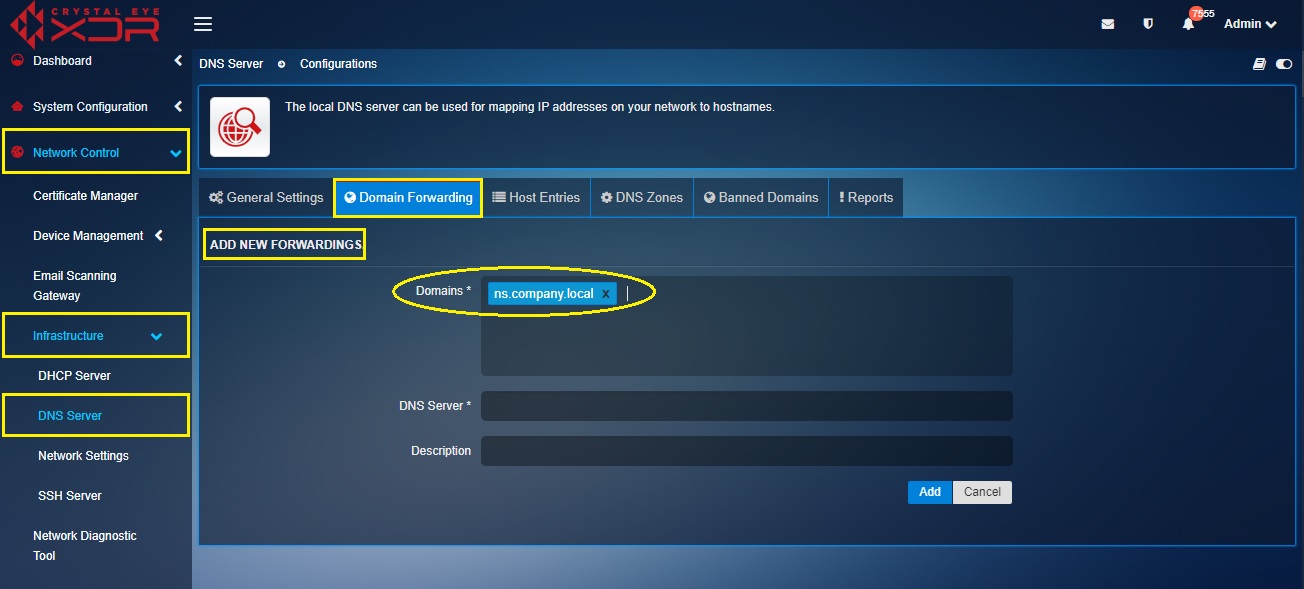
Step 2: You will now see the Add New Forwarding page. Enter the Domain Name of the assigned internal DNS server.
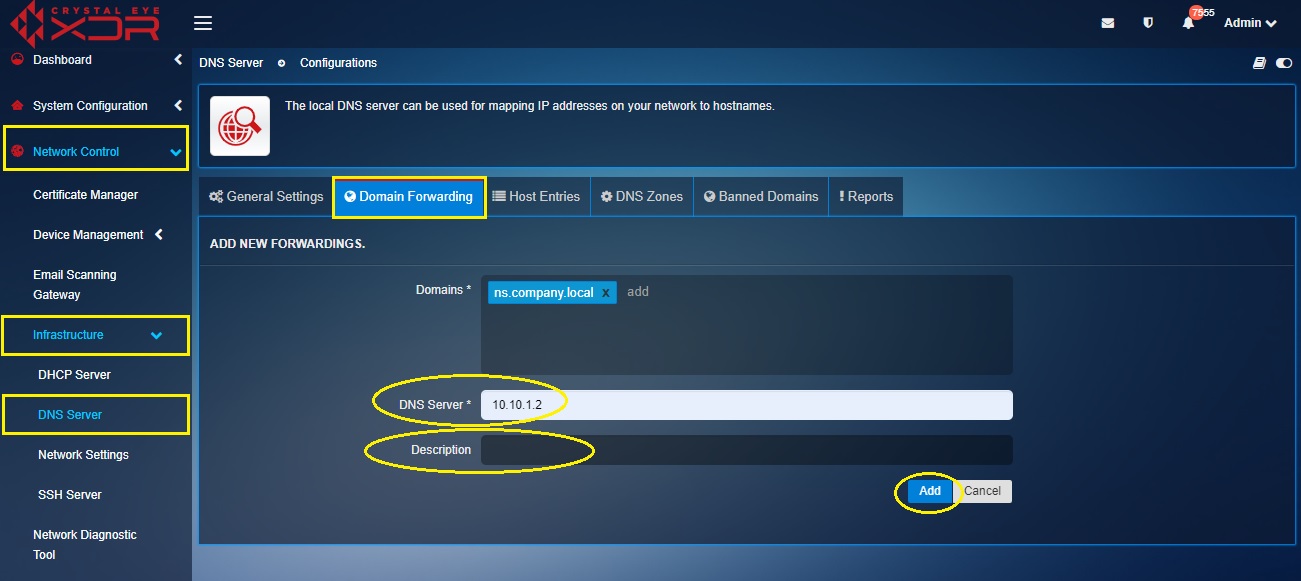
Step 3: Now enter the custom internal DNS server’s IP address in the DNS Server textbox, enter the Description and click the Add button.
There might be instances when there is a requirement to create a custom DNS mapping in the internal network. This functionality helps CE XDR administrators to ensure users reach a server with the help of its assigned domain name/host name. The Host Entries feature of the CE XDR can be used to perform the DNS mapping in the internal network.
Let’s understand the core functionality of the Host Entries feature of the DNS application with the help of the following scenario:
Problem: ABS Pvt Ltd. has a web server placed in its premises in the LAN Zone behind the Crystal Eye XDR with its private IP address as 10.1.1.2 and its public address is 51.1.1.11. The public URL of the website is www.exampleabs.com which can be accessed by users from the WAN side. It has been observed that the devices of the marketing team of the company placed behind the CE XDR aren’t able to access the website causing hindrances in their daily work. The company’s infrastructure team considers this as a major issue and works out a plan to deal with it.
Solution: The CE XDR administrator would have to create a host entry in the DNS application to point the internal IP address of the web server (10.1.1.2) with the public URL. This solution would ensure that the user devices belonging to the segregated network of the marketing team are able to access the internal web server with the public URL.
The following steps can be pursued to achieve the above:
How to add host entries in the DNS application?
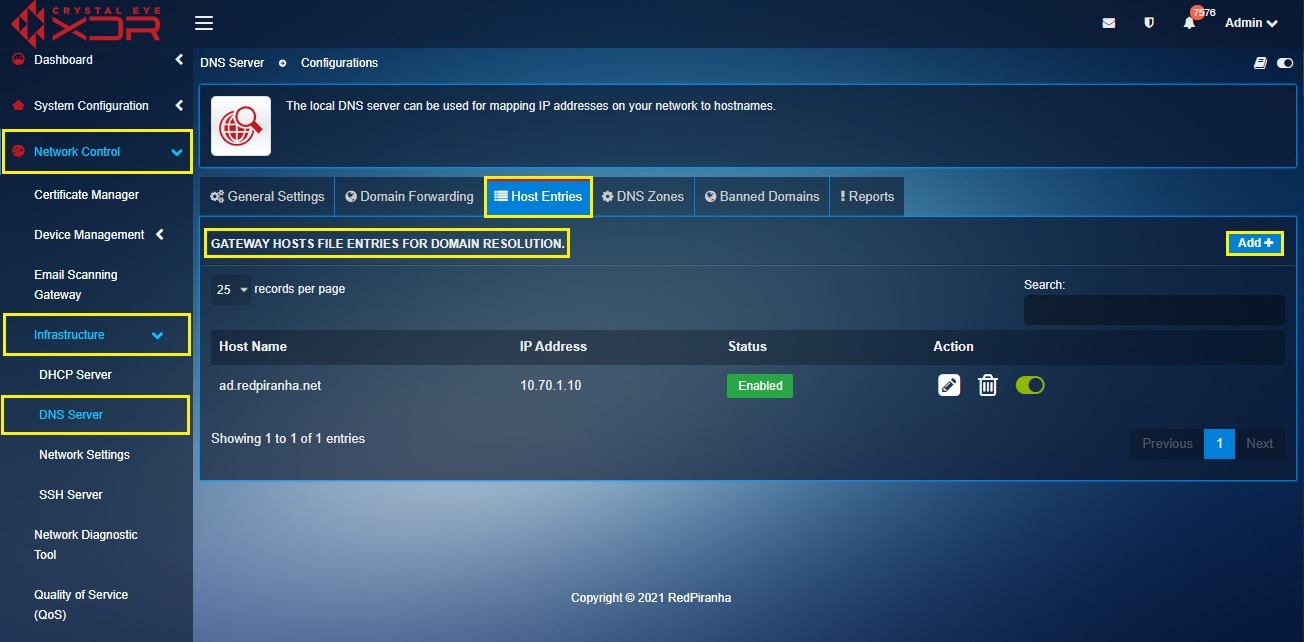
Step 1: In the DNS application page, click the Host Entries tab and click the Add button in the gateway hosts file entries for domain resolution section.
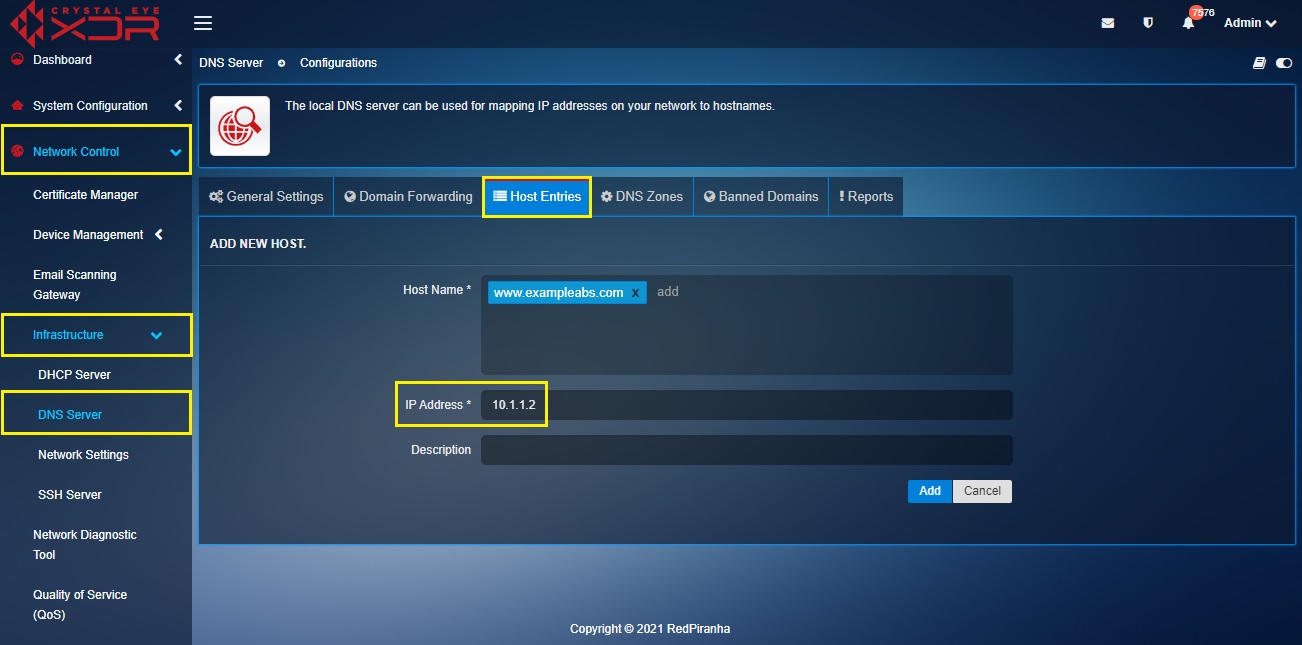
Step 2: You will now be directed to the Add New Host section. Enter the public URL www.exampleabs.com (as discussed in the above scenario) in the Host Name text box.
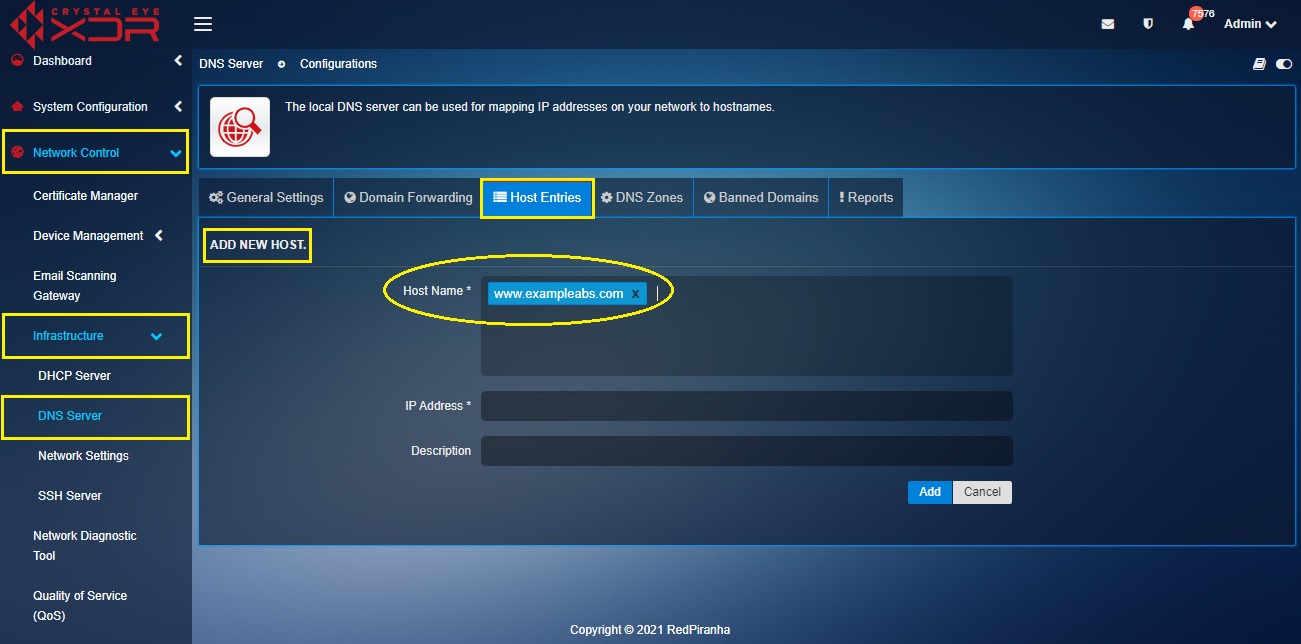
Note: As discussed in the scenario above, www.exampleabs.com is the public URL of the website hosted in the web server in the LAN zone of the CE XDR network.
Step 3: Enter the private IP address of the web server in the IP address text box.
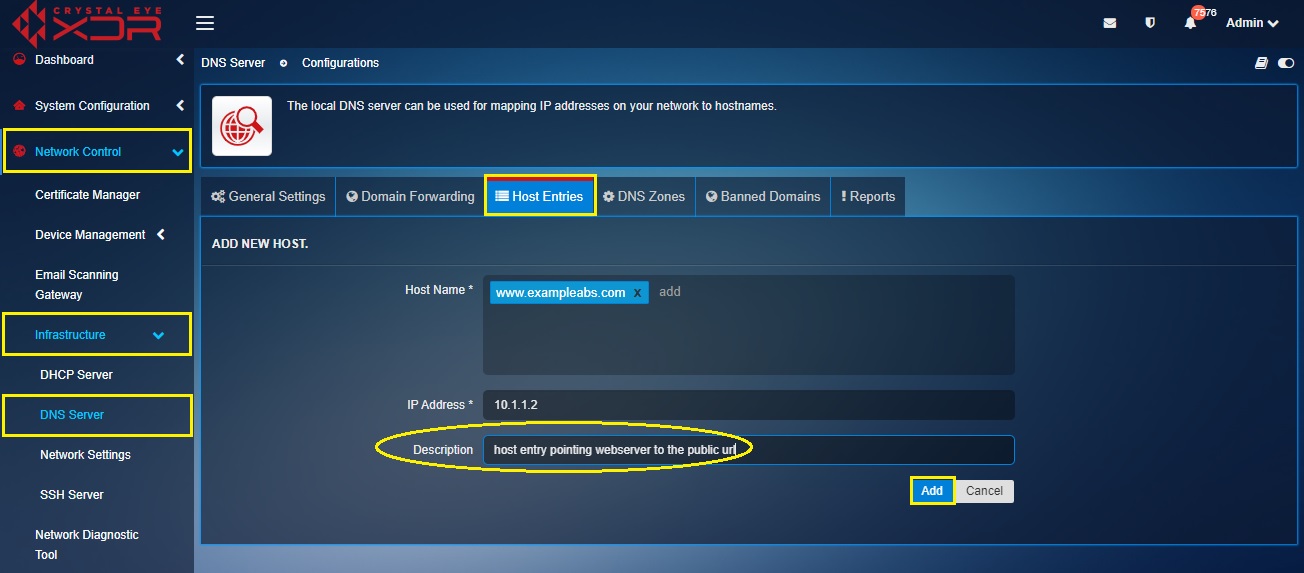
Step 4: Enter the Description in the text box and click the Add button.
A DNS zone is used to host the DNS records for a particular domain. The DNS Zones feature of the Crystal Eye XDR is used to enforce DNS policies related to various commonly used record types. The record types can be setup for devices connected to a particular subnet of the CE XDR network.
The record types that can be set-up for a particular CE XDR network subnet are:
- A/AAAA Record
- TXT Record
- CNAME Record
- MX Record
- SRV Record
Note: A DNS zone is used to host the DNS records for a particular domain.
Let’s understand the concept of DNS Zones in the Crystal Eye XDR with the help of the following scenario.
We shall create a DNS Zone for the domain 'redpiranha.net' which would contain several DNS records, such as 'mail.redpiranha.net' (for a mail server) and 'www.redpiranha.net’ (for a web site). As per requirement we will ensure that these DNS record types are implemented for the subnet 10.10.3.1/24 used by the marketing team of the company.
How to create a DNS Zone for a subnet in the CE XDR?
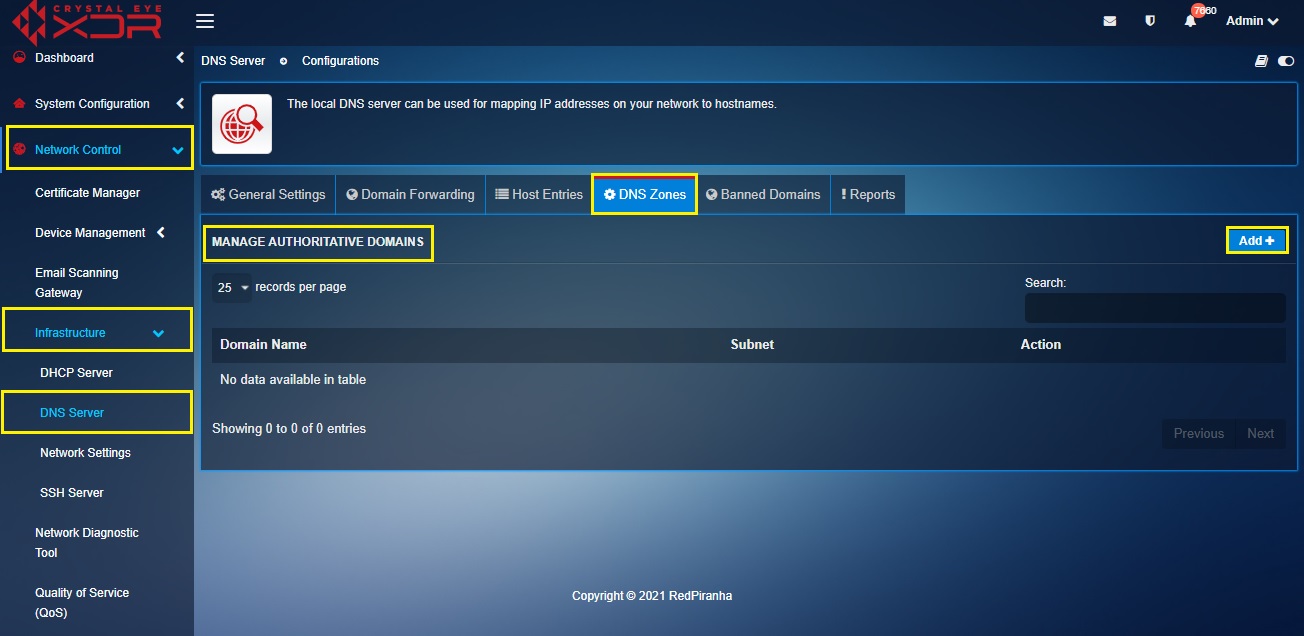
Step 1: In the DNS Server application page, click the DNS Zones tab and click the Add button on the top-right corner of the Manage Authoritative Domains section.
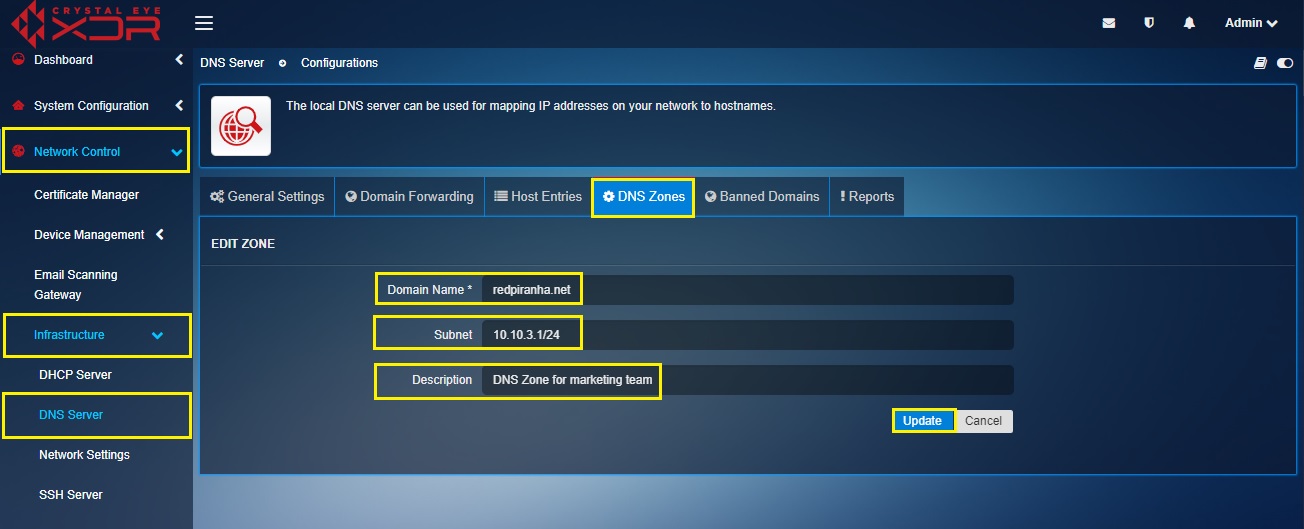
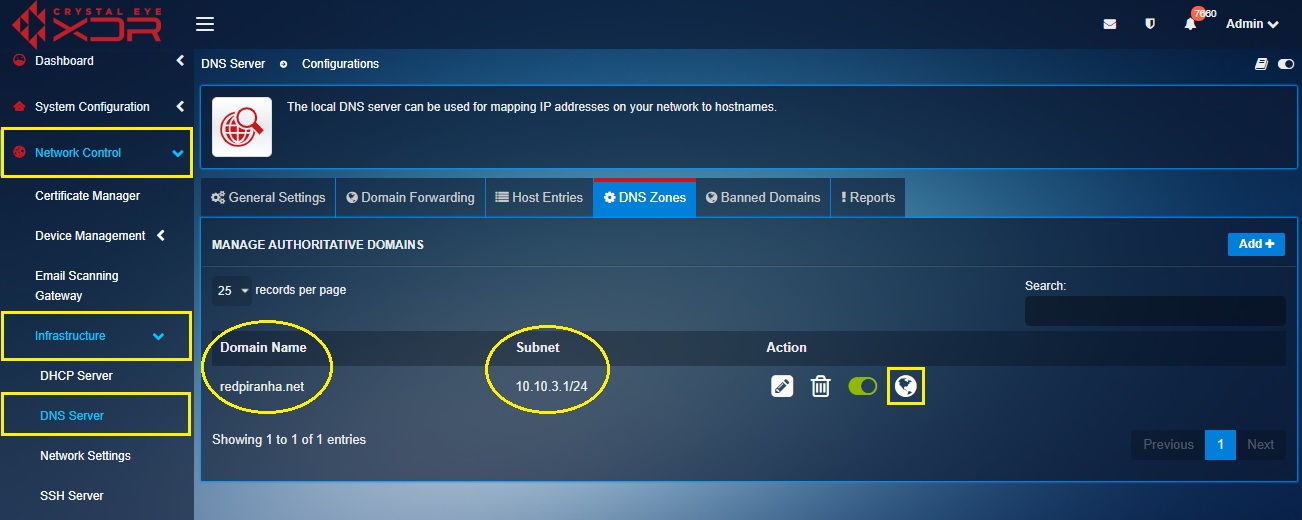
Step 2: You will now see the Add New Zone section. In our scenario, we are creating a DNS Zone for the domain 'redpiranha.net' for the subnet 10.10.3.1/24. Enter the following in the designated textboxes on this page and click the Add button.
- Domain Name – redpiranha.net
- Subnet - 10.10.3.1/24
- Description – DNS zone for the marketing team
Step 3: You will now see the domain name redpiranha.net, subnet 10.10.3.1/24 in the Manage Authoritative Domains dashboard. Click the Globe icon.
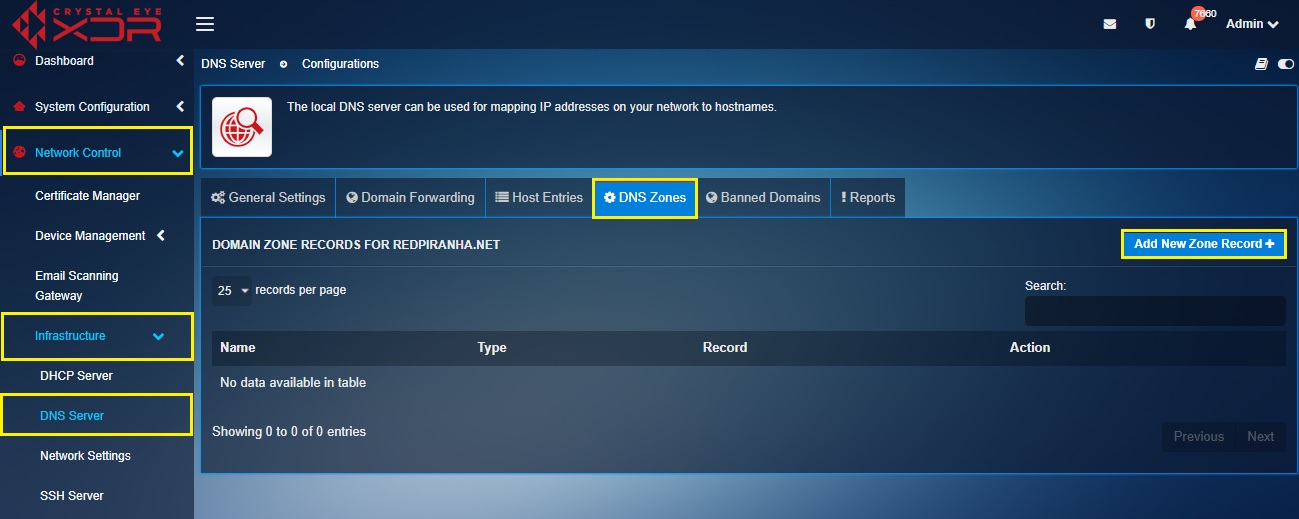
Step 4: You will now see the option to Add New Zone Records. Click the Add New Zone Records button.
Note: You will now see the Add Zone Records section consisting various tabs for various record types such as A record, AAAA record, TXT record, CNAME record, MX record, and SRV record. 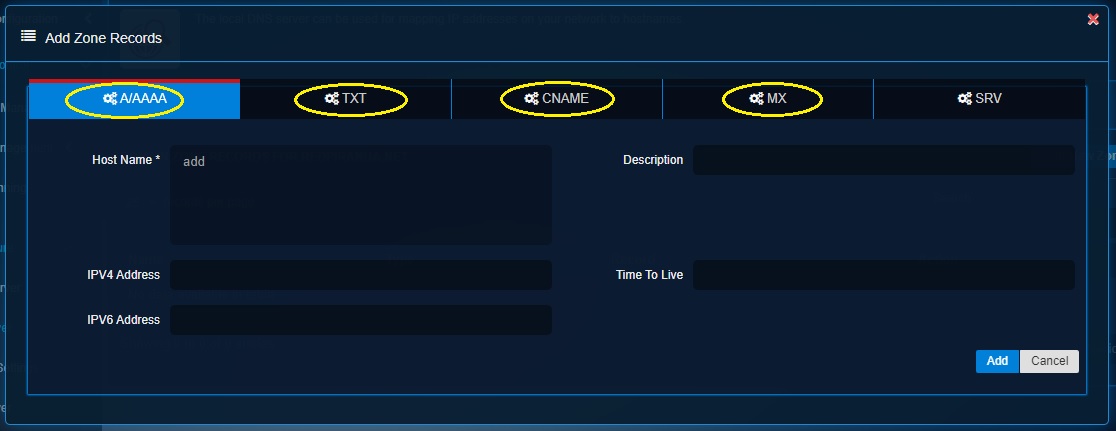
In our scenario, we will add:
- MX records for the mail server mail.redpiranha.net with its server IP address as 10.10.3.2
- AAAA record for the website www.redpiranha.net and the web server IPV6 address.
Note: These record types will be entered and implemented only for the subnet 10.10.3.1/24
Step 5: Click on the MX records tab. Execute the following:
• Enter the MX Name as mail.redpiranha.net
• Enter the Destination as 10.10.3.2
• Enter the Priority as 10
• Enter the Description as mail server MX record
• Click the Add button
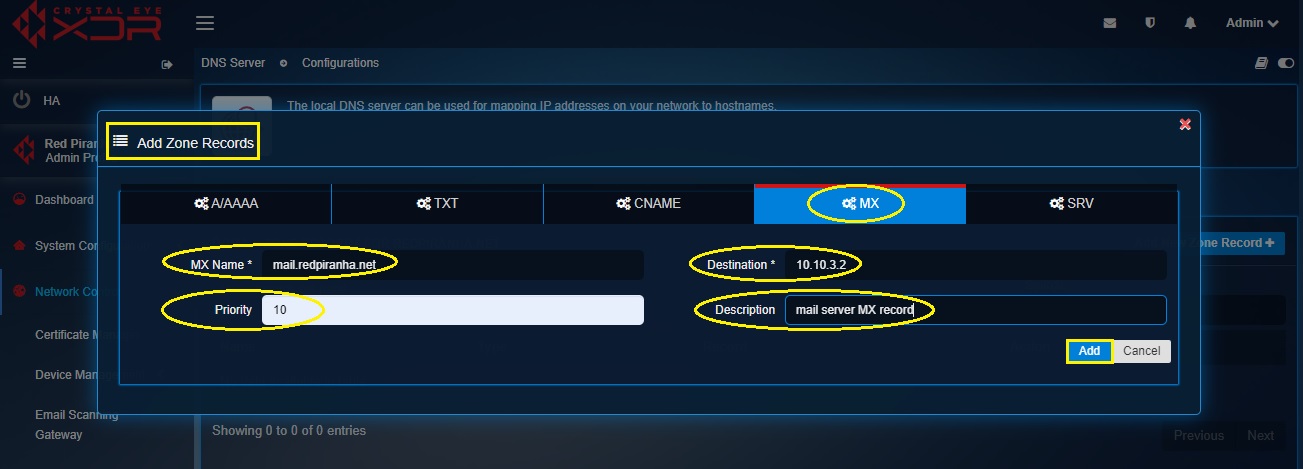
Note: You will see the MX records on the Domain Zone Records for redpiranha.net section.
We will now add Quad A record also known as AAAA record to point www.redpiranha.net to the IPv6 address of the web server.
Step 6: Now click the Add New Zone Record button. You will now see the AAAA record entry section. Enter the following:
- Host Name – www.redpiranha.net
- IPv6 - 2001:db8:3333:4444: 5555:6666:7777:8888
- Time To Live (TTL) – 3600
- Click the Add button
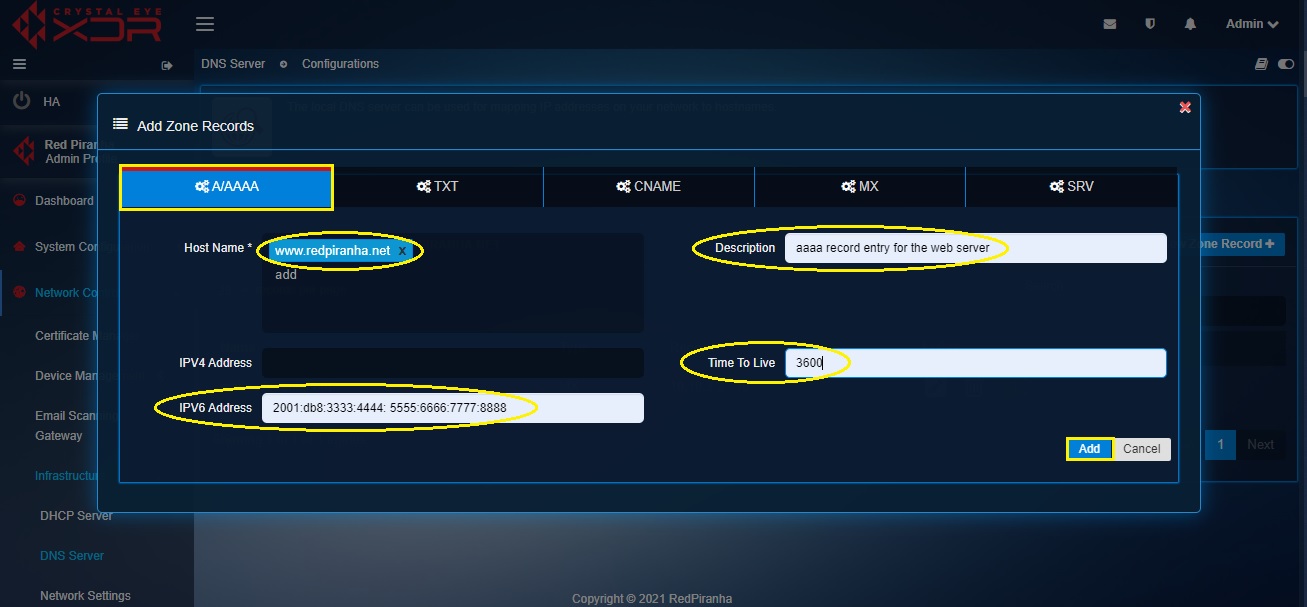
Note: Time to Live (TTL), measured in seconds, determines how long the record is cached in resolvers.
The Banned Domains feature of the DNS Server application controls the DNS blacklist features that automatically maintains that blacklist. It facilitates the functionality of banning a website URL and any other content that relies on the DNS for delivery.
Note: The category lists of banned websites are updated automatically and are reflected in the Blacklist section of the Content Filter Engine application. This can be seen in the screenshot below.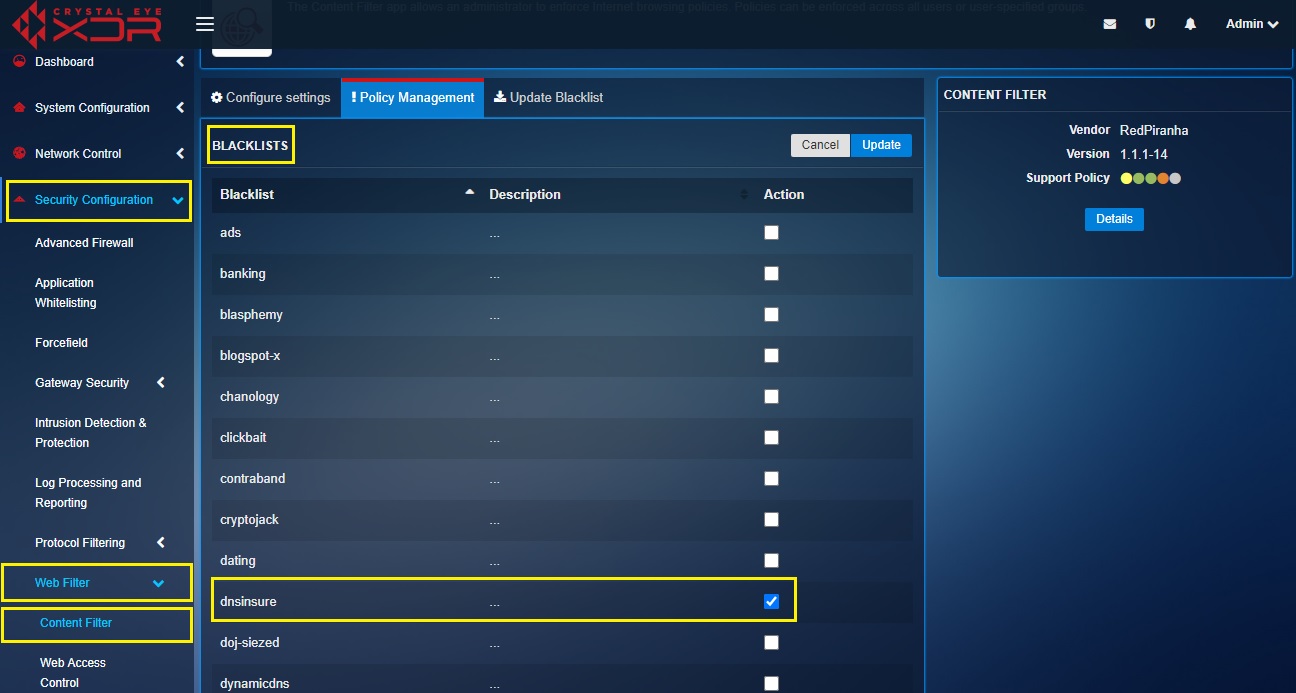
Using the Banned Domains application feature, the CE XDR administrator can add any website manually to the banned lists of URLs as well.
How to Manually Ban Websites on the Crystal Eye Network?
The CE XDR administrator can add a list of websites to be blocked by Crystal Eye with the help of a user friendly add banned sites feature.
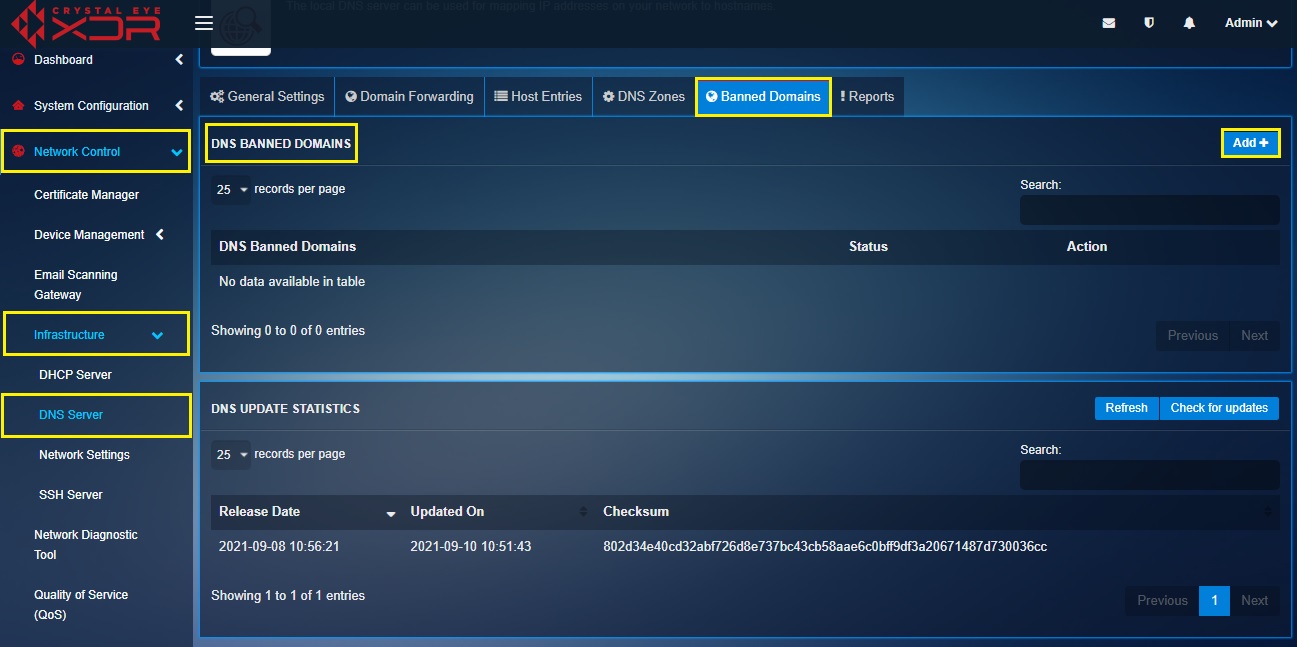
Step 1: In the DNS Server application page, click the Add button in the DNS Banned Domains.
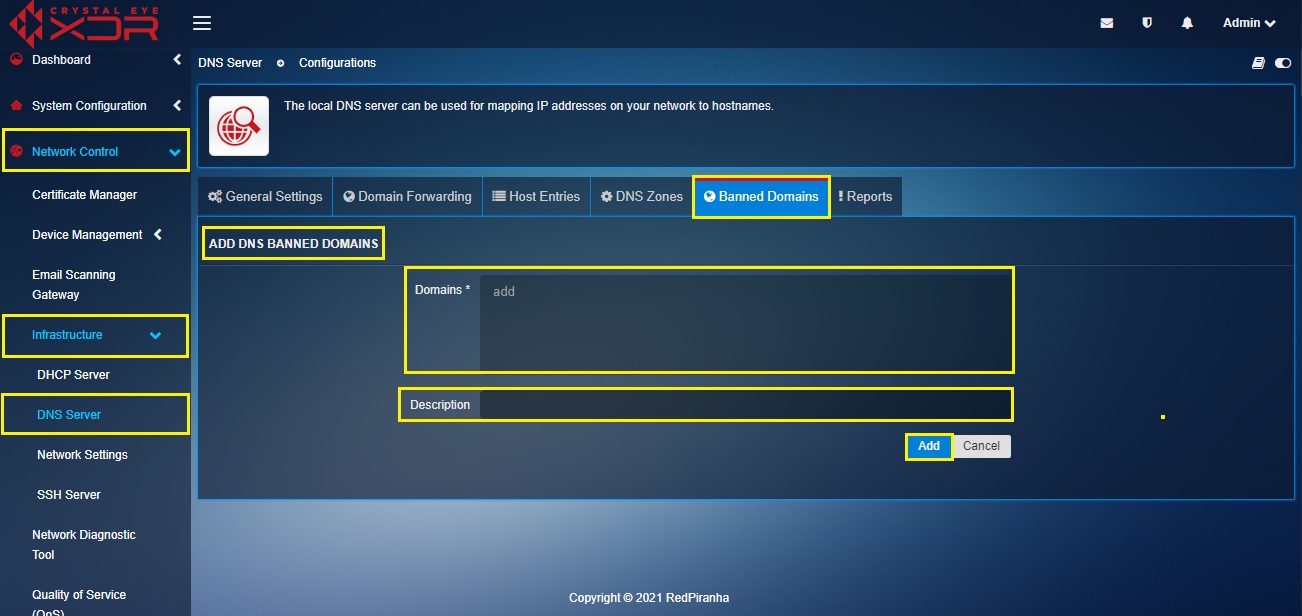
Step 2: You will now see the Add DNS Banned Domains page. Enter the Domain name, the description regarding the domain name that needs to be banned and click the Add button.
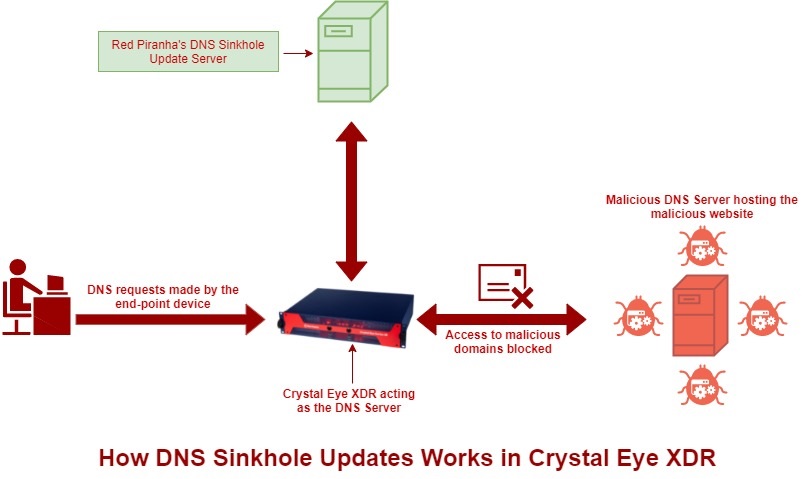
The DNS Update Statistics relate to the automated mechanism aimed at providing protection to the CE XDR users by restricting access to malicious or unwanted domains. This technique is also called DNS Sinkholing where the hosts behind the Crystal Eye XDR are prevented from connecting with known malicious destinations.
The Crystal Eye XDR receives DNS Sinkhole Updates from a dedicated updates server on a regular basis and these updates are shown in the DNS Updates Statistics.
The diagram below shows:
- How all the DNS requests originating from the endpoints is resolved by the CE XDR.
- CE XDR automatically blocks access to malicious websites.
- It also shows that the CE XDR gets its DNS sinkhole updates from a dedicated DNS sinkhole update server.
Note: The CE XDR administrator can also manually update DNS sinkhole using the Update button.