Configuration Backup and Restore
The Configuration Backup and Restore app has advanced features that allow administrators to take manual and automatic backups of Crystal Eye XDR’s configuration. In an event of data loss, the previous configurations can be restored which makes this app a phenomenal contributor towards business continuity. One of the most convenient features of this app is that it provides the option for both manual and automatic backup of CE XDR configurations.
The Automatic Backup can be scheduled with the help of the backup scheduler where the administrator can select the Backup Target and can schedule backup daily, weekly, or monthly. The CE XDR configurations can be stored locally, RP Cloud, dedicated server, Azure, RP Blockchain or in a USB device. These options shed light on the various backup targets that the administrator can choose to determine where the backup data is to be stored.
Various alerts can be monitored by setting up and activating the email notification feature. Manual Backup feature can be used to perform Full Backup, Incremental Backup or Differential Backup. Another important aspect of the Manual Backup is a niche option to create and store encrypted backup file.
The Archives section provides the much-needed convenience while performing the restoration process as it provides leverage to administrators to download files from any computer that is connected to the CE XDR.
Note: Configuration backups can be restored only on identical Crystal Eye XDR models. Backups restored on higher or lower Crystal Eye XDR models will not get executed.
The Configuration Backup and Restore application is installed by default and can be accessed from the left-hand navigation panel.
Left-hand Navigation Menu > System Configuration > Backup > Configuration Backup and Restore 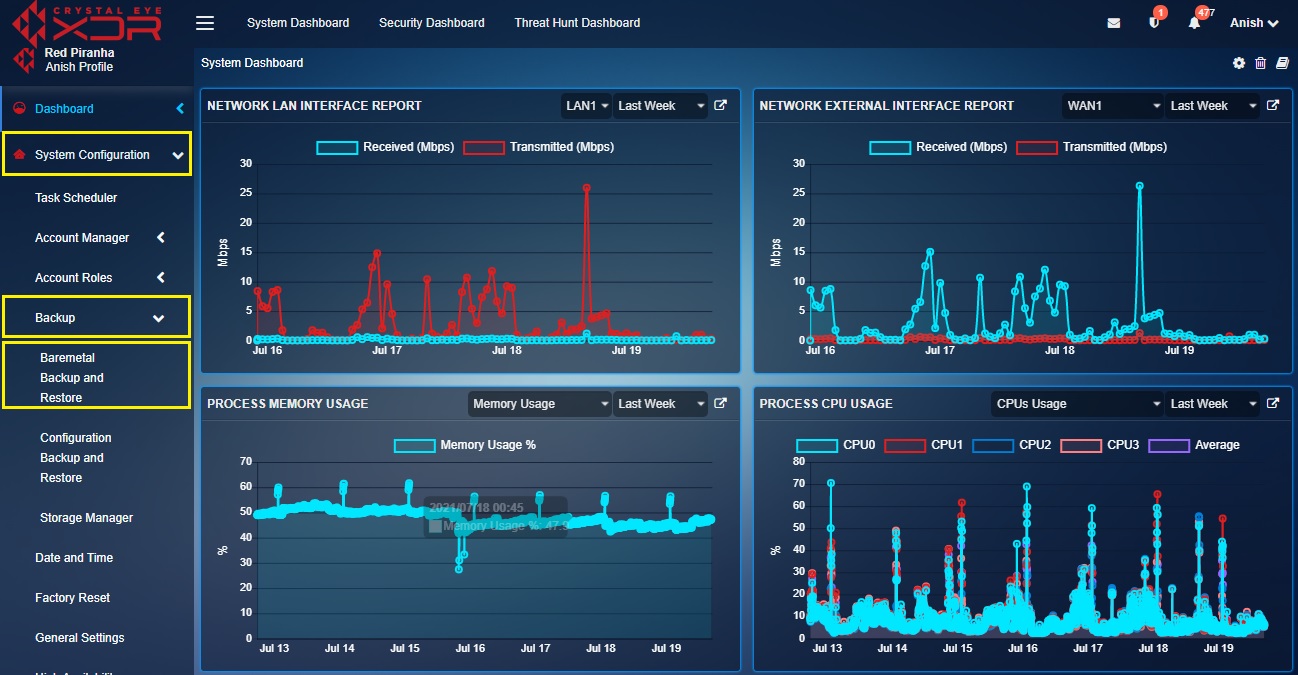 |
|---|
The Scheduled Backup Job List section is an integral component of the Automatic Backup Scheduler feature of the Configuration Backup and Restore App. A pre-defined backup schedule can be easily created and can be set to roll-off backups Daily, Weekly or once a Month. The convenience levels from the users point of view is further attributed through the flexible Backup Target options. These Backup Targets include Local Backup, RP Cloud, Own Server, Azure, RP Blockchain and USB Device.
Note: Backup Targets relates to the location where the data is stored after performing the backup procedure. The backup targets may vary as per requirements. The Crystal Eye XDR’s Configuration Backup and Restore App provides the option to the administrator to choose the location at which the backup files must be stored. This location of the Backup Target can either be Local Backup, RP Cloud, Own Server, Azure, RP Block Chain or USB Device.
How to Schedule a CE Configuration Backup Task Using the Automated Backup Scheduler?
Step 1: In the Configuration Backup and Restore App page, click the Add button under the Scheduled Backup Job List section. 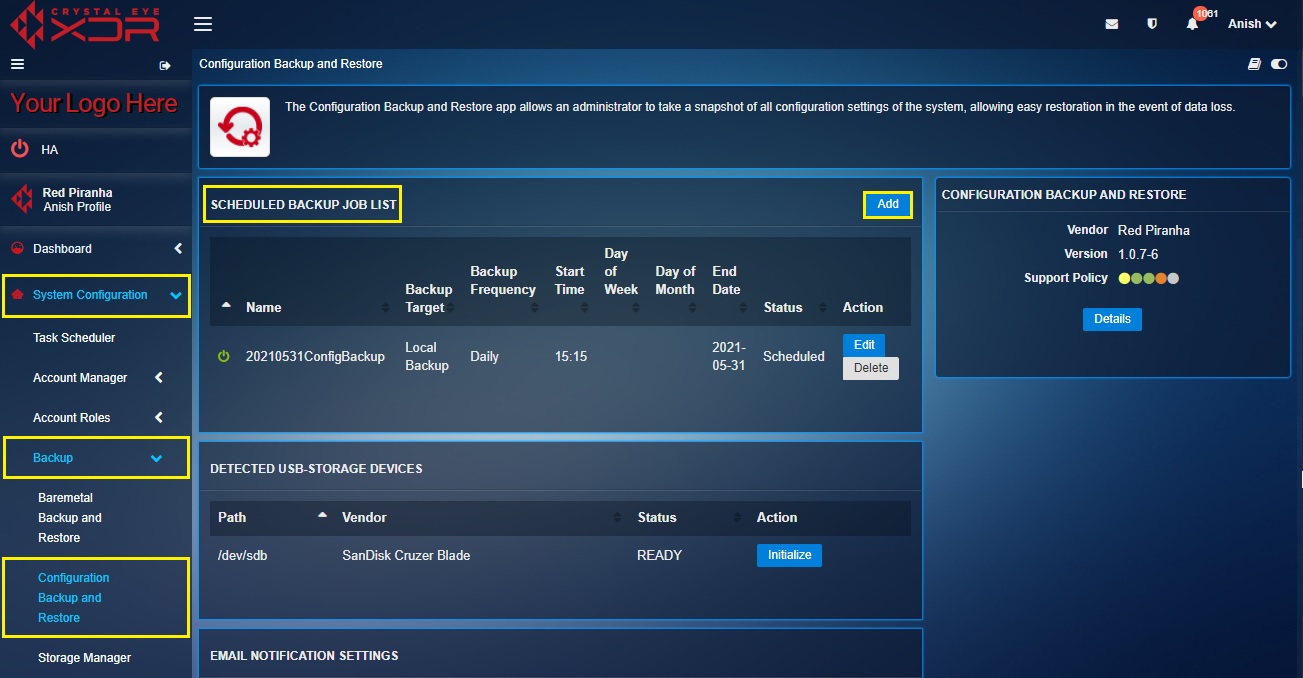
Step 2: You will now see the Schedule Backup section. Enter the Name for the scheduled backup in the textbox. 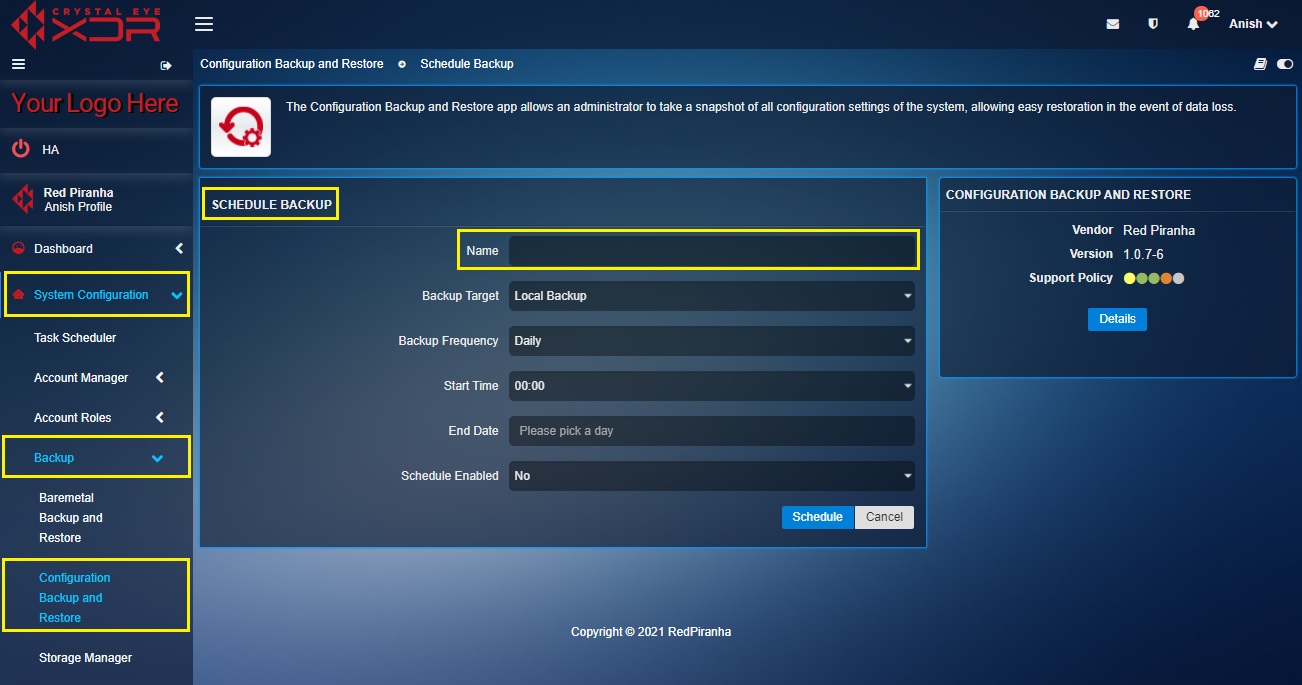
Step 3: Select the Backup Target (backup storage location) from the dropdown. 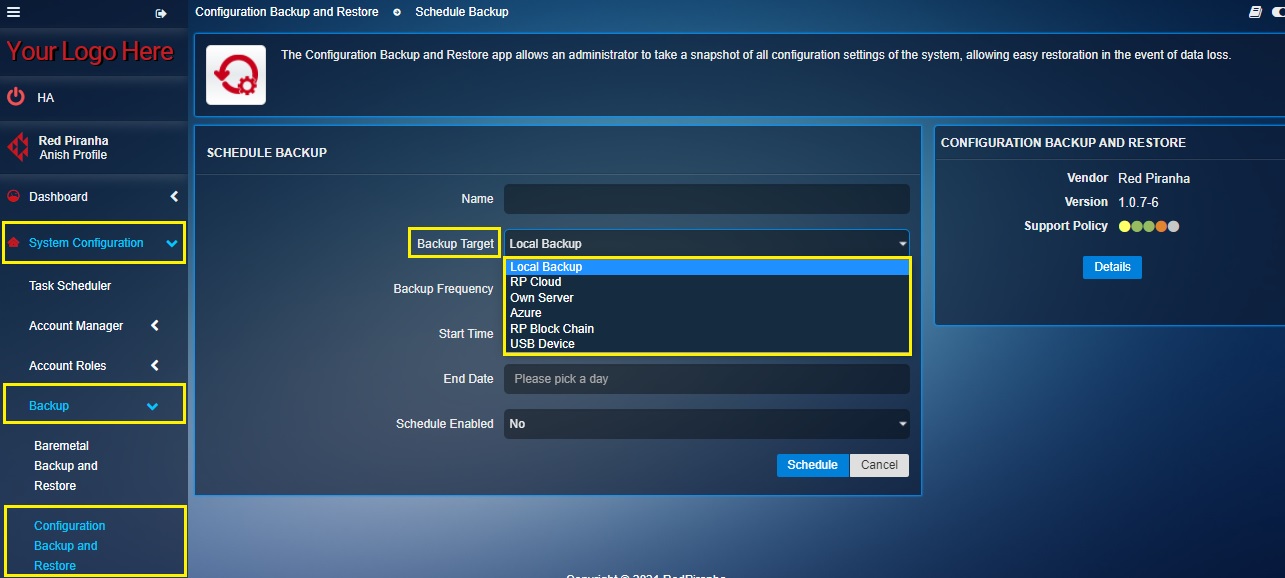
Note: Backup Target means the location at which the backup files will be stored. The administrator has the option to store the backup up files Locally, RP Cloud, Own Server, Azure, RP Blockchain and USB Device. Click here to understand the procedure to be followed if you want to store the backup files in the USB Device.
Step 4: Select the Backup Frequency from the dropdown. 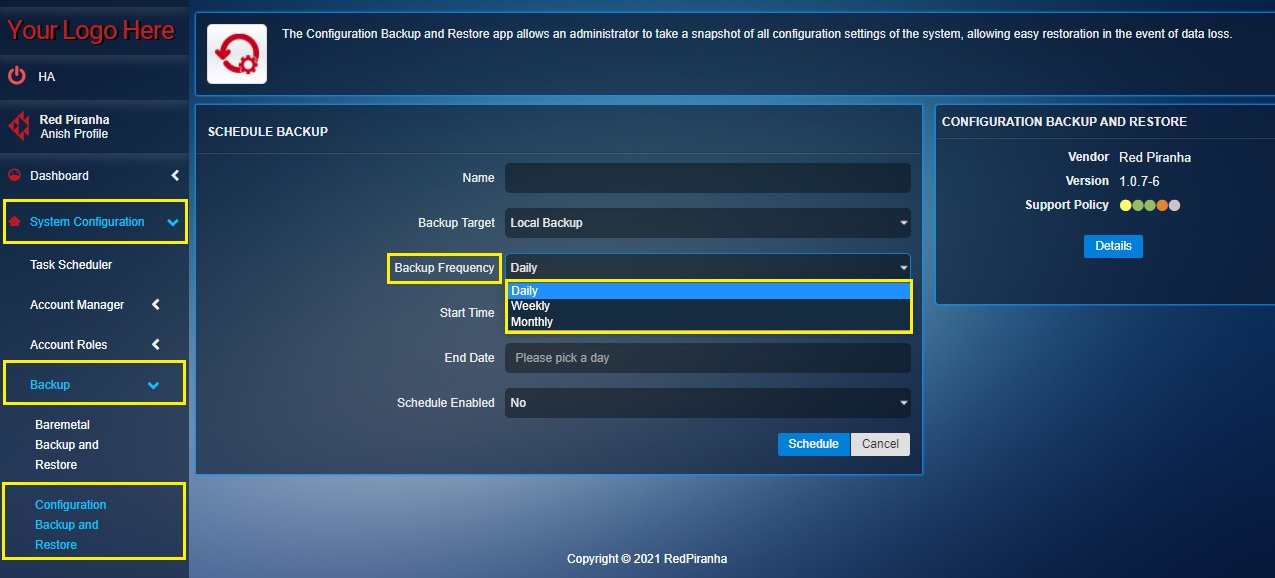
Note: The Backup Frequency can be set as Daily, Weekly or Monthly. The settings parameter will change as per the Backup Frequency.
| Perform the Following Steps if the Backup Frequency is Set Daily |
|---|
Step 5: Select the hour of the day the scheduled backup is to be initiated from the dropdown. 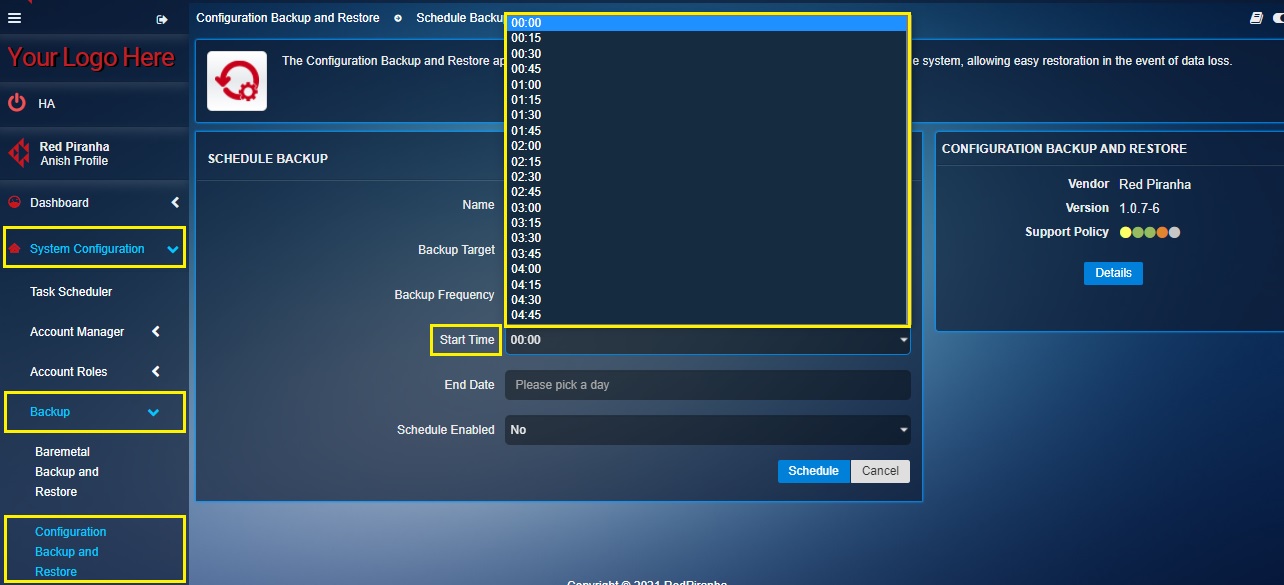
Step 6: Select the date beyond which the scheduled backup of CE XDR’s configuration is not required from the End Date dropdown. 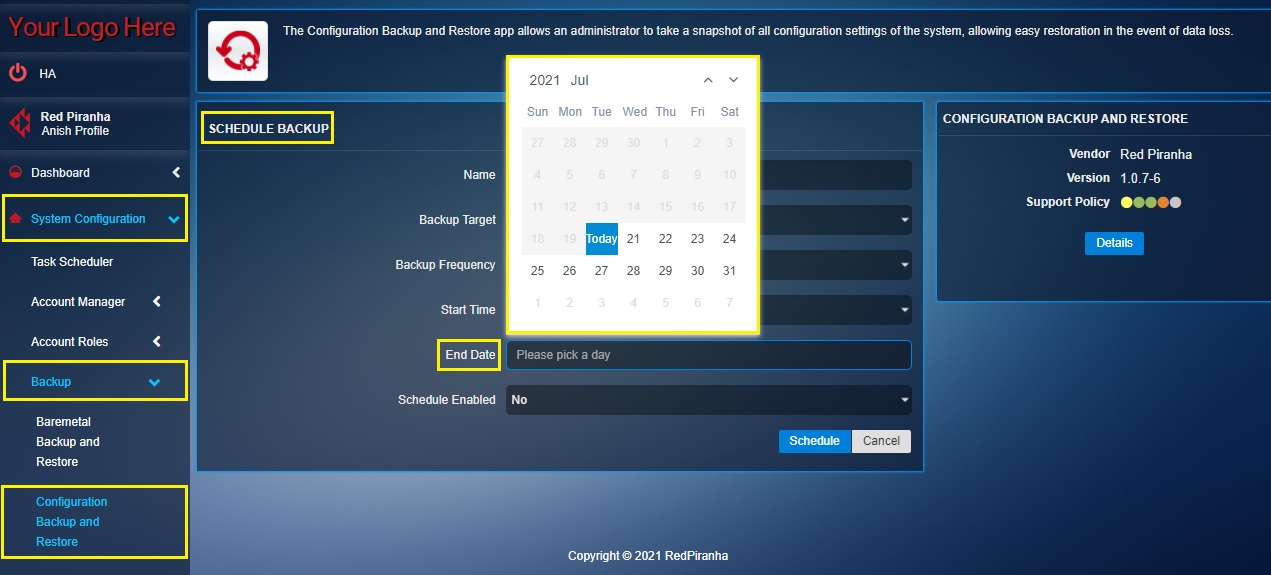
Step 7: Enable the Schedule from the dropdown and then click the Schedule button.
| Perform the Following Steps if the Backup Frequency is Set Weekly |
|---|
Step 8: Select the hour of the day the backup is required to be scheduled from the Start Time dropdown. 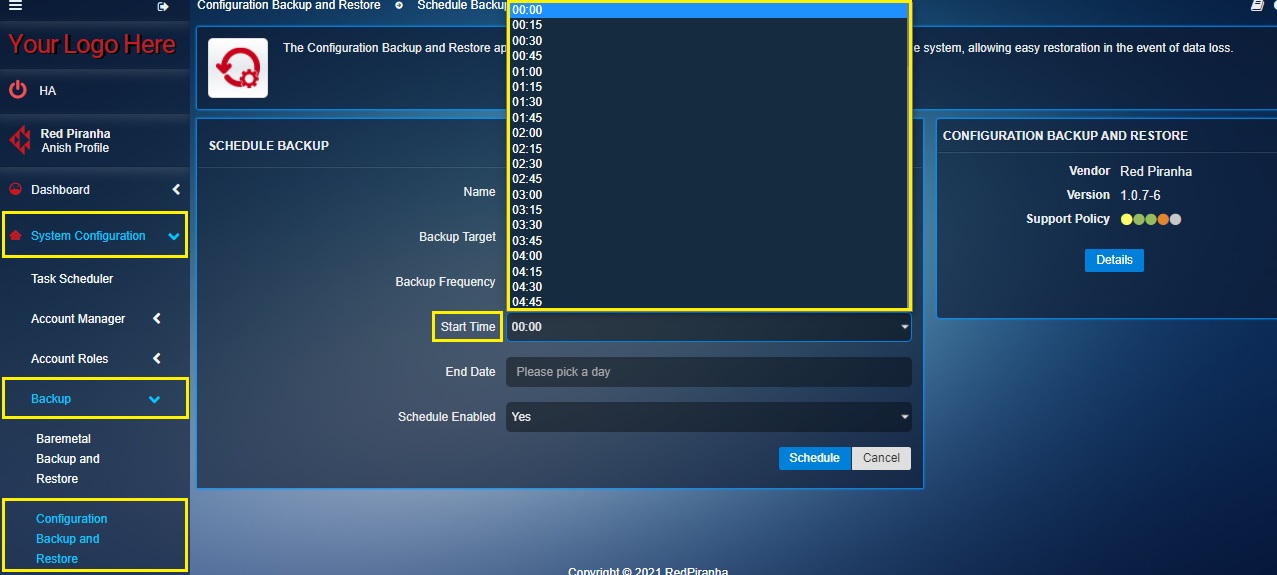
Step 9: Select the Day of the Week on which the backup needs to be done. 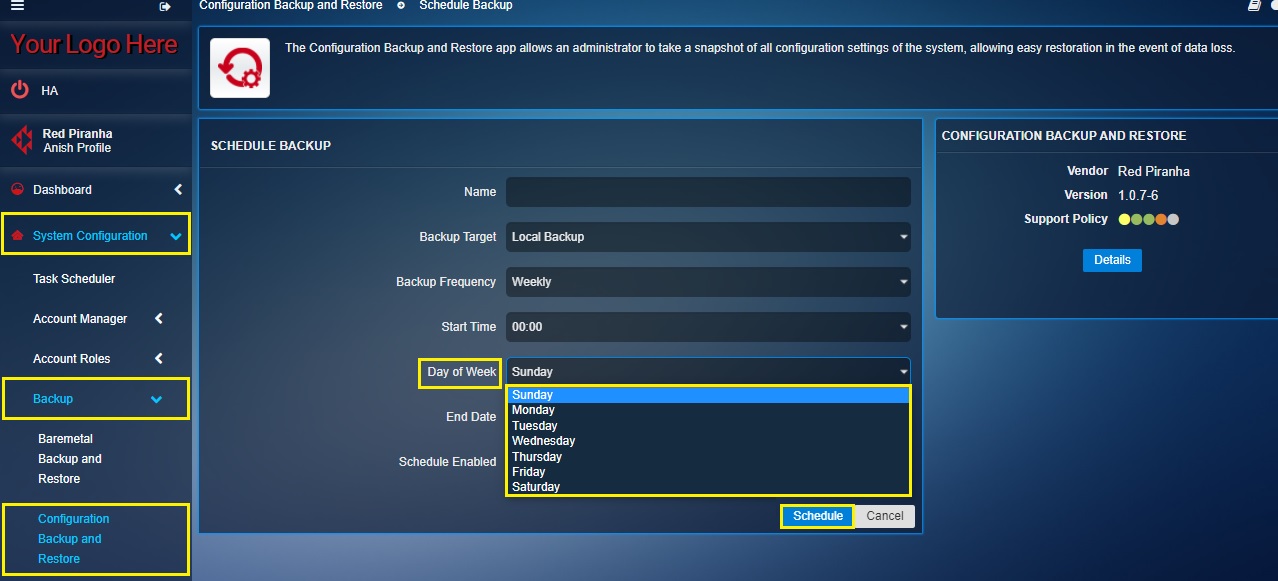
Step 10: Select the date beyond which it is required to stop the backup from the End Date Calendar. 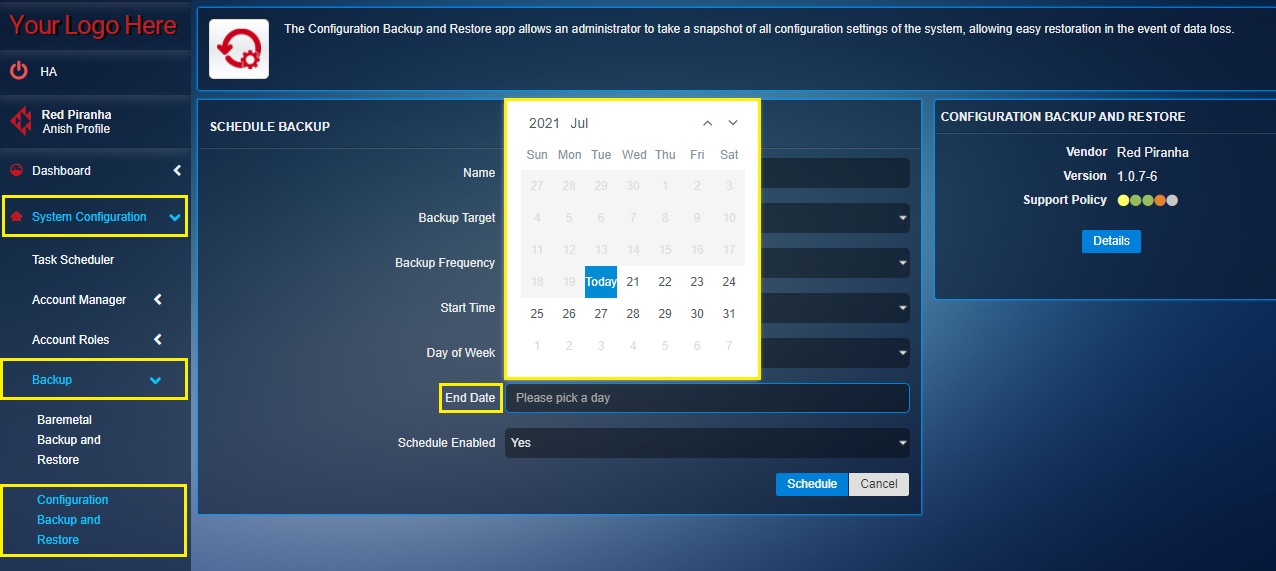
Step 11: Enable the Schedule and click the Schedule button.
| Perform the Following Steps if the Backup Frequency is Set Monthly |
|---|
Step 12: Select the hour of the day the backup is required to begin from the Start Time dropdown.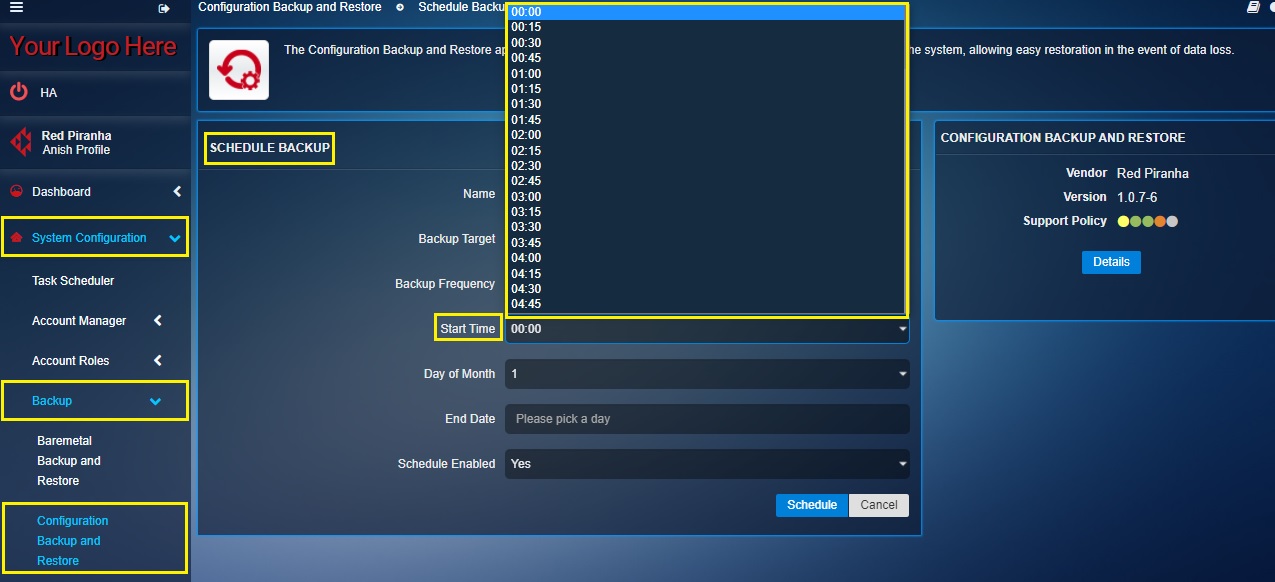
Step 13: Select the Day of the Month on which the backup is meant to initiate. 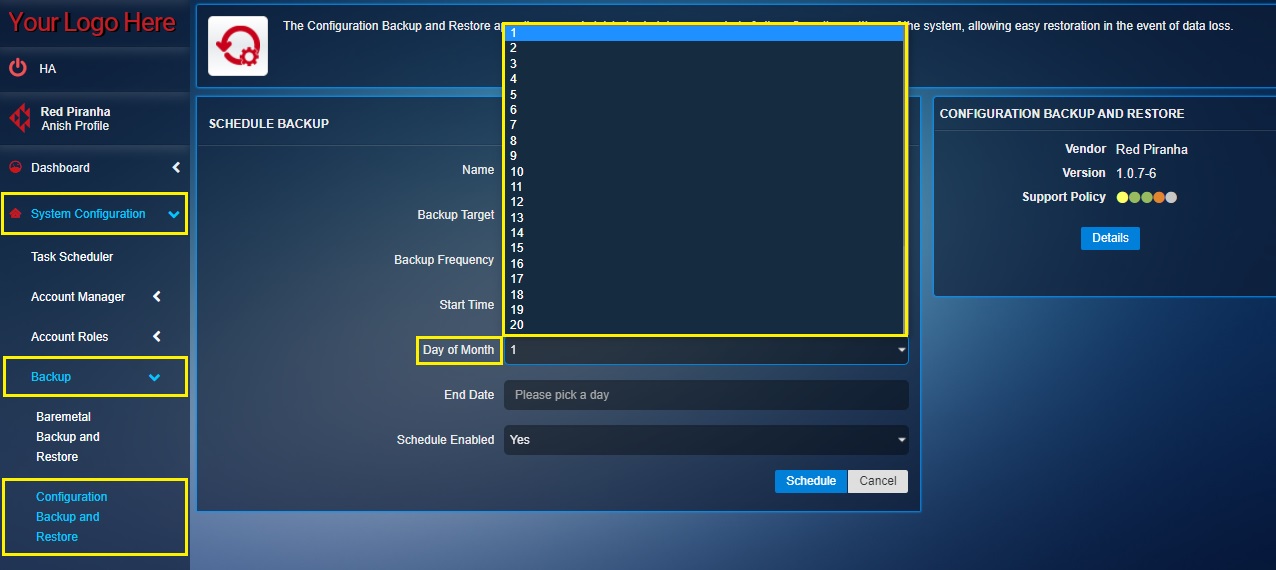
Step 14: Select the Date beyond which the backup is not required from the End Date Calender. 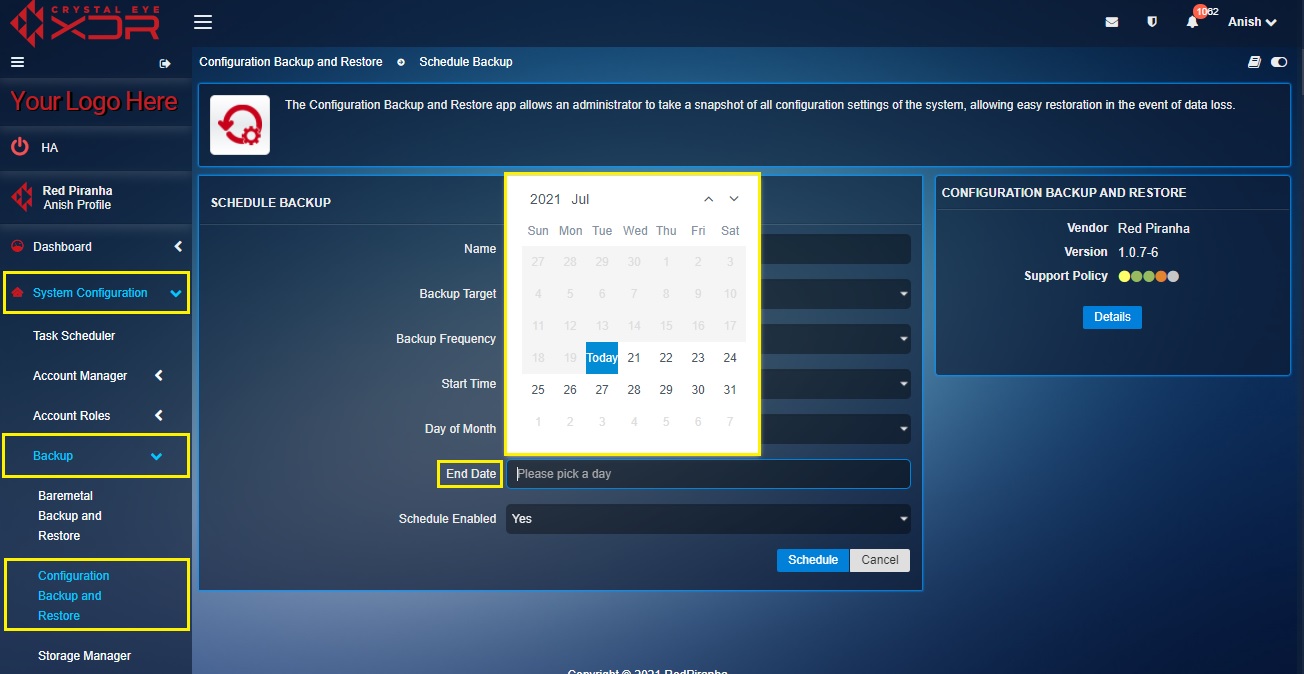
Step 15: Enable the Schedule and click the Schedule button.
You will now see the newly created schedule in the Scheduled Backup Job List. The screenshot below shows the name of the scheduled backup, the backup target, backup frequency, date and time details of the backup and the schedule status. 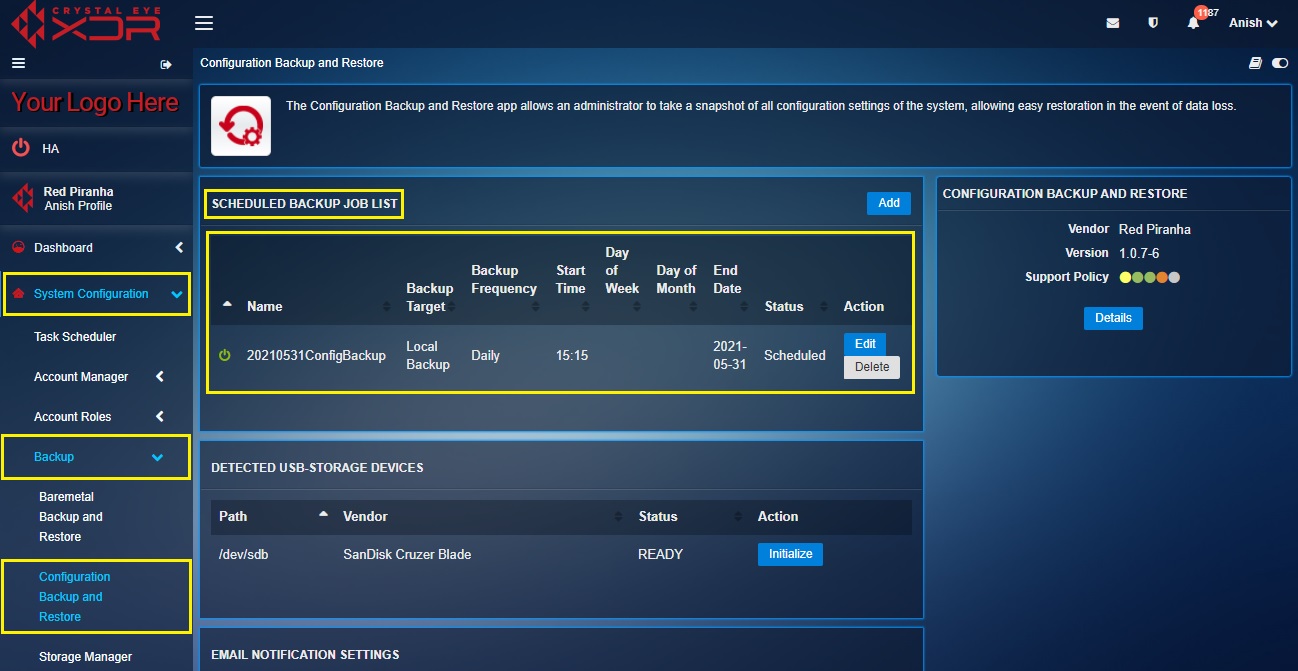
Note: Once the backup schedule is executed the system configuration gets stored to the designated backup target. Post this, the details would essentially be displayed in the Archives section under the selected Backup Target tab.
The current configuration of a Crystal Eye XDR can be saved and a backup for the same can be created through the auto scheduler and the backup files can be stored to a USB Device. Having the backup files stored in the USB device makes it convenient if there is a requirement to have an identical configuration on another Crystal Eye XDR appliance.
How to Create a Scheduled Crystal Eye Configuration Backup on a USB Device?
Step 1: Plugin the USB Device to the Crystal Eye XDR.
Step 2: Refresh the webpage to view the details of the USB Device. View the details under the Detected USB-storage Devices section. 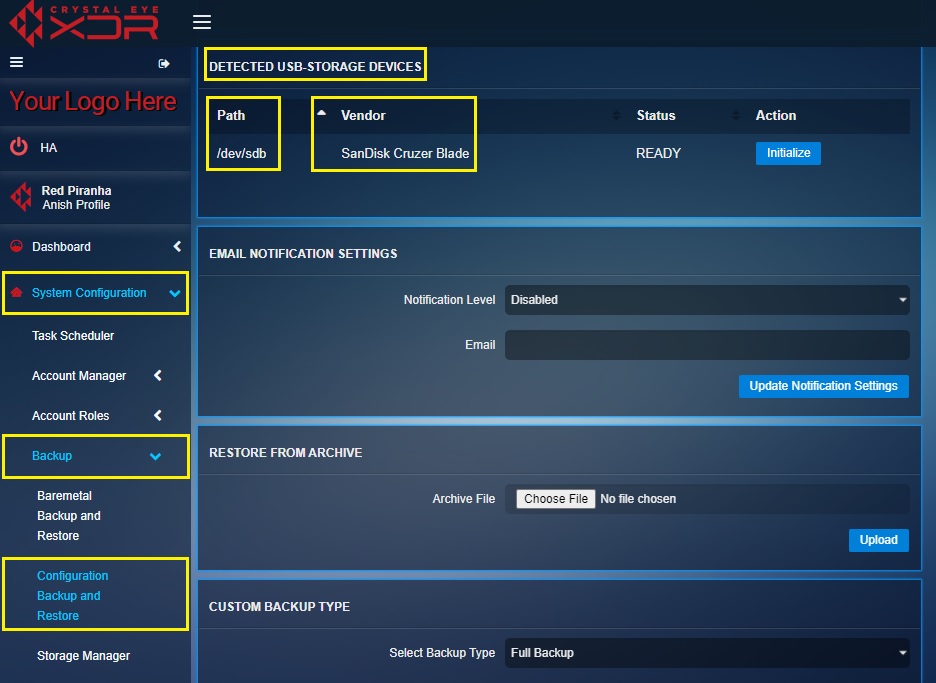
Step 3: In the Configuration Backup and Restoration app page, click the Initialize button under the Detected USB-Storage Devices section. 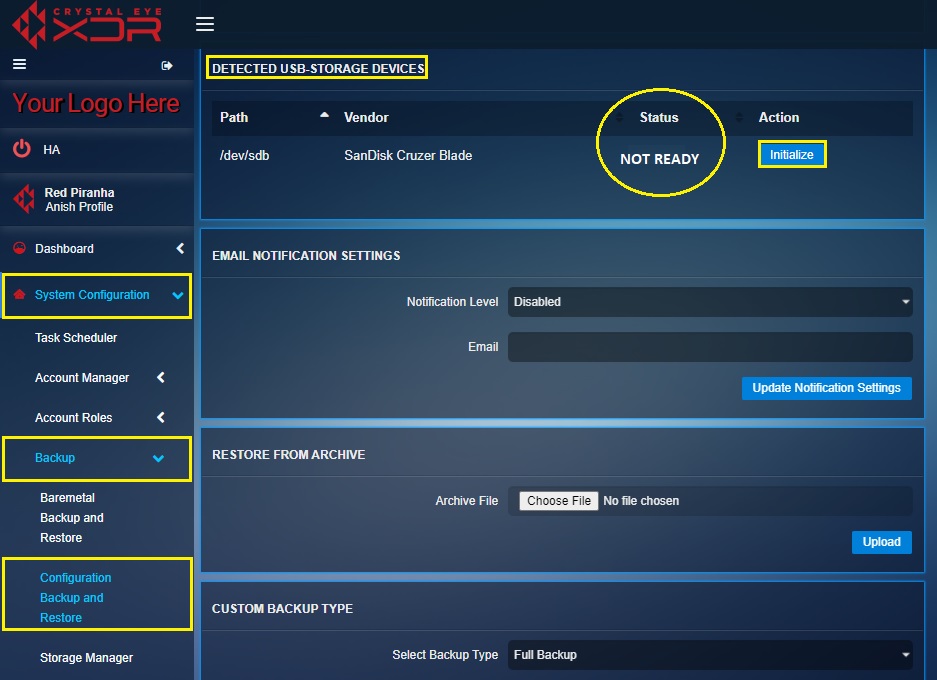
Note: The Not Ready Status sheds light on the fact that the USB device has not been used to store backup files before.
Step 4: You will now see the Confirmation Box. Click the OK button.
Note: By doing this, the connection between the USB Device and the Crystal Eye XDR appliance would essentially initiate and you will see the message, “USB Initialized successfully” and the Status under the Detected USB-storage Devices would be ‘Ready.
Step 5: Now, click the Add button under the Scheduled Backup Job List. 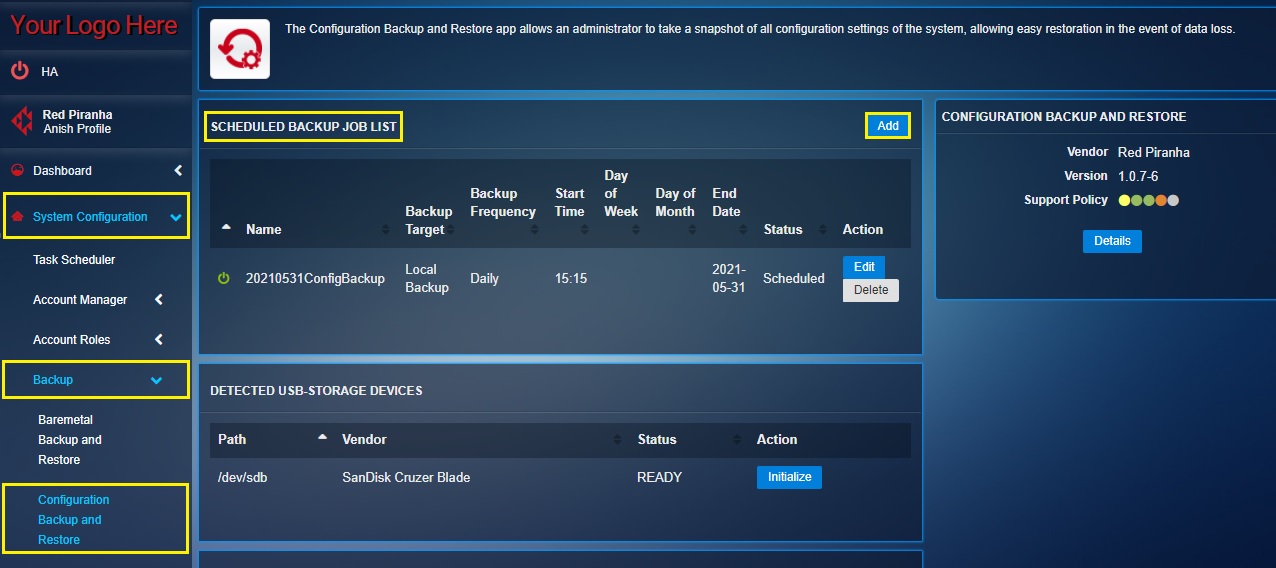
Step 6: You will now see the Schedule Backup page. Enter the Name in the textbox. 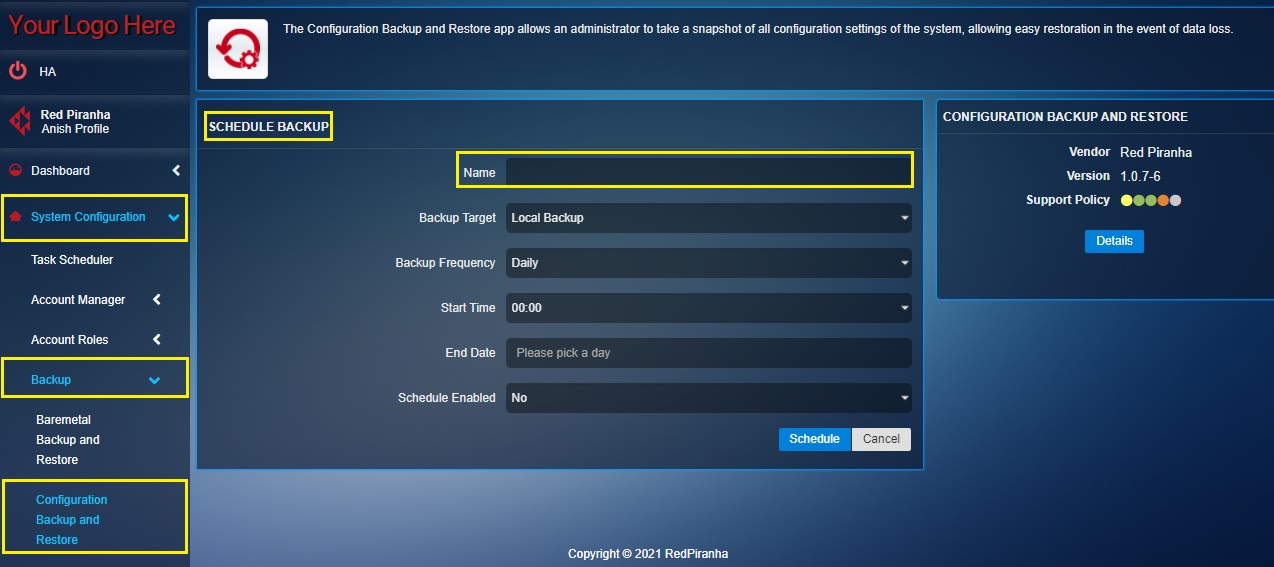
Step 7: Select the Backup Target (backup location) as USB Device from the dropdown. 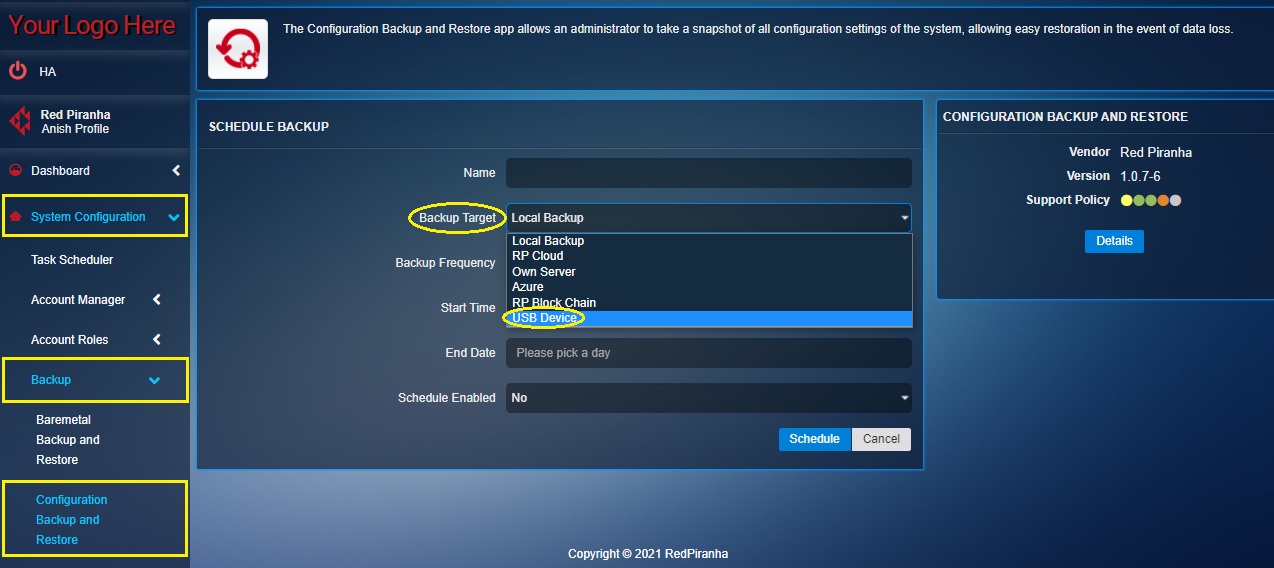
Step 8: Select the desired Backup Frequency and the time at which the backup is required. Enable the schedule and click the Schedule button. 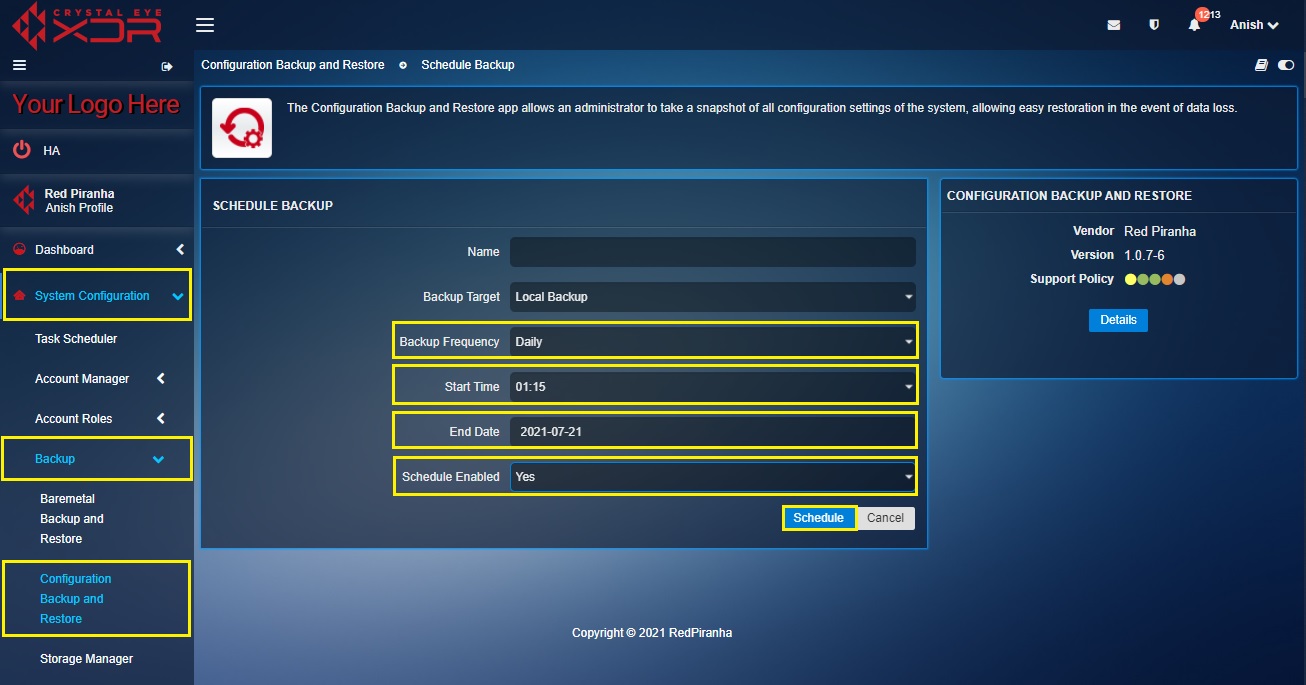
The Email Notification Settings can be easily configured to send All Notifications or Only Errors & Warnings to the desired email address. Backup being a sensitive process, receiving email notifications regarding it and the possible errors related to backups could be very useful.
How to Configure Email Notifications to Receive Backup Process Alerts?
Step 1: In the Configuration Backup and Restore page, select the Notification Level from the dropdown. 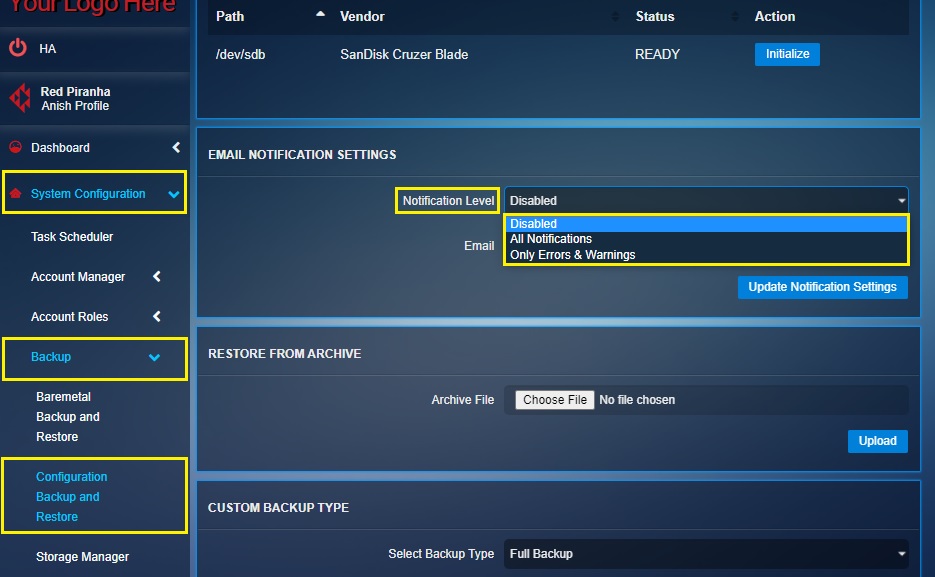
Step 2: Enter the Email Address in the textbox and click the Update Notification Settings. 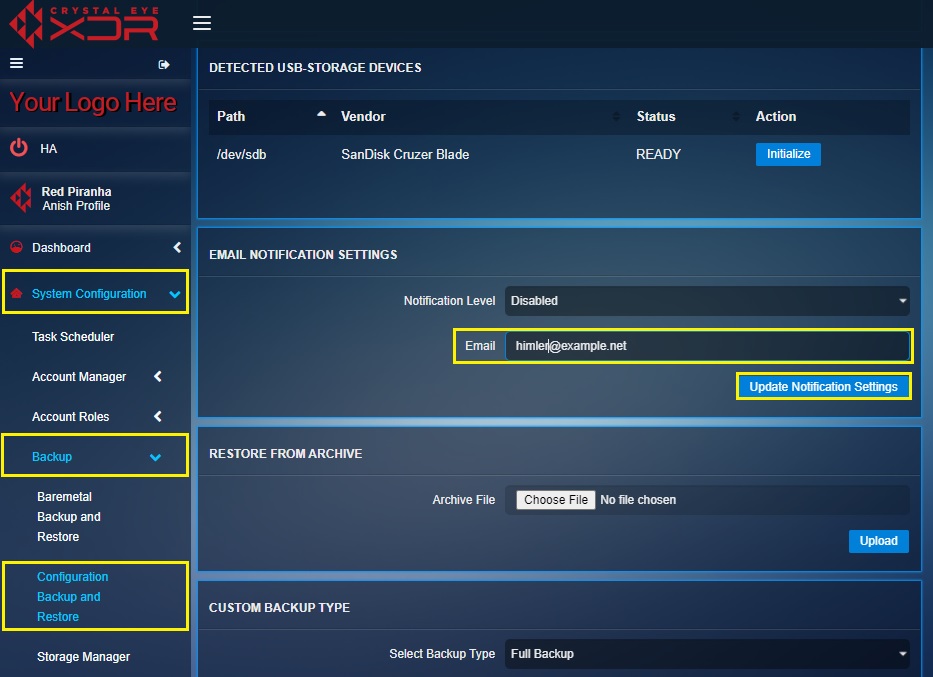
Manual Backup/Custom Backup is an integral part of the Configuration Backup and Restore App as it allows the administrator to take Full Backup, Incremental Backup and Differential Backup. The backup files are stored locally and can be downloaded instantly.
Note: One of the most important aspects of the Manual Backup is that it provides leverage to the administrator to create encrypted backup files. These files can then be downloaded and also stored in a USB Device. Click here to know how to get a copy of encrypted backup files.
The Full Backup provides a full copy of the CE XDR configuration and is tested to be the best backup type. However, one of the limitations regarding full backups are that it might be a little time consuming to perform a backup since it scans all the settings that have been configured so far and then stores it locally.
How to Initiate a Full Backup of Crystal Configurations?
Step 1: In the Configuration Backup and Restore app page, select Full Backup from the dropdown in the Custom Backup Type section. 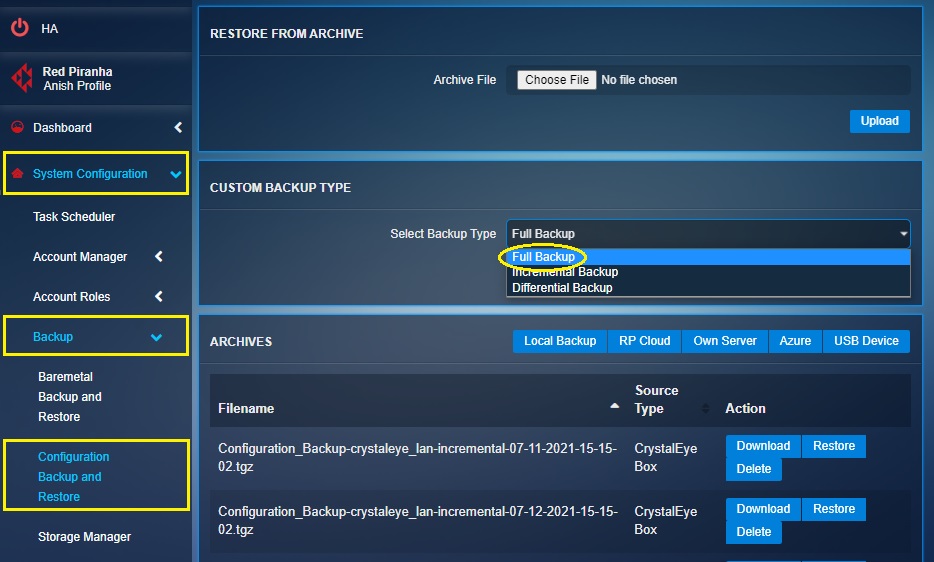
Step 2: In the Custom Backup Type section, click the Backup Now button. 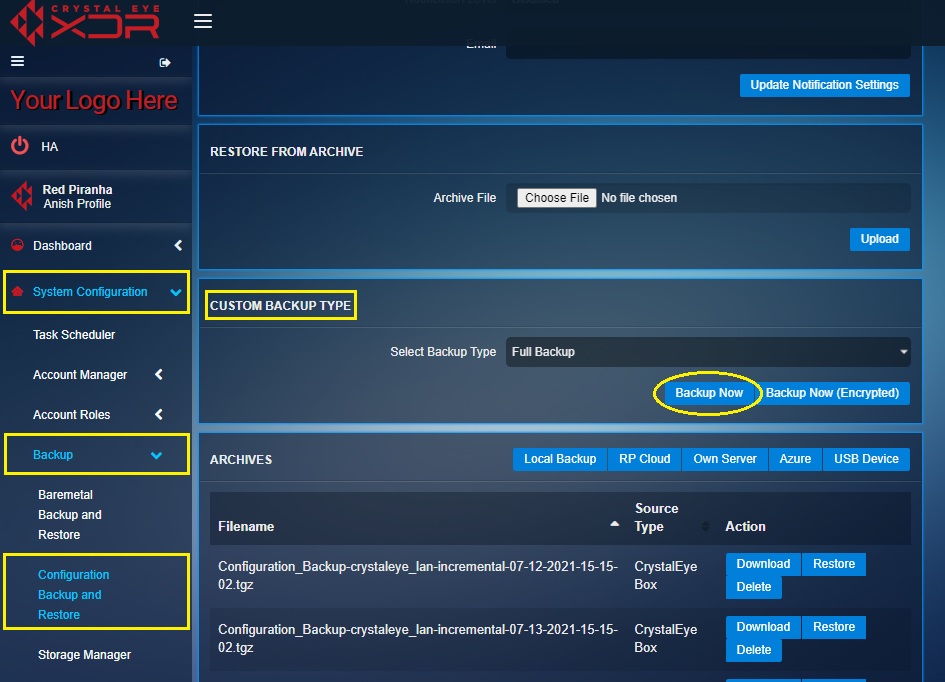
An Incremental Backup relates to creating backup data of the files that has been changed since the previous backup was done or scheduled.
Note: Here, the backup done earlier to the present Incremental Backup could either be Full Backup or a Differential Backup type.
One of the advantages of performing an Incremental Backup is that the backup copy is compact and smaller as compared to the copy generated through Full Backup and Differential Backup. This essentially helps to accomplish the Incremental Backup operations at a faster rate.
How to Initiate Incremental Backups of Crystal Eye XDR Configurations?
Step 1: In the Configuration Backup and Restore app page, select Incremental Backup from the dropdown in the Custom Backup Type section and click the Backup Now button. 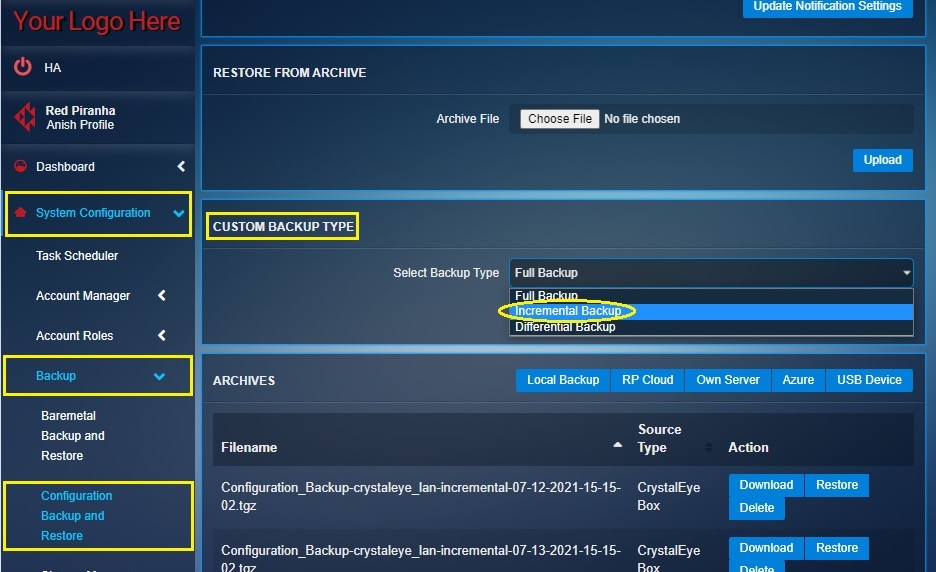
Step 2: Now, click the Backup Now button. 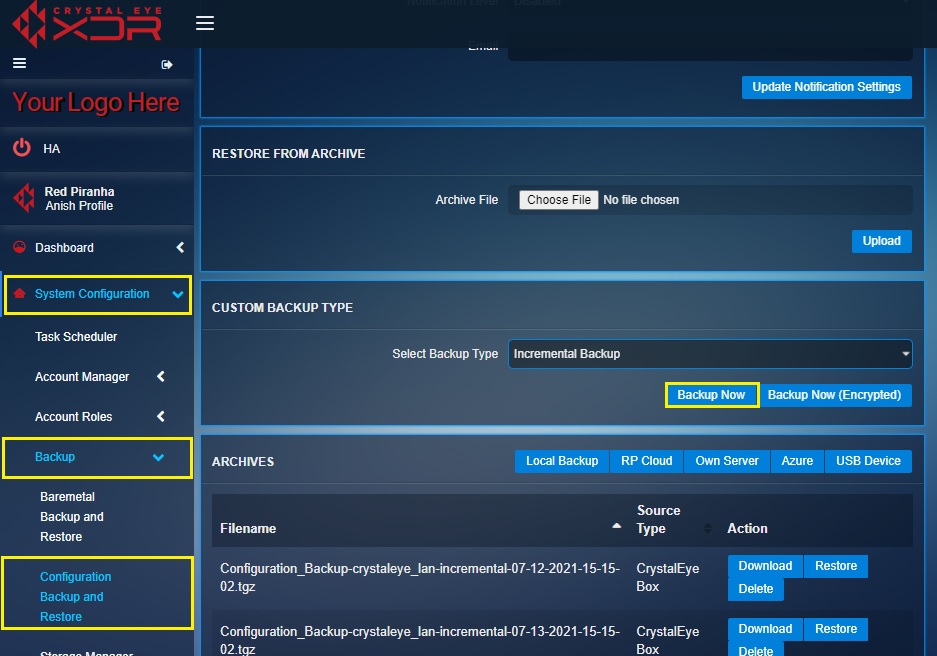
Differential Backup allows administrators to create a copy of the CE configuration since the last Full Backup was initiated. Such a backup would capture and store more data than incremental backup. However, the configurations data saved during differential backup is far less than full backups.
How to Initiate Differential Backups of Crystal Eye XDR Configurations?
Step 1: In the Configuration Backup and Restore app page, select Differential Backup from the dropdown in the Custom Backup Type section and click the Backup Now button. 
Step 2: Now, click the Backup Now button. 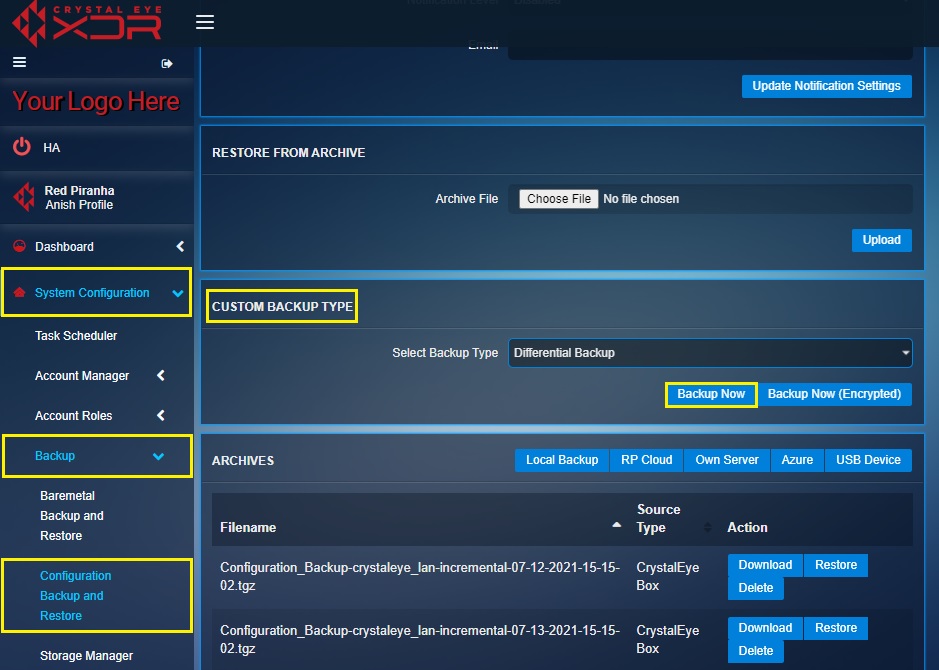
Crystal Eye XDR supports Encrypted Backups which essentially adds another layer of protection to the backups. The encrypted version of the backup file is stored locally and can easily be downloaded to a desktop/laptop connected to the crystal eye network. Before the Encrypted Backup File is downloaded the system prompts to assign a password which is essentially used to decrypt the file later when it’s required to access it. The file can also be transferred to a USB Drive which speaks volumes of the convenience levels that this feature exhibits.
How to Download Encrypted Backup Files of Crystal Eye XDR Configuration?
Step 1: In the Configuration Backup and Restore app page, select Full Backup, Incremental Backup, or Differential Backup from the dropdown in the Custom Backup Type section and click the Backup Now (Encryption) button. 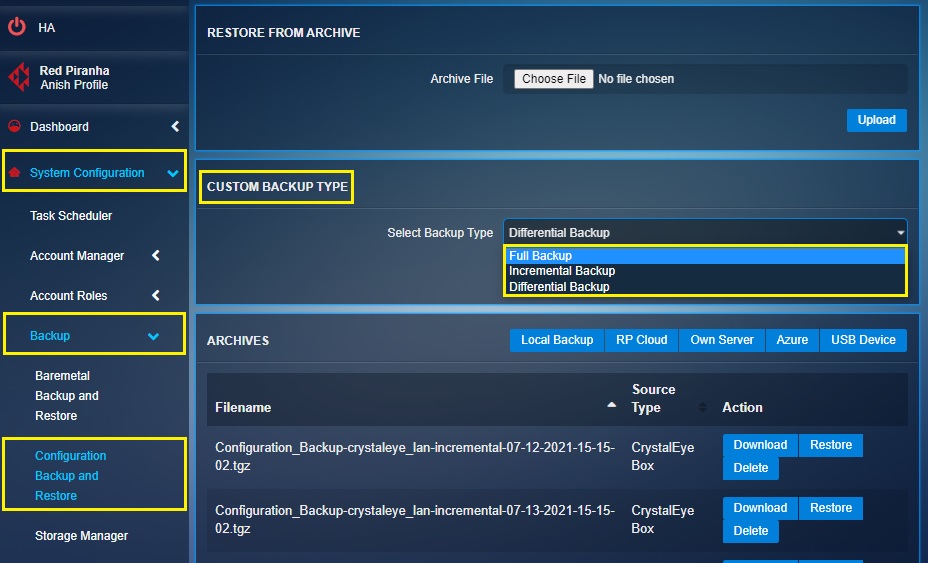
Step 2: Now, click the Backup Now (Encrypted) button. 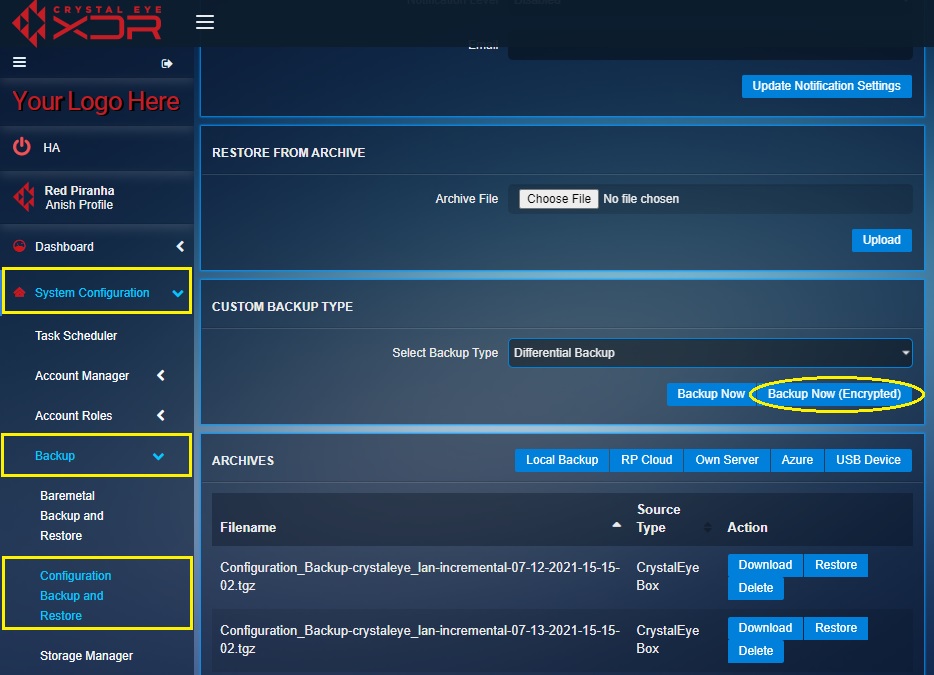
Step 3: You will now see the Backup section. Enter the password and click the Backup Now button. 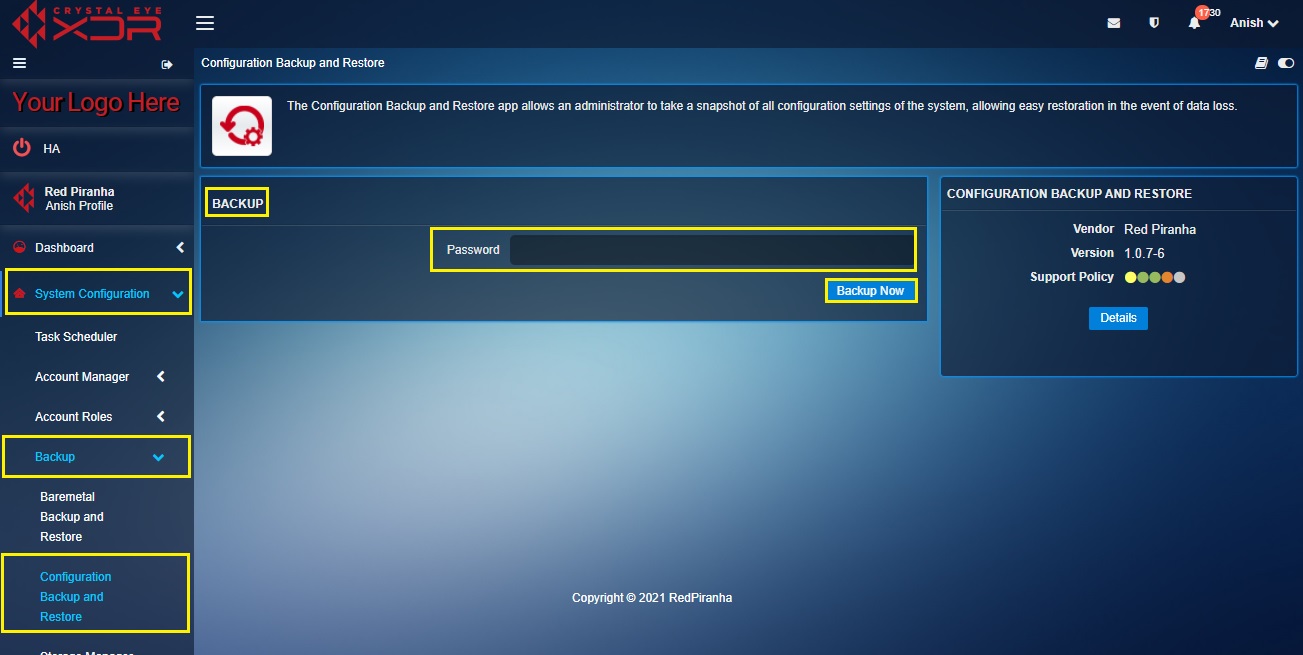
The Backup Archives displays the list of Crystal Eye XDR Configuration backup files that have been created periodically over a period of time. The Backup Archives Dashboard displays backup files which were downloaded to different locations.
The CE XDR configuration backup files are categorized to five categories based on the locations they are saved to. These categories are as follows:
- Local Backup
- RP Cloud
- Own Server
- Azure
- USB Device
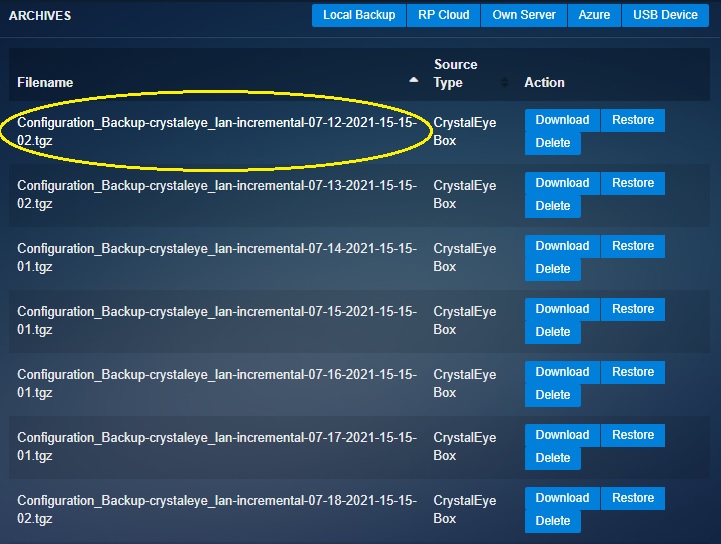
The following screenshot shows the above mentioned categories. Click the highlighted buttons in the screen to view the backup files stored in various locations. 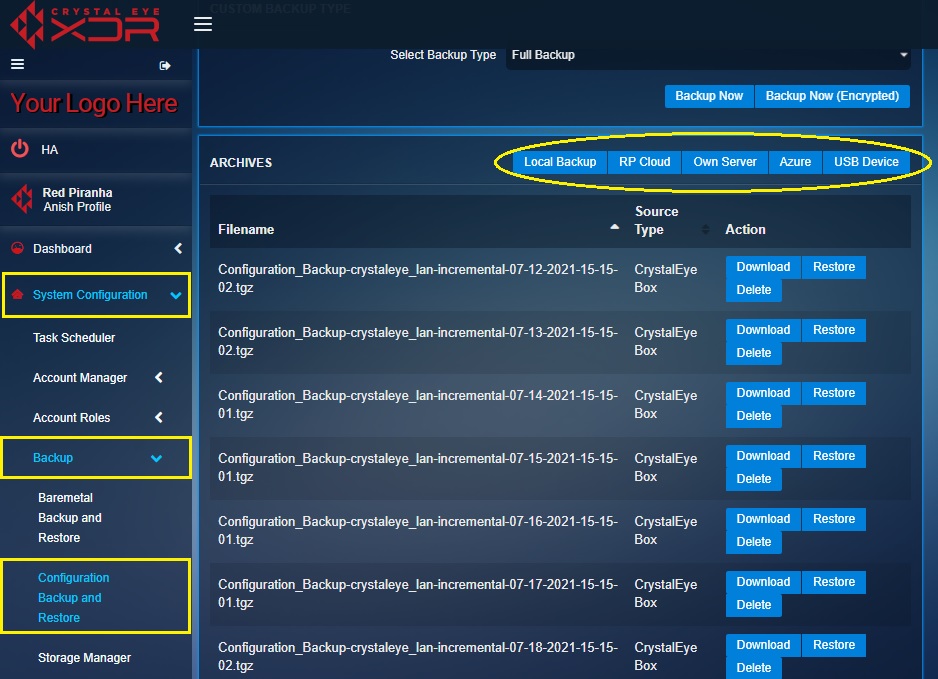
The administrator can also Download, Restore and Delete backup files stored in all the locations and displayed at the Backup Archives. The Restore button restores the configuration that was saved earlier. This is a quick way of restoring CE configurations and is also an effective one.
How to Download, Restore and Delete Backup Files from the Backup Archives Dashboard?
Step 1: In the Configuration Backup and Restore app page, click the Download, Restore or the Delete button as per requirements. 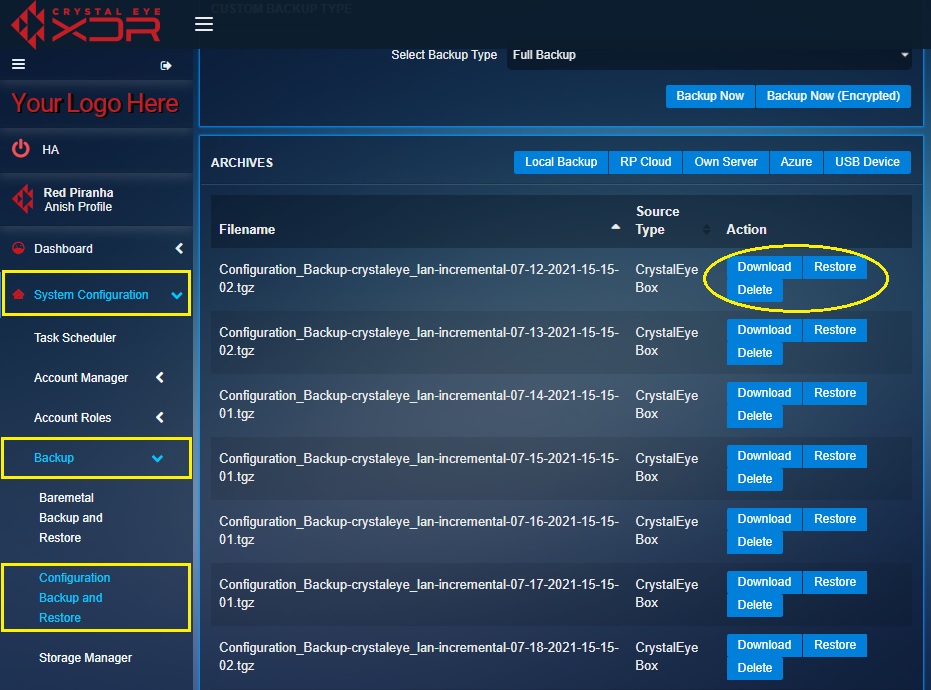
The only way to distinguish between non-encrypted and encrypted backup files in the Backup Archives dashboard is the file extension. Apparently, the file extension of a non-encrypted file will be .tgz and the file extension of an encrypted file would be .aes 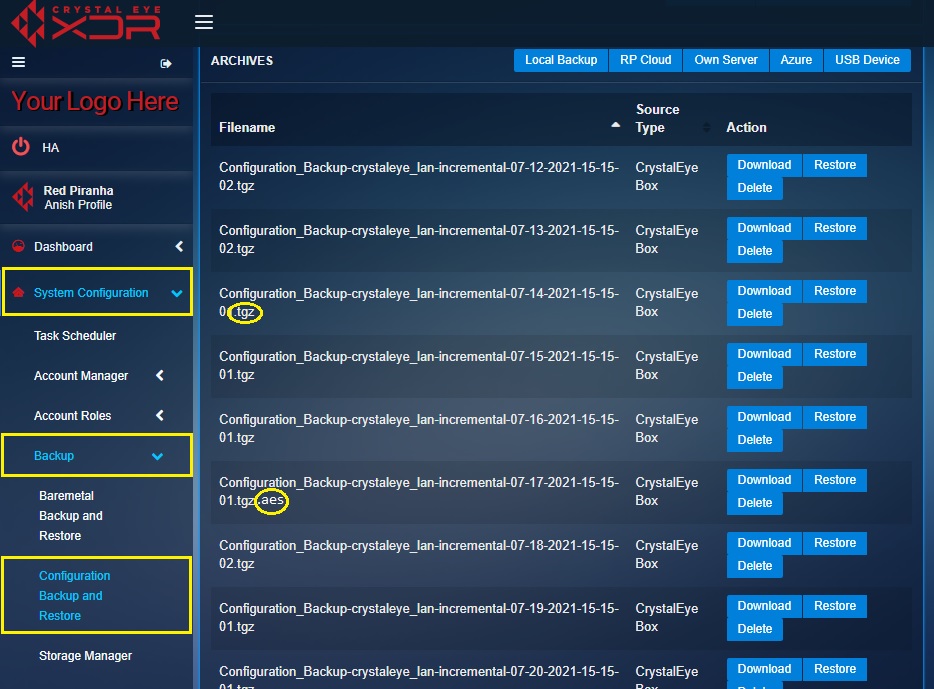
How to Know the Backup Type and the Date and Time the Backup was Initiated on?
Carefully observe the screenshot showing the file naming convention of the backup files saved and displayed in the Backup Archives section. In the file name configuration_Backup-crystaleye_lan-differential-07-12-2021-15-15-02.tgz the last bit of information shows that the backup type is incremental, the date on which the backup file was created is 07-12-2021 (MM-DD-YYYY) and the time on which the file was created is 15:15:02 (HH:MM:SS) 