Data Loss Protection
The Data Loss Protection (DLP) application is designed to provide industry-standard protection for the data stored within Crystal Eye’s network. One of the most powerful features of this app is that it has a phenomenal alert generating system with the sole objective to provide a greater degree of control over Personal Identity Information (PII). Once the DLP feature is enabled it searches all files located in various computers in the CE network for structured data formats involving credit card numbers and social security number (SSN). Thereon, the DLP apps in-built default functionality triggers an alert every time Credit Card Numbers and Social Security Numbers (SSN) are extruded outside CE networks.
Data theft and unauthorized transfer of data to realms outside the CE network can immediately be detected and also stopped. This advanced measure involves a process based approach where all the files containing confidential and critical information are first identified and then uploaded to the tracking system in the DLP app.
Note: The administrator can upload files containing confidential and critical information to the ‘alert system’ or ‘stop movement of files system’ as a standard measure to stop unauthorized transfer of data outside the CE network.
The files that are uploaded to the ‘alert system’ would essentially trigger an alert which would be recorded in the ‘Sensitive/Confidential Files Movement Report’. On the other end of the spectrum, if the files are uploaded to ‘stop movement of files system’ of the DLP app then it would block the passage and would not let the file to be transferred outside CE networks.
Left-hand Navigation System > Compliance Controls > Data Loss Protection 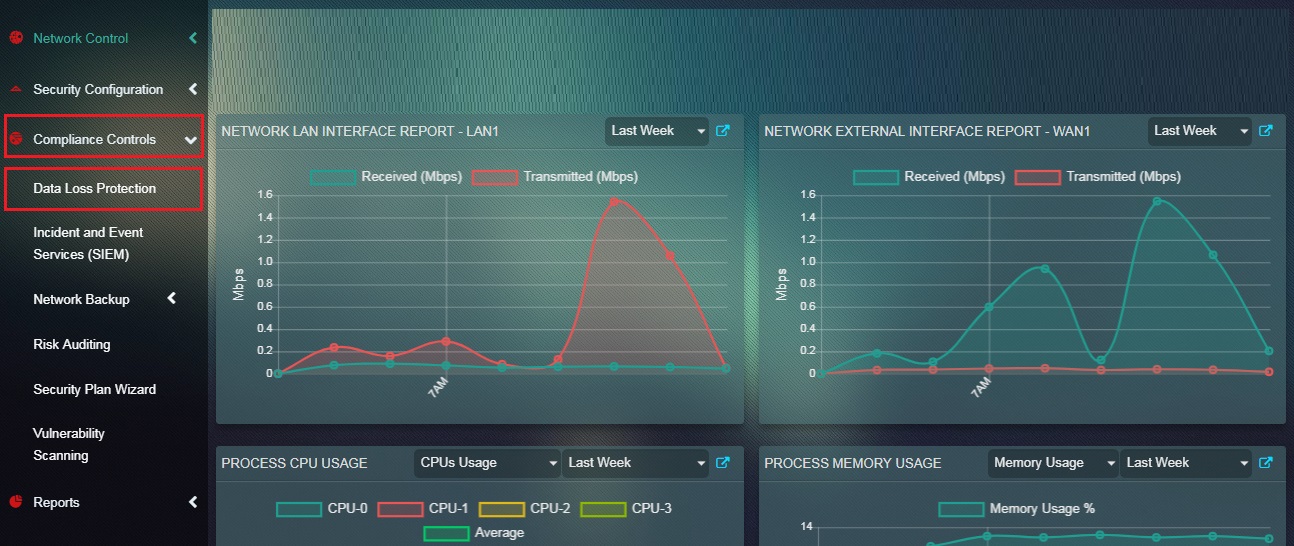 |
|---|
By default, DLP app searches various computers and servers in the CE network for structured data formats involving credit card numbers and social security number, and creates alerts upon movement of the files containing these numbers.
Note: Crystal Eye's Data Loss Protection application blocks credits card numbers and social security numbers mentioned in a particular data format. DLP will block the file only if the credit card number format is xxxx-xxxx-xxxx-xxxx and the social security number format is xxyyzzzz or xxx-yy-zzzz.
DLP must be enabled from the Scan File For Sensitive Data section for the alerts to be generated. The administrator can also set the minimum credit card numbers and social security numbers that would trigger the alert.
How to Enable/Disable Data Loss Protection App?
Step 1: In the Data Loss Protection app page, click the Edit button under Scan File for Sensitive Data section. 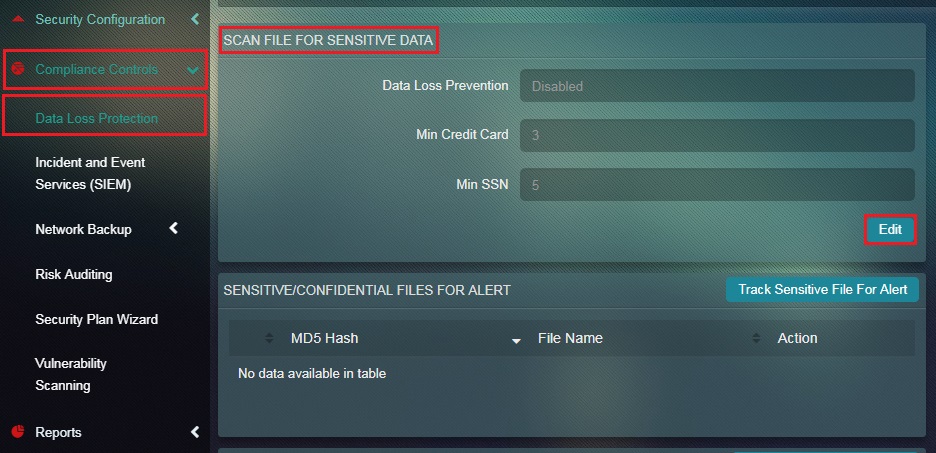 Step 2: You will now see the editable version of the Scan File For Sensitive Data section. Select Enable from the Data Loss Protection dropdown and click the Update button.
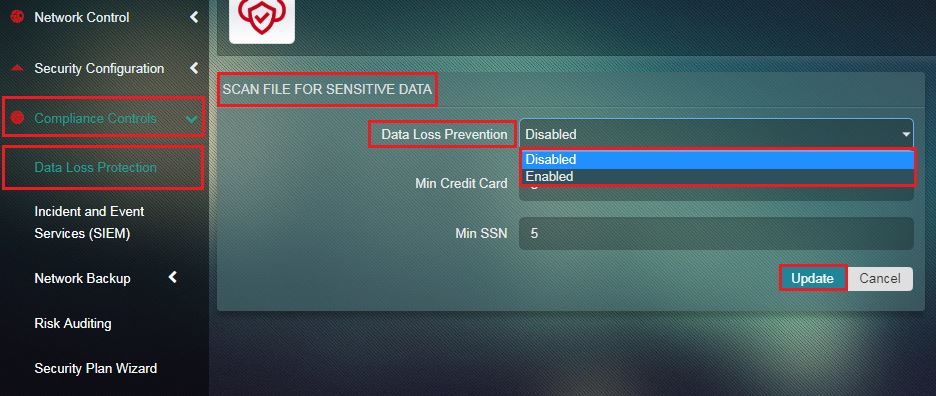
How to Set Alerts for Credit Card Number and Social Security Number Detection?
This procedure will enable an administrator to set an alert that would trigger on detecting the bare minimum number of credit card numbers and social security numbers sent outside CE network.
Step 1: In the Data Loss Protection app page, click the Edit button under Scan File for Sensitive Data section.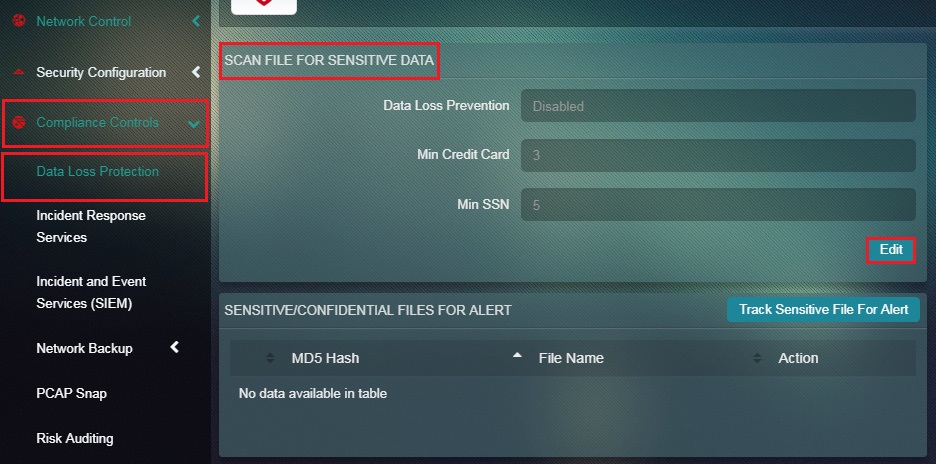
Step 2: You will now see the editable page of Scan File for Sensitive Data. Select Enable from the dropdown.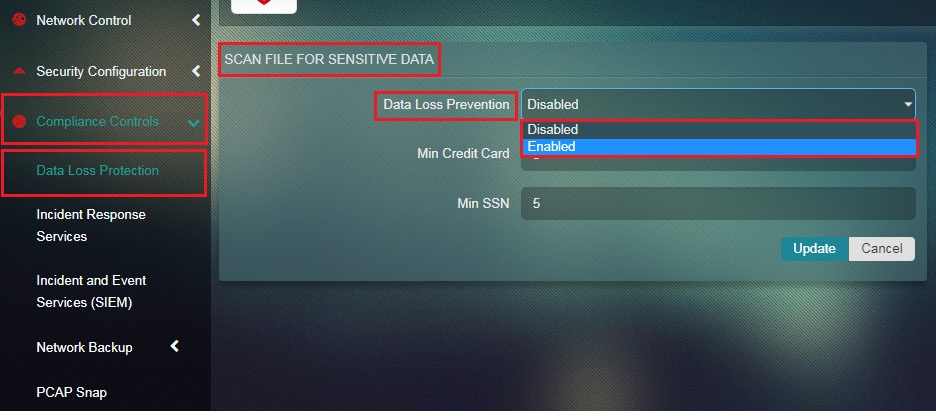
Step 3: Enter the least Credit Card Numbers and Social Security Numbers that triggers a files movement alert in the Min Credit Card and Min SSN textbox.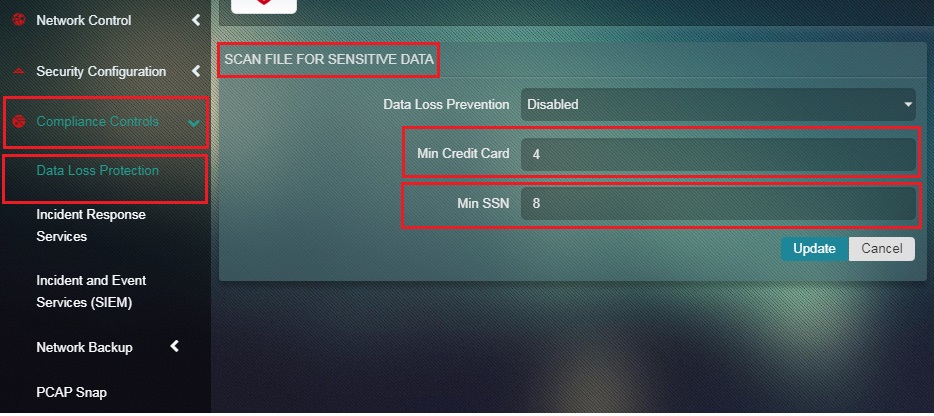
Step 4: Click the Update button to save the settings.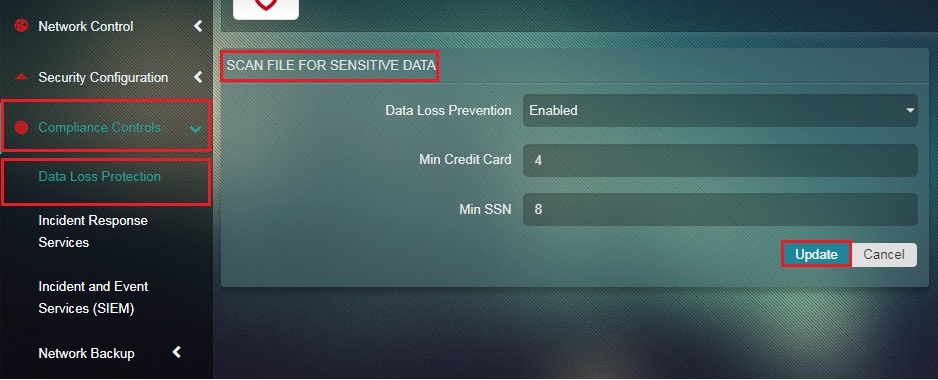
The DLP alert system is a feature that can be customized according to the requirements and compliance policies of the company. The entire process involves identifying the files that are deemed confidential and then uploading it. After uploading the files to the Sensitive/Confidential Files for Alert section, an alert would be generated every time these files are transferred outside the Crystal Eye Network. The alerts will get registered in the Sensitive/Confidential Files Movement Report which can also be downloaded in PDF format. Apart from this, the alert will also be visible in the Real Time Attack Tracker–Table.
Note: Crystal Eye generates a MD5 Hash for every file that is uploaded and triggers an alert as soon as it detects a file transfer.
How to Set Alarm For Sensitive File Movement Outside CE Network?
Step 1: In the Data Loss Protection app page, click the Track Sensitive File for Alert button under the Sensitive/Confidential Files for Alert section.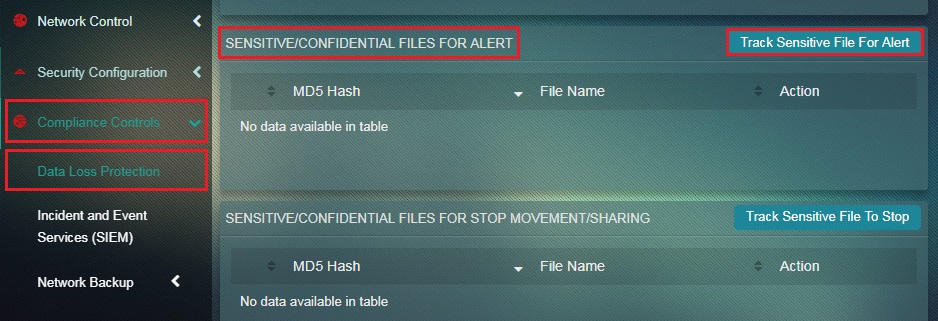 Step 2: You will now see the Track Sensitive File for Alert section. Choose the file that requires alert protection here and click the Upload button.
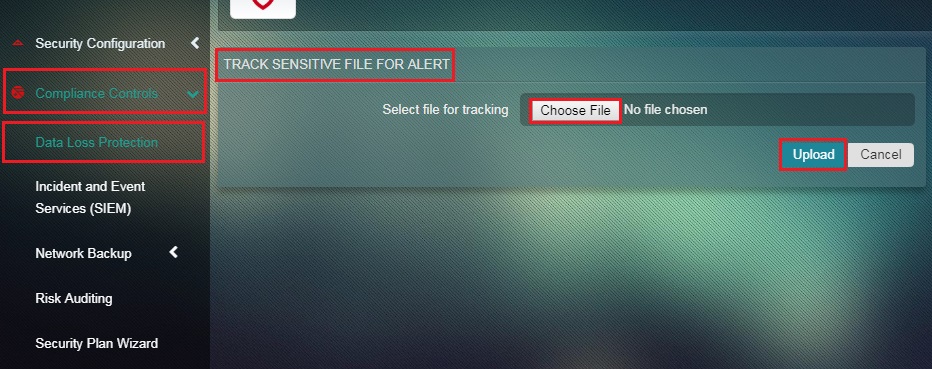 Step 3: After the files are uploaded to the CE, its MD5 Hash, and File Name will appear in the Sensitive/Confidential Files for Alert section.
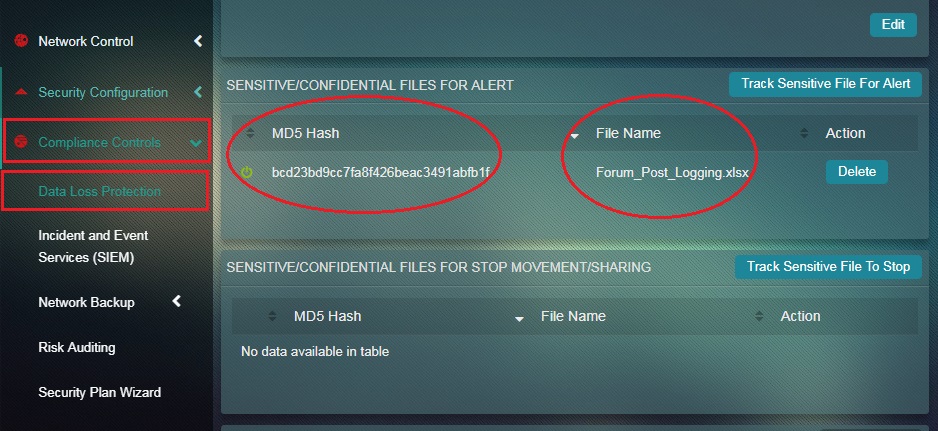
How to Delete a File Uploaded to the Sensitive Confidential Files For Alert section?
Step 1: In the Sensitive/Confidential Files for Alert section, click the Delete button under the Action column.
The DLP Stop File Movement/Sharing Feature essentially blocks any attempt to transfer a file outside CE network. However, the process of enabling this system requires an elaborated effort to identify the sensitive files. Once the identification process is done, these files must be uploaded to the Sensitive/Confidential Files for Stop Movement/Sharing section. Crystal Eye generates a MD5 Hash for every file that is uploaded and stops file movement as soon as it detects the MD5 Hash. The alerts for ‘stop file movement’ feature of this app will get registered in the Sensitive/Confidential Files Movement Report which can also be downloaded in PDF format. Apart from this, the alert will also be visible in the Real Time Attack Tracker–Table.
Note: The intrusion mode of the Intrusion Protection & Detection app must be set as “Prevention” to stop movement of selected sensitive files. Click here to know how to assign an intrusion mode.
How to Configure Settings to Stop Confidential File Movement/Sharing Outside CE Network?
Step 1: In the Data Loss Protection app page, click the Track Sensitive File to Stop button under the Sensitive/Confidential Files for Stop Movement/Sharing section.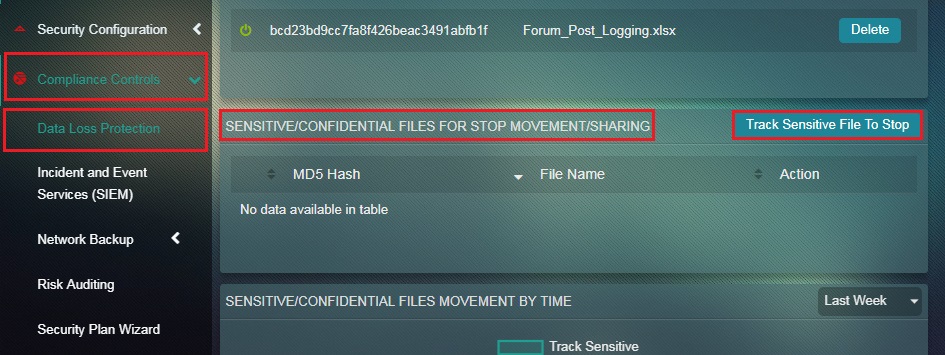 Step 2: You will now see the Track Sensitive File to Stop Movement/Sharing section. Choose the file which needs to be covered by ‘block file movement system’ and click the Upload button.
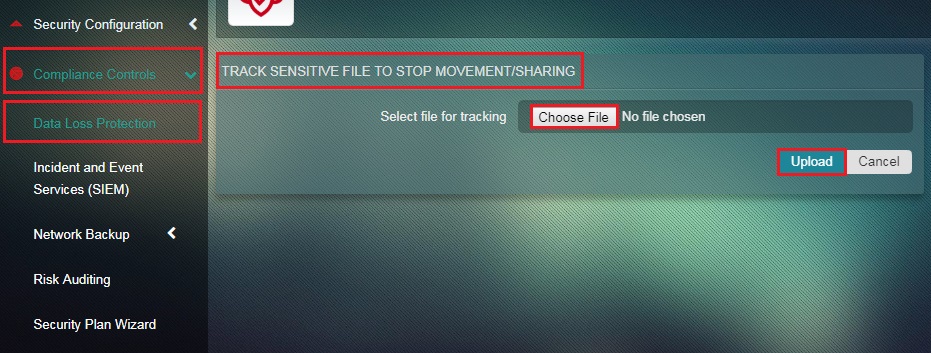 Step 3: After the files are uploaded to the CE, its MD5 Hash, and File Name will appear in the Sensitive/Confidential Files for Stop Movement/Sharing section.
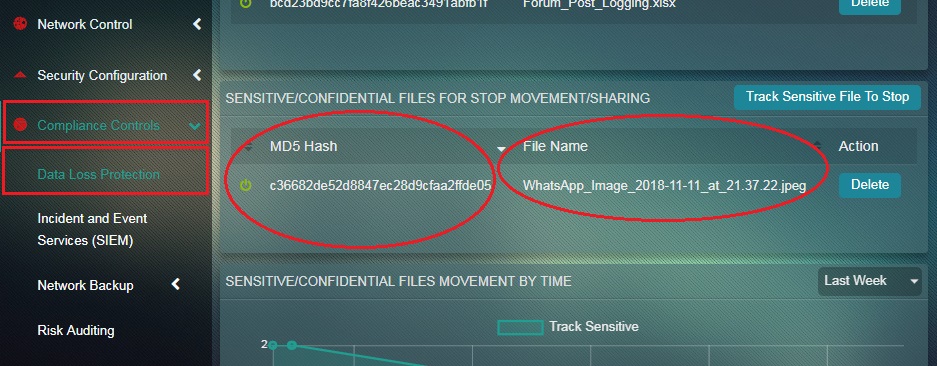
How to Delete a File Uploaded to the Sensitive/Confidential Files For Stop Movement section?
Step 1: In the Sensitive/Confidential Files for Alert section, click the Delete button under the Action column.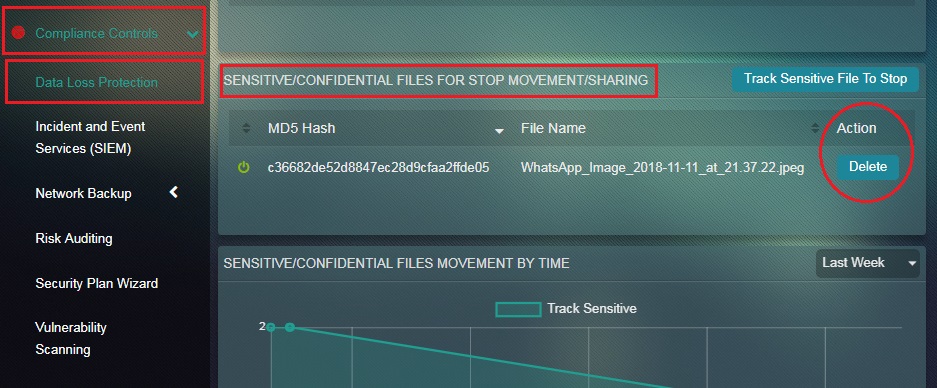
The overall process of using the DLP app involves detecting sensitive and confidential files across the network, uploading files that are deemed sensitive and confidential in the alert generation and stop file movement section and lastly, monitor and analyze various graphs and reports generated due to unauthorized transfer of data.
The data loss protection app hhttps://manual.redpiranha.net/compliance-controls/data-loss-protection#dlp-alert-featureas an excellent logging mechanism and unauthorized data transfer monitoring system.
DLP monitoring can be done with the help of the following:
- Sensitive/Confidential Files Movement by Time (timeline graph)
- Sensitive/Confidential Files Movement by Host (bar graph)
- Sensitive/Confidential Files Movement Count (pie-chart)
- Sensitive/Confidential Files Movement Report (tabular report)
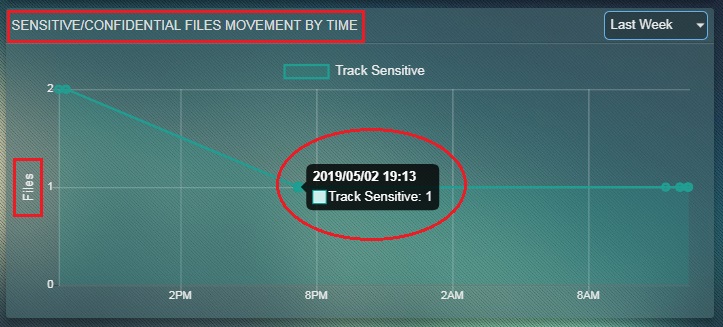 This timeline graph displays the date and time at which the files where moved from the crystal eye network to an external location. The administrator can know the date, time and the number of files transferred out of the CE network by hovering the cursor over the graph points.
Note: The data can be filtered to gain insights of DLP incidents in the Last Hour, Last 3 Hours, Last 12 Hours, Last 24 Hours, Last 3 Days, Last Week, Last Month, and Last 3 Months.
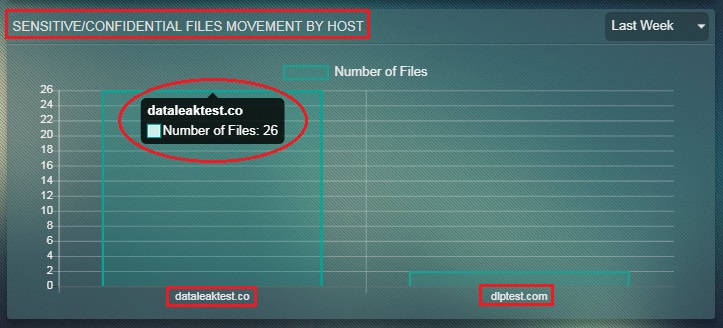
This bar graph shows the number of files uploaded to a particular host. The host name and the total number of files uploaded to the host will be displayed on hovering the cursor over the bar.
Note: The data can be filtered to gain insights of DLP incidents in the Last Hour, Last 3 Hours, Last 12 Hours, Last 24 Hours, Last 3 Days, Last Week, Last Month, and Last 3 Months.
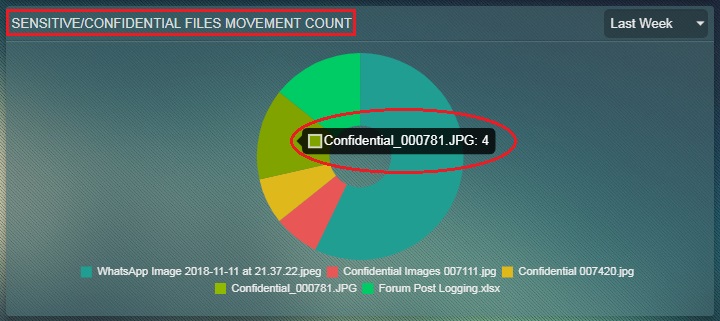
The pie-chart shows the name of the file and the number of times it was transferred out of the CE network. The file name and the count of file movement out of the CE network is displayed on hovering the cursor over the pie-chart.
Note: The administrator can retrieve Sensitive/Confidential Files Movement Count related data for Last Hour, Last 3 Hours, Last 12 Hours, Last 24 Hours, Last 3 Days, Last Week, Last Month, Last 3 Months or ALL.
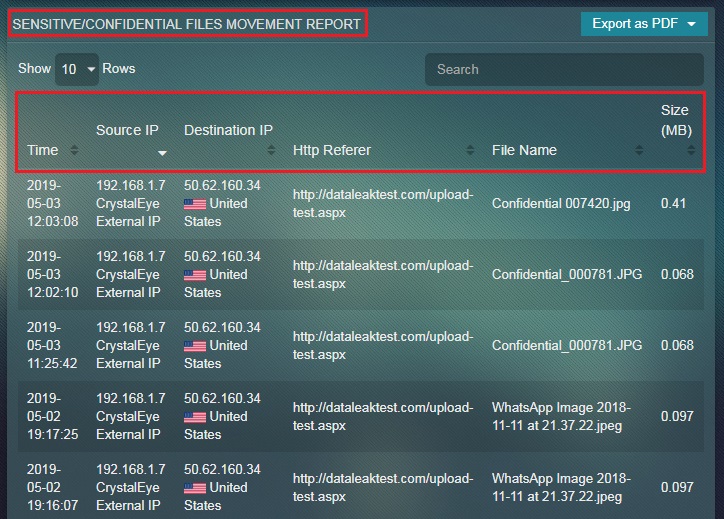
The tabular report shows the details of the sensitive or confidential files transferred outside the CE network.
- Time: This column shows the Time at which the file was transferred.
- Source IP: This column shows the IP address from where the files originated while being transferred outside the network.
- Destination IP: This column shows the IP address of the computer to which the files were sent to.
- HTTP Referrer: This column shows the HTTP header field that identifies the address of the webpage (i.e. the URI or IRI) that is linked to the resource being requested.
- File Name: This relates to the file naming convention.
- Size: This relates to the file size.