Forensic Logging
The Forensic Logging app plays a vital role in recording forensic logs and allows administrators to perform manual and automatic backup of these logs. This app generates forensic logs procured from various Crystal Eye applications such as BackupPC, Antivirus, Content Filter, Intrusion Protection & Detection, Log Processing & Reporting, Packet Inspector and Web Proxy Server.
The Automatic Backup can be scheduled with the help of the backup scheduler where the administrator can select the Backup Target and can schedule backup daily, weekly, or monthly. The CE configurations can be stored locally, RP Cloud, dedicated server, Azure, RP Blockchain or in a USB device. These options shed light on the various backup targets that the administrator can choose to determine where the backup data is to be stored.
Various alerts can be monitored by setting up and activating the email notification feature. Manual Backup feature can be used to perform Full Backup, Incremental Backup or Differential Backup. Another important aspect of the Manual Backup is a niche option to create and store encrypted backup file.
The Archives section provides the much needed convenience while performing the restoration process as it provides leverage to administrators to download files from any computer that is connected to the CE.
Why Create Backup of the Forensic Logs Generated through Crystal Eye Apps?
The Forensic logs generated from various apps installed in the CE appliance can be used to analyse the root cause of security incidents. In some business domains keeping these logs to the auditors are a part of a pre-defined compliance policy. Some of the other reasons for a company to opt for a policy that requires storage of CE apps forensic logs could be providing evidence of a cyber attack done with a criminal intent and detecting vulnerability that might have possibly paved the path for the cyber security incident. These logs can also be a matter of importance while analysing and tracking the activities of employees.
The Forensic Logging application is installed by default and can be accessed from the left-hand navigation panel.
Left-hand Navigation Panel > Compliance Controls > Network Backup > Forensic Logging 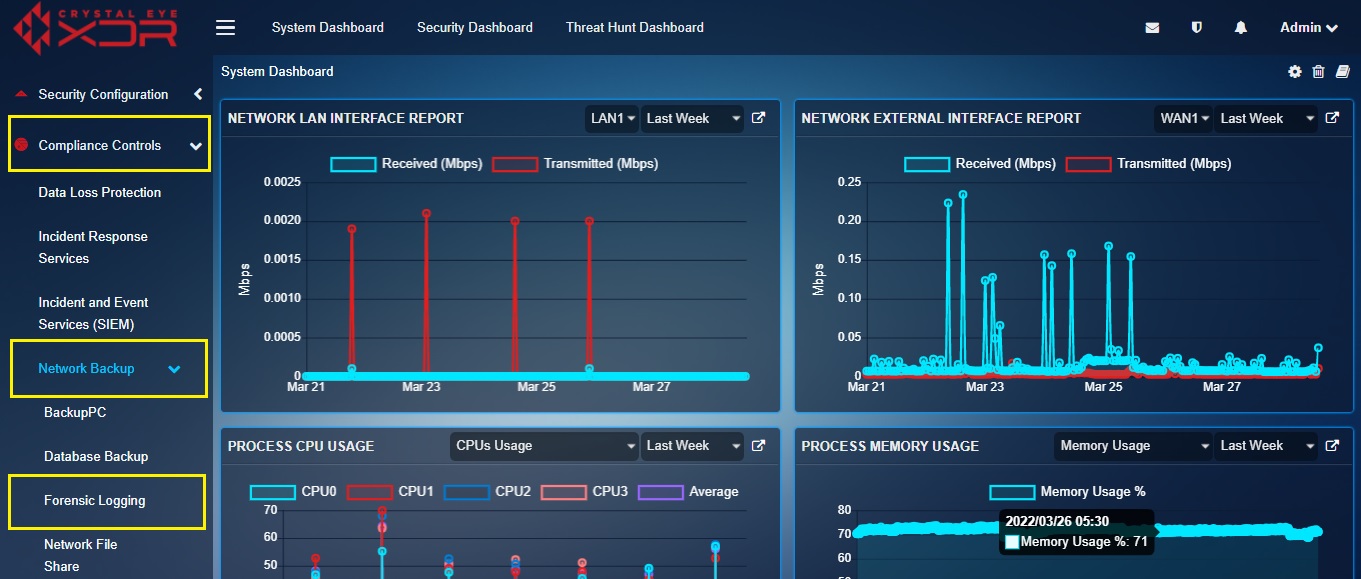 |
|---|
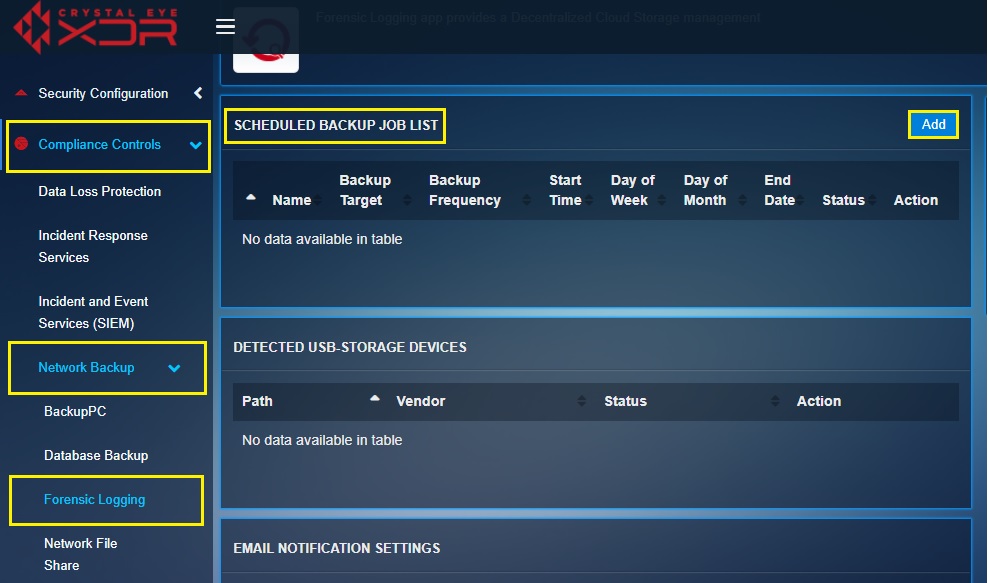
The Scheduled Backup Job List section is an integral component of the Automatic Backup Scheduler feature of the Forensic Logging App. A pre-defined backup schedule can easily be created and can be set to roll-off backups Daily, Weekly or once a Month. The convenience levels from the users point of view is further attributed through the flexible Backup Target options. These Backup Targets include Local Backup, RP Cloud, Own Server, Azure, RP Blockchain and USB Device.
Note: Backup Targets are the locations where the data is stored after performing the backup procedure. The backup targets may vary as per requirements. The Crystal Eye’s Forensic Logging App provides the option to the administrator to choose the location at which the backup files must be stored. This location of the Backup Target can either be Local Backup, RP Cloud, Own Server, Azure, RP Block Chain or USB Device.
How to Schedule CE Application Forensic Logs Backup Task Using the Automated Backup Scheduler?
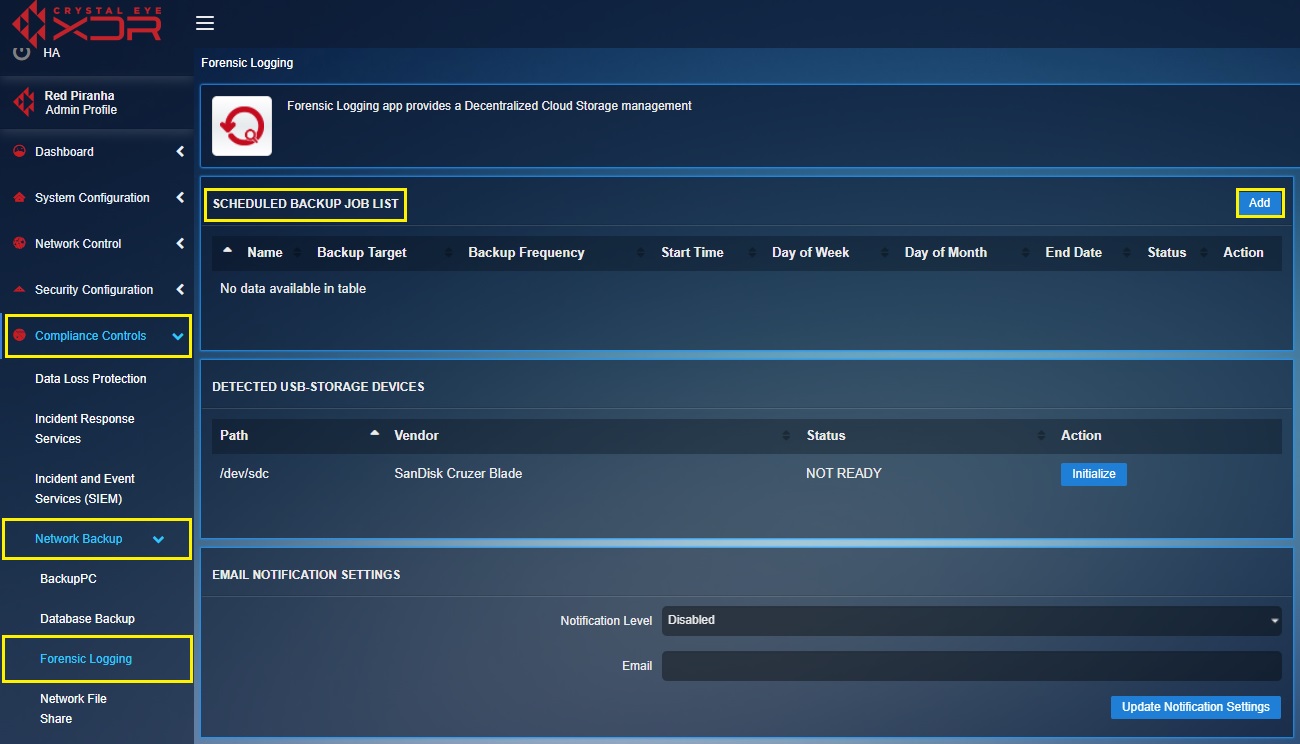
Step 1: In the Forensic Logging Application page, click the Add button under the Scheduled Backup Job List section.
Step 2: You will now see the Schedule Backup section. Enter the Name for the scheduled backup in the textbox.
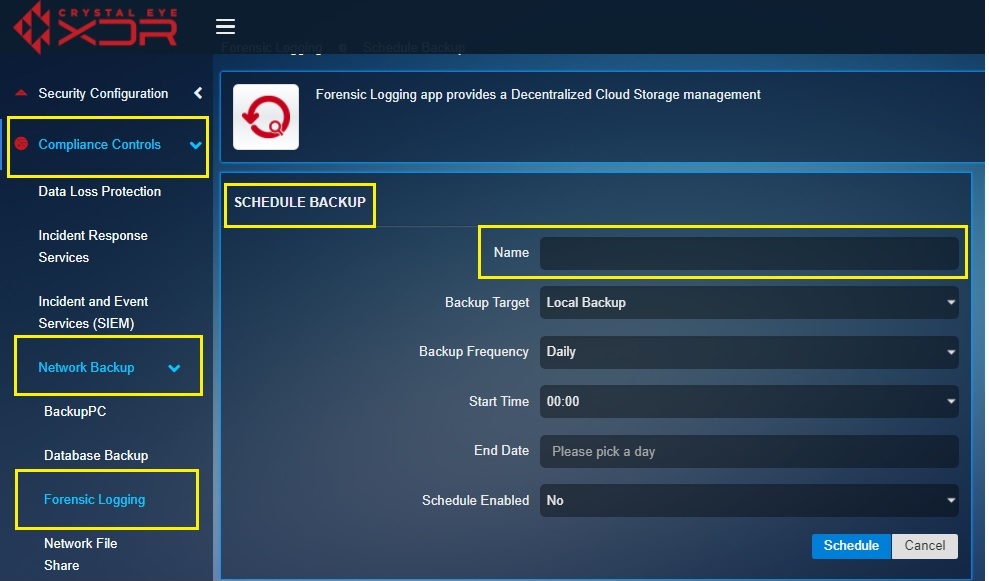
Note: Please enter schedule name without spacing.
Step 3: Select the Backup Target (backup storage location) from the dropdown.
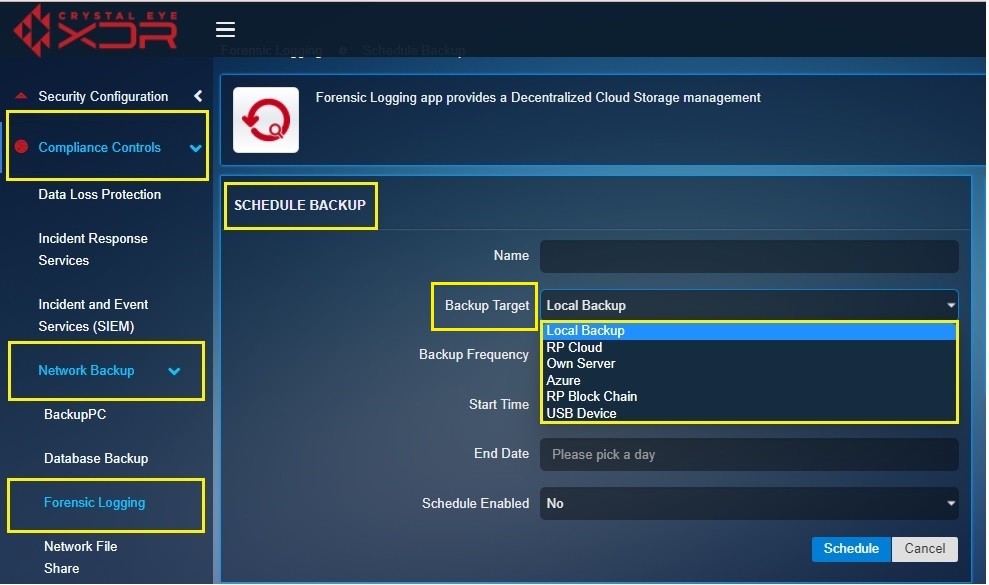
Note: Backup Target means the location at which the backup files will be stored. The administrator has the option to store the backup up files Locally, RP Cloud, Own Server, Azure, RP Blockchain and USB Device. Click here to understand the procedure to be followed if you want to store the backup files in the USB Device.
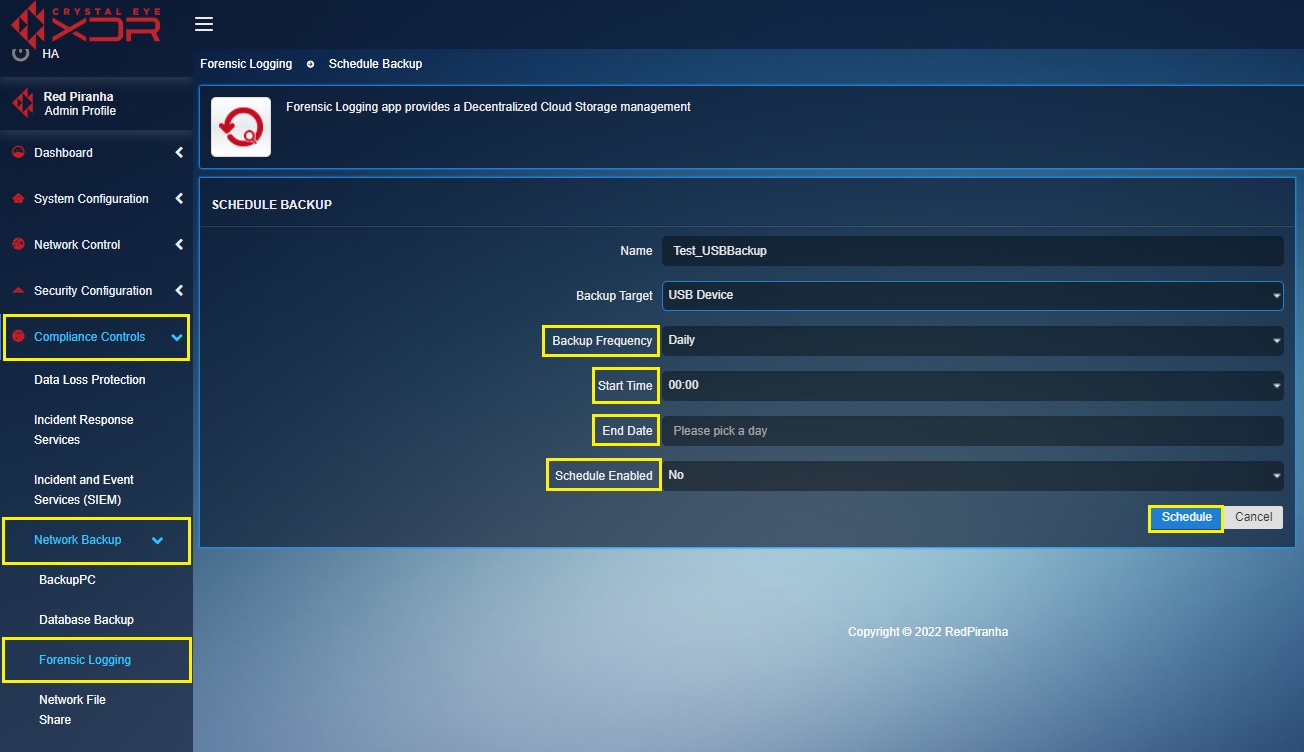
Step 4: Select the Backup Frequency from the dropdown.
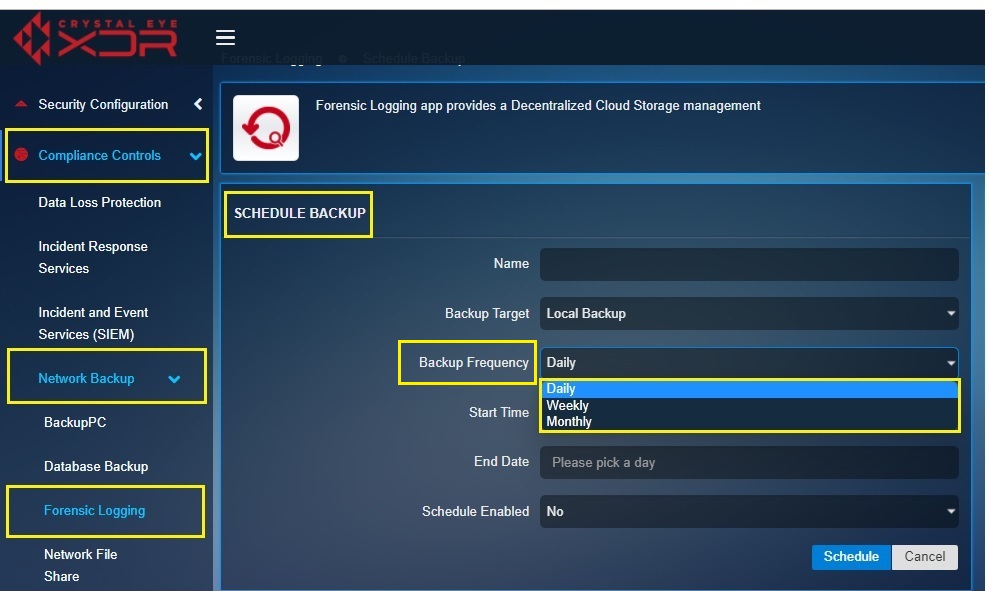
Note: The Backup Frequency can be set as Daily, Weekly or Monthly. The overall settings parameters will change as per the Backup Frequency.
| Perform the Following Steps if the Backup Frequency is Set Daily |
|---|
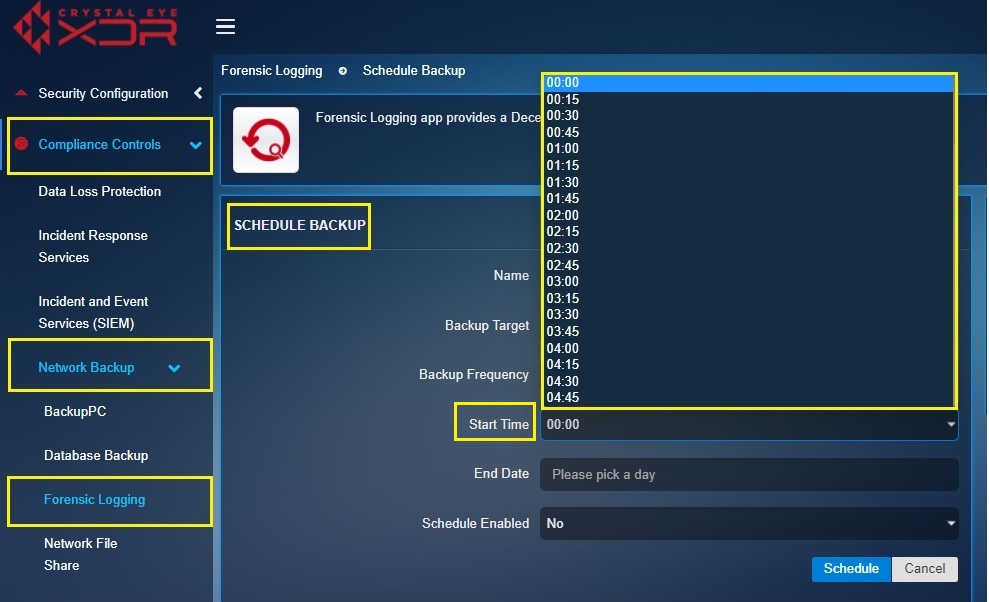
Step 5: Select the hour of the day for which the forensic logs scheduled backup is to be initiated from the dropdown.
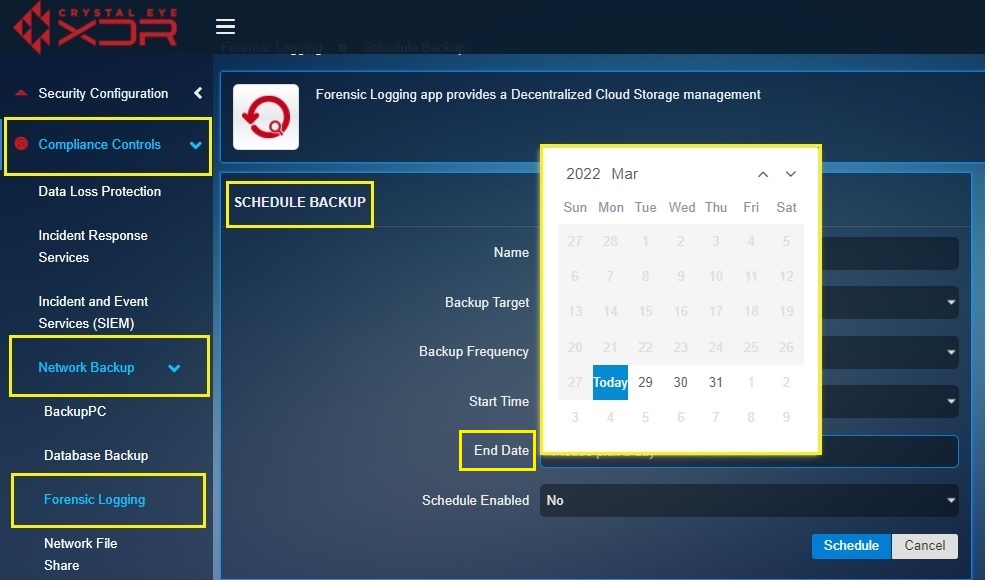
Step 6: Select the date beyond which the forensic logs scheduled backup is not required from the End Date dropdown.
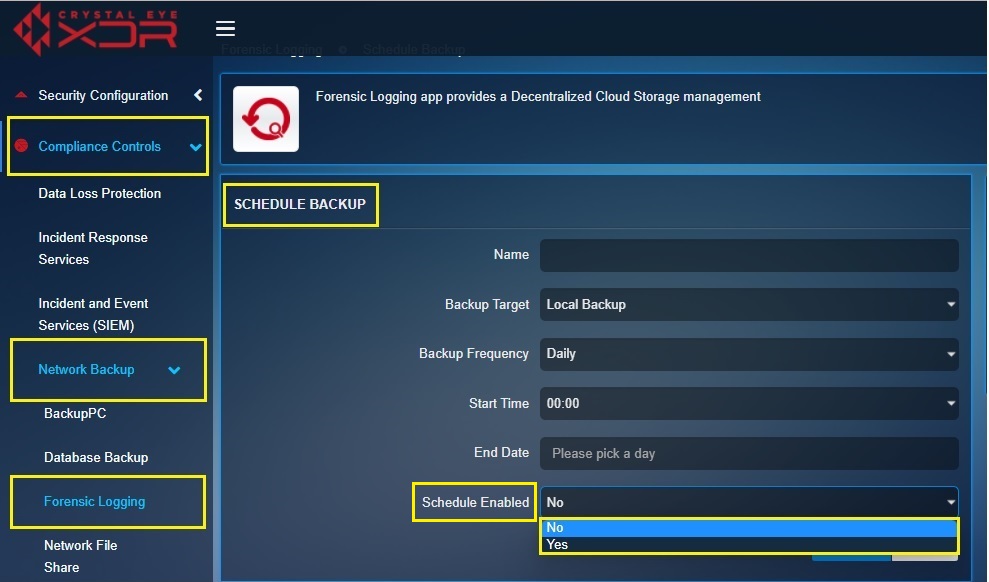
Step 7: Enable the Schedule from the Schedule Enabled dropdown and then click the Schedule button.
| Perform the Following Steps if the Backup Frequency is Set Weekly |
|---|
Step 8: Select the hour of the day the backup is required to be scheduled from the Start Time dropdown.
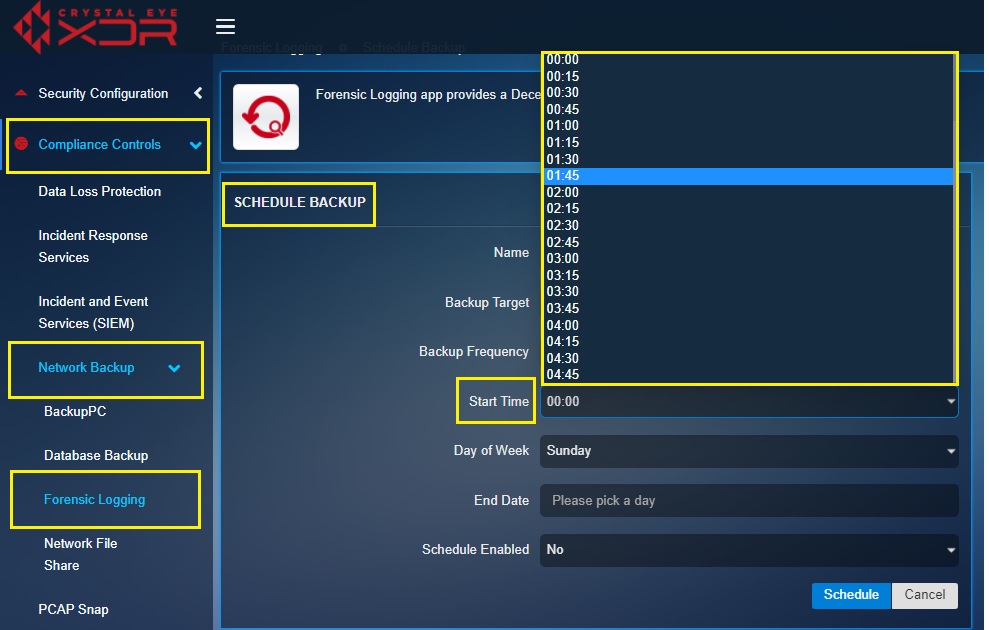
Step 9: Select the Day of the Week on which the backup needs to be done.
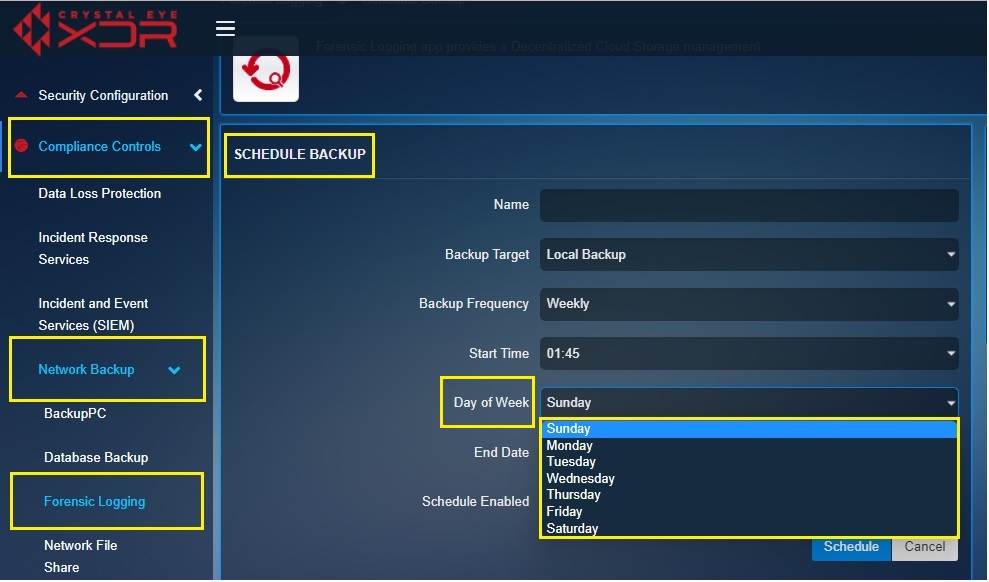
Step 10: Select the date beyond which forensic logging backup is not required from the End Date Calendar.
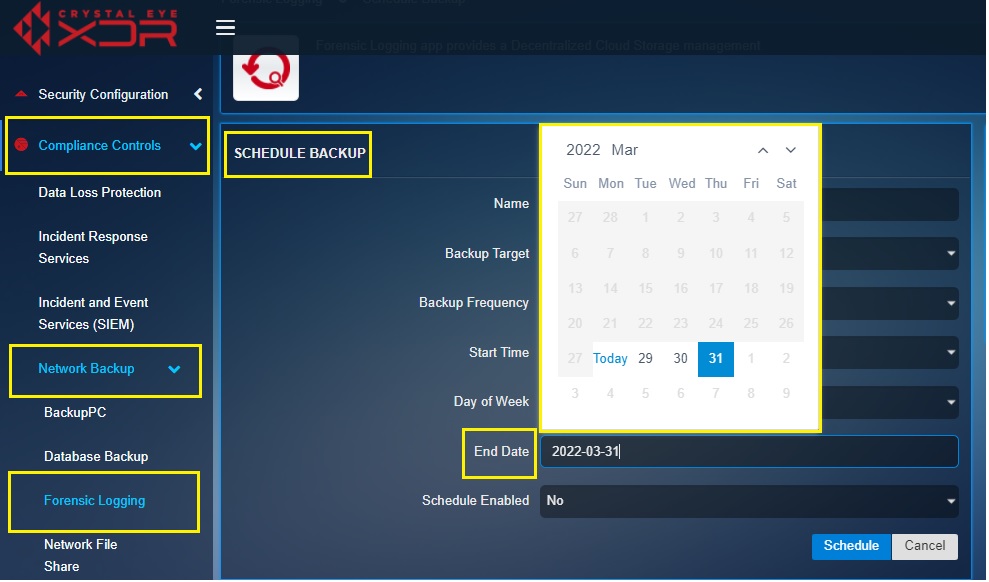
Step 11: Enable Schedule from the dropdown and click the Schedule button.
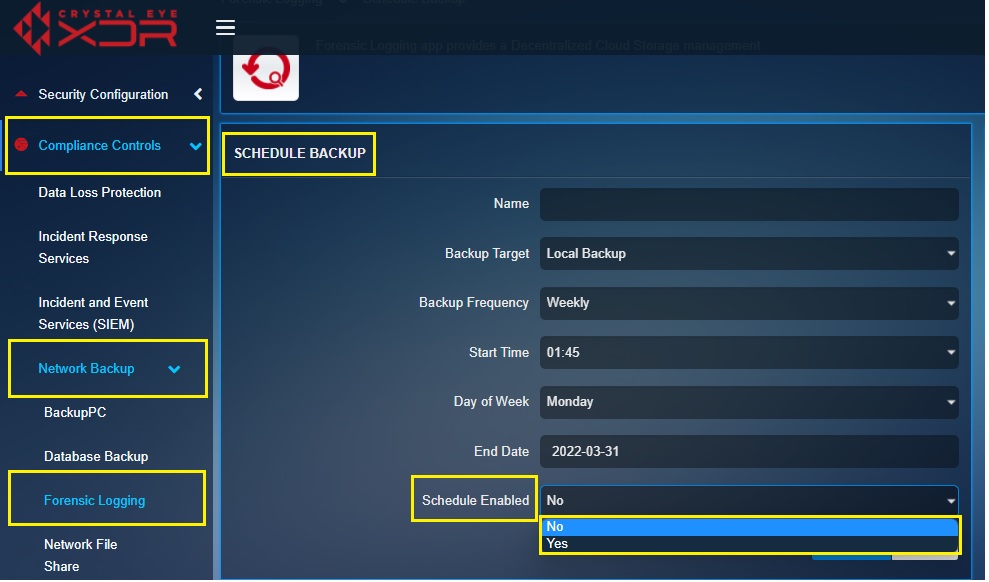
| Perform the Following Steps if the Backup Frequency is Set Monthly |
|---|
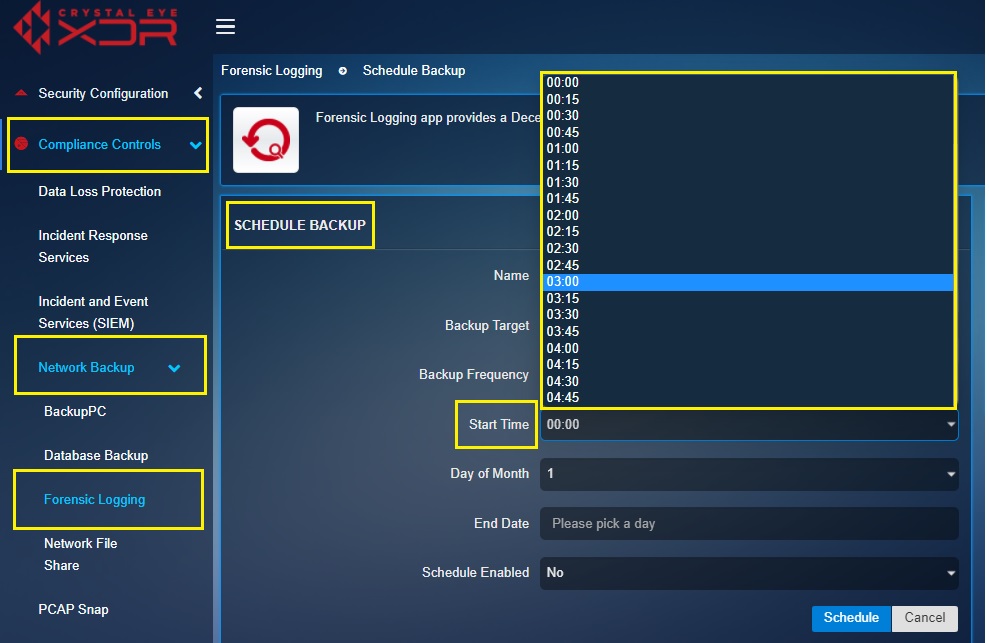
Step 12: Select the hour of the day the backup is required to begin from the Start Time dropdown.
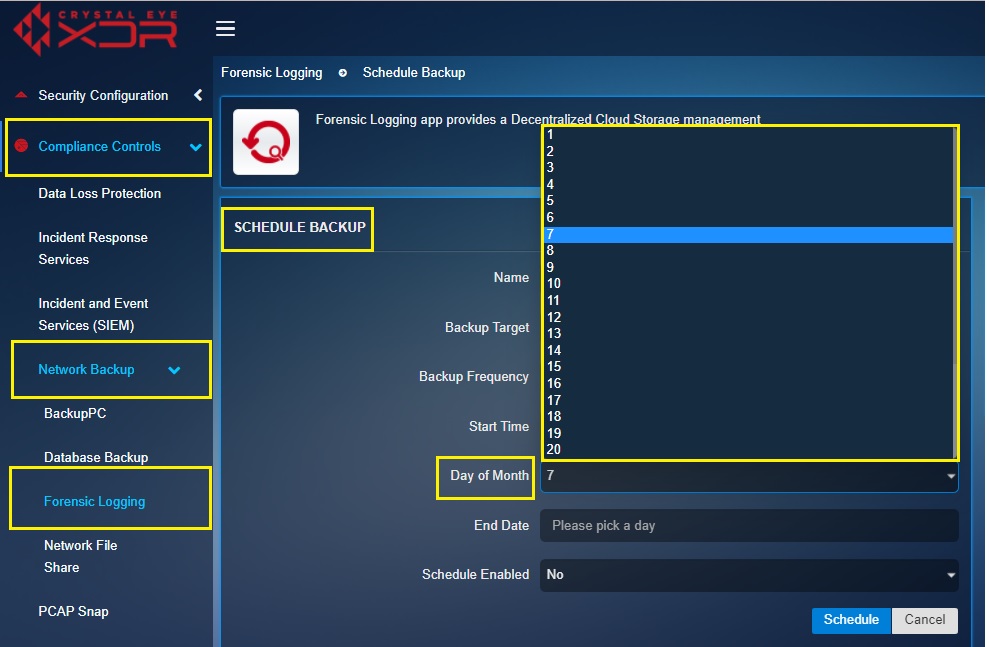
Step 13: Select the Day of the Month on which the backup is meant to initiate.
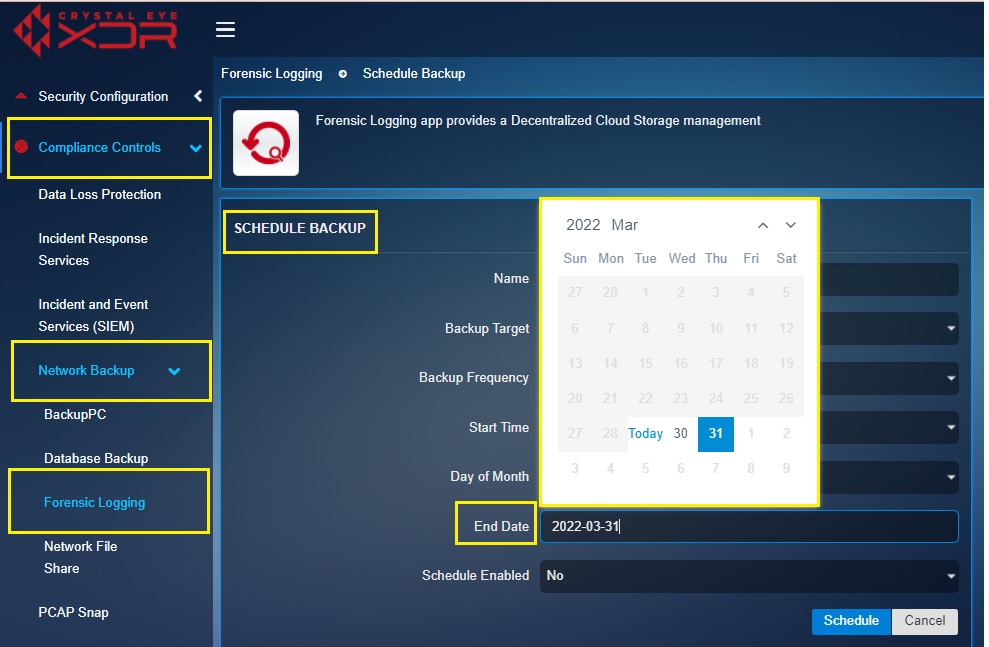
Step 14: Select the Date beyond which the backup is not required from the End Date Calendar.
Step 15: Enable the Schedule and click the Schedule button.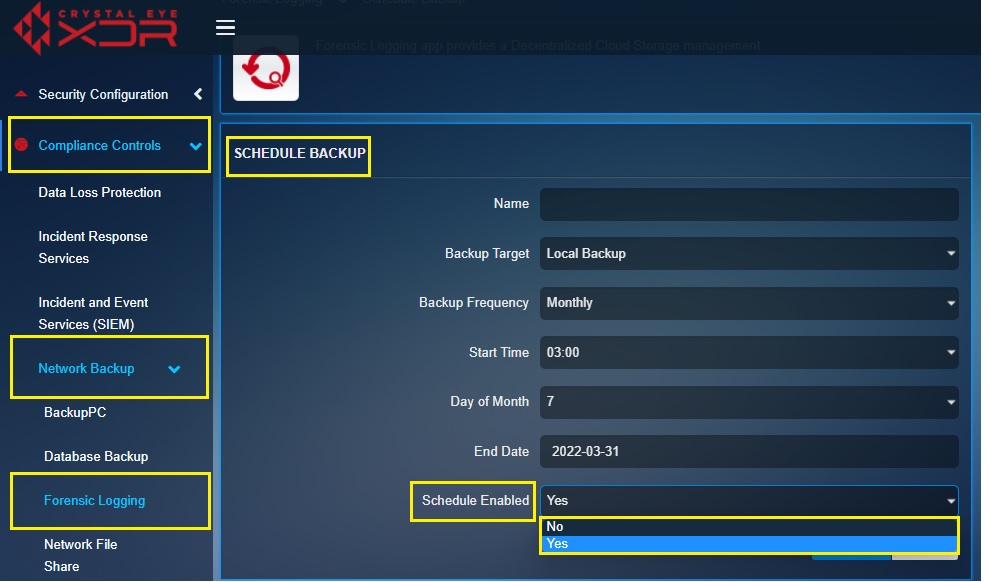
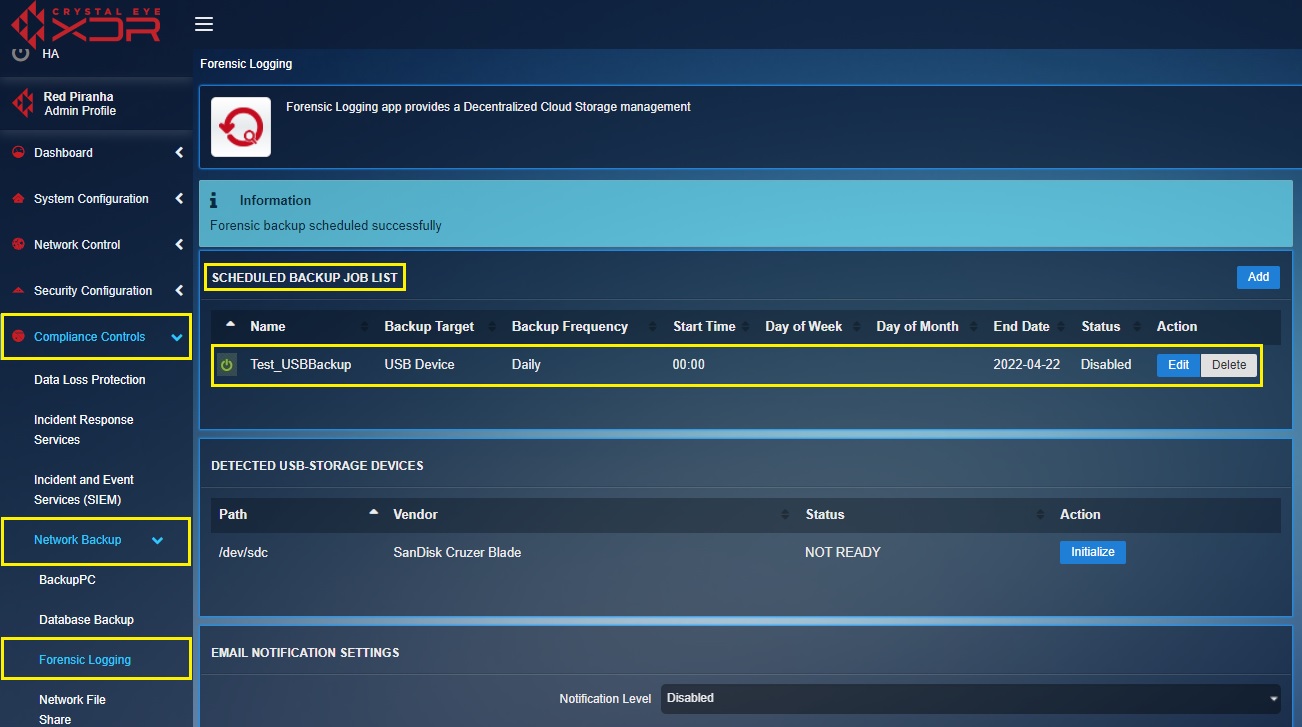
You will now see the newly created schedule in the Scheduled Backup Job List. This list would show the name of the scheduled backup, the backup target, backup frequency, date and time details of the backup and the schedule status.
Note: Once the backup schedule is executed the Crystal Eye application forensic logs gets stored to the designated backup target. After this, the details would essentially be displayed in the Archives section under the selected Backup Target tab.
The forensic logs can be saved and a backup for the same can be created through the auto scheduler and the backup files can be stored to a USB Device.
How to Create a Scheduled CE Application Forensic Logs Backup on a USB Device?
Step 1: Plugin the USB Device to the Crystal box.
Step 2: Refresh the webpage to view the details of the USB Device. View the details under the Detected USB-storage Devices section.
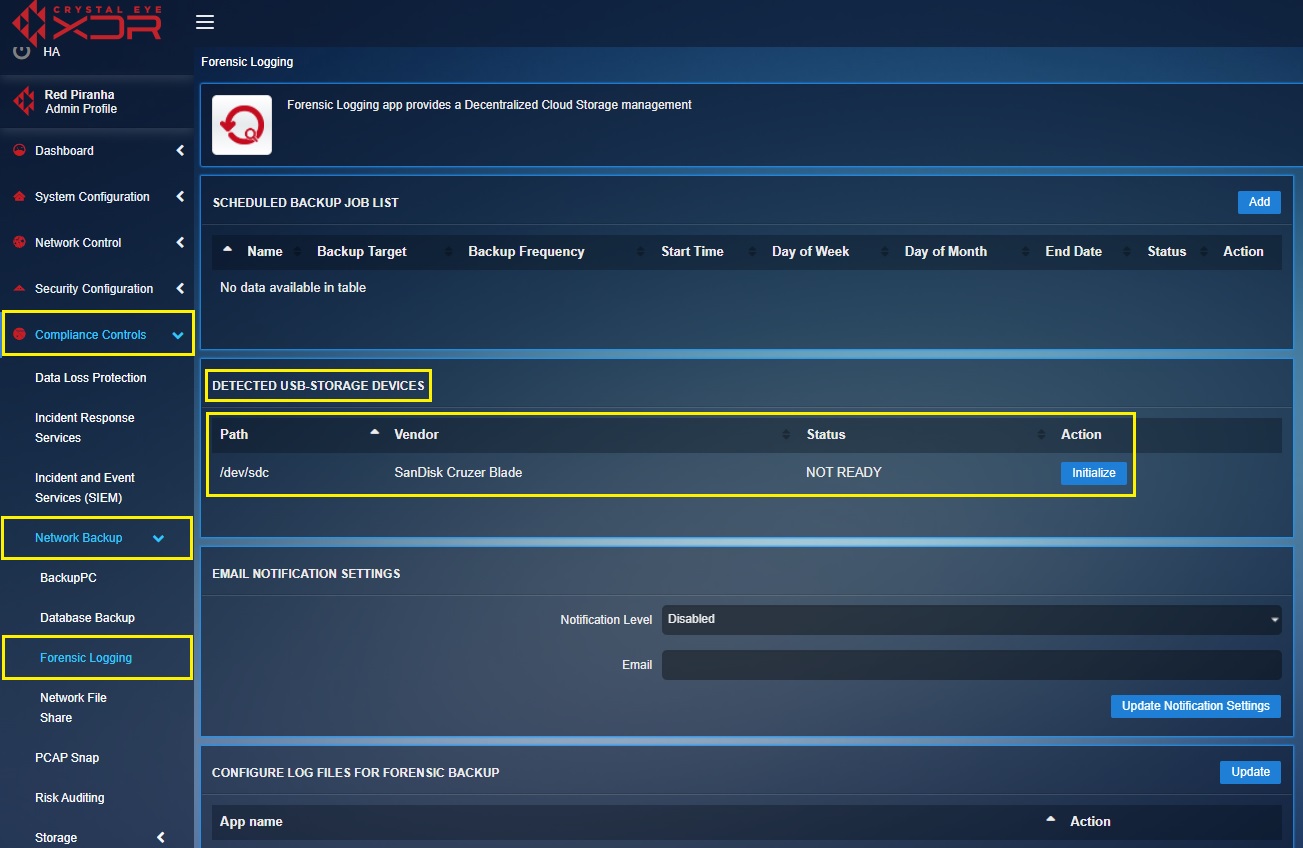
Step 3: Now click the Initialize button under the Detected USB-Storage Devices section.
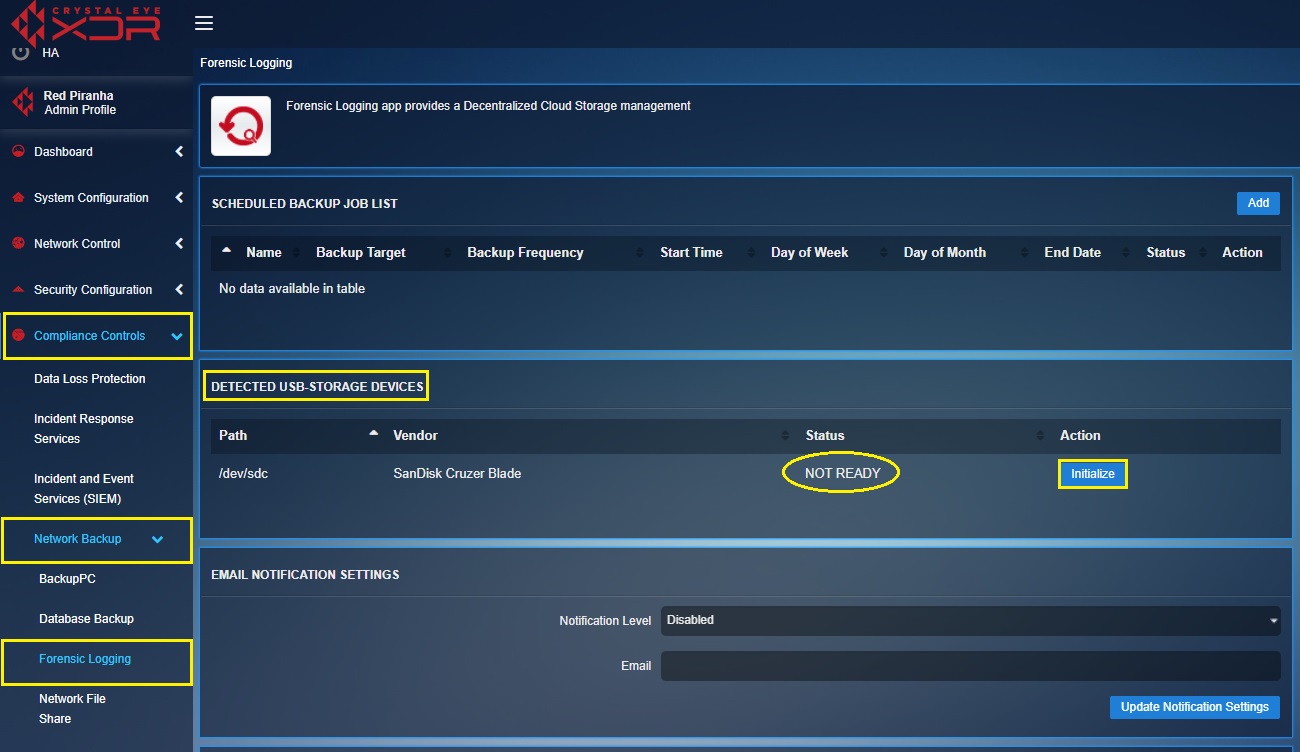
Note: The Not Ready Status sheds light on the fact that the USB device has not been used to store backup files before.
Step 4: You will now see the Confirmation Box. Click the OK button.
Note: By doing this, the connection between the USB Device and the Crystal Eye box would essentially initiate and you will see the message, “USB Initialized successfully” and the Status under the Detected USB-storage Devices would be ‘Ready’.
Step 5: Now, click the Add button under the Scheduled Backup Job List.
Step 6: You will now see the Schedule Backup page. Enter the Name in the textbox.
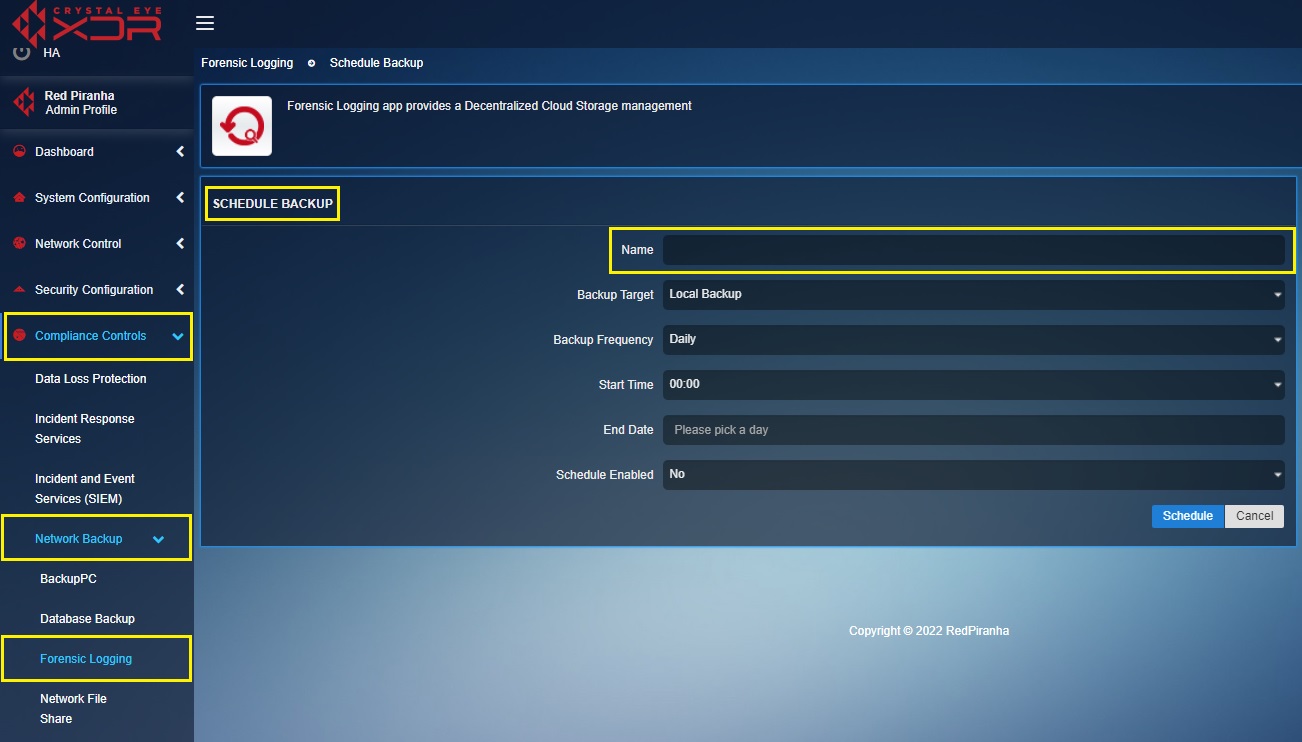
Step 7: Select the Backup Target (backup location) as USB Device from the dropdown.
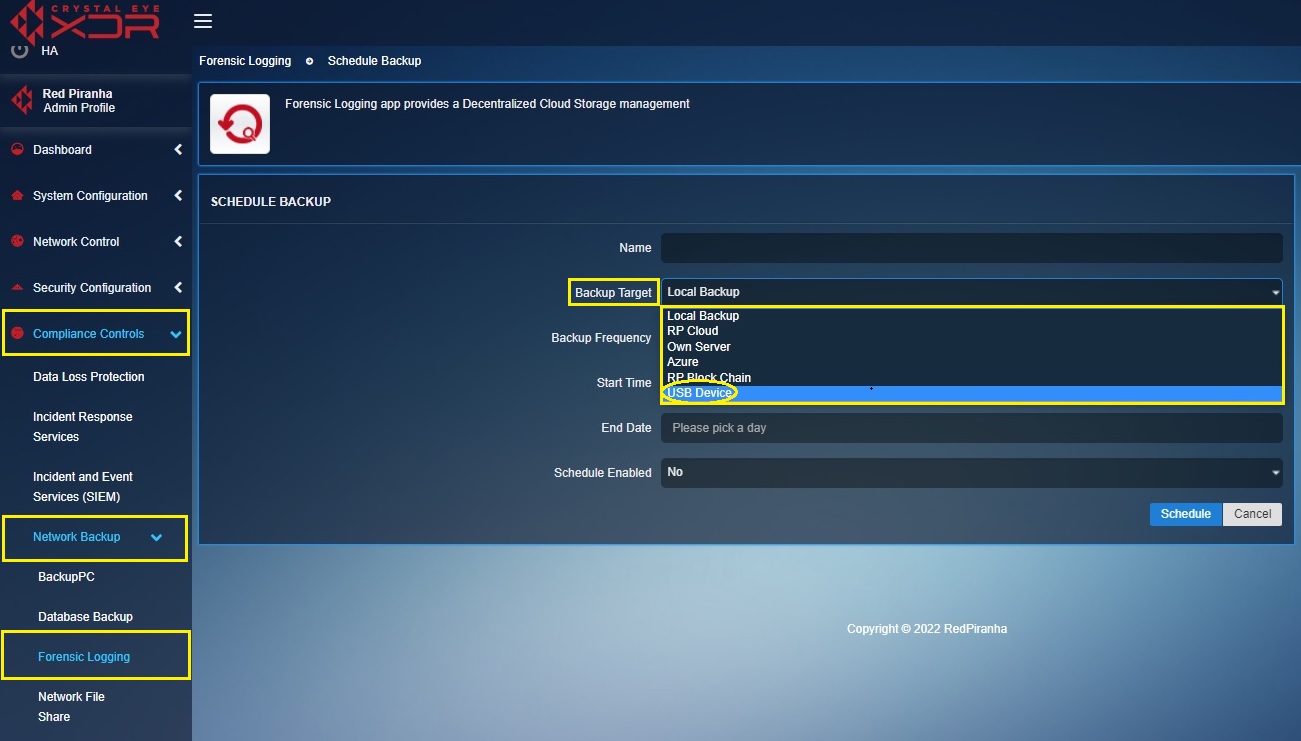
Step 8: Select the desired Backup Frequency and the time at which the backup is required. Enable the schedule and click the Schedule button.
You will now be able to view the scheduled forensic logs backup in the scheduled backup job list section. Refer to the screenshot below to view the forensic logs backup details.
The Email Notification Settings can be easily configured to send All Notifications or Only Errors & Warnings to the desired email address. Backup being a sensitive process, receiving email notifications regarding it and the possible errors related to backups could be very useful.
How to Configure Email Notifications to Receive Forensic Logs Backup Process Alerts?
Step 1: In the Forensic Logging application page, select the Notification Level from the dropdown.
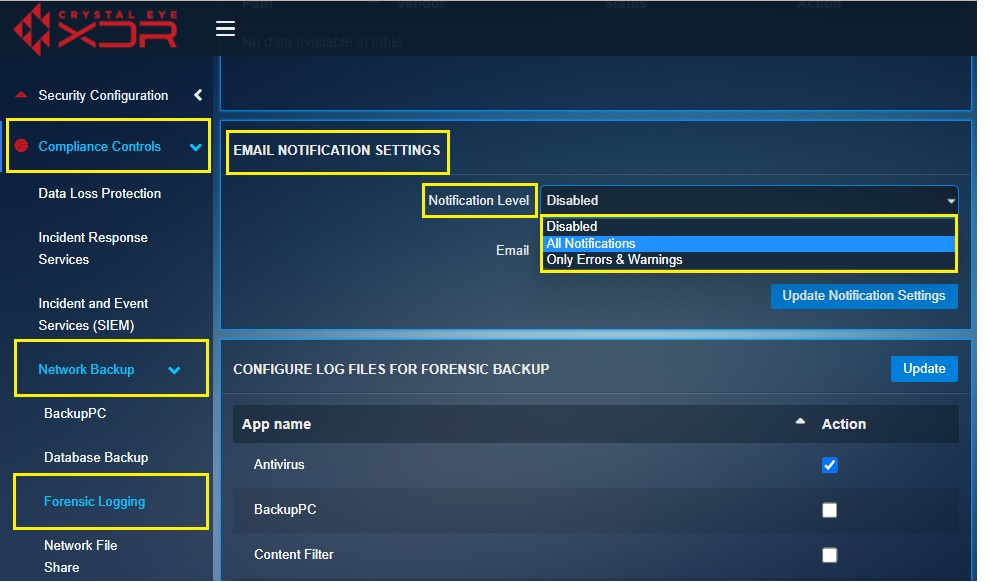
Step 2: Enter the Email Address in the textbox and click the Update Notification Settings.
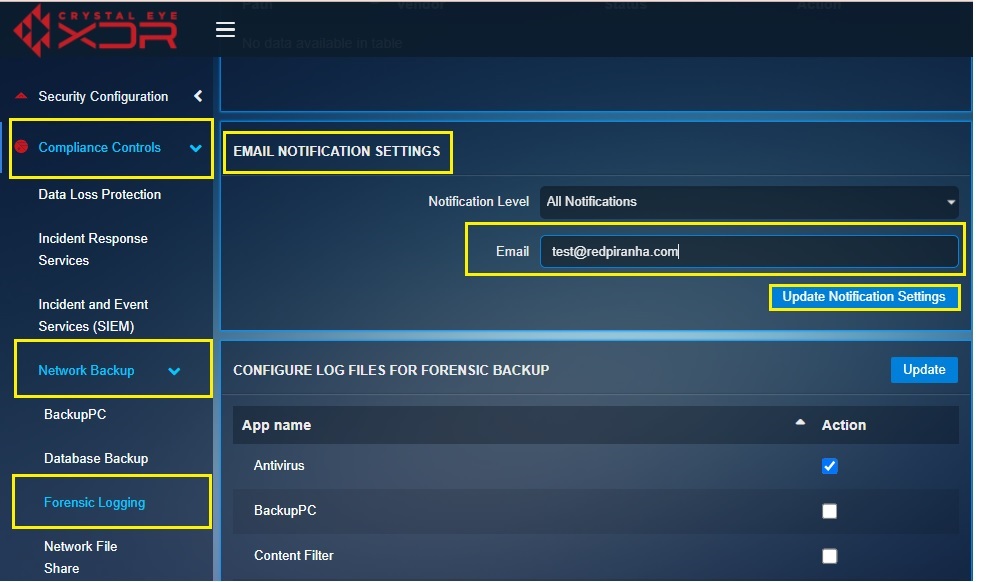
Crystal Eye’s Forensic Logging App provides log information derived from applications such as Anti-virus, BackupPC, Content Filter, Intrusion Protection & Detection, Log Processing and Reporting, and Web Proxy Server.
The administrators can choose the apps for which the logs are required by checking the tickbox as shown below.
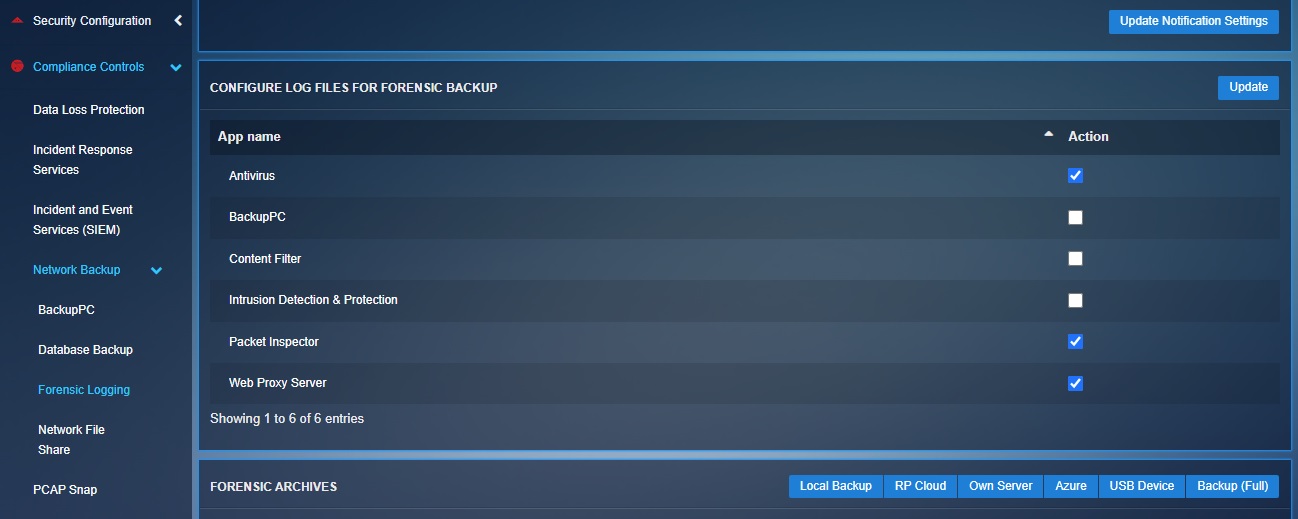
The Forensic Backup Archives displays the list of Crystal Eye app forensic logs that have been created periodically over a period of time. The archives dashboard displays backup files which were downloaded to backup targets.
The CE configuration backup files are categorized to five categories based on the locations they are saved in. These categories are as follows:
- Local Backup
- RP Cloud
- Own Server
- Azure
- USB Device