Backup PC
Backup PC app is a performance centric and user-friendly tool having an array of functions allowing administrators to make automatic backup of all file formats available in a computer. The plug and play feature of the app makes it user friendly and easy to install and configure.
The app supports a range of operating systems such as Linux, Unix, MacOSX and Windows. Administrators can also schedule a backup and set a time interval for the same. The app is built to accommodate automatic backup which can long for a maximum of 7 days. The app is designed in such a way that the first scheduled backup of the week is a full backup and the rest are incremental backups. This helps in saving storage space and also results in taking less time for each backup.
Note: The Backup PC application will not function if the Crystal Eye appliance does not have an external storage.
The Backup PC application is installed by default and can be accessed from the left-hand navigation panel.
Left-hand Navigation Panel > Compliance Controls > Network Backup > Backup PC  |
|---|
The process of configuring BackupPC starts with adding the host details of the client where the backup is required. The next phase of configuring this app involves scheduling the backup where the administrator specifies the operating system of the machine, its user credentials, name of the directory that requires backup, time and day of the backup schedule, and the backup storage details.
Note: The app has the capability to create backup of multiple files and directories in host machines running on operating systems like, Windows, Linux, Unix, and MacOSX.
How to Configure BackupPC app and Schedule a Backup?
Phase I – Add Host Details
Step 1: In the BackupPC application page, click the Start button in the box on the right end of the screen.

Step 2: You will now see the app status changed from Stopped to Running.

Step 3: Click the Add Host button in the Host Details section.

Step 4: You will now see the Host Setting page. Enter the Host Name/IP from where the backup has to be taken in the Host Name textbox.

Step 5: If the machine uses DHCP it needs to be specified in the DHCP dropdown as ‘Yes’ or ‘No

Step 6: Enter the machine domain User in the textbox.

Note: Avoid assigning administrator’s account as the machine domain user. Instead, it is advisable to create a new domain user for backup.
Step 7: You will now be able to view the added details in the Host Details section.
Phase II – Scheduling Backup
Step 8: Click the Schedule button of the host where the directory that requires backup is located.

Step 9: You will now see the Schedule page. Select the operating system of the machine from the Method dropdown.

Note: Crystal Eye’s BackupPC app supports various operating systems such as Linux, Unix, MacOSX and Windows.
Step 10: Enter the Password of the domain user of the added host.

Note: Avoid assigning administrator’s account as the machine domain user. Instead, it is advisable to create a new domain user for backup.
Step 11: Enter the name of the folders that requires backup in the Directory Name textbox and click the Update button.

Note: If you are using a Windows machine then the folders must be set to sharing mode. In order to do so, right click the folder and select Properties. Then go to Sharing, click the Advanced Sharing button, check the Share this Folder tick box and click the OK button. (However, if you are using a Linux machine no such configuration is required.) 
Step 12: You will now be directed to the Schedule page. Select the Start Time, End Time, the Days on which the backup is required and click the Update button.

Step 13: You will now see the Schedule app page. Select required backup location in the Backup Storage dropdown and click the Update button.

Note: The BackupPC app supports four types of Backup Storage such as RP Cloud, Own Server, Azure and RP Block Chain.
Step 14: The backup schedule will now be visible in the Host Details section. You will now be able to see the assigned operating system of the backup machine and the scheduled time intervals and days.

How to Edit/Delete Host Details?
Step 1: In the Backup PC app page, click the Browse Host dropdown button and select Edit Host or Delete Host.

The Backup Summary provides details regarding various parameters of the backup such as number of times the backup is done, backup type (Full Backup or Incremental Backup), backup level, date and time of the backup, duration of the backup (mins), and how old is the backup with respect to the current date.
Note: The BackupPC app supports multi-level incremental backup. This means that the app has the capability to backup all the files that have changed since the most recent backup initiated at a previous stage. This feature of the app helps in reducing the backup duration.
Interpreting the Backup Summary section in the screenshot above:
- Backup – The backup number (example: 1st backup, 2nd backup, 3rd backup etc.)
- Type – The type of backup (Full Backup/Incremental Backup)
- Filled -
- Level – The level of backup determines whether it’s a full backup or an incremental backup. If the level is 0 then it’s a full backup. Level 1, 2, 3, 4, 5, 6, etc. shows the levels of incremental backup
- Start Date – The date and time of the full backup or incremental backup.
- Duration/mins – The duration of the backup.
- Age/days – This defines how old is the backup with respect to the current date.
How to View the Backup Summary of a Particular Host?
Step 1: In the BackupPC app page, click the Browse Host dropdown and select View Backups.!
Step 2: You will now see the Backup and Restore Summary Page. View the details of each backup initiated in the Backup Summary section.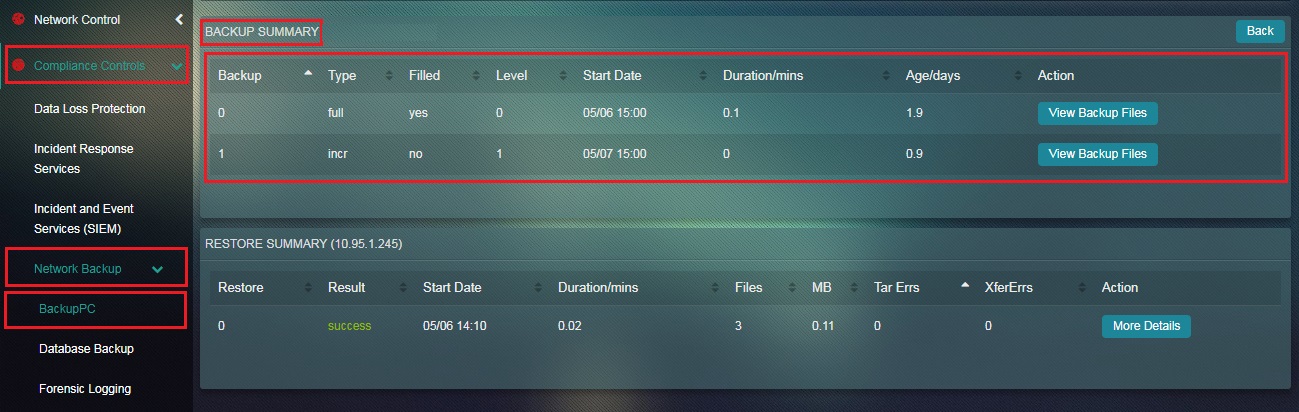
Note: Click here to view the detailed explanation of Backup Summary section.
If required, the details of the files and directories that are saved after the scheduled backup can be viewed. This functionality can be considered as an added advantage and lets the administrator know the name of the files, file size (bytes), file type, mode and the date/time of the backup.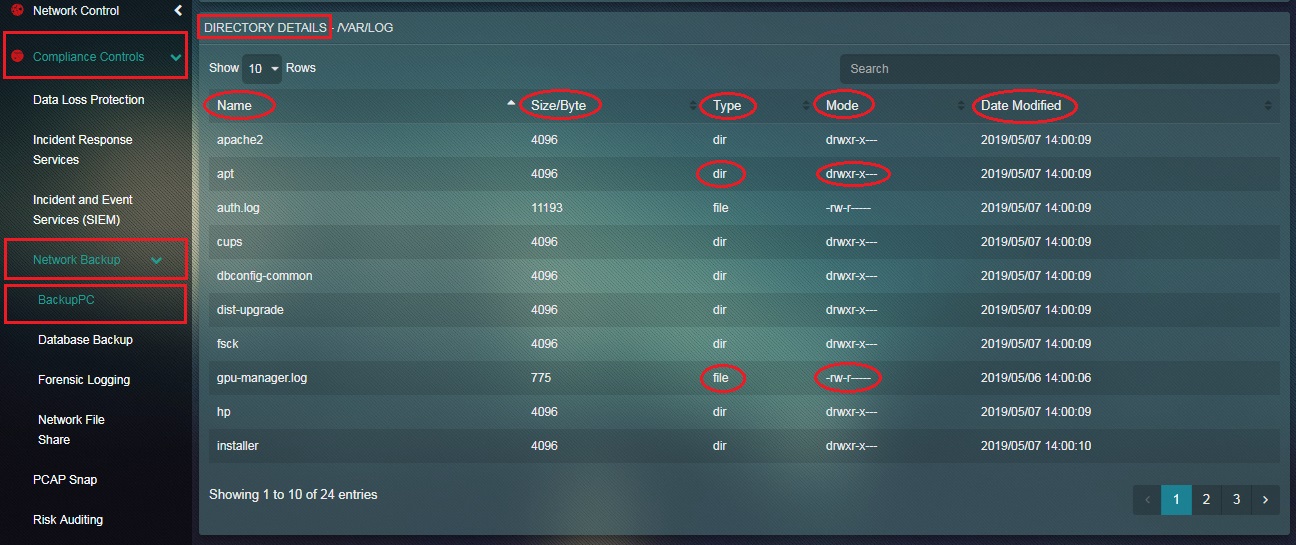
Interpretation of the backup files/directory section in the screenshot above:
- Name: The name of the files saved after the scheduled backup is executed.
- Size: The size of the directory or file measured in bytes.
- Type: The backup content is broadly categorized as dir (directory) or file.
- Mode: It defines the permission levels for a user and user groups to a particular directory or file.
| As highlighted in the above screenshot, “drwxr-x---“ stands for: |
|---|
"d" means the file is a directory. "rwx" means the directory's owner can list its contents, create new files within it, and descend into it. "r-x" means members of the directory's group can list its contents and descend into it.
| As highlighted in the above screenshot, “-rw-r-----“ stands for: |
|---|
"-" means the file is a regular file "rw-" means the file's owner can read from and write to the file "r--" means members of the file's group can read from the file
- Date Modified: The date and time at which the scheduled backup was initiated.
How to View the Backup Files/Directory Details?
Step 1: In the BackupPC app page, click the Browse Host dropdown and select View Backups. 
Step 2: You will now see the Backup and Restore Summary page. Click the View Backup Files button of the particular backup for which the files/directories is to be viewed. 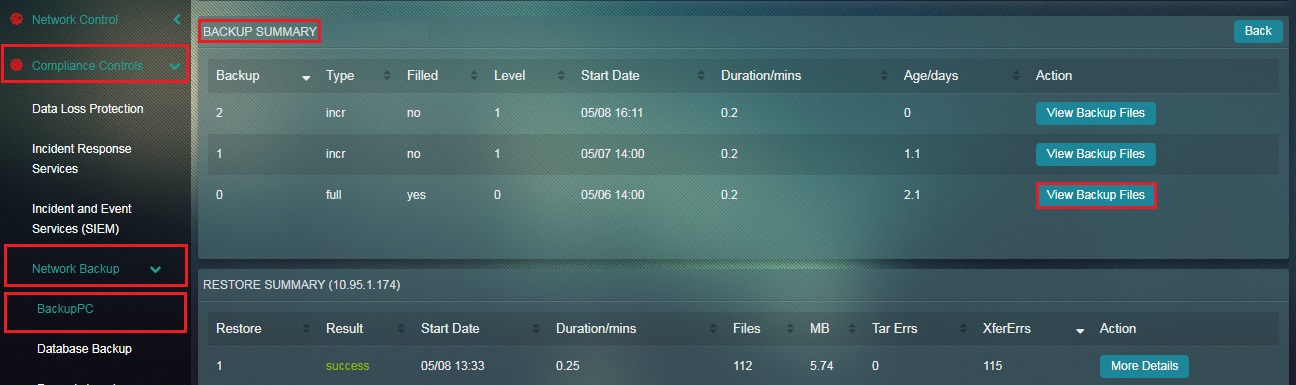
Step 3: You will now see the Backup File/Directory Details page. Click the directory hyperlink in the Backup File/Directory Details section. 
Step 4: The Backup files and directory details will now appear on the page. 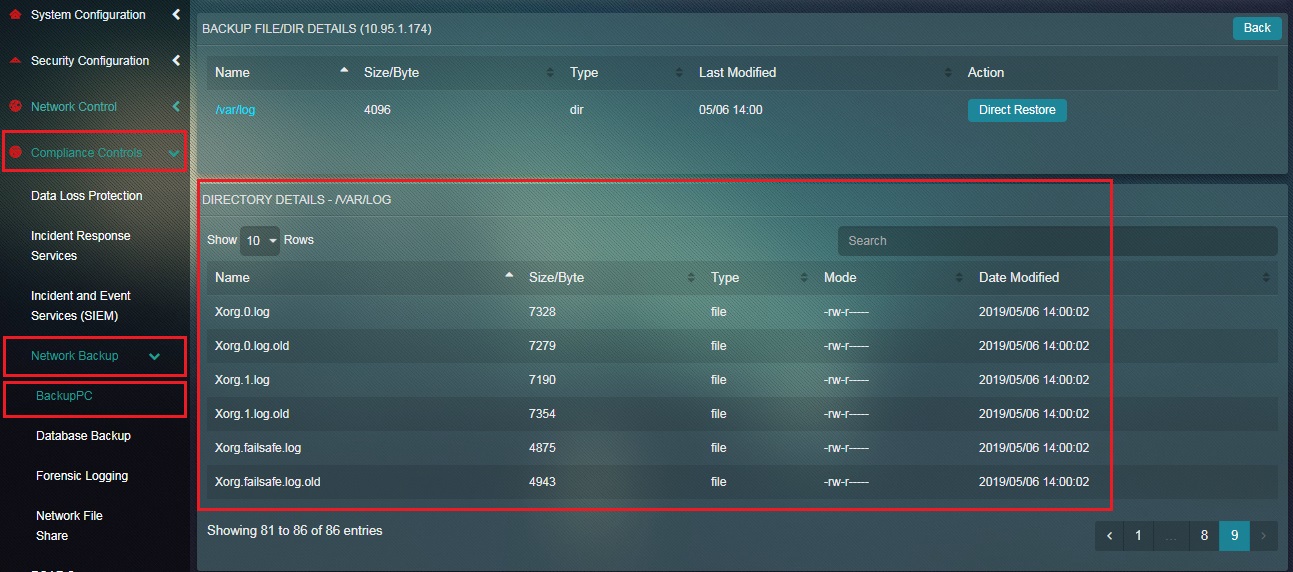
Note: Click here to view the detailed explanation of Backup Files/Directory Details section.