Active Directory Authentication
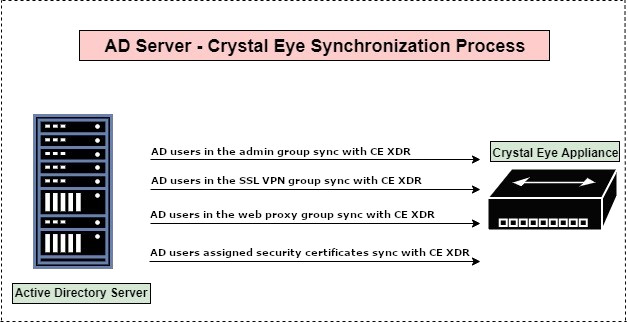
The Active Directory Authentication application allows the Crystal Eye XDR to be integrated with an Active Directory Server. Apart from being a bridge between the AD server and the CE XDR, it also makes things convenient as it eliminates any possible requirements of re-creating AD server users in the Crystal Eye XDR. This essentially means that once the synchronization process is done, the CE XDR grabs the users created in the AD server. The CE XDR administrator can provide the user admin privileges, SSL VPN access, web proxy access, and access to user certificates directly from the AD server further lessening the burden of redoing it in the Crystal Eye XDR.
The synchronization process involves entering AD server details in Active Directory Authentication application such as, Netbios Domain, Windows Domain, Domain Controller FQDN. The Domain Controller IP also needs to be fetched from the AD server and then entered in the DNS server application of the Crystal Eye XDR.
Upon entering the above details in the AD authentication application, the users created in the AD server auto-syncs with the CE XDR and gets displayed in the Accounts application under System Configuration.
Why Use the Active Directory Authentication Application?
- It reduces the administrative burden of re-creating users in the CE XDR which have already been created in the AD server.
- It enables Crystal Eye XDR administrators to assign users created in the AD server to explicitly have admin privileges, VPN access, web proxy access and user certificate access.
The Active Directory Authentication application is not available by default. It can be installed from Marketplace in the left-hand navigation panel.
Left-hand Navigation Panel > System Configuration > Account Manager > Active Directory Authentication 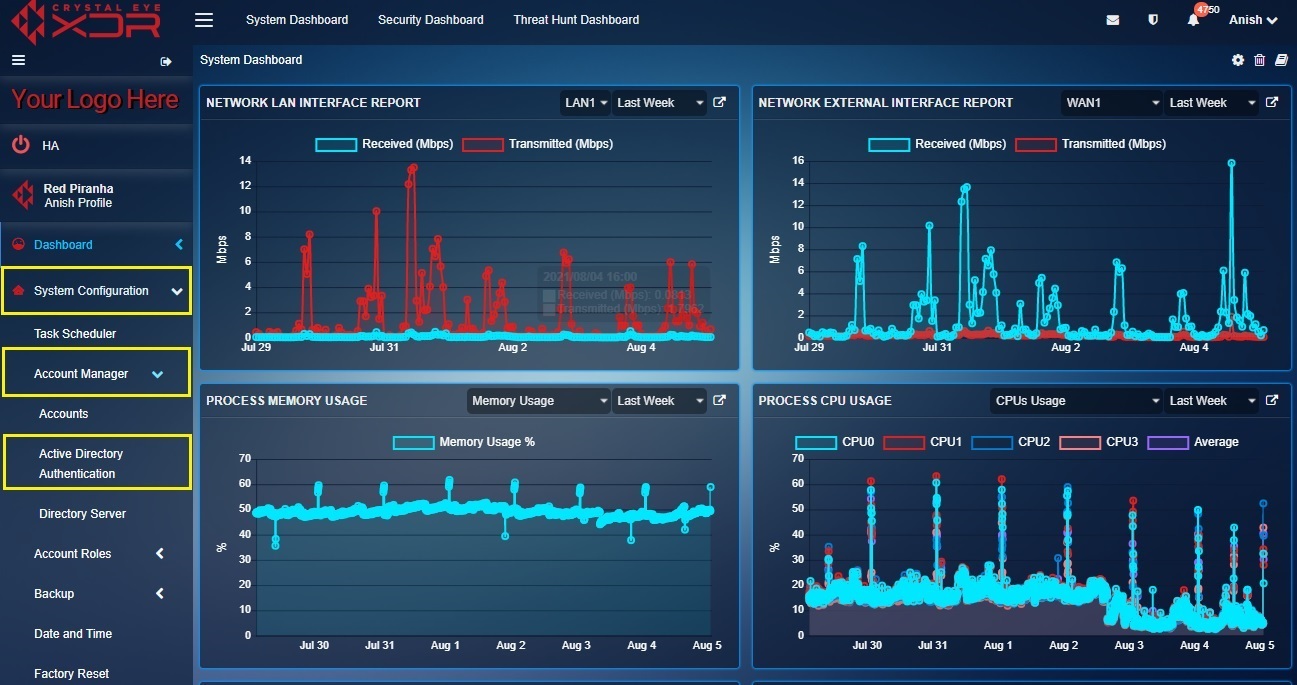 |
|---|
The Active Directory Authentication application authenticates users and groups created in the AD and display’s them in the Accounts application of the Crystal Eye XDR. However, CE XDR administrators can assign specific roles to the AD users before they are synced with the Crystal Eye XDR.
The following roles can be assigned to AD users:
- Provide admin privilege
- Provide VPN access
- Provide web proxy access
- Provide access to user certificate
In order to assign the above mentioned roles the CE XDR administrator would have to create four groups in the active directory server and name them rp_admin_group, web_proxy_plugin, openvpn_plugin, and user_certificates_plugin. Post this; users must be placed in the relevant groups based on the roles decided for them. For example, if a user is required to be given admin privileges in the CE XDR then the user must be aligned with rp_admin_group. Likewise, the user must be added to AD groups such as web_proxy_plugin, openvpn_plugin and user_certificates_plugin if there is a requirement to provide them with SSL VPN access, web proxy access and access to user certificates.
How to assign roles to users in the AD Server and sync with the Crystal Eye XDR?
Step 1: Create 4 user groups in the AD server namely, rp_admin_group, web_proxy_plugin, openvpn_plugin and user_certificates_plugin. Add the desired users to these groups.
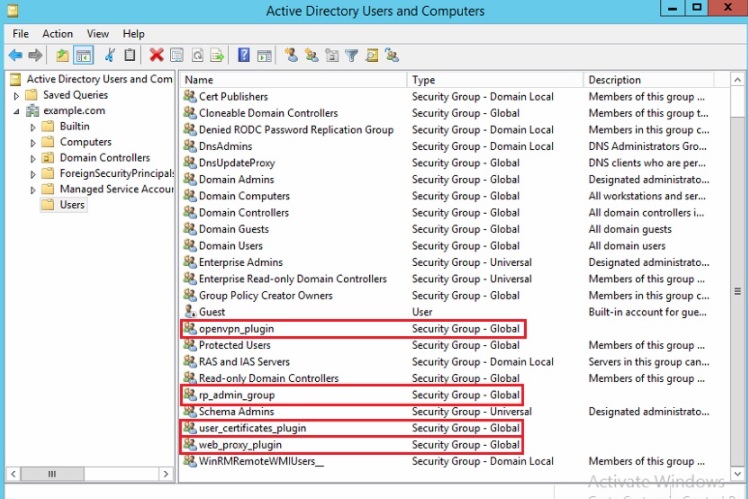
Note: Please make sure that users requiring admin access are added to rp_admin_group and similarly users requiring web proxy, vpn and user certificate access are added to groups named as web_proxy_plugin, openvpn_plugin and user_certificates_plugin.
You have now successfully assigned roles to the users in the AD server. Sync the AD users with the CE XDR by pursuing the following steps.
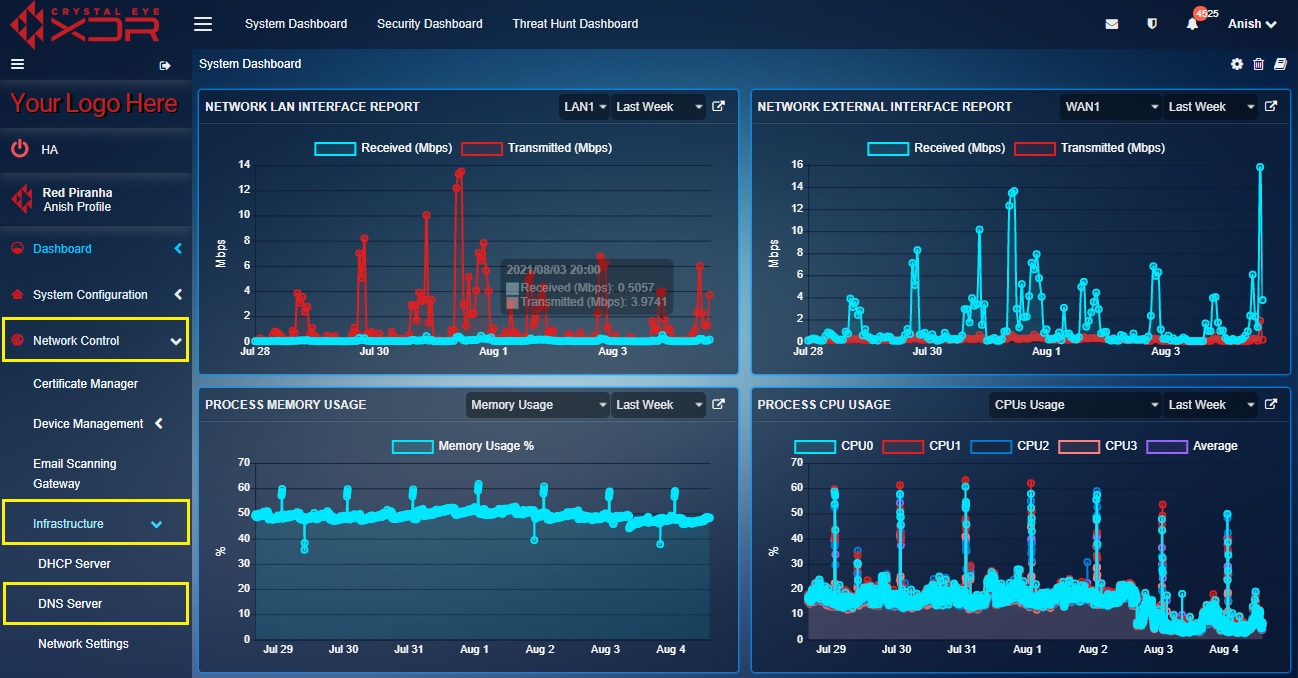
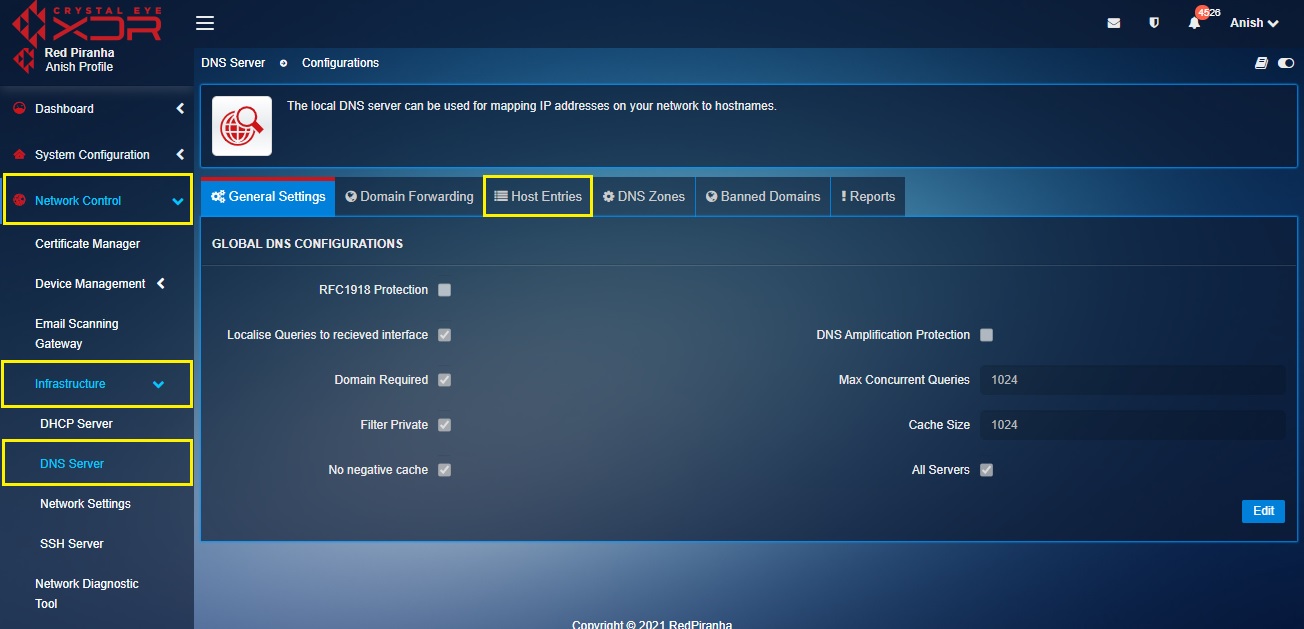
Step 2: Log into Crystal Eye XDR and go to Network Control > Infrastructure > DNS Server
Step 3: You will now be directed to the DNS Server application page. Click the Host Entries tab.
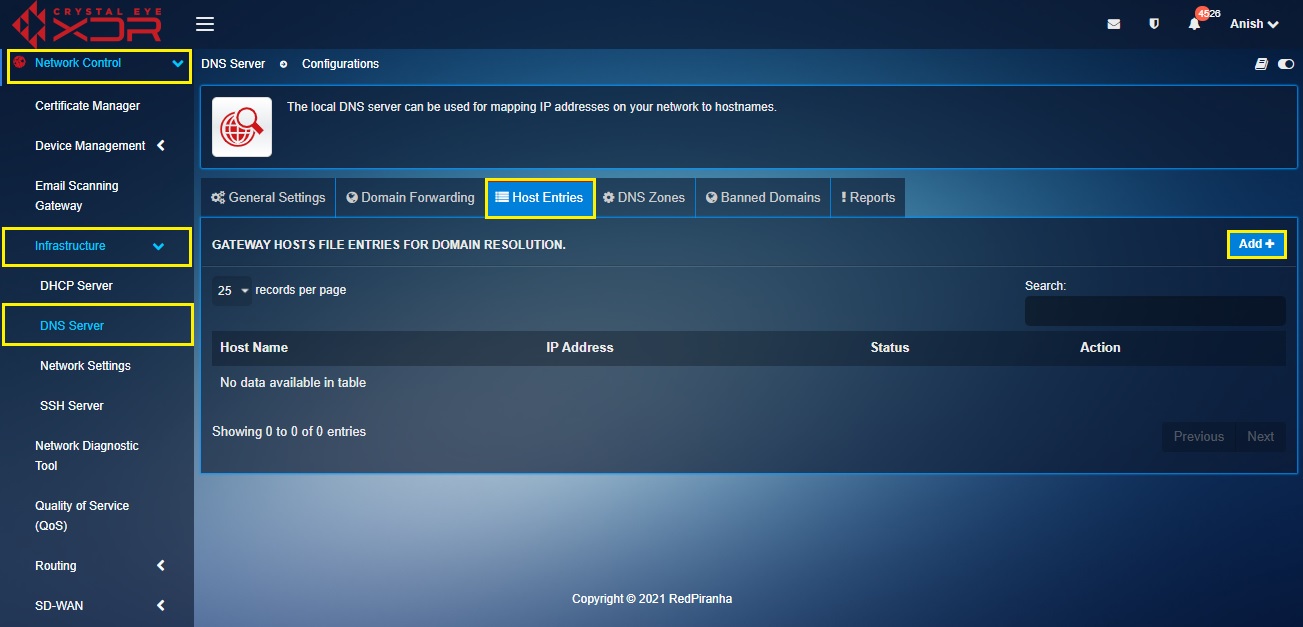
Step 4: You will now be directed to the Host Entries tab page. Click the Add button in the Gateway Hosts File Entries for Domain Resolution section.
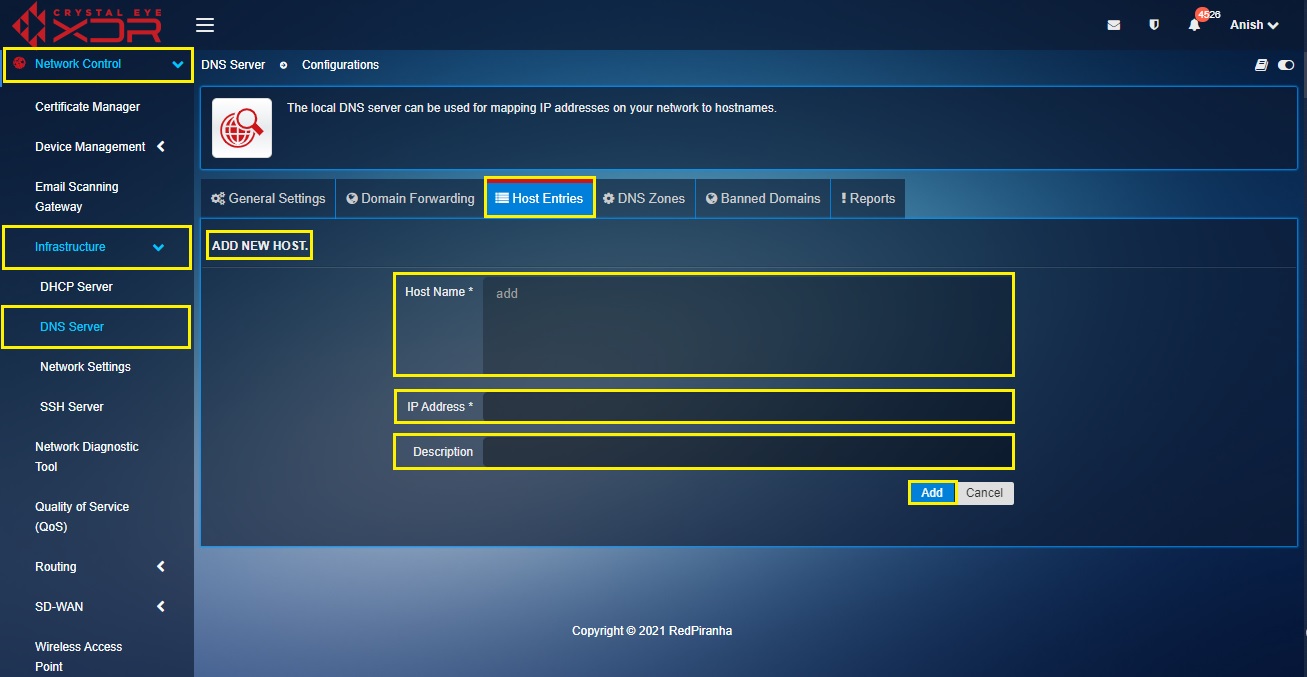
Step 5: You will now be directed to the Add New Host section. Enter the Domain Controller FQDN in the Host Name textbox and the Domain Controller IP in the IP Address text box. Enter a suitable Description and click the Add button.
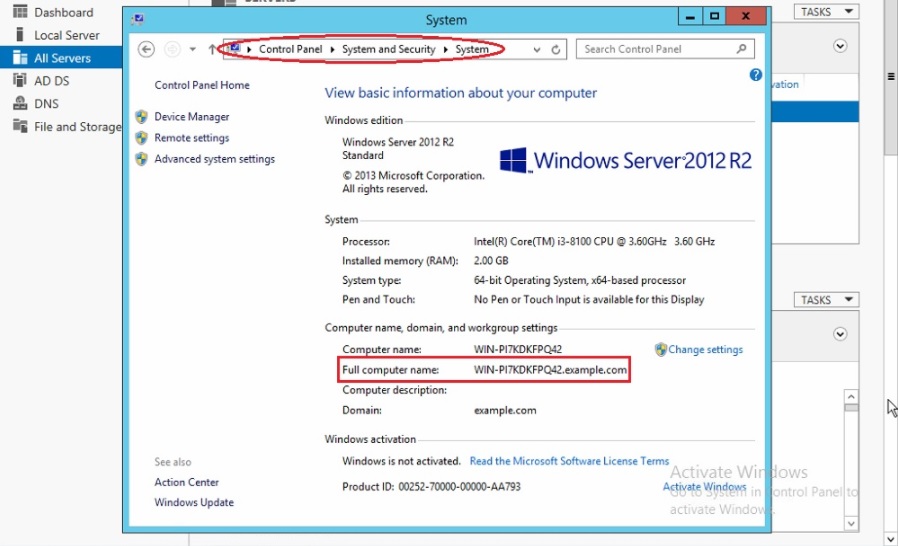
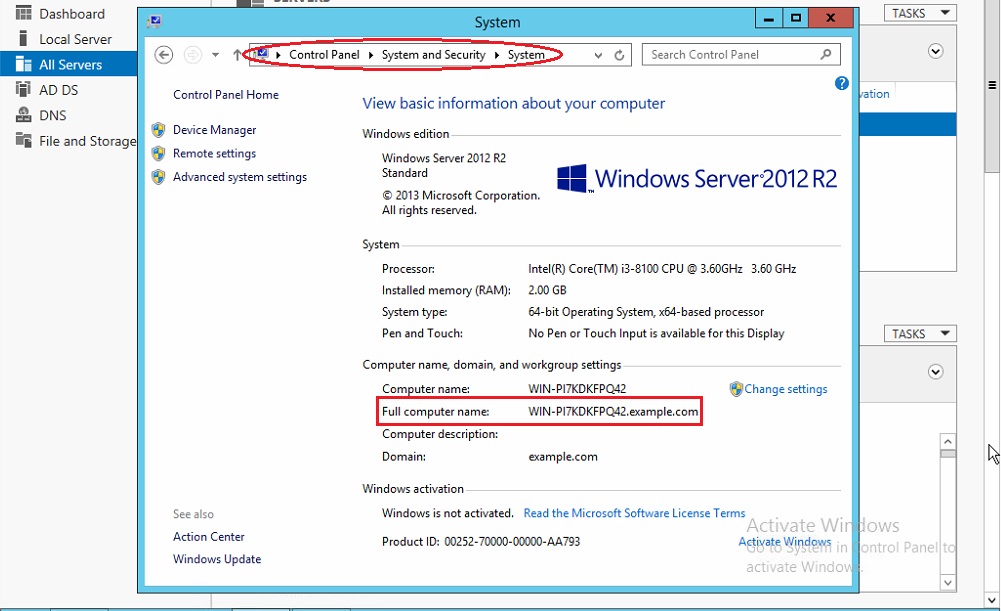
Note 1: To know the Domain Controller FQDN in the MS AD Server go to Control Panel > System and Security > System. You will see the Domain Controller FQDN under Full Computer Name (refer to the screenshot below).
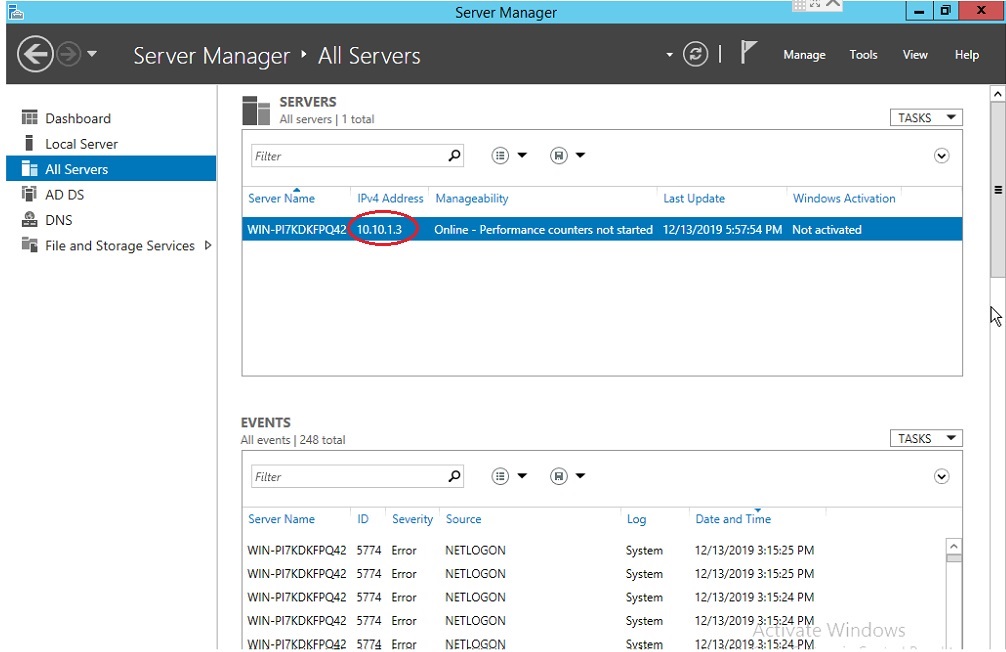
Note 2: To know the Domain Controller IP in MS AD Server, click all servers in the left pane. You will find the Domain Controller IP address under the Servers section.
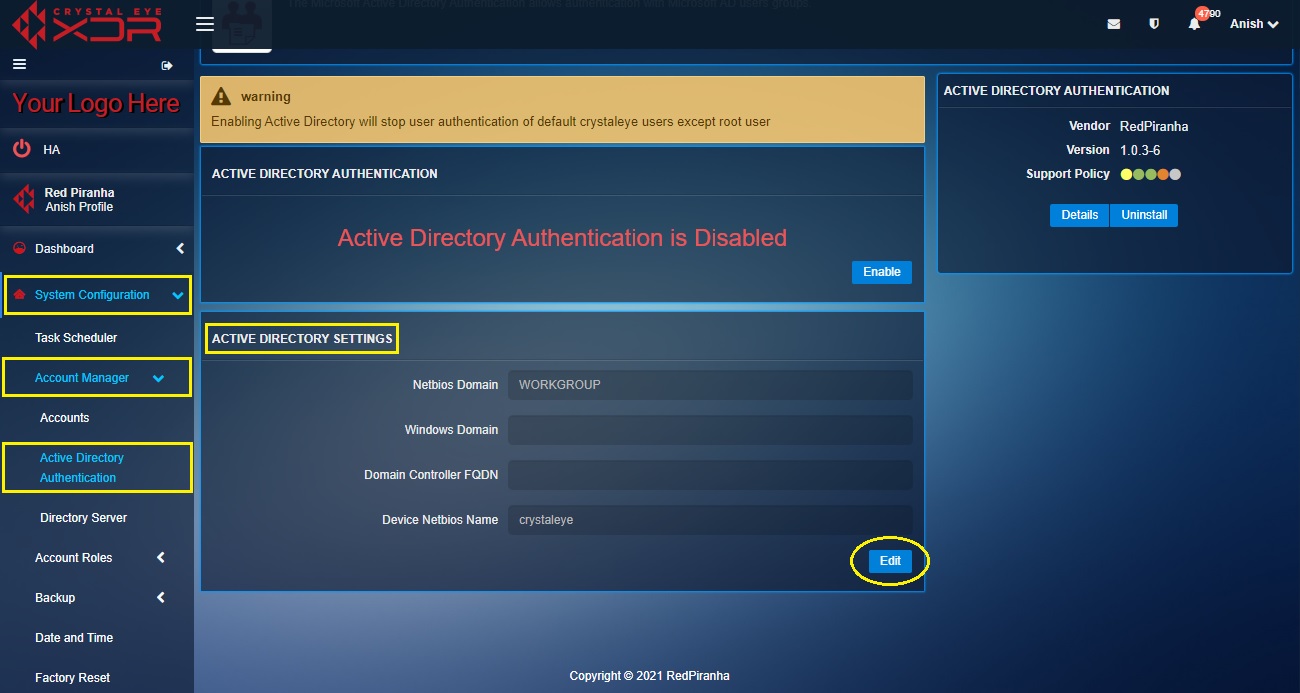
Step 6: Now go to System Configuration > Account Manager > Active Directory Authentication. Click the Edit button.
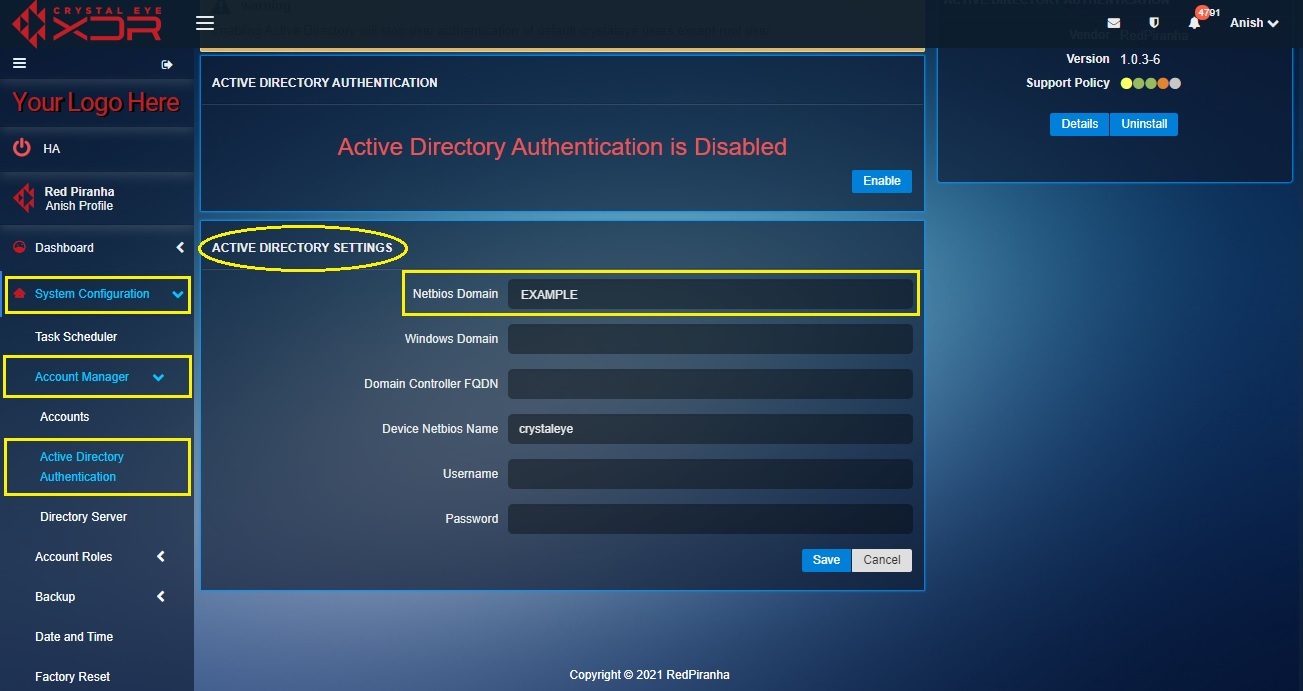
Step 7: You will now be directed to the editable version of the Active Directory Settings section. Enter the Netbios Domain in the textbox.
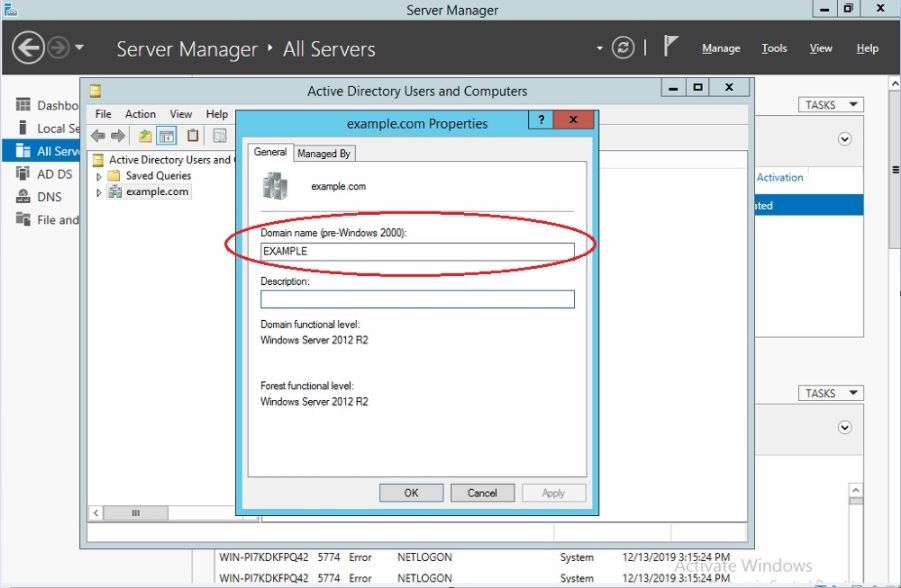
Note: To know the Netbios Domain in the AD server, go to Active Directory Users and Computers. You will find the Windows Domain on the left pane. Right click on it and select Properties. The Properties pop-up will then pop out. The Netbios domain will be mentioned in the Domain name (pre-Windows 2000) textbox (Refer to the screenshot below).
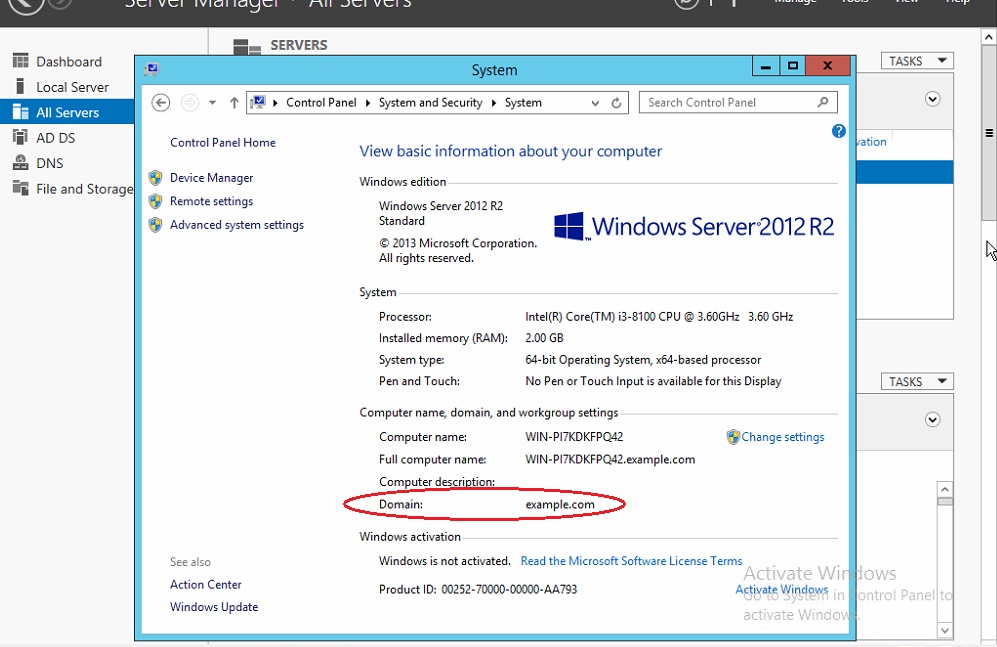
Step 8: Enter the Windows Domain in the textbox.
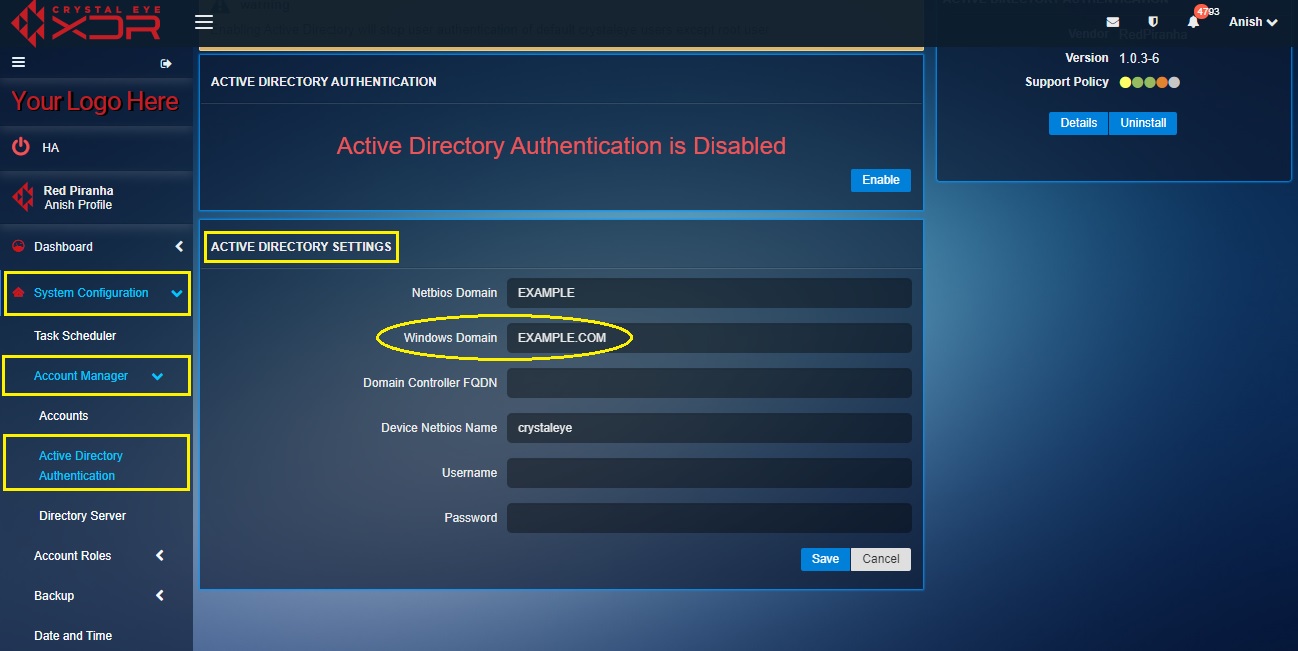
Note: To know the Windows Domain in the AD server, go to Control Panel > System & Security > System. You will then see the Windows Domain (refer to the screenshot below).
Step 9: Enter the Domain Controller FQDN in the textbox.
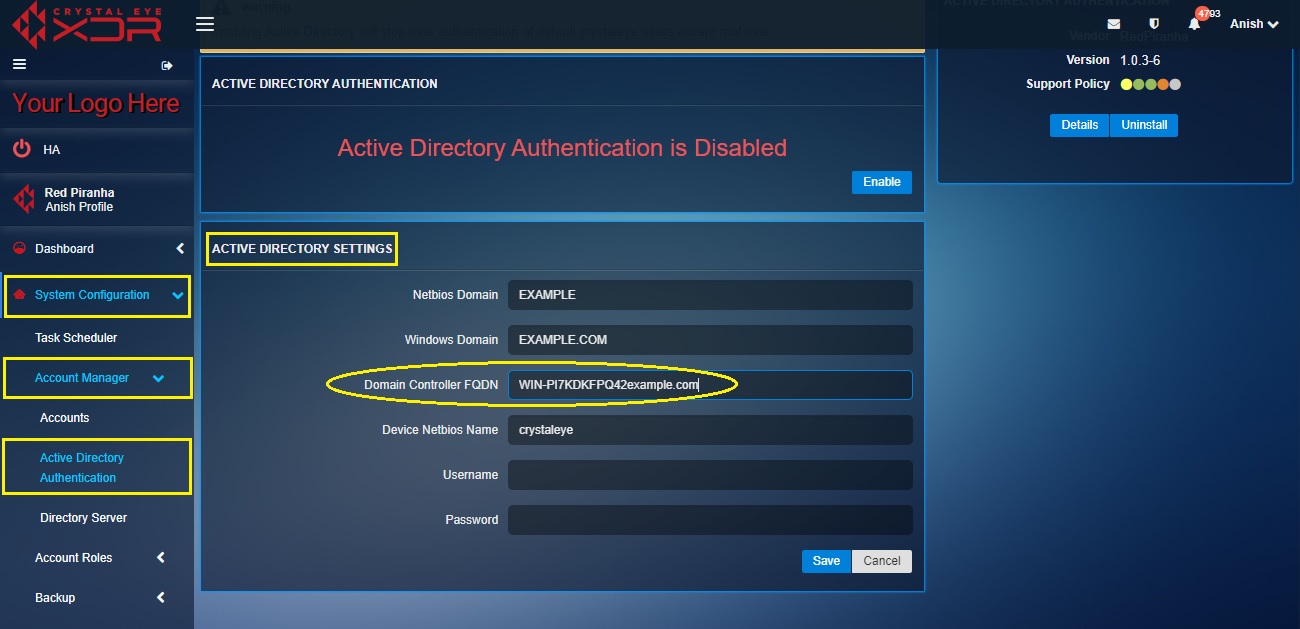
Note: To know the Domain Controller FQDN in the AD server go to Control Panel > System and Security > System. You will see the Domain Controller FQDN under Full Computer Name (refer to the screenshot below).
Step 10: Enter the AD server admin account Username and Password in the textbox and click the Save button.
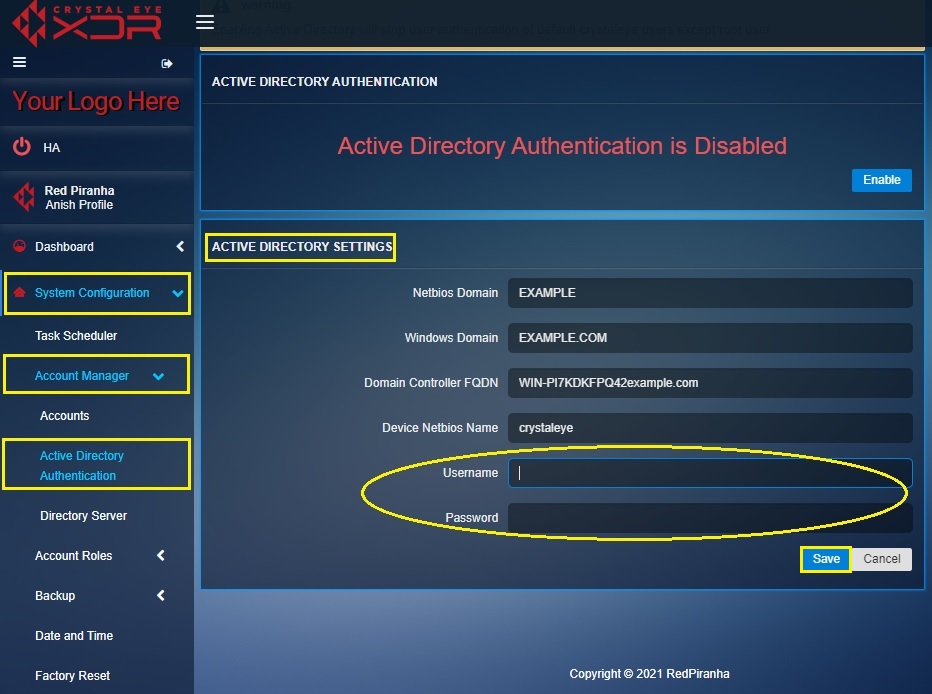
Note: Enter the Active Directory Server admin credentials in the username and password textbox
Step 11: You will now see the connection status message. Click the Active Directory Authentication button.
Step 12: You will now be directed to the Active Directory Authentication application page. Click the Enable button.