SSL VPN
Overview
The SSL VPN application of the CE XDR is used to create Remote-access VPN connections in full tunnel mode and split-tunnel mode.
CE XDR’s SSL VPN application essentially allows users to connect to a remote network behind the CE XDR with the help of secured SSL based connections. The Crystal Eye XDR provides cutting edge technology ensuring smooth connectivity over a VPN network.
The SSL VPN application allows CE administrators to create and configure multiple servers and assign SSL VPN users to it. These servers can then be custom configured as per the explicit requirements of each VPN user group.
The TLS security certificate deployed using the Crystal Eye XDR interface ensures an encrypted connection making it possible for multiple users to connect to a central site behind the CE XDR.
The custom SSL VPN servers created using the SSL VPN application can be configured to fine tune various parameters such as:
- Enabling Multi-WAN capabilities of CE XDR’s SSL VPN
- Selecting the Tunnel Mode
- Designating an IP Subnet for the SSL VPN Users
- Allocating a DHCP Range for the SSL VPN Users
- Assigning a DNS Server for the SSL VPN Server
- Allowing Users to Use SSL VPN Servers
- Assigning SSL VPN Port for the Server
- Allotting a Zone for SSL VPN Users
- Activate/Deactivate Concurrent Connections Feature
- Activating Multi-factor Authentication
- Configuring Split-tunneling and its Risks
- Deploying Shared Client Certificates for Authentication
- Deploying User-specific Client Certificates for Authentication
Installing and configuring the SSL VPN Application in CE XDR
The SSL VPN application must be downloaded from the Marketplace and then configure its interface as it’s not a default application.
Once the SSL VPN application is downloaded it will be visible in the navigation panel on the left under the SD-WAN sub-section and Network Control main section.
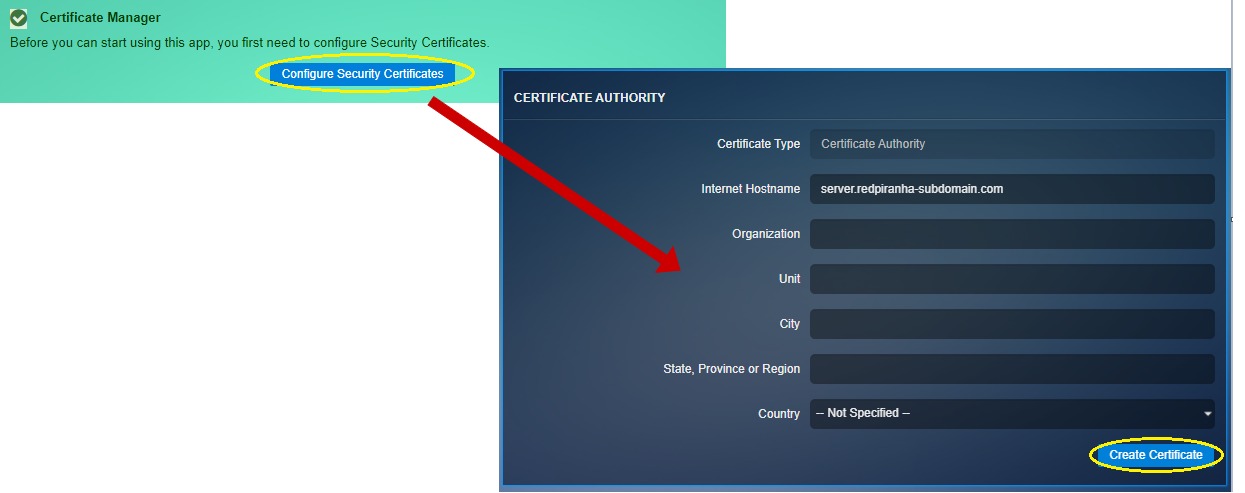
Step 1: On clicking the SSL VPN application, you will see a message box prompting users to configure Security Certificates.
Step 2: Click the Configure Security Certificates button, enter the relevant details in the Certificate Authority page and click the Create Certificates button.
Step 3: You will now see the security certificates message. Click the continue button.
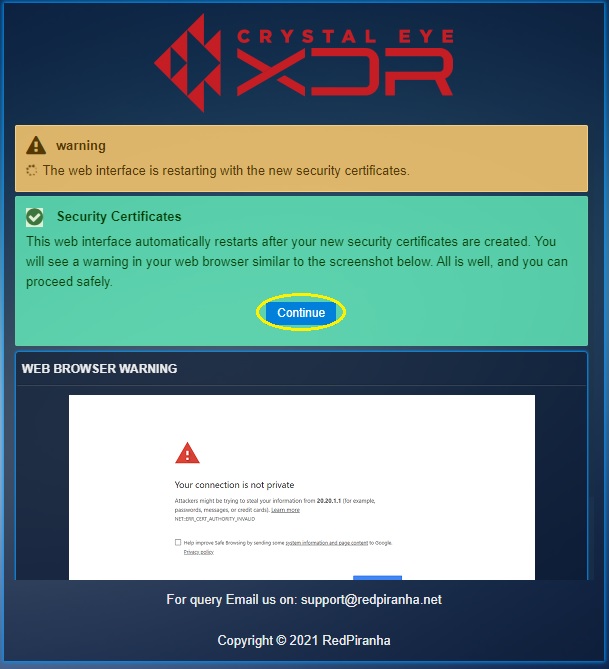
Step 4: You will now see a web browser warning, bypass using the advanced settings and proceed.
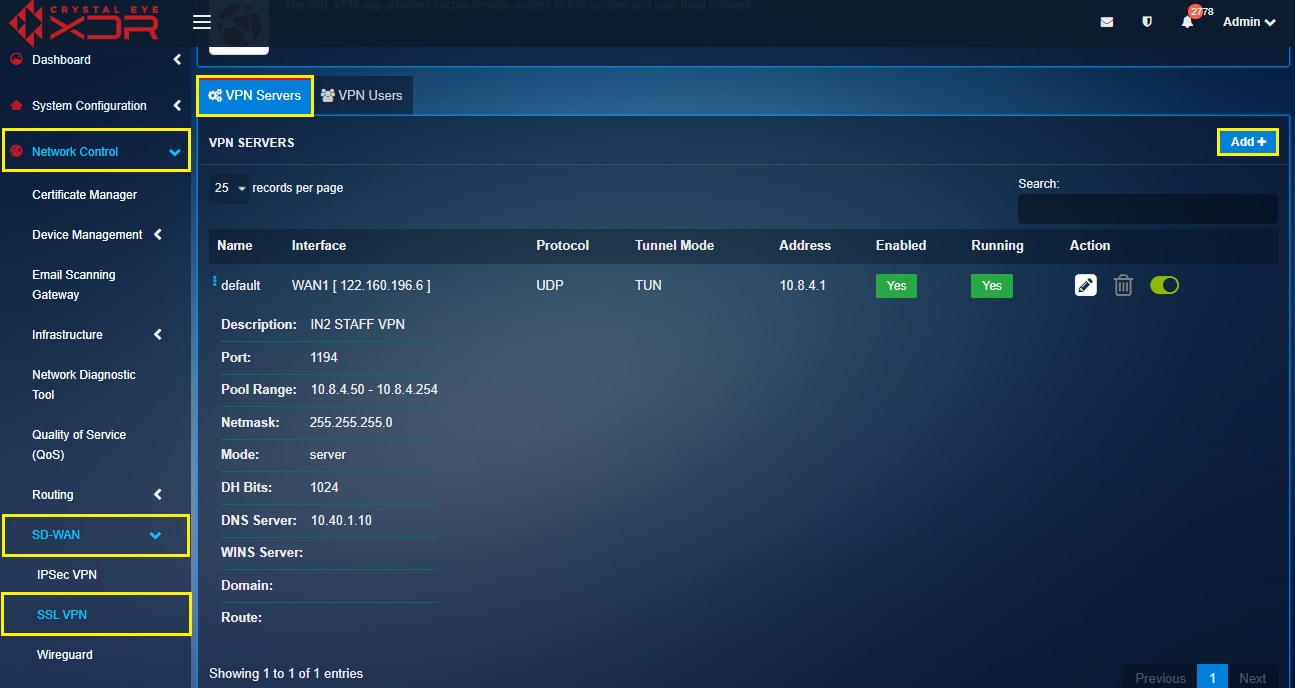
Step 5: You will now be directed to the Certificate Manager app page. Go to Network Control > SD-WAN > SSL VPN.
Configuring SSL VPN Servers
The SSL VPN setup process can be divided into two major configuration components based on its configuration requirements. The first part majorly deals with configuring SSL VPN servers (as per requirement) and the second part specifies the steps related to downloading the user certificates to finally upload it to the RP SSL VPN end-point client.
Note: The Crystal Eye XDR’s SSL VPN application comes with a pre-configured default VPN server which has all SSL VPN users aligned to it. However, these SSL VPN users can be further divided into more groups and aligned to other custom VPN servers.
Pursue the following steps to cover all the SSL VPN server configuration parameters:
Step 1: Create a new SSL VPN server.
Go to Network Control > SD-WAN > SSL VPN and then click the Add Button on the top-right corner of the VPN Servers section.
Step 2: Name the SSL VPN server.
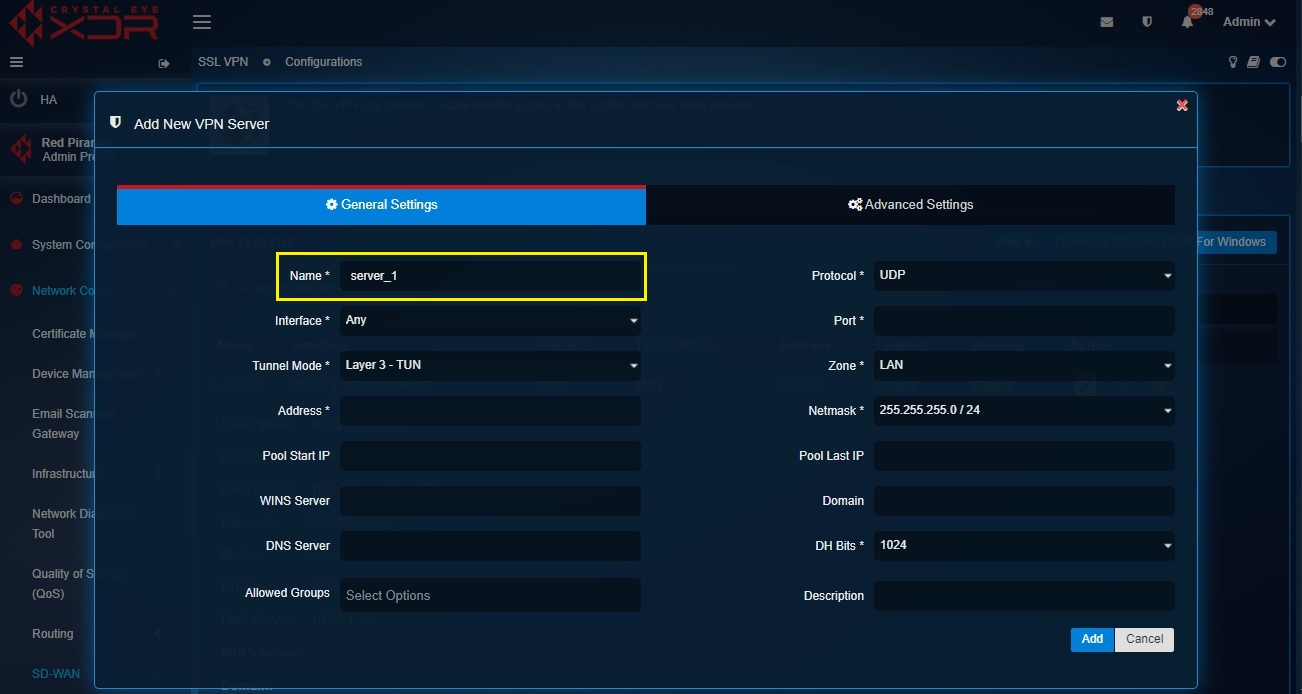
Enter the desired name in the VPN Server Name textbox.
Step 3: Enabling Multi-WAN capabilities of CE XDR’s SSL VPN.
There are options of explicit settings that enables a custom feature ensuring uninterrupted SSL VPN services through Multi-WAN. In case there are two WAN interfaces in the CE XDR, select Any from the dropdown to activate the multi-wan feature for the SSL VPN users.
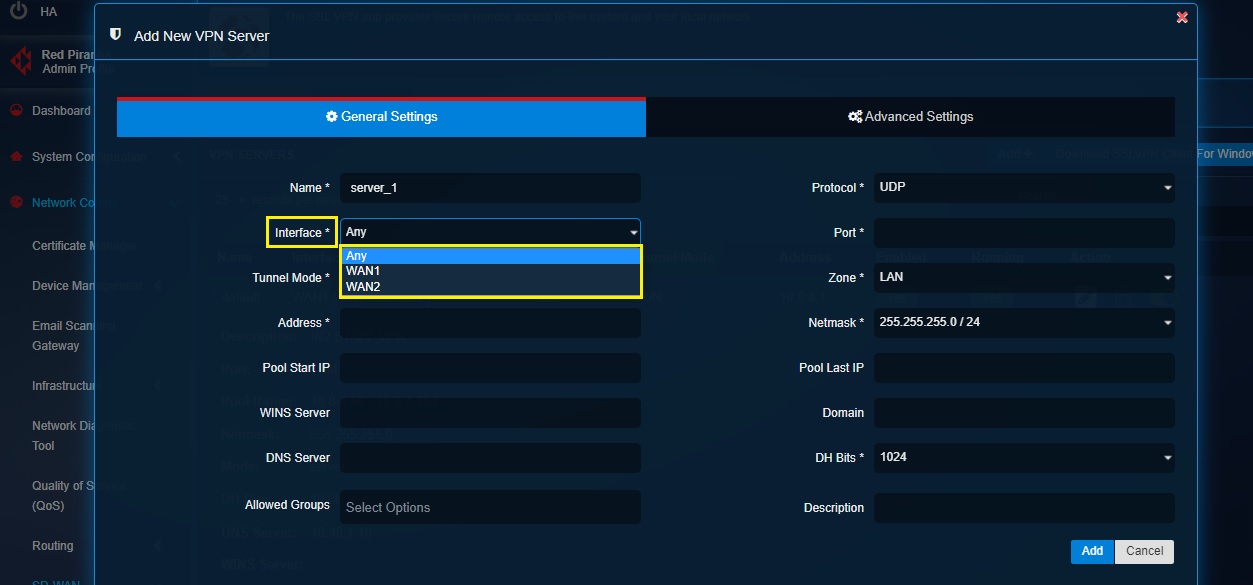
Note: Select WAN1 or WAN2 from the dropdown if there is a requirement to assign a single WAN interface to the SSL VPN server.
Step 4: Selecting Tunnel Mode.
Choose Layer 2 – TAP if you want to bridge two LAN segments in two different locations behind a CE XDR each. Choose Layer 3 – TUN if there’s a requirement to confine the SSL VPN access to a single machine (IP machine).
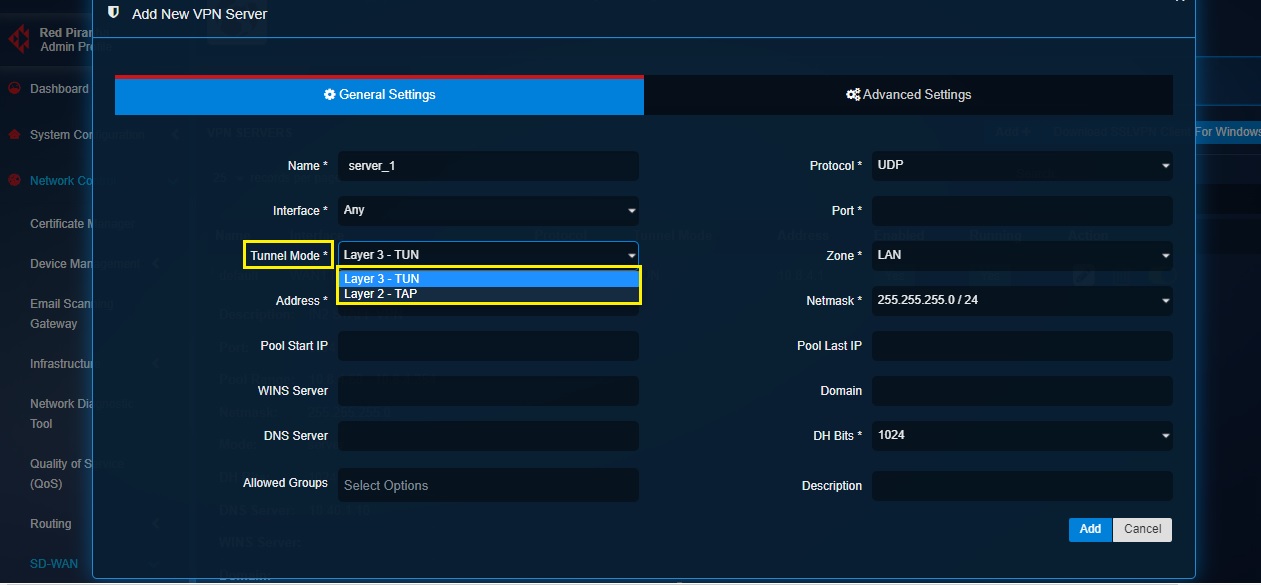
Note: Layer 3 – TUN tunnel mode presumably offers better security due to the limited connectivity it provides in the CE XDR network. TUN connection creates less load on the VPN tunnel since traffic to/from a single IP address crosses the VPN tunnel to the other side. It is always recommended to use IPsec VPN to bridge two LAN segments in two different locations behind a CE XDR.
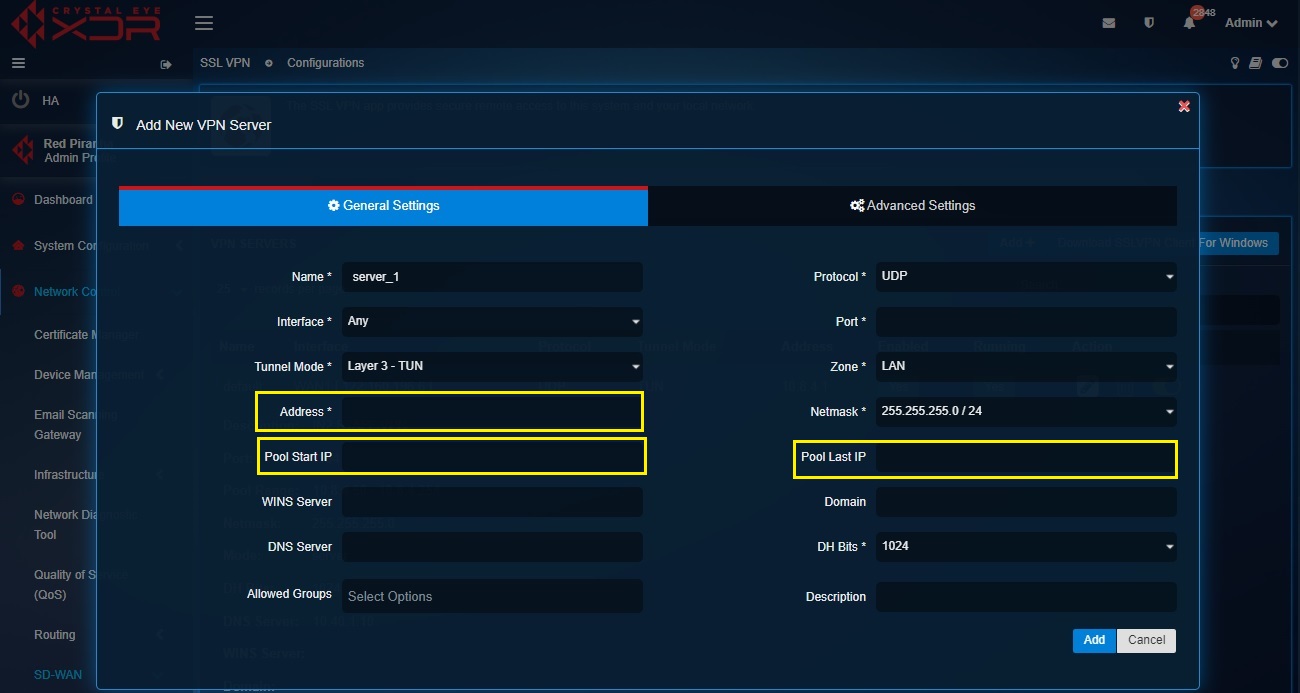
Step 5: IP settings for the SSL VPN server and SSL VPN users. The Crystal Eye XDR assigns an IP address of 10.8.1.x subnet in the default server. However, if SSL VPN is being setup over IPsec VPN (at both ends of the IPsec tunnels i.e on both the CE XDR’s) then there will be an explicit requirement to ensure that the IP addresses assigned to the SSL VPN servers at both the ends with CE XDR’s are different. In such cases, the IP address assigned to the SSL VPN server is changed. Enter the new IP address in the Address textbox.
In addition to this, the CE administrator can also assign the IP range for the users connected to the given SSL VPN server in the Pool Start IP and Pool Last IP textbox.
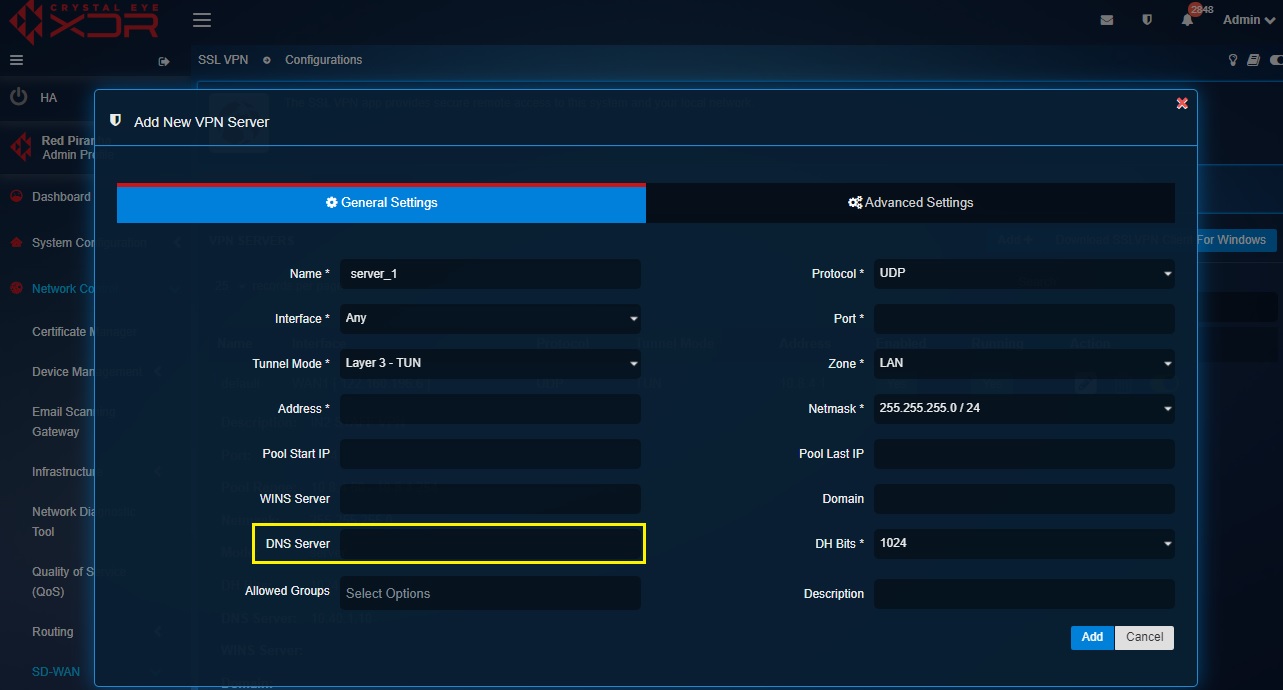
Step 6: Assigning external DNS server for the SSL VPN users
The DNS Server textbox can be edited to assign an external DNS server to the SSL VPN server. This field remains empty by default and if not updated the system assigns the CE XDR as the DNS Server.
Step 7: Configuring User Groups for SSL VPN Users
As a default feature, the CE XDR adds ssl_vpn_plugin in the Allowed Groups section of the default SSL VPN server. The ssl_vpn_plugin consists all the SSL VPN users created using the users application. However, if SSL VPN users are created in the AD server and synced with the CE XDR then the default ssl_vpn_plugin group picks VPN users from the synced AD server.
In case AD server SSL VPN users are not synced with the CE XDR then custom SSL VPN user groups can be created using the Groups and Users application.
To assign SSL VPN users to the VPN server, select the desired SSL VPN user group from the Allowed Groups field dropdown.
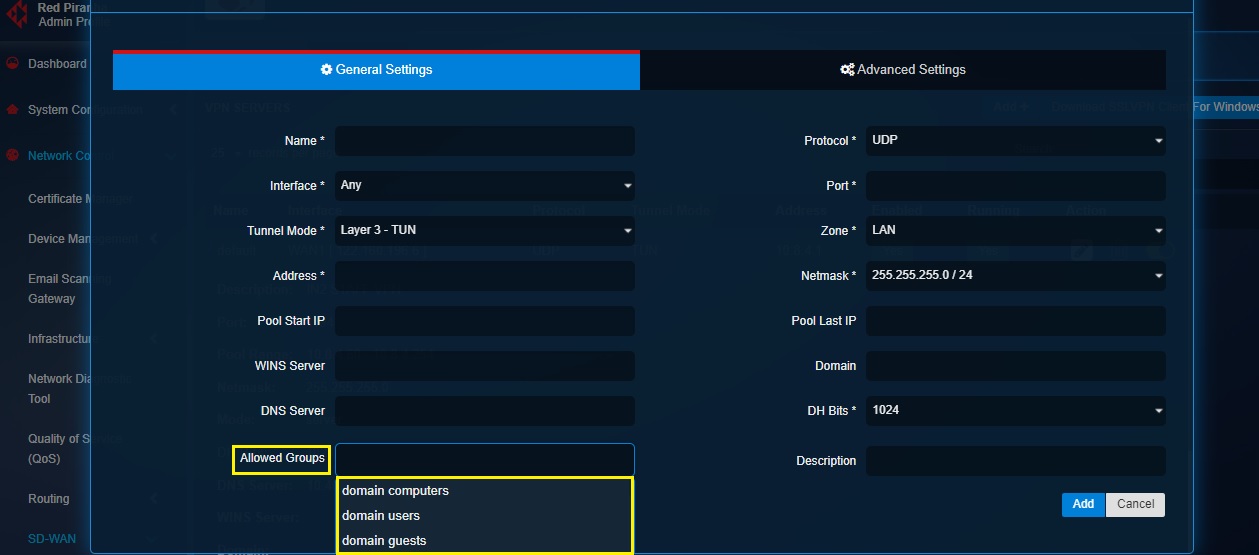
Note: Learn how to create an SSL VPN user with the help of the User Manager feature of the User app here (Please refer to Step 4). As a default feature, every user created in the CE XDR has SSL VPN privileges enabled. You may enable or disable SSL VPN privileges as per requirements. These SSL VPN users can also be further added to a custom group. Know how to create a custom group and add users here. Refer to this article to know how to sync the SSL VPN users created in the AD server with the CE XDR.
Step 8: Assigning SSL VPN Port for the SSL VPN Server.
By default, this field is empty and requires the CE administrator to assign a unique port to each SSL VPN server created.
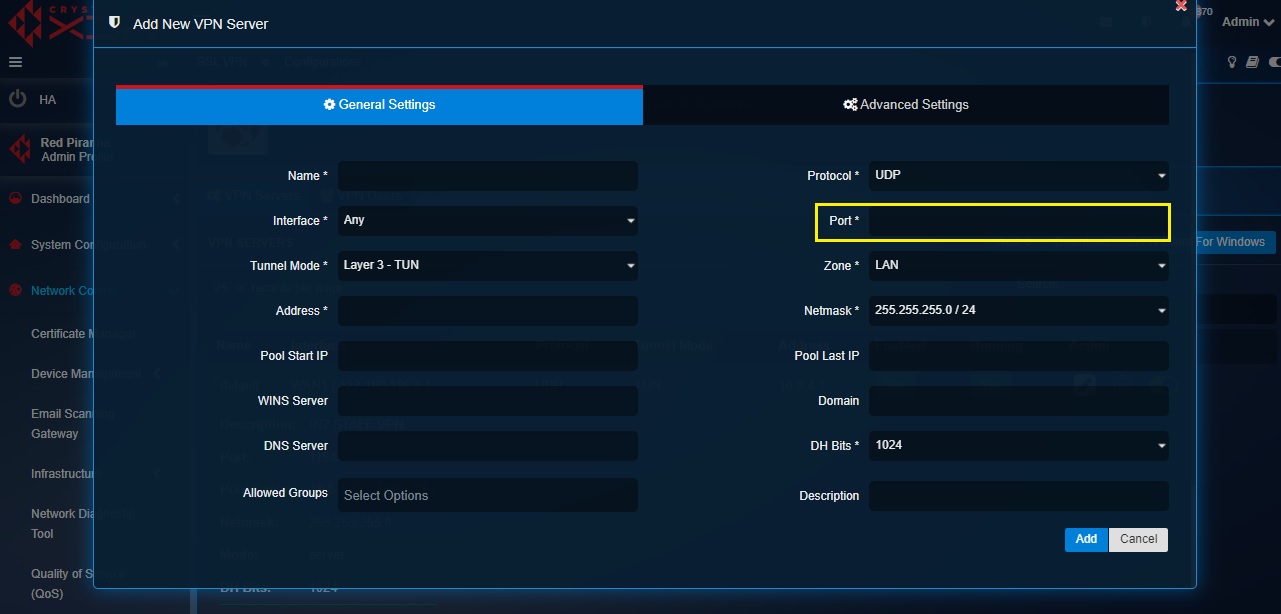
Note: CE XDR’s SSL VPN will not function if the port numbers of multiple VPN servers are identical. Always have a unique port number for each custom SSL VPN server. As a default feature the CE XDR assigns port 1194 for the default SSL VPN server.
Step 9: Allotting a Zone for SSL VPN Users.
A custom SSL VPN server is aligned to LAN zone by default. This default setting can be changed and the SSL VPN server can also be aligned to a custom zone. Learn how to create a custom zone here
Step 10: Managing Concurrent SSL VPN Connections.
The Concurrent SSL VPN Connections feature provides control over allowing or disallowing a given SSL VPN user’s ability to log into multiple devices using the same SSL VPN credentials.
To manage Concurrent SSL VPN Connections check/uncheck the Concurrent Connections in the Advanced Settings section.
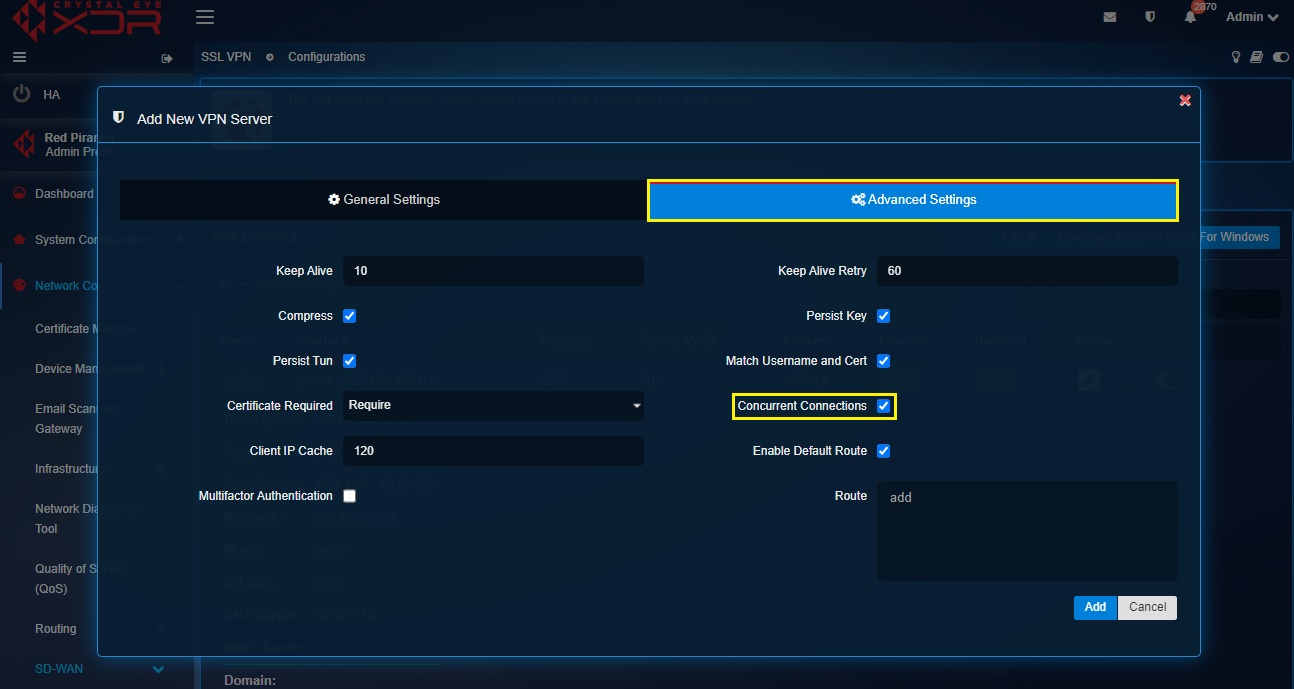
Note: The concurrent SSL VPN connections feature is enabled by default.
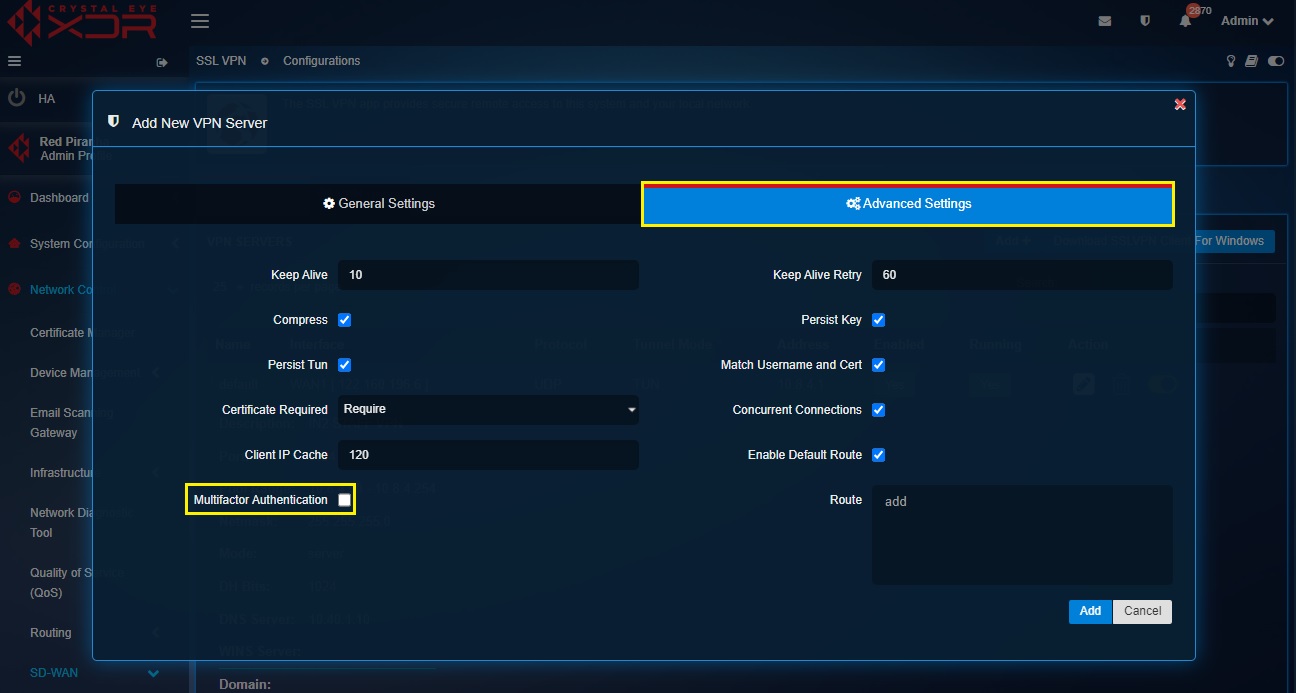
Step 11: Activate multi-factor authentication.
Multi-factor authentication can be activated for all VPN users aligned to the given VPN server by just checking the Multi-factor Authentication tick box in the Advanced Settings section. Post this a QR code will be made available with the SSL VPN configuration files. Read this article to know the detailed set of steps to configure MFA for SSL VPN users.
Step 12: Configure Split-tunneling Crystal Eye XDR’s SSL VPN runs on full tunnel mode by default. Full tunneling refers to the entire traffic originating from the VPN client being put across through the SSL VPN tunnel. However, the CE XDR offers the option to switch the SSL VPN mode to split-tunneling where only the traffic destined for the subnets on the CE XDR LAN on the otherside will pass through the SSL VPN tunnel. The rest of the traffic destined to other destinations like www.google.com will go through normal internet connection.
To activate split tunnelling uncheck the Enable Default Route tick box in the Advanced Settings tab and then enter the LAN subnets of the CE XDR network that needs to be accessed by the SSL VPN users in the Routes section.
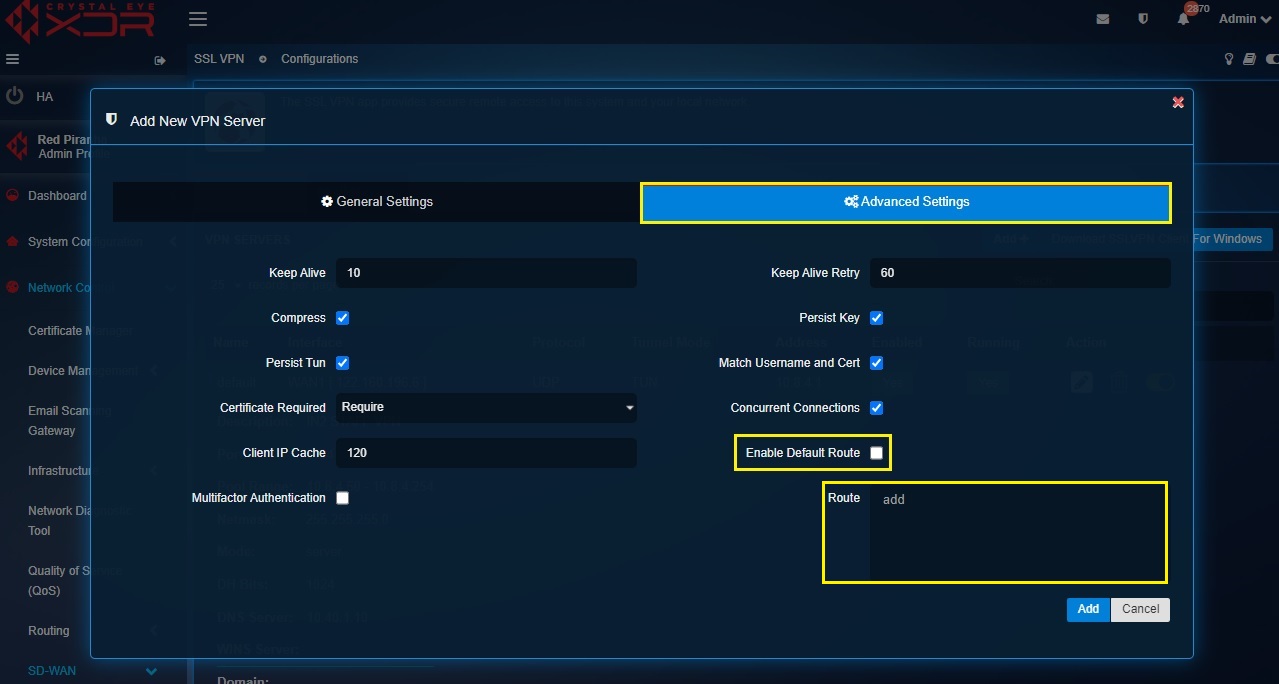
Risks involved in split tunneling: Split-tunneling avoids overwhelming the internet connection by transmitting only the traffic destined to internal LAN networks behind the CE XDR through the SSL VPN tunnel. However, one must take cognizance of the potential risks of using split-tunneling as it increases the possibility of a third party (such as an ISP) accessing the traffic that’s excluded from encryption of CE XDR’s SSL VPN.
Step 13: Deploy Shared certificates for Authentication.
The CE administrator can opt for shared configuration files/certificates for all SSL VPN users which essentially means that a common set of VPN certificate needs to be imported to the RP SSL VPN client to establish connection.
To deploy shared certificates, select None or Optional from the Certificates Required dropdown and ensure that the Match Username and Cert tickbox is unchecked. After saving this configuration, click VPN Users tab, generate the certificates, and download the VPN certificates for each user.
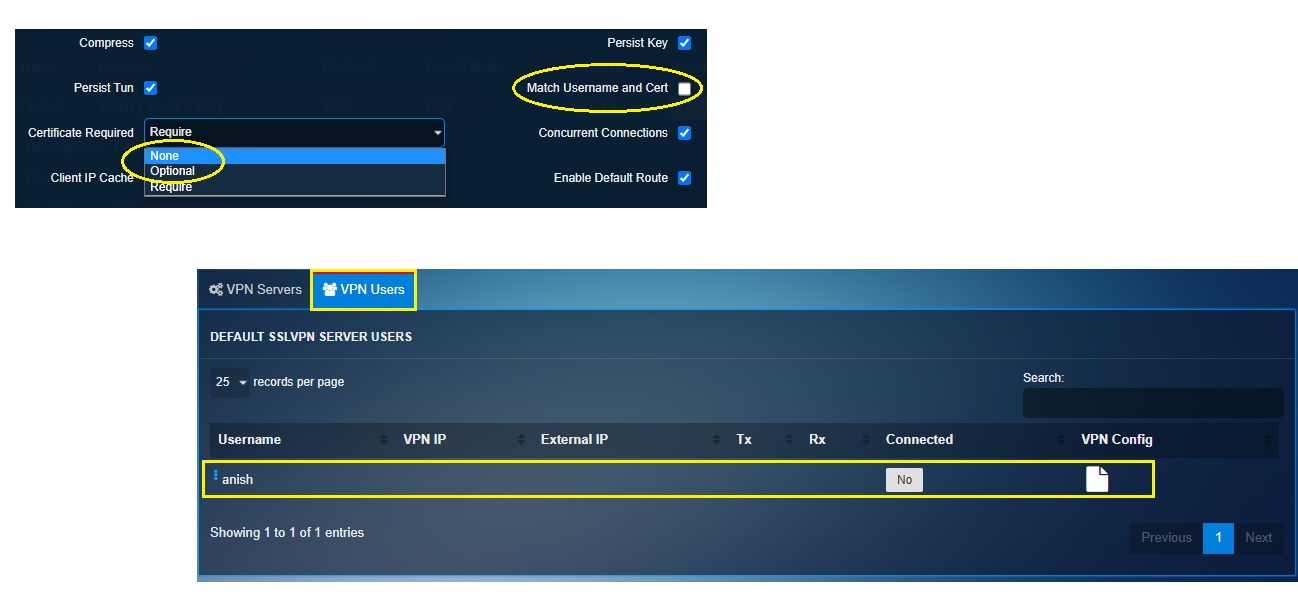
Note: There is a provision to directly email the certificate to the VPN users as well. Read [this detailed article]() to understand how to deploy shared client certificates for authentication.
Step 14: Deploying User-specific Client Certificates for Authentication.
The CE XDR offers the option of configuring the SSL VPN to allow deployment of user-specific client certificates for authentication.
To deploy user-specific client certificates for authentication, select Require from the Certificate Required dropdown and then ensure that the Match Username and Cert tickbox is checked. After saving this configuration, click VPN Users tab and download the VPN certificates for each user.
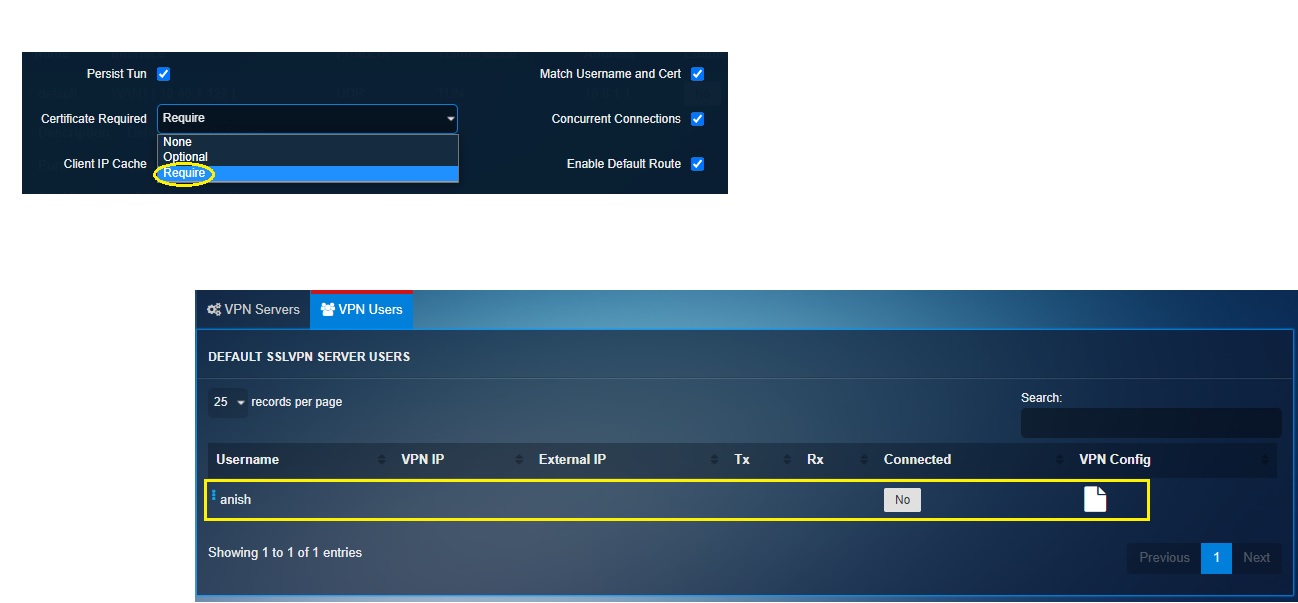
Note: There is a provision to directly email the certificate to the VPN users as well. Read this detailed article to understand how to deploy shared client certificates for authentication.
Downloading SSL VPN Configuration File
Crystal Eye XDR’s SSL VPN application has a dedicated section for downloading SSL VPN configuration file called ‘VPN User’. Once the SSL VPN server is configured, the SSL VPN configuration file needs to be downloaded and imported to the RP SSL VPN end client (this process has been explained in detail in the section Configuring the CE XDR’s SSL VPN End Point Application
The VPN user section displays default and custom SSL VPN servers with the configuration files of the aligned VPN users (as grouped while configuring the SSL VPN server).
Note: The SSL VPN configuration file can be directly emailed to the user. To do so, click the email icon next to the SSL VPN users listed in the VPN users section (see the screenshot below).
How to download the SSL VPN configuration file?
Step 1: Go to Network Control > SD-WAN > SSL VPN and then click the VPN Users tab.
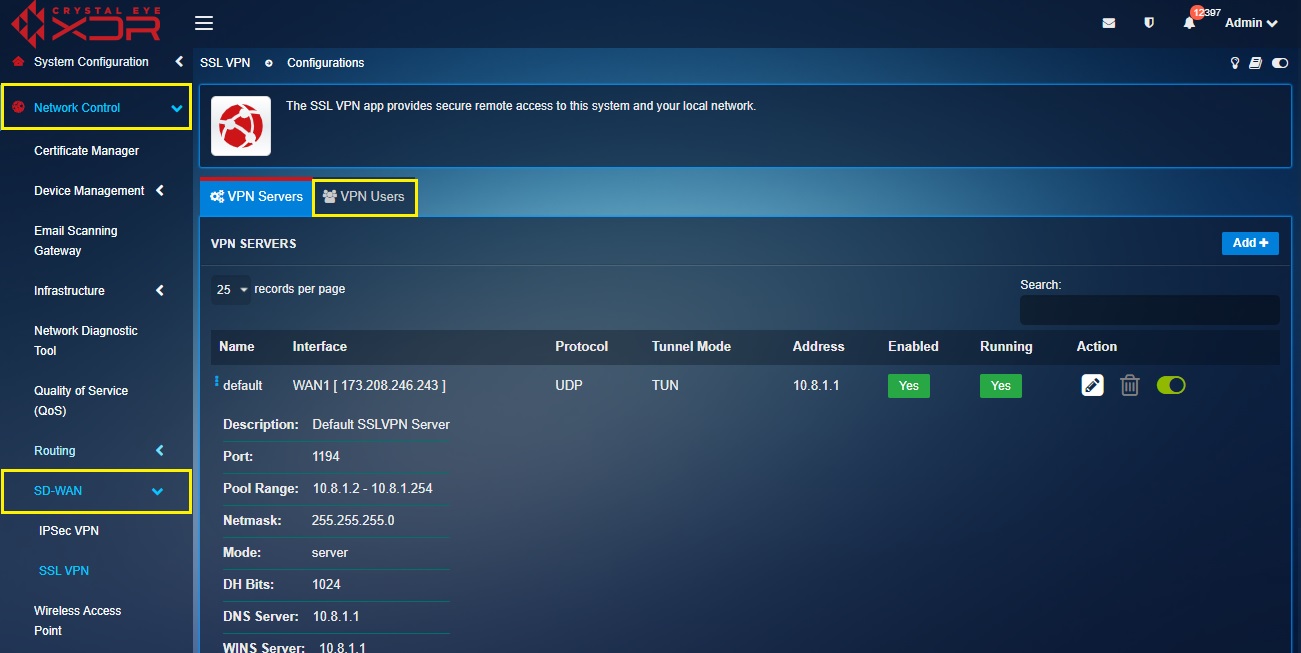
Step 2: You will now see all the SSL VPN users in the VPN Users dashboard. Click the Generate User Certificate icon next to any one of the VPN users listed in the dashboard.
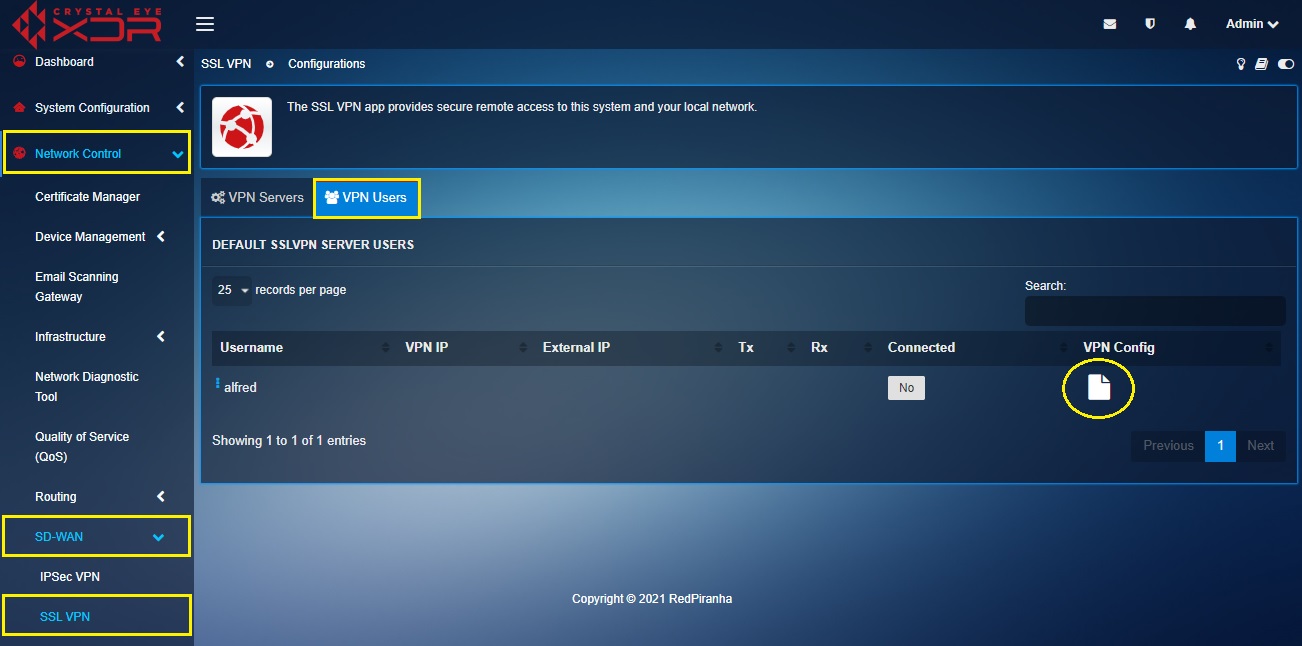
Step 3: Once the user certificate is generated, you will see a download icon and a send VPN configuration via email icon. Click the download icon to download the VPN configuration.
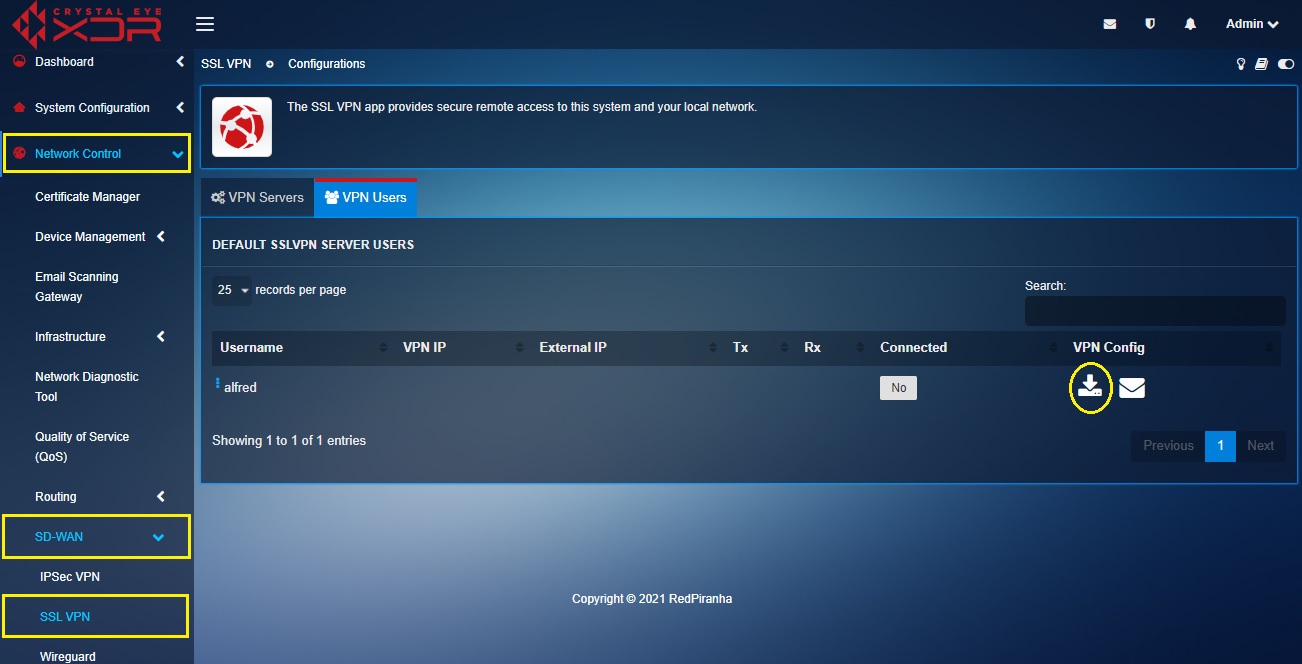
Note: Place the downloaded zip file in a folder and extract the files. Once you extract the files you will see three folders with VPN config files for Linux users, Mac users and MS OS users. You will also see a multi-factor authentication QR code image. 
Configuring the CE XDR’s SSL VPN End Point Application
Crystal Eye XDR’s SSL VPN end point application can be configured based on the operating system used by the SSL VPN User.
Note: The Crystal Eye XDR end point SSL VPN application can be explicitly configured to support Linux, MAC OS and MS OS users.
The configuration process of the end point SSL VPN app includes extracting the setup file from the zip file and then running installation wizard. Once the app is installed a shortcut icon will be created in desktop. Once the end point SSL VPN application is opened, the VPN configuration application needs to be imported to the app and the server name must be selected followed by entering the user credentials and the one time password.
How to configure CE XDR’s SSL VPN end point client application for Microsoft operating system users?
Step 1: In the VPN Server section, click the Download SSL VPN Client for Windows button.
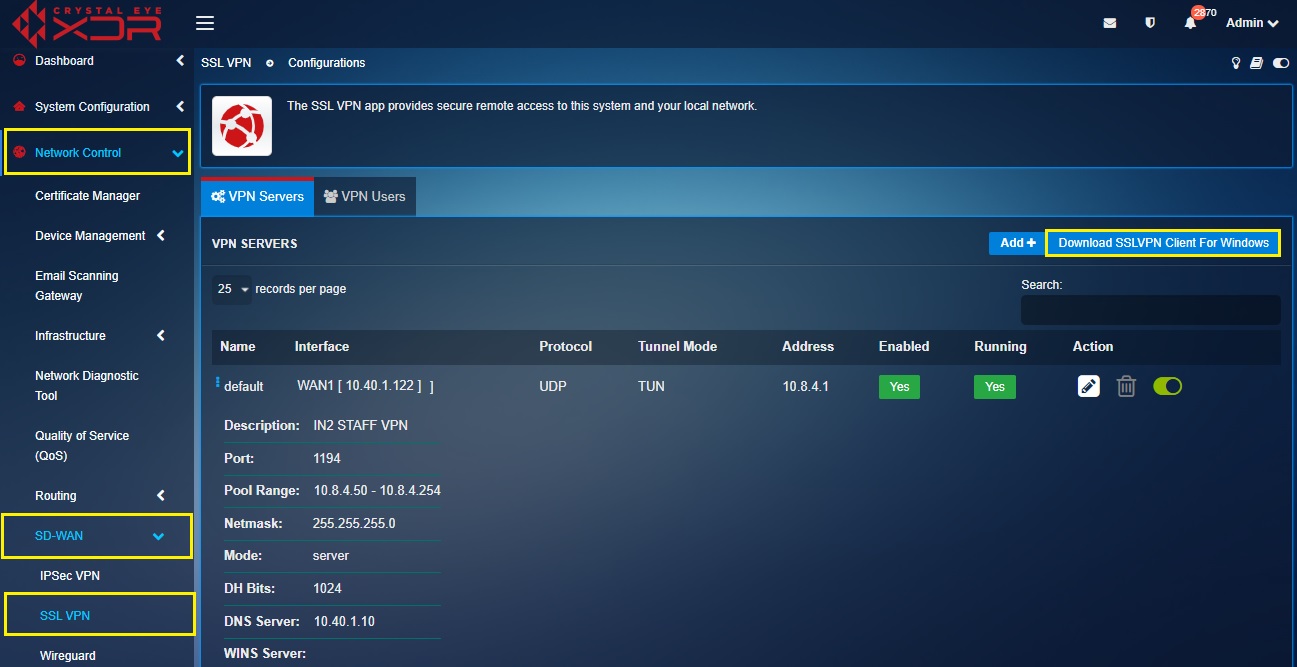
Note: Once you download the end point app, extract the RP SSL VPN Windows Installer Package.
Step 2: You will now see the Red Piranha SSL VPN Client Setup Wizard. Click the Next button.
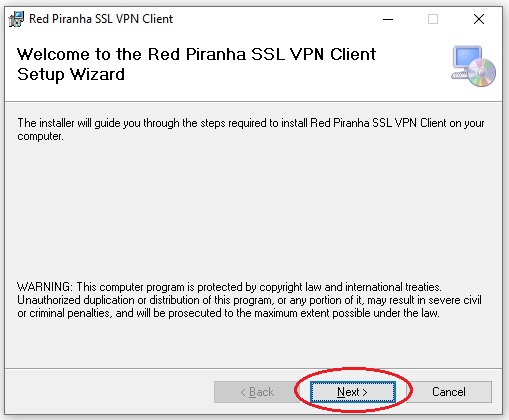
Note: The installer will guide you through the steps required to install Red Piranha SSL VPN Client on your computer.
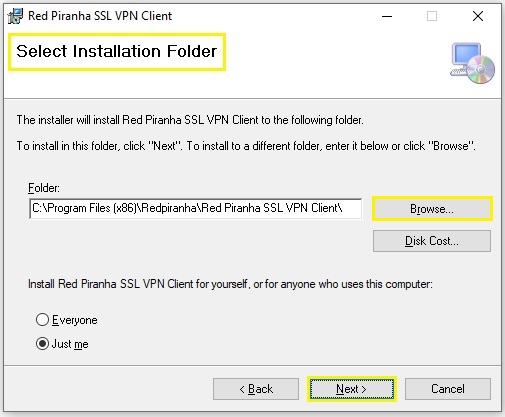
Step 3: Select the Installation Folder using the Browser button and click the Next button.
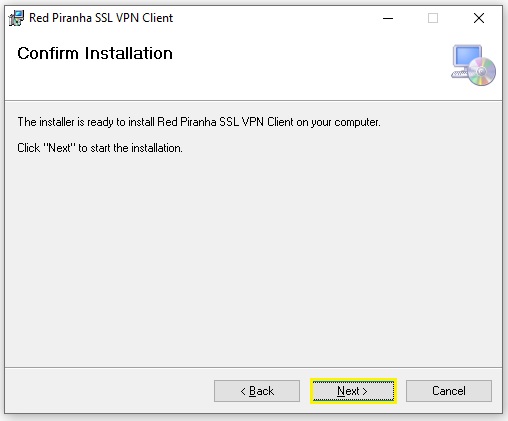
Step 4: Click the Next button to start the installation.
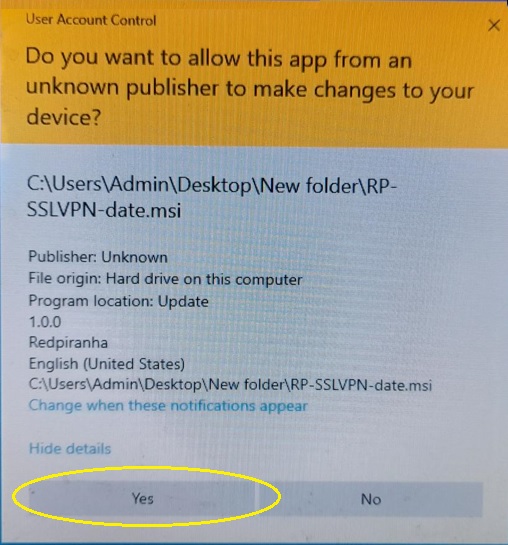
Step 5: You will now see a Windows User Account Control pop-up box. Click the Yes button to allow the installation process to continue.
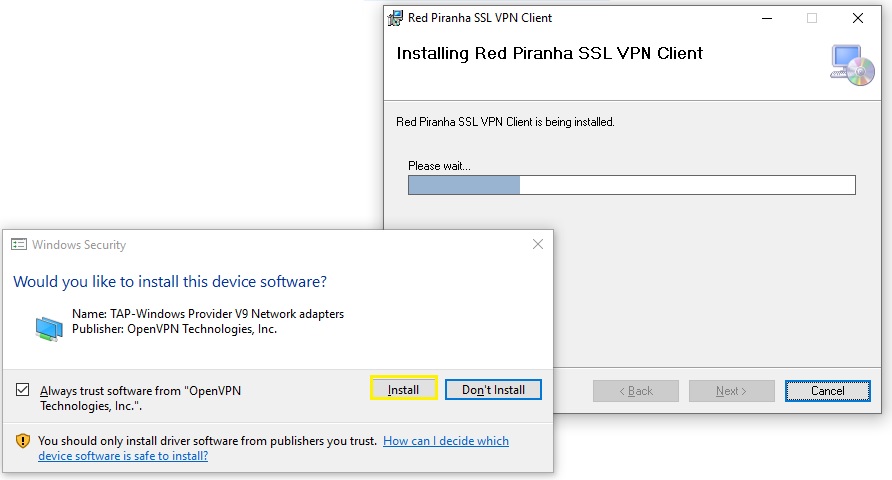
Step 6: You will now see the loading bar highlighting the ongoing installation. As the installation proceeds, you will also see a Windows Security pop-up box confirming the installation. Click the Install button.
Step 7: You will now see the Installation Complete message. Click the Close button.
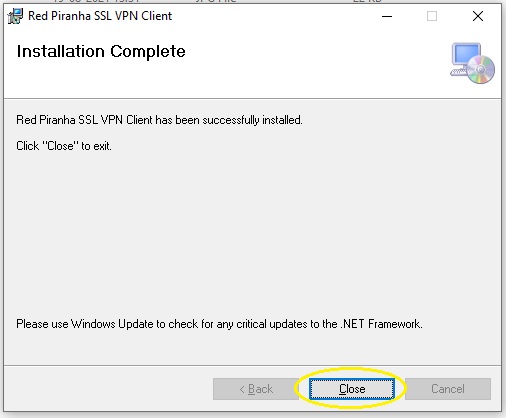
Step 8: You will see the Red Piranha SSL VPN shortcut icon on your desktop screen. Double-click the icon.

Note: You will now see the Red Piranha SSL VPN end client application. 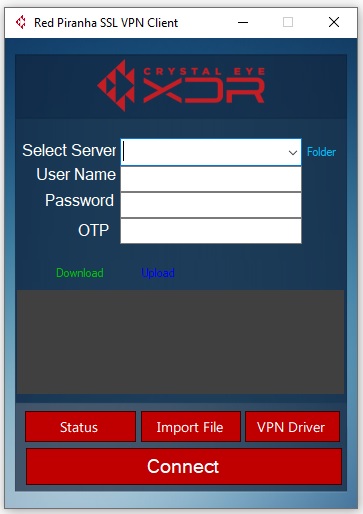
Step 9: Now click the Import File button on the end point app GUI and then import the VPN configuration file in windows folder.
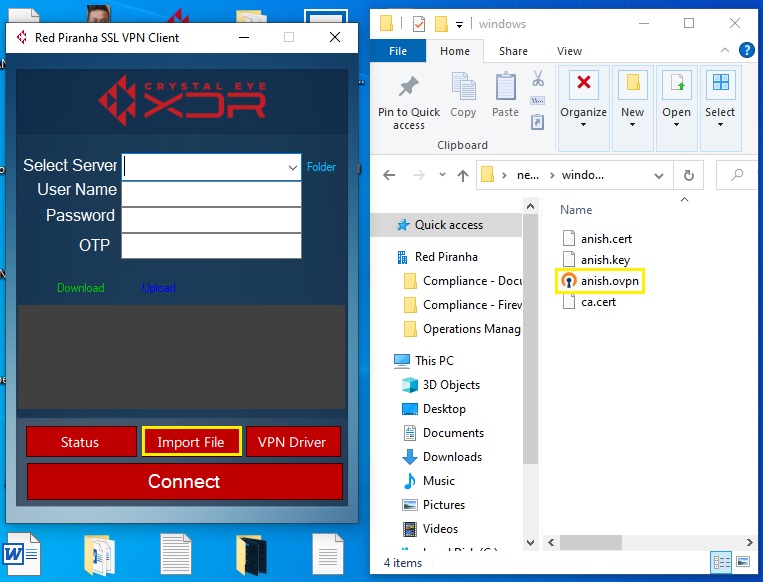
Note: Make sure you place the VPN configuration file in a folder with the ca.cert file while you import it to the end point SSL VPN application (as shown in the screenshot above). The VPN file name would be identical to the SSL VPN user created in the CE XDR. In our case, the name of the VPN file is anish. This file can be shared with all the VPN users.
Step 17: Click the dropdown icon next to the Select Server textbox and select the server name which would be identical to the SSL VPN username created in the Crystal Eye XDR appliance.
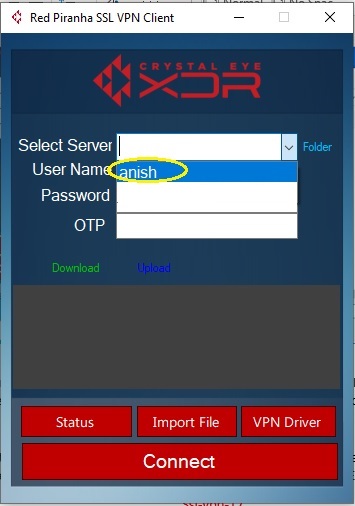
Step 18: Now enter the user credentials of the SSL VPN user in the designated textbox and click the Connect button.
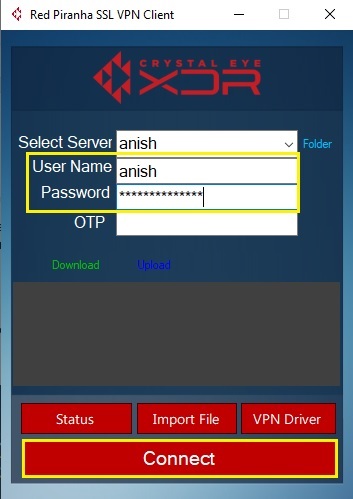
Note: These credentials are the ones which were generated while creating the user account. To know the user credentials, go to System Configuration > Account Roles > Users and click the edit button next to the user.