High Availability
High Availability is a network deployment scenario where two Crystal Eye XDR appliances can be used to provide uninterrupted access to the users in the event of link or node failure. Such a network configuration helps in creating a robust failover system wherein, if the primary CE XDR fails to operate, the secondary CE XDR automatically secures the network. Such a characteristic of the CE XDR ensures agreed level of operational performance for a desirable period of time also known as High Availability.
There are certain pre-requisites to ensure successful deployment of a High Availability Set-up in Crystal Eye XDR:
- Both the CE XDR appliances must be of the same model.
- Both the CE XDR appliances should have the same release running for configuration and state synchronization.
- Both the CE XDR appliances should be registered individually and should have valid licenses.
- Each CE XDR appliance should have a dedicated port for state synchronisation with the peer.
- The LAN IPs’s of both the primary CE and the secondary CE must be different from each other and not identical to each other.
- To create a High Availability setup using CE XDR, its imperative to have a WAN subnet that supports three IP addresses. The minimum subnet requirement should be /29 which must be arranged from your upstream service provider.
The High Availability application is not available by default. It can be installed from Marketplace in the left-hand navigation panel.
Left-hand Navigation Panel > System Configuration > High Availability 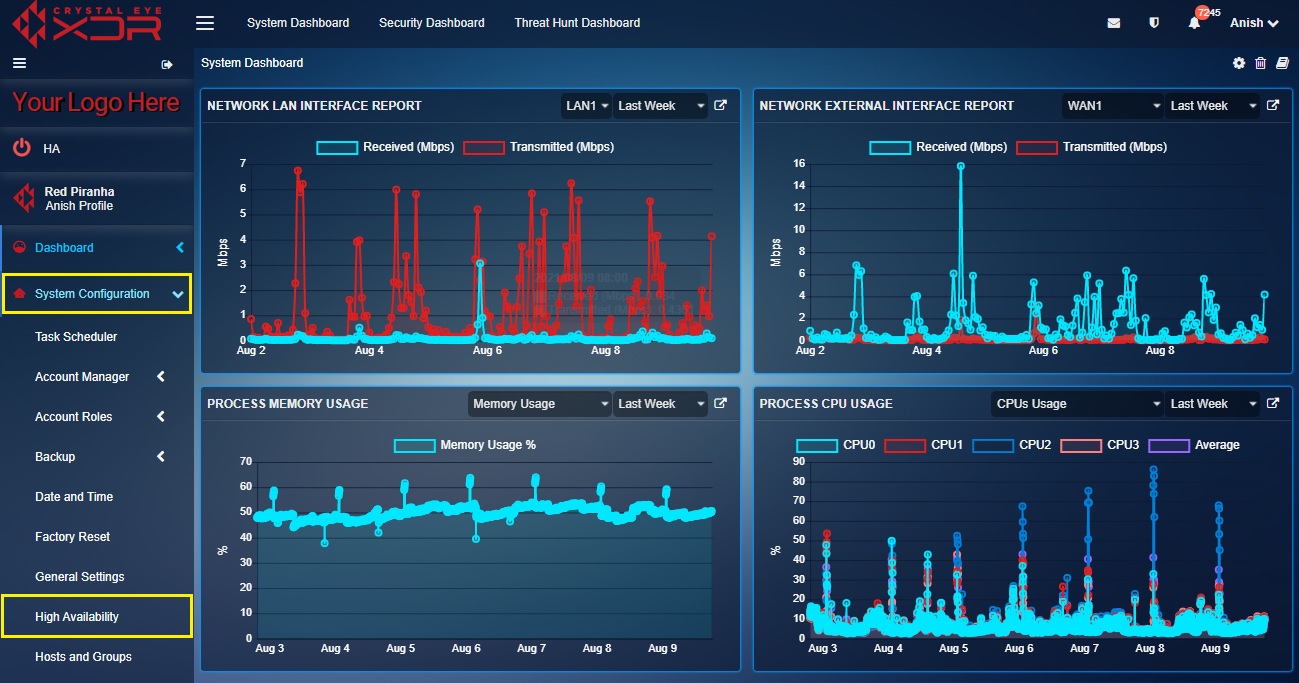 |
|---|
Crystal Eye’s High Availability feature can be used to monitor interfaces such as LAN, WAN, VLAN, PPPoE and Virtual Interfaces.
Configuring and setting up high availability to monitor services on Crystal Eye XDR can be broadly divided into four set of steps based on the network deployment:
- Physical set-up of High Availability in Crystal Eye XDR
- Ensuring HA pre-requisites are met
- HA Settings & Configurations in Primary and Secondary CE XDR
Note: The physical set-up of high availability generally involves assigning a dedicated port in both the primary and secondary CE XDR appliances as a HA peer link. To complete the physical set-up, these ports in primary and secondary CE’s must be linked to each other with a RJ45 cable.
Let’s learn how to configure HA for the following network deployment:
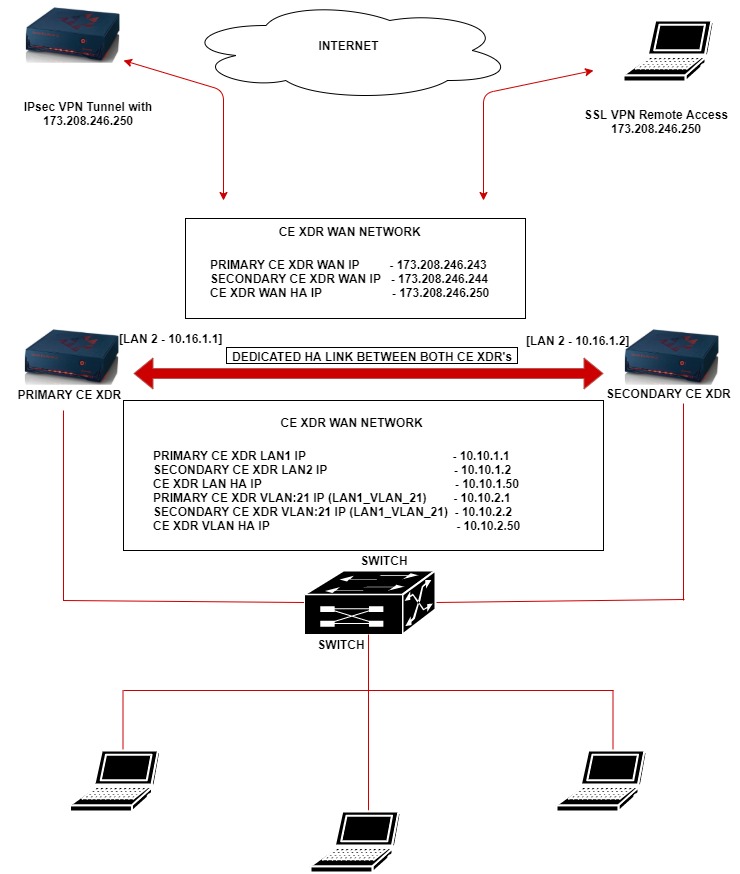
In the above network deployment diagram, we have two Crystal Eye XDR’s namely primary CE and secondary CE which is connected to the internet.
A dedicated link is created between the primary CE and the secondary CE by connecting both its LAN 2 ports with a RJ45 cable.
In our case, we have selected the LAN 2 ports of both the CE XDR’s to be the peer ports for the dedicated physical HA link. However, we can select any CE XDR LAN ports for this purpose.
Note: To create a High Availability setup using CE XDR, its imperative to have a WAN subnet that supports three IP addresses. The minimum subnet requirement should be /29 which must be arranged from your upstream service provider.
We have a LAN network and VLAN network that requires high availability due to the critical nature of the business. In our scenario, we also have remote access SSL VPN tunnel and IPsec tunnel established with the Primary CE XDR. Automatic switchover to the secondary CE while ensuring high availability of the VLAN interface and Virtual interfaces requires these interfaces be created on both the CE XDR’s. On a failover, the VLANs and the virtual interfaces will have its traffic automatically switched over to the secondary CE given that these interfaces are created on both the CE XDR’s.
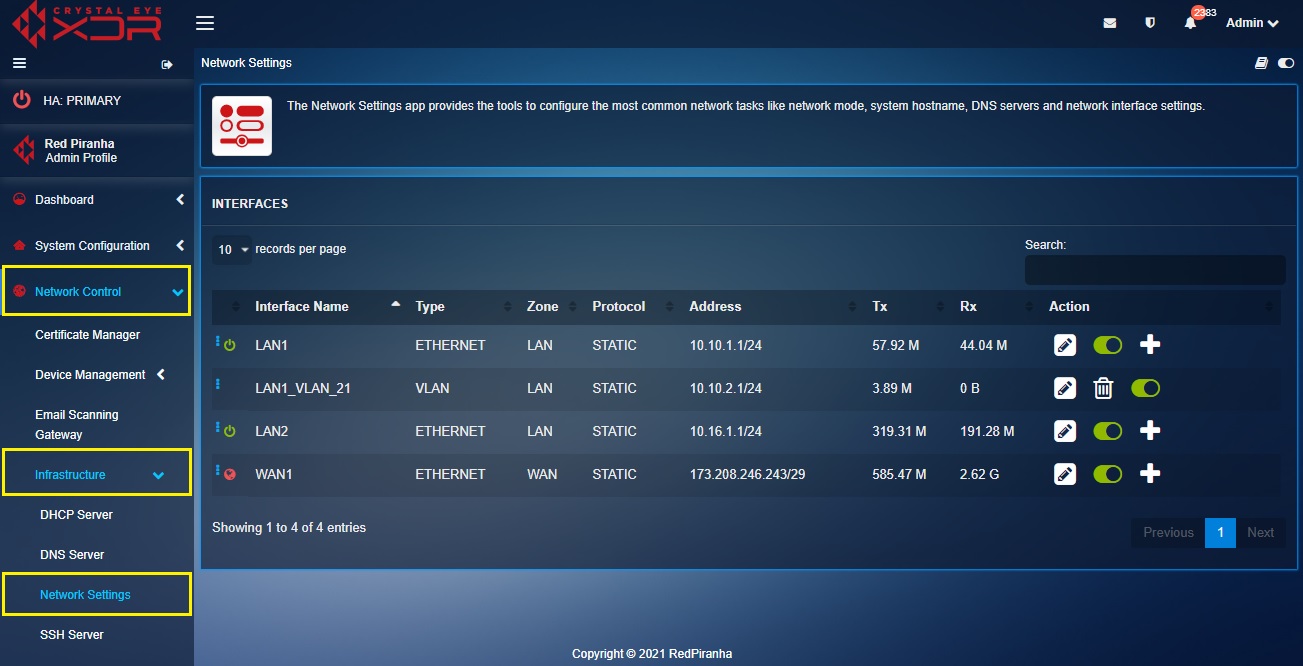
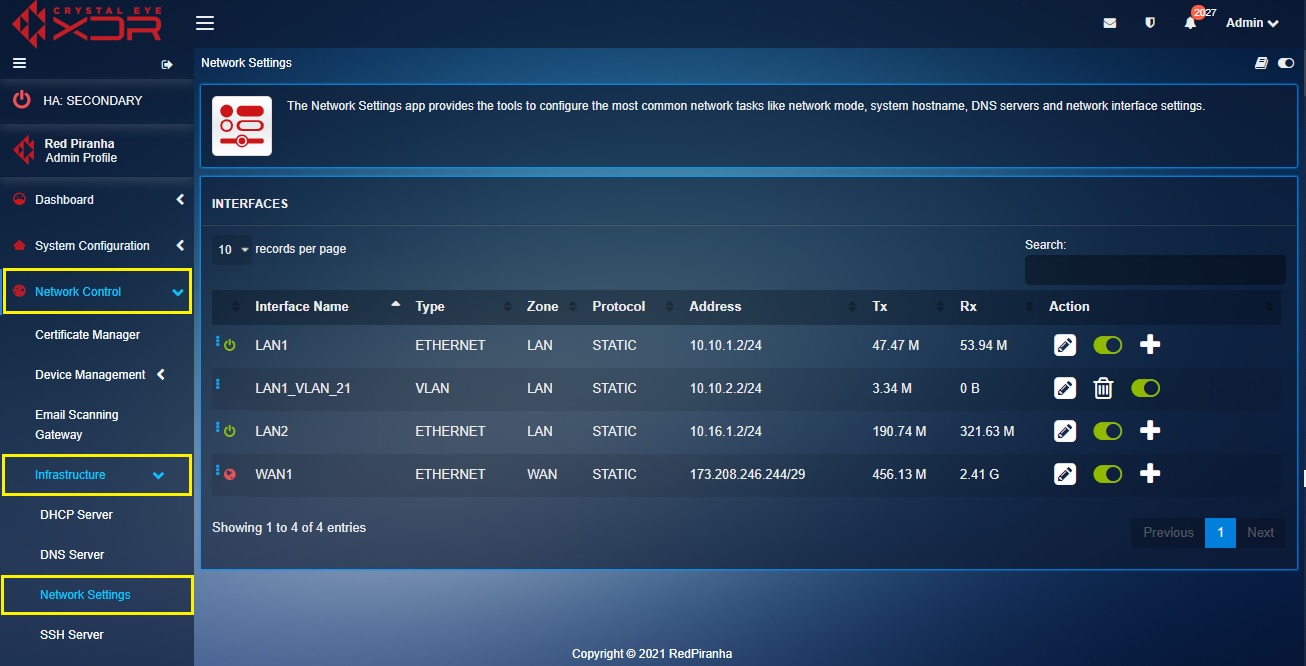
The following 2 screenshots shows the network settings in the Primary and the Secondary Crystal Eye XDR’s.
Note: DHCP is enabled while creating all these interfaces.
Network Interface Settings of the Primary Crystal Eye XDR
Network Interface Settings of the Secondary Crystal Eye XDR
Note: The settings mentioned below are done on a Crystal Eye series 20 model which has two LAN ports and two WAN ports.
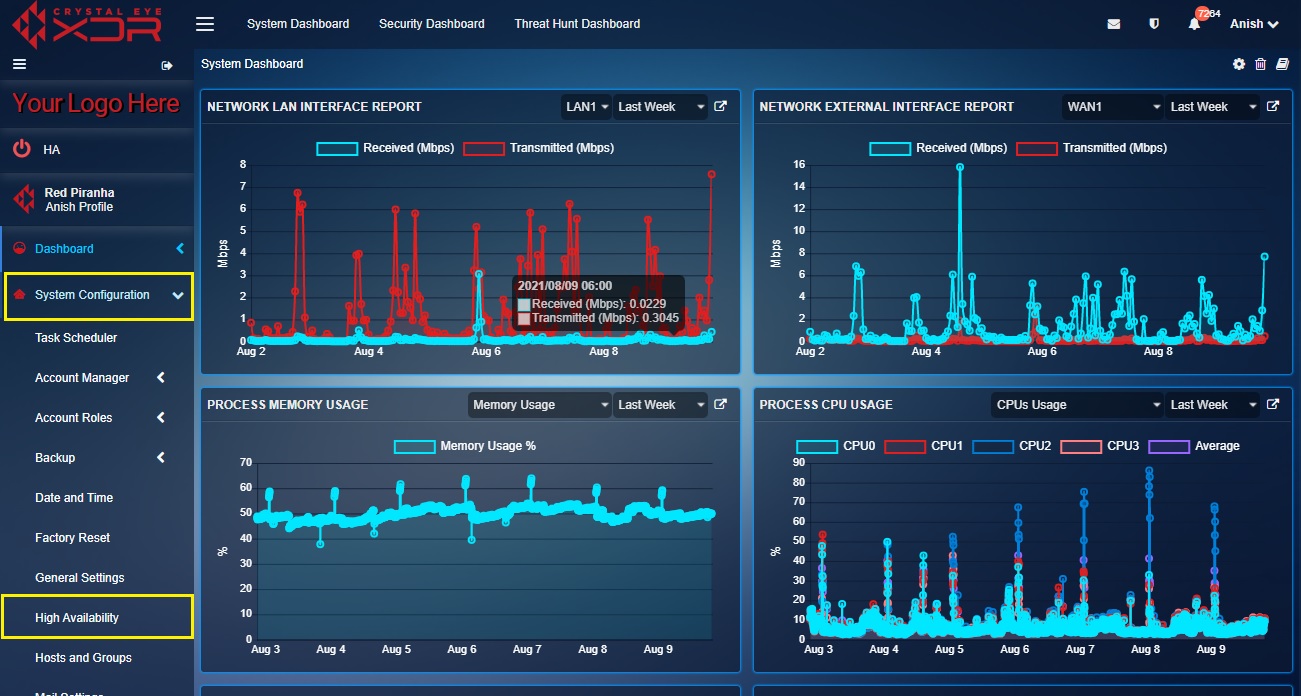
Step 1: Go to High Availability application in the Primary Crystal Eye XDR.
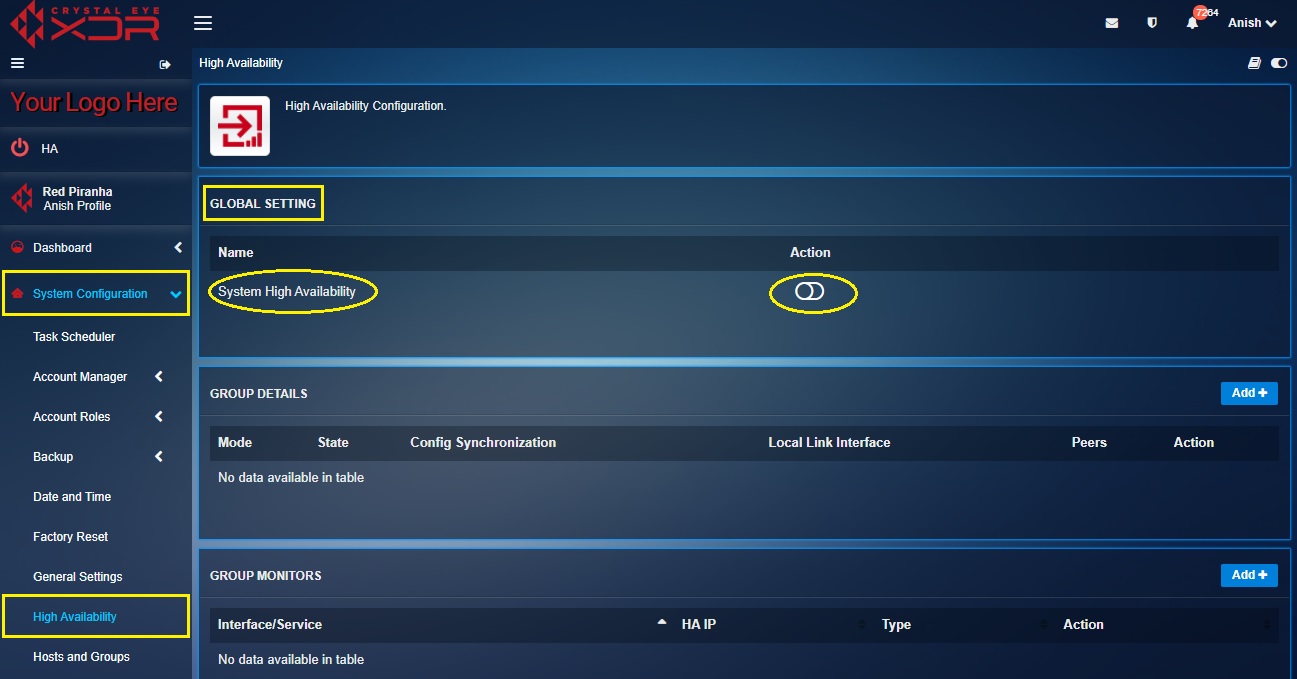
Step 2: You will now be directed to High Availability application page. Switch-on the System High Availability button as it turns green in the Global Setting section.
Note: Once the System High Availability button is switched-on from the Global Settings section it would turn green, and a system message would pop-up “Success! Successfully enabled System High Availability”. 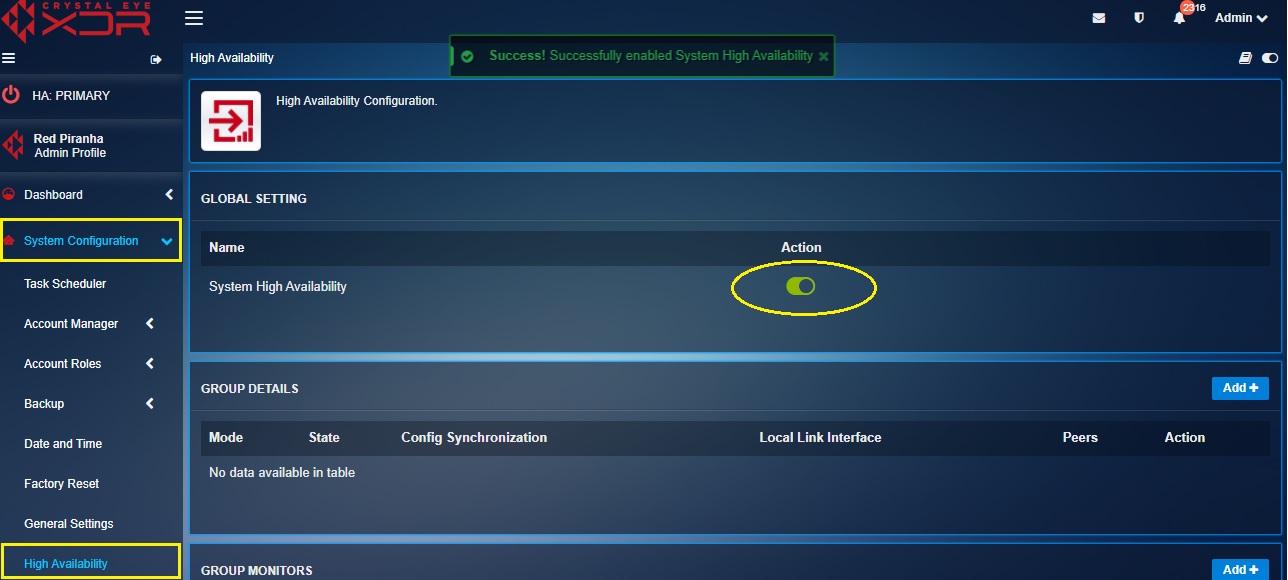
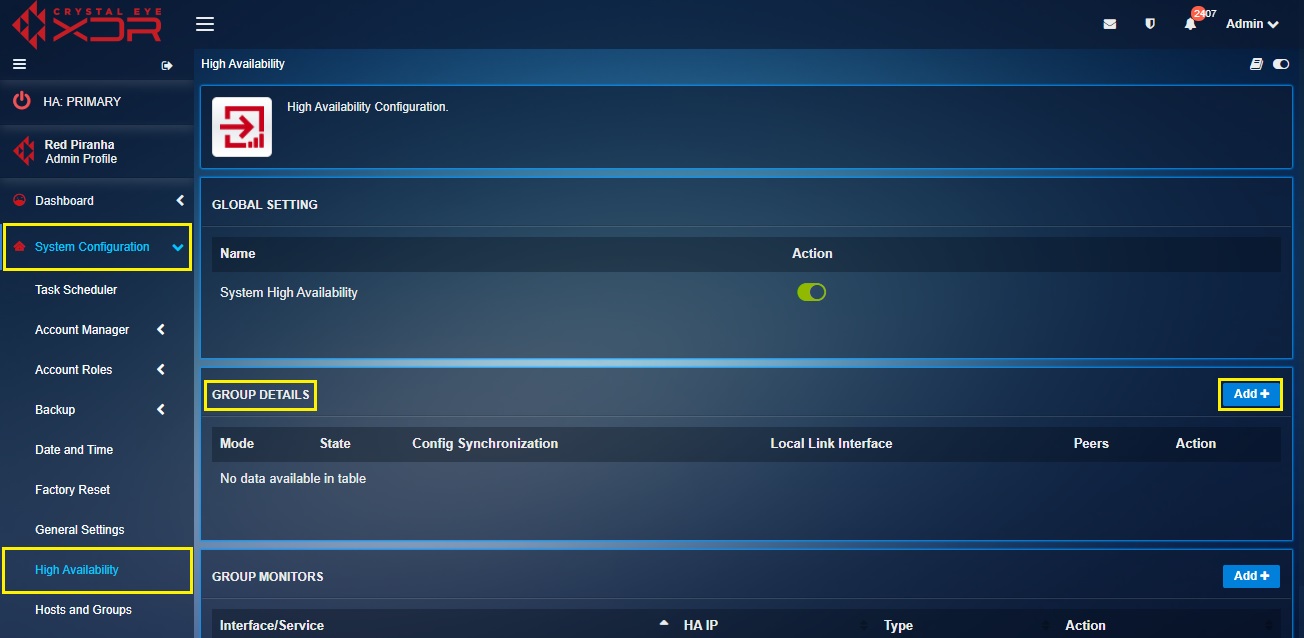
Step 3: Now, click the Add button on the top right corner of the Group Details section of the Primary CE XDR.
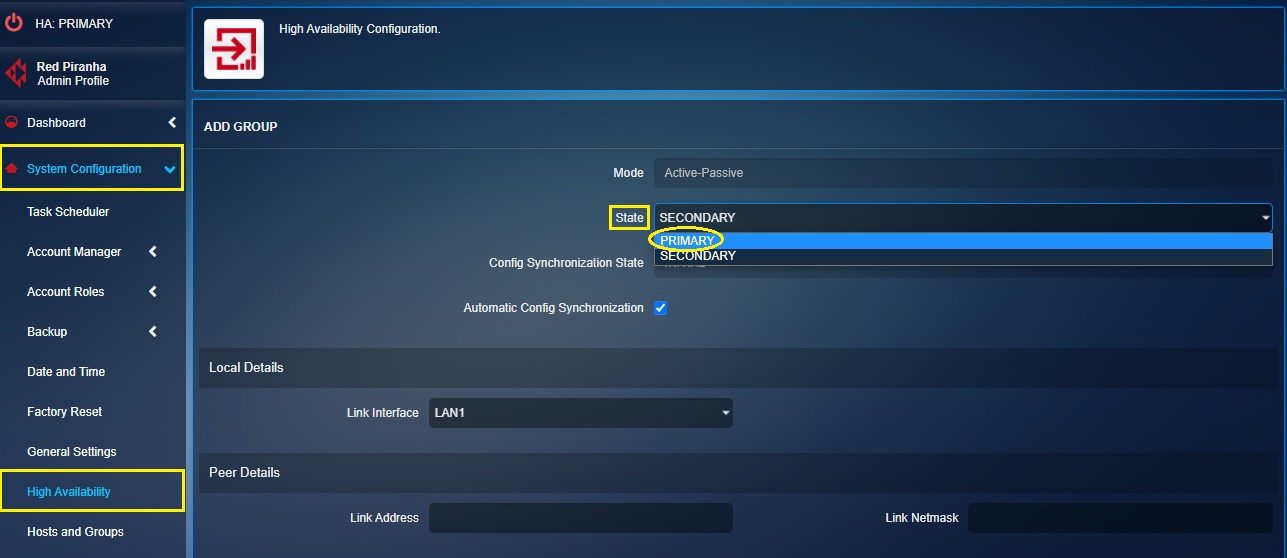
Step 4: You will now be directed to the Add Group page. Select Primary from the State dropdown and ensure Automatic Config Synchronization tick box is selected.
Step 5: Select LAN2 from the Link Interface dropdown in the Local Details section.
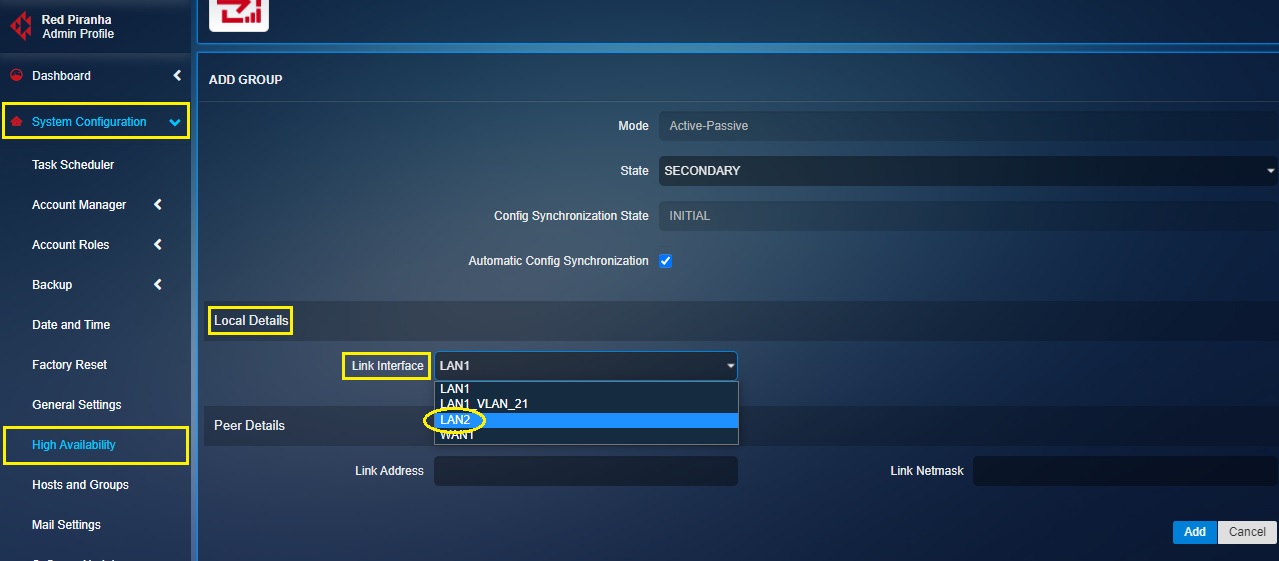
Note: We have selected LAN2 from the Link interface dropdown, since LAN2 port of the secondary CE is used for connecting the dedicated HA link to it.
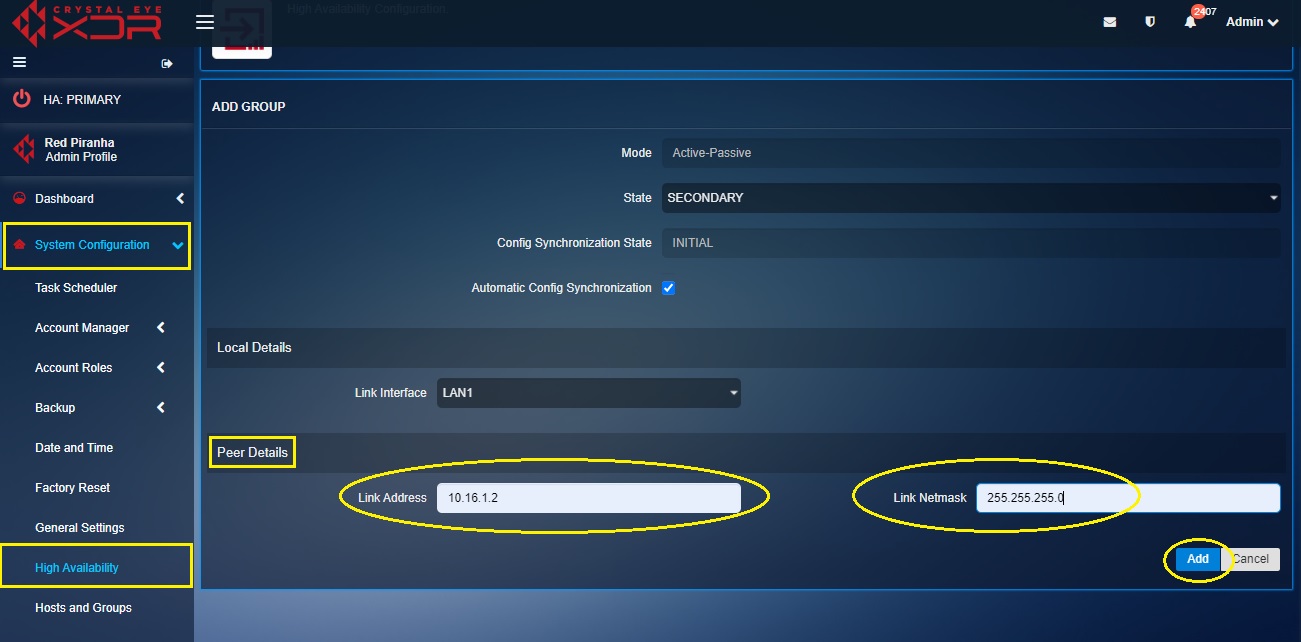
Step 6: Enter the Link Address, Link Netmask in the given text boxes under the Peer Details section and then click the Add button. As per our scenario, we will enter the LAN2 IP address of the secondary CE (i.e 10.16.1.2) in the Link Address textbox and its netmask as 255.255.255.0
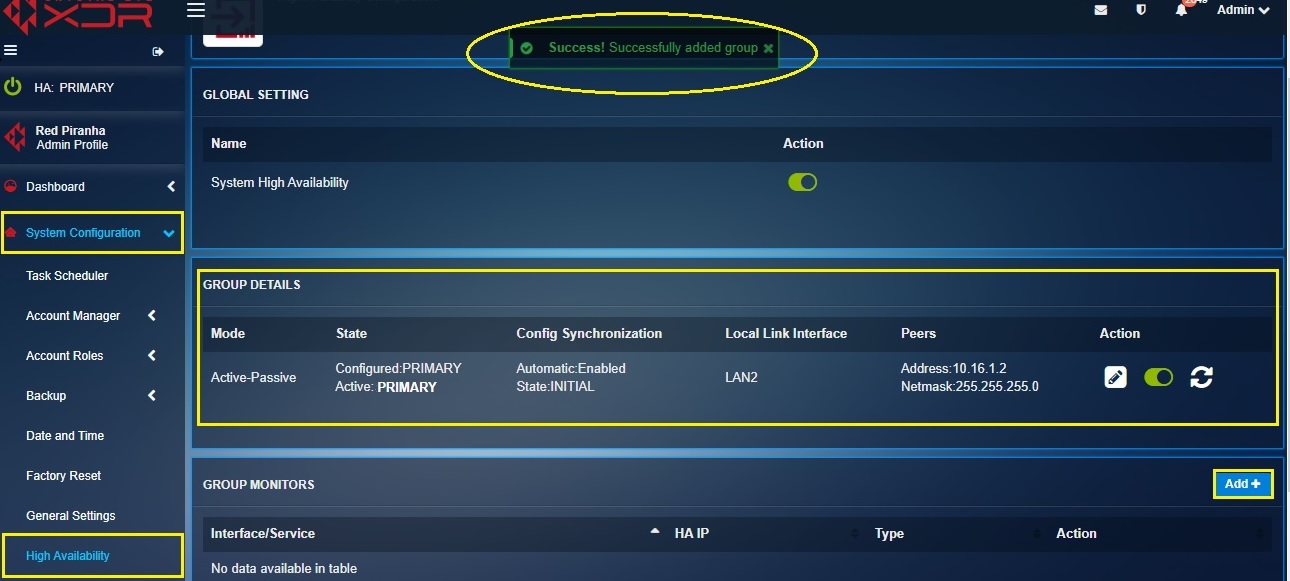
Step 7: You will now be directed to the high availability application dashboard page. The Group Details section will show the LAN2 IP Address and its Netmask. Click the Add button in the Group Monitors section.
Step 8: You will now be directed to the Add Monitor page. Select Interface from the Monitor Type dropdown.
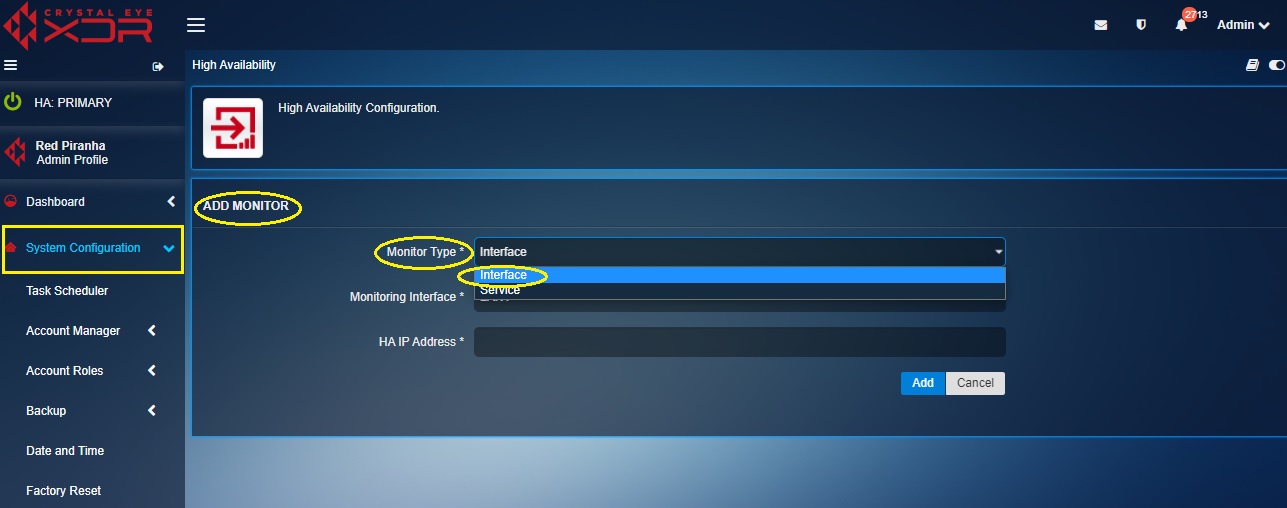
Step 9: Select LAN1 from the Monitoring Interface dropdown, enter the LAN HA IP address in the HA IP address text box and then click the Add button.
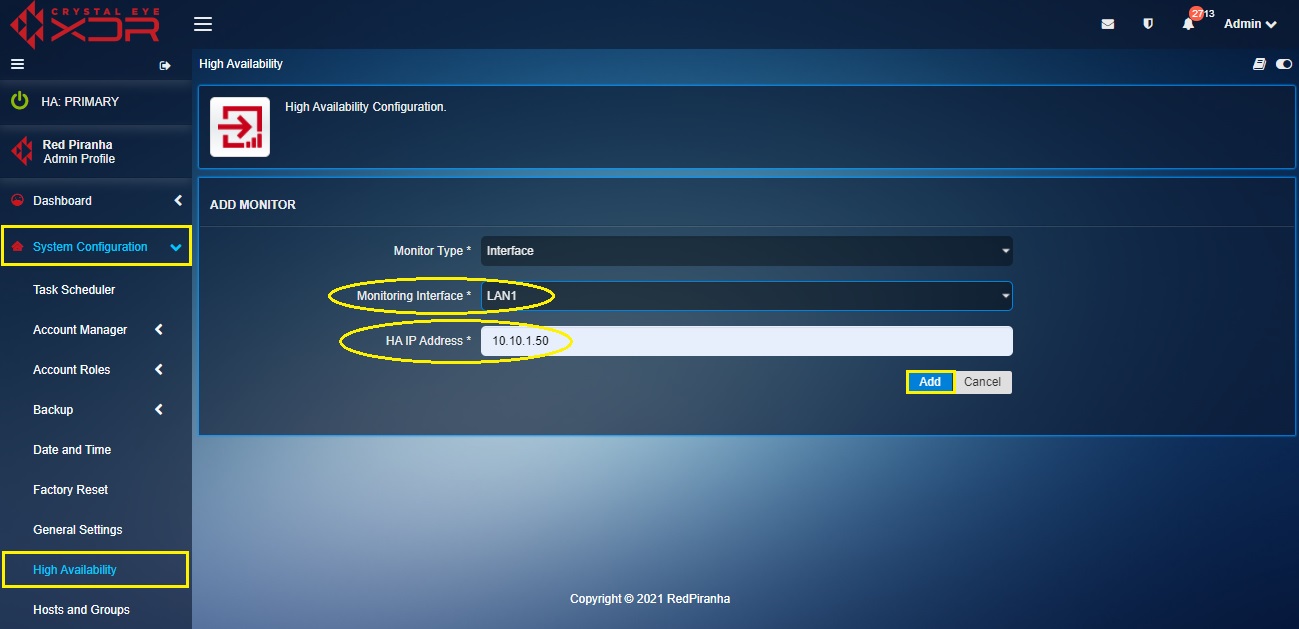
Note: As per our scenario, LAN1 is the interface that will be monitored henceforth we will select an IP address (i.e 10.10.1.50) as our LAN HA IP address which belongs to the same subnet as that of LAN1 of the primary CE (10.10.1.1) and the LAN1 of the secondary CE (10.10.1.2).
Step 10: You will now be directed to the high availability application page where you will see LAN1 as your monitoring interface in the high availability application page.
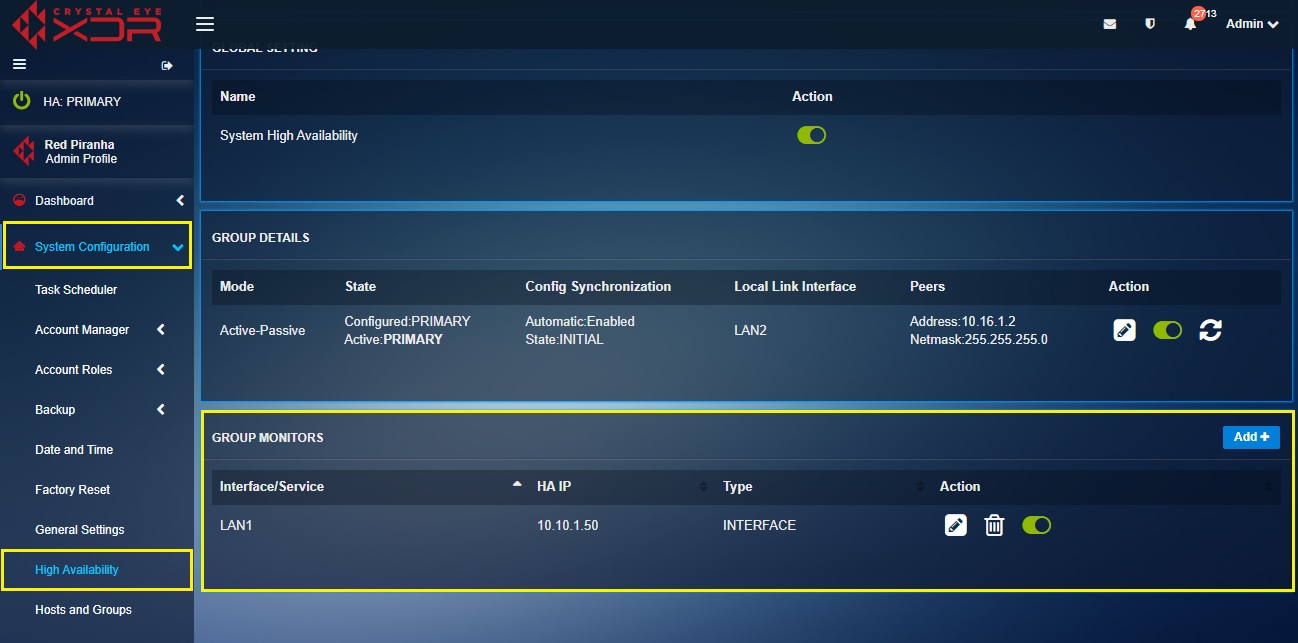
Step 11: We will now add the VLAN interface as the Group Monitors. Click the Add button in the top right corner of the Group Monitors section. 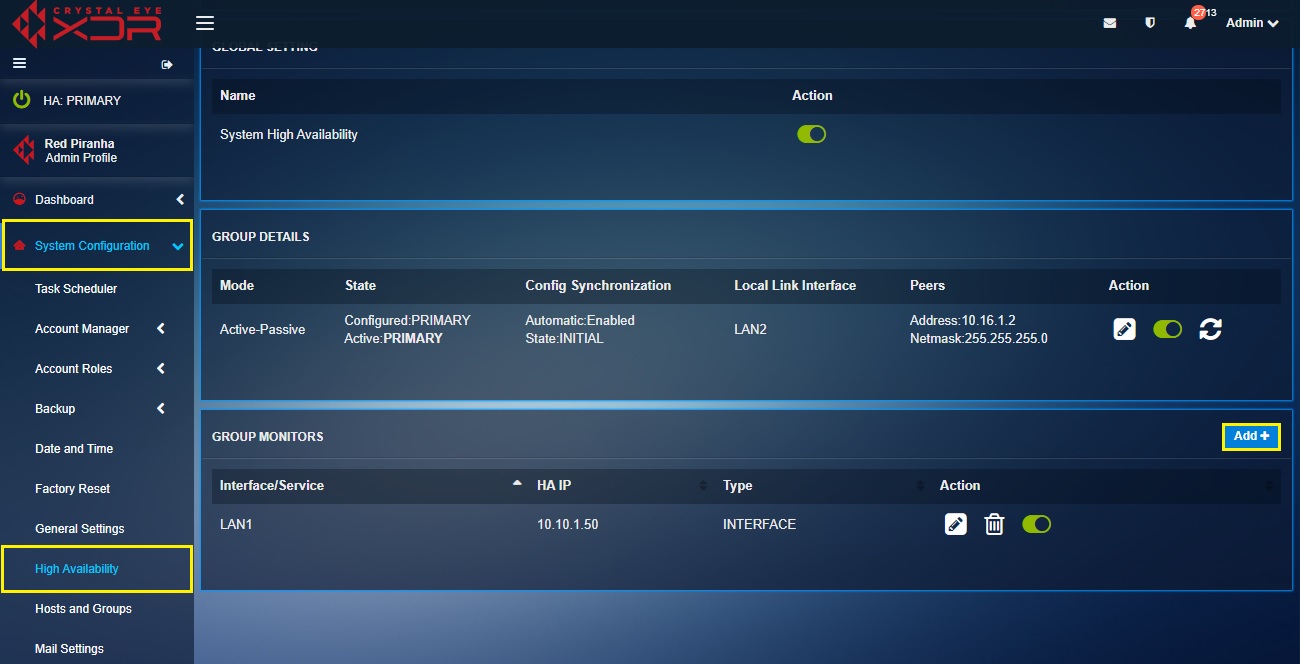
Step 12: You will now be directed to the Add Monitor page. Select Interface from the Monitor type dropdown, select LAN1_VLAN_21 from the Monitoring Interfaces dropdown, enter the VLAN HA IP Address and click the Add button.
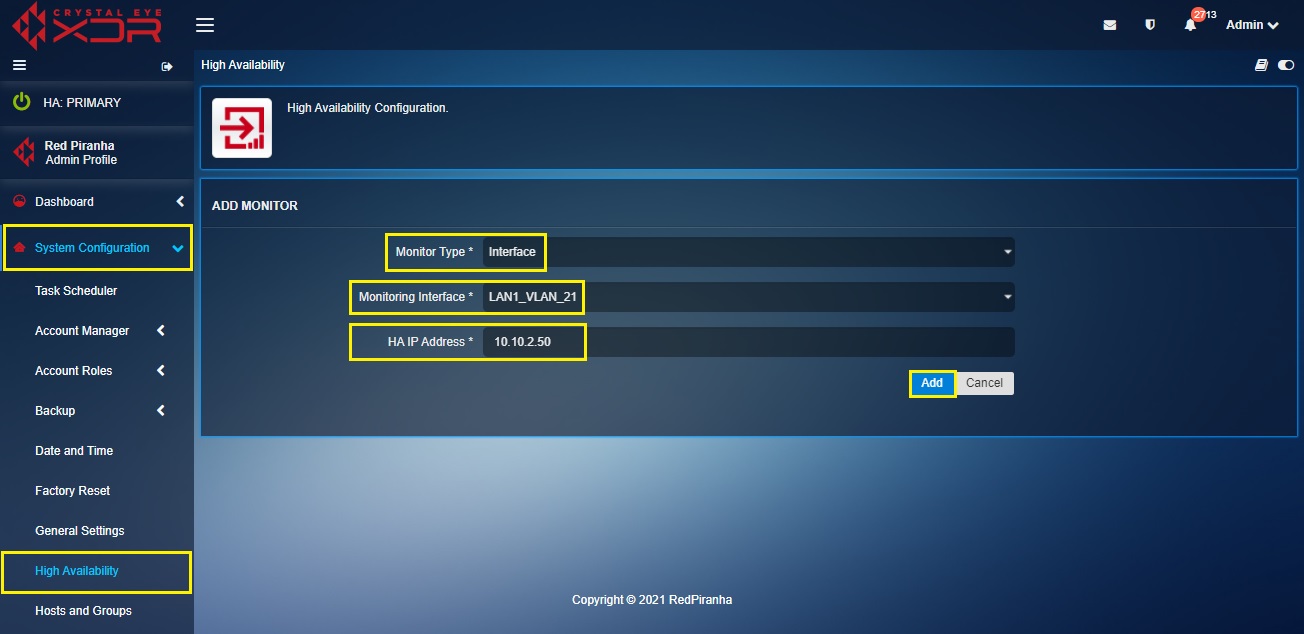
Note: As per our scenario, LAN1_VLAN_21 is one of the interfaces that will be monitored henceforth we will select an IP address (i.e 10.10.2.50) as our VLAN HA IP address which belongs to the same subnet as that of LAN1_VLAN_21 of the primary CE (10.10.2.1) and the LAN1_VLAN_21 of the secondary CE (10.10.2.2).
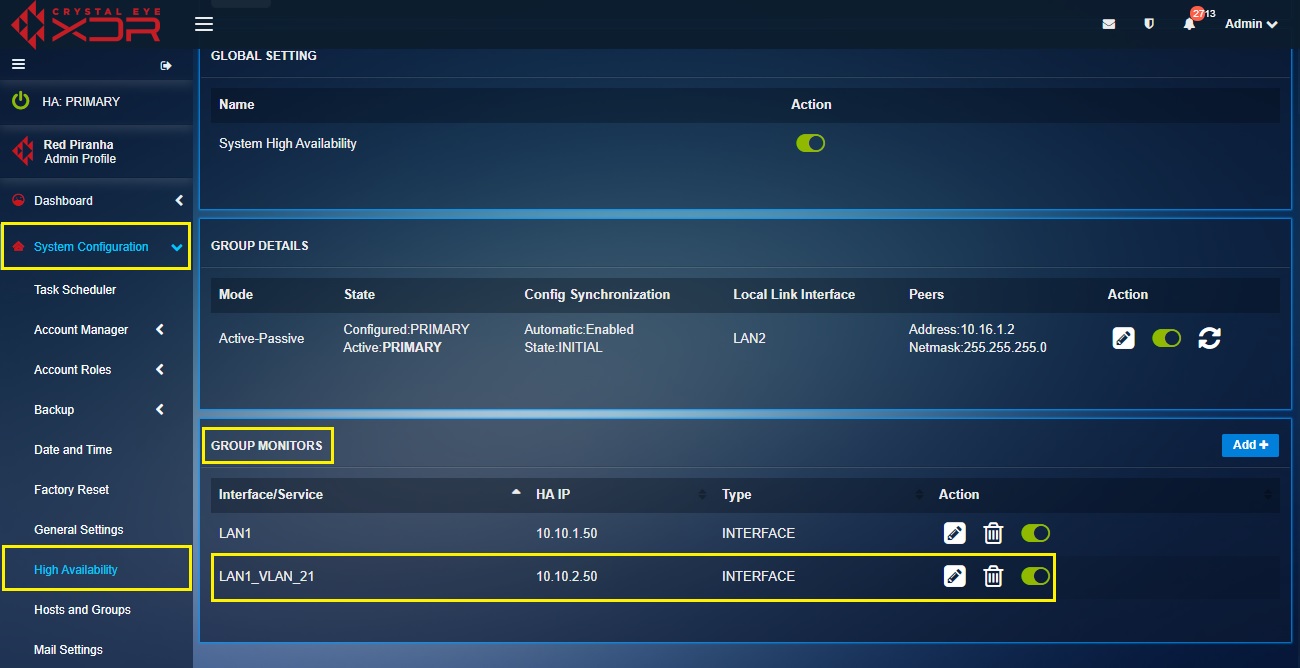
Step 13: You will now be directed to the high availability application page where you will be able to see the newly added VLAN interface in the Group Monitors section.
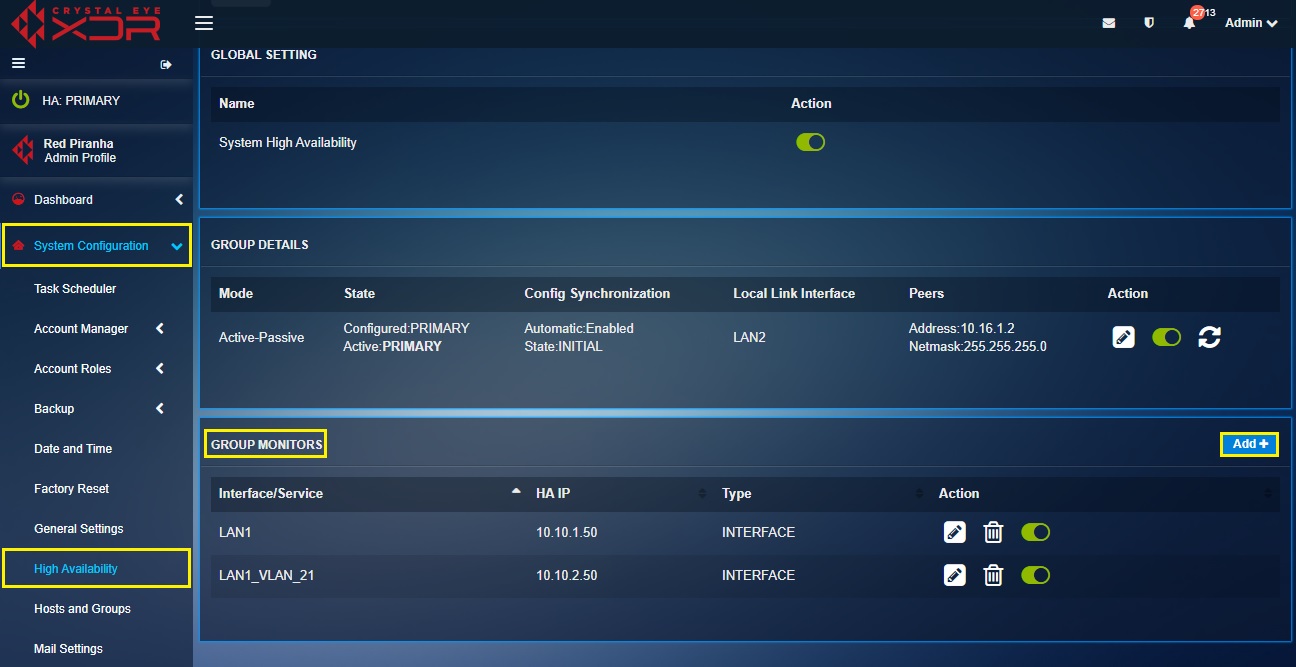
Step 14: We will now add the WAN interface as the Group Monitor. Click the Add button in the top right corner of the Group Monitors section.
Step 15: You will now be directed to the Add Monitor page. Select Interface from the Monitor type dropdown, select WAN1 from the Monitoring Interfaces dropdown, enter the WAN HA IP Address and click the Add button.
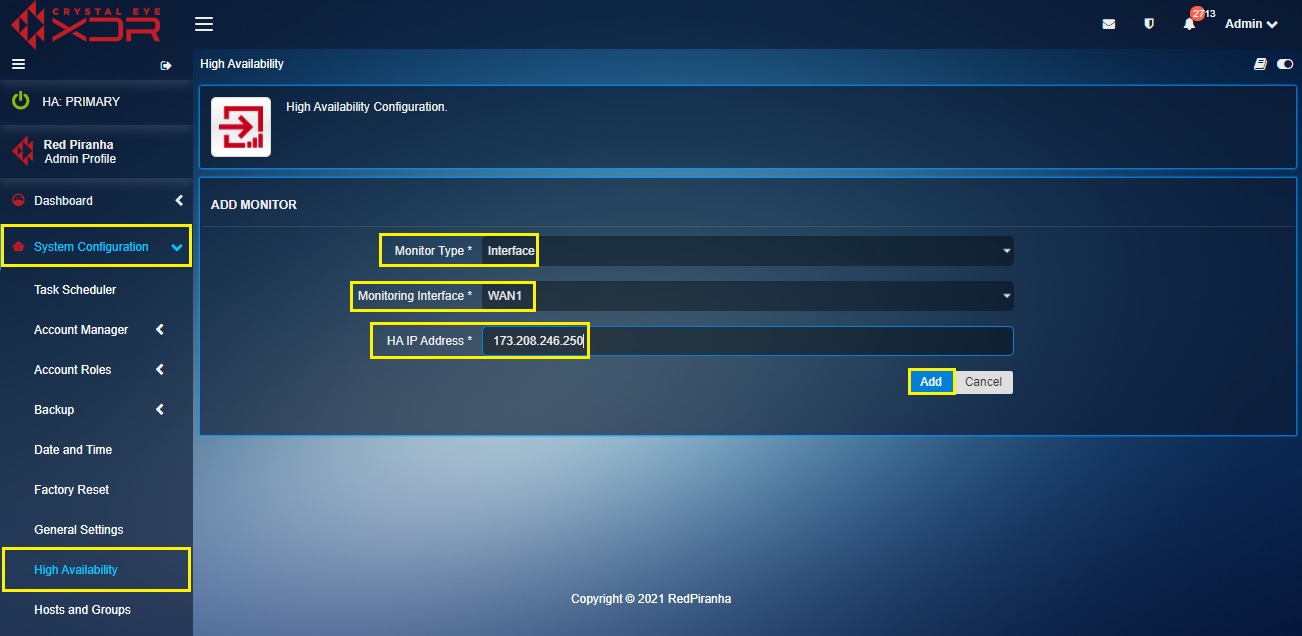
Note: As per our scenario, WAN1 is one of the interfaces that will be monitored henceforth we will select an IP address (i.e 173.208.246.250) as our VLAN HA IP address which belongs to the same subnet as that of WAN1 of the primary CE (173.208.246.243) and the WAN1 of the secondary CE (173.208.246.244).
Step 16: You will now be directed to the high availability application page where you will be able to see the newly added WAN interface in the Group Monitors section.
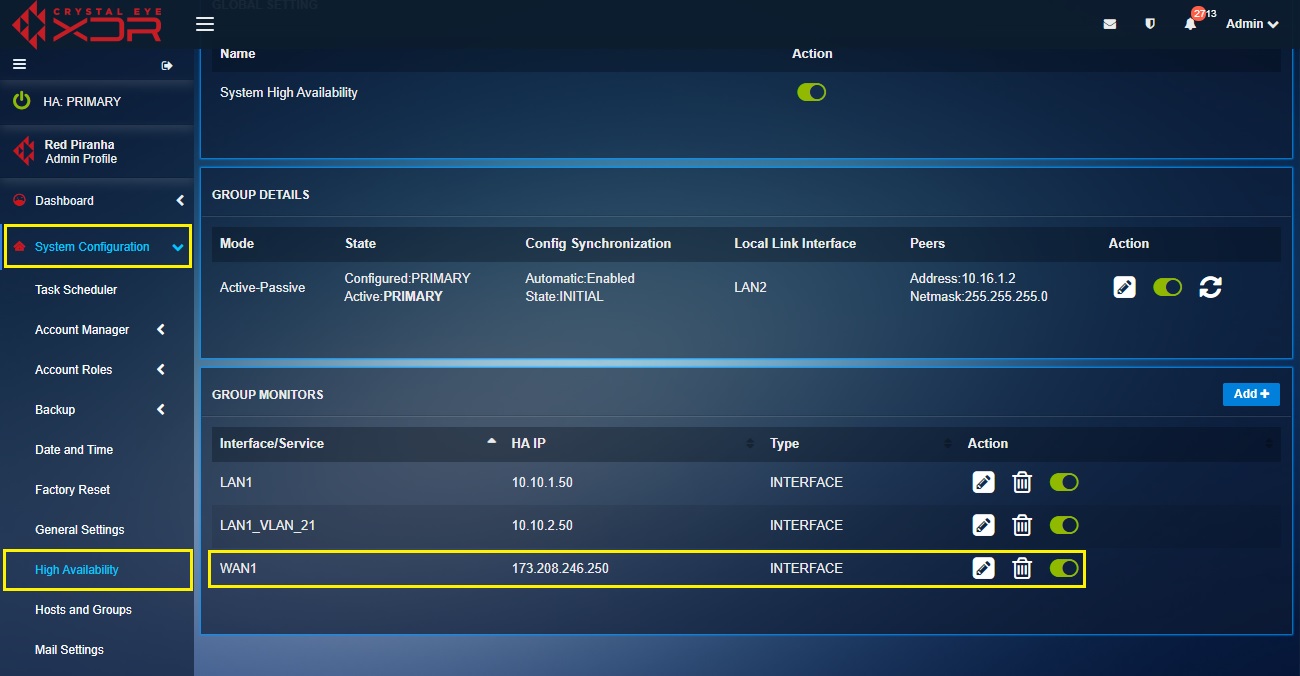
Step 17: Now go to the High Availability application in the Secondary Crystal Eye XDR.
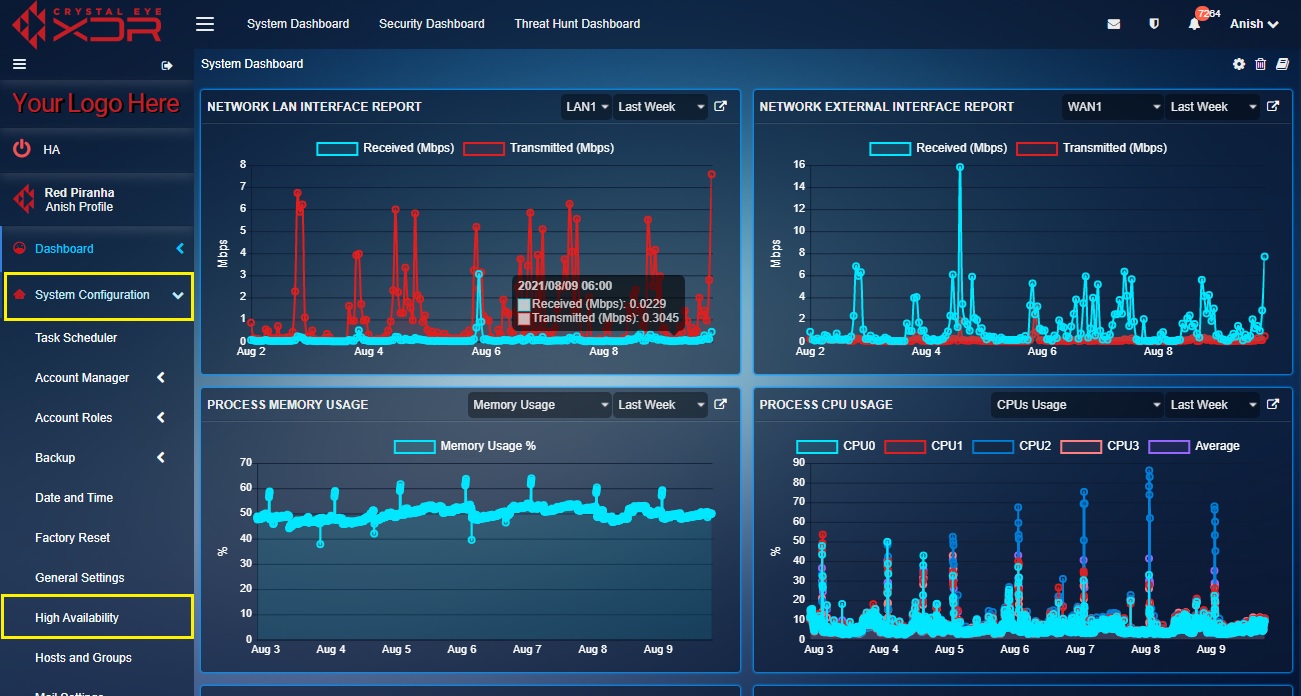
Step 18: You will now be directed to High Availability application page. Switch-on the System High Availability button as it turns green in the Global Setting section.
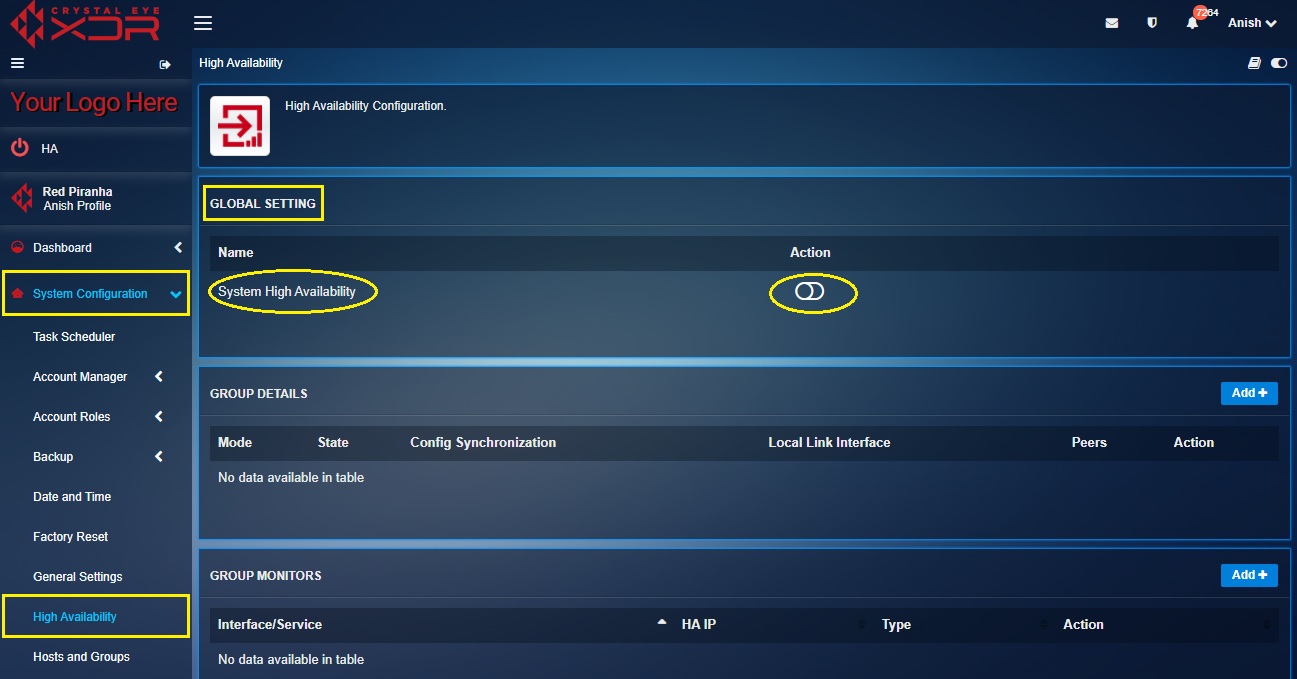
Note: Once the System High Availability button is switched-on from the Global Settings section it would turn green, and a system message would pop-up “Success! Successfully enabled System High Availability”.
Step 19: Now, click the Add button on the top right corner of the Group Details section of the Primary CE XDR.
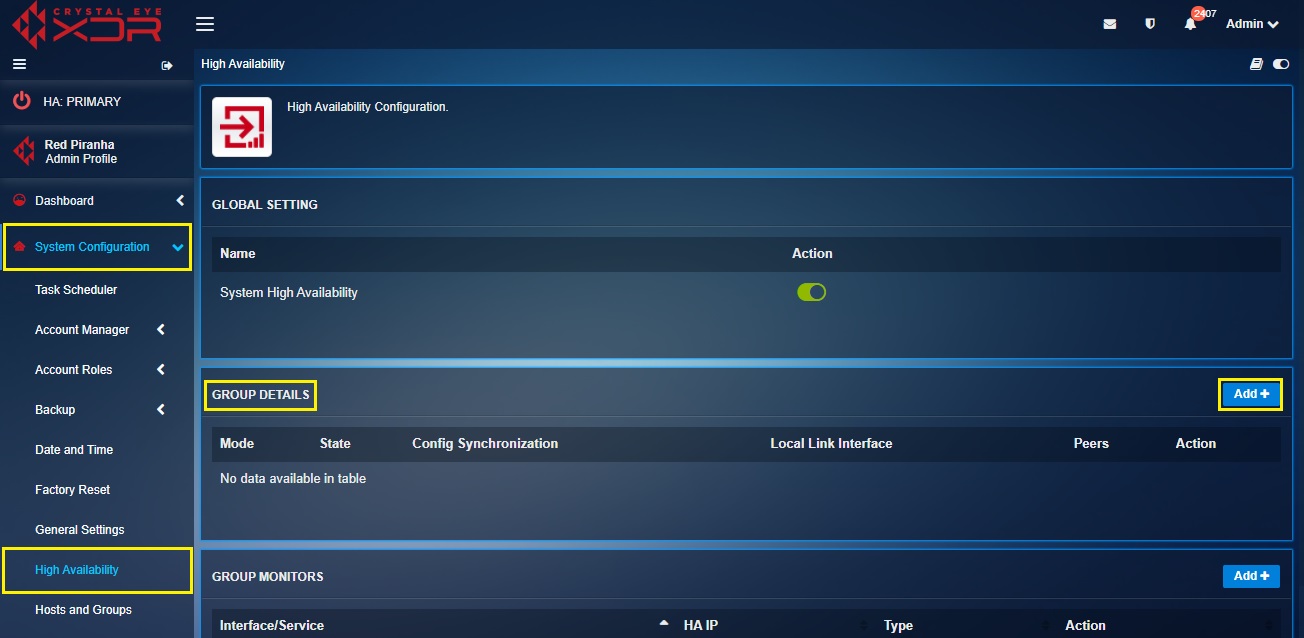
Step 20: You will now be directed to the Add Group page. Select Secondary from the State dropdown and ensure Automatic Config Synchronization tick box is selected.
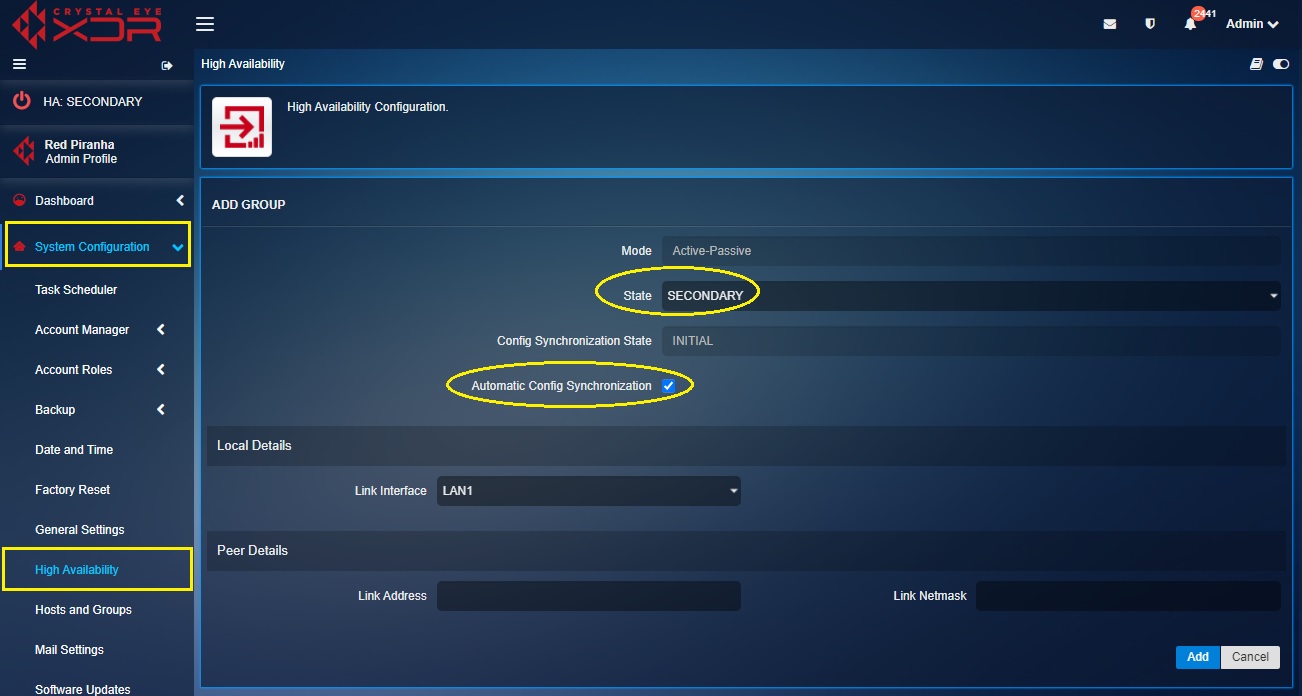
Step 21: Select LAN2 from the Link Interface dropdown in the Local Details section.
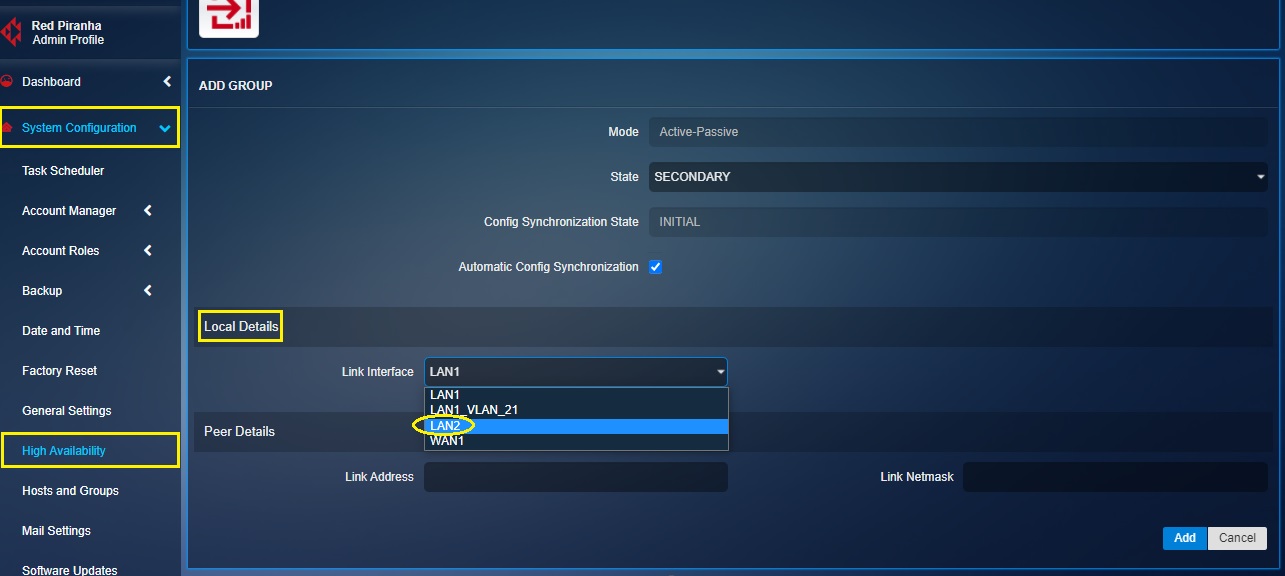
Note: We have selected LAN2 from the Link interface dropdown, since LAN2 port of the Primary CE is used for connecting the dedicated HA link to it.
Step 22: Enter the Link Address, Link Netmask in the given text boxes under the Peer Details section and then click the Add button. As per our scenario, we will enter the LAN2 IP address of the primary CE (i.e 10.16.1.1) in the Link Address textbox and its netmask as 255.255.255.0
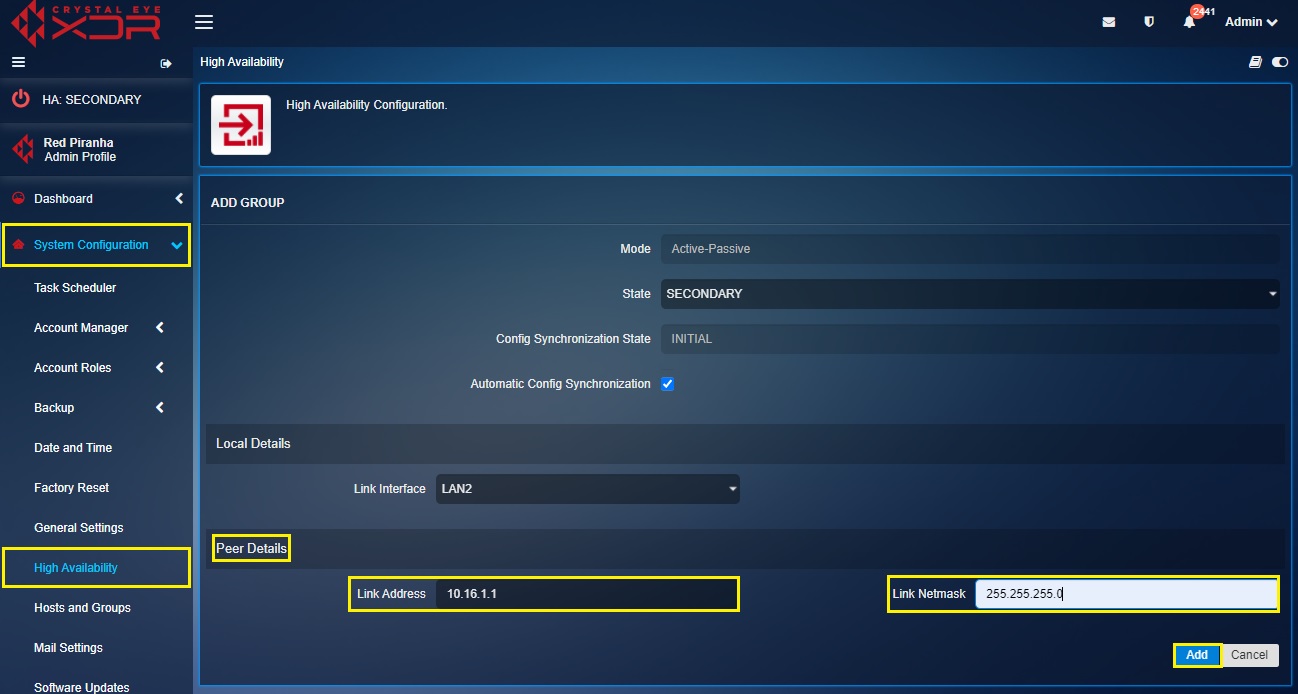
Note: You will now be directed to the high availability application dashboard page. The Group Details section will show the LAN2 IP Address and its Netmask.
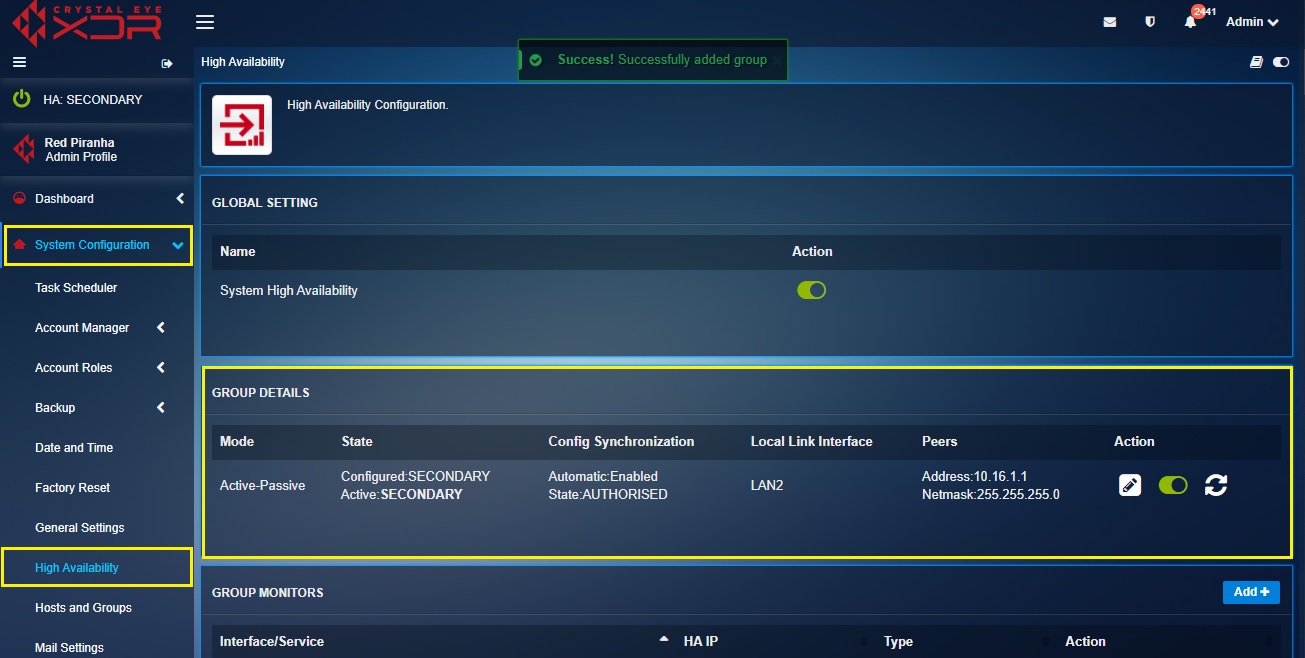
Step 23: In the Group Monitors section, click the Add button on the top-right corner of the Group Monitors section.
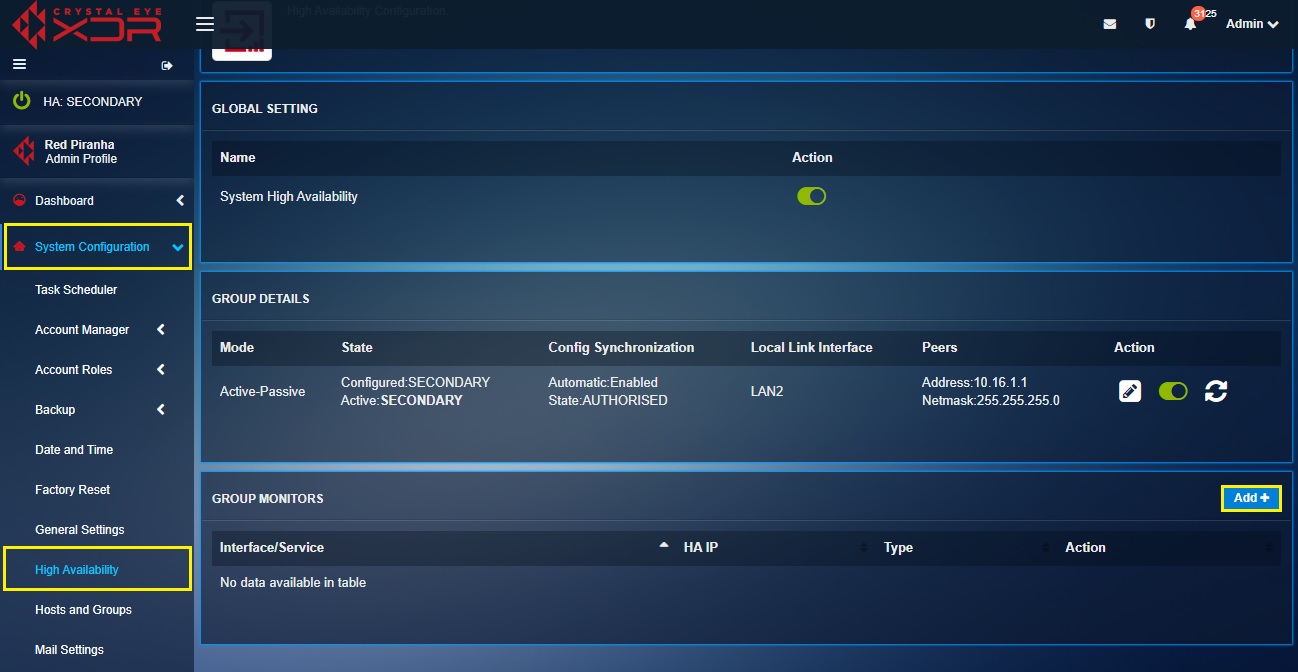
Pursue the steps mentioned from Step 8 to step 18 to add the Group Monitors.
Content to be uploaded Soon!
Content to be uploaded Soon!
Content to be uploaded Soon!
Content to be uploaded Soon!
Content to be uploaded Soon!