Web Proxy Server
Crystal Eye’s Web Proxy Server app acts as an intermediary for web requests originating from a network. The basic functionality of this app is improve page access time, decrease bandwidth use and provides site visit audits by user and IP address.
The Web Proxy Server app turns the Crystal Eye appliance as a high performance Proxy Caching Server. This essentially means that the CE appliance acts as an intermediary between the client and the original web server. The advantages of having such a setup is that the CE would act as a gateway and start co-coordinating with the source server so as to start caching or storing its resources. 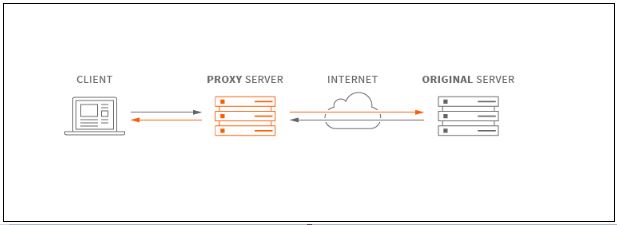 It also provides improved security by provinding an extra cover against malicious websites etc. One of the most important features of Crystal Eye’s Web Proxy is that it allows users to bypass blocked resources. These resources are generally blocked by the organisation but the bypass functionality of CE’s web proxy can be used to whitelist any IP address of a server, website etc.
Left-hand Navigation Panel > Network Control > Web Proxy Server  |
|---|
The Crystal Eye has a brilliant feature that can be used to set up the appliance to work on Transparent Proxy mode.
Crystal Eye appliance works as an intermediary through which the web traffic is routed from a user device in the CE network. When the Transparent Proxy + No User Authentication mode of CE is enabled, the appliance silently proxies all the HTTP traffic. This also means that a CE administrator can push the HTTP web traffic originating from a user device in the CE network through the proxy without performing browser reconfiguration tasks or installing CE certificates in the browsers.
The transparent proxy mode of the Crystal Eye appliance does not have an authentication mode and can only be used to enforce blanket proxy on the entire CE network traffic.
While the CE appliance is run on transparent proxy mode, advanced CE proxy features such as SSL Decryption can also be activated to enable proxy services for HTTPs traffic. However, the process of enabling proxy services for HTTPs traffic requires all network users to install CE certificates in the proxy settings section of their browsers.
Note: While SSL decryption is enabled in Transparent Proxy mode, internet can only be accessed if CE certificate is installed in the browser.
This option is widely appreciated for its ability to reduce the administrative burden of the CE administrator since explicit configuration of proxy is not required to be done on each device in the CE network.
How to setup Transparent Proxy in the Crystal Eye appliance to enable proxy services for both HTTP and HTTPs Traffic?
Note: The Crystal Eye appliance runs on Transparent Proxy + No User Authentication mode by default.
Step 1: In the Web Proxy Server application page, click the Edit button in the Authentication section.![]()
Step 2: You will now be directed to the Authentication page. Select Transparent Proxy + No User Authentication from the dropdown. ![]()
Important: In order to enable proxy services for HTTPs traffic, CE provides an option to enable ‘SSL Decryption’ in the Web Proxy Server. When this option is enabled, CE proxies for all the HTTPs traffic as well. Thus network users should have CE certificates installed in the trusted chain in their devices for accessing the internet.
Follow these steps below to enable proxy services for HTTPs traffic:
Step 3: Now that the Crystal Eye appliance is running on Transparent proxy mode it will silently proxy all HTTPs traffic. To enable proxy service for HTTPs traffic in Transparent Proxy mode, click the Enable button in the SSL Decryption column under the Rules section.![]()
Step 4: Click the Download Certificate button in the SSL Decryption column under Rules section.![]()
Step 5: Install the CE Certificate to the browser if you are using a Laptop. Read below to know how to install certificates in Google Chrome and Morzilla Firefox browsers.
Follow the steps below to install CE certificate in Google Chrome:
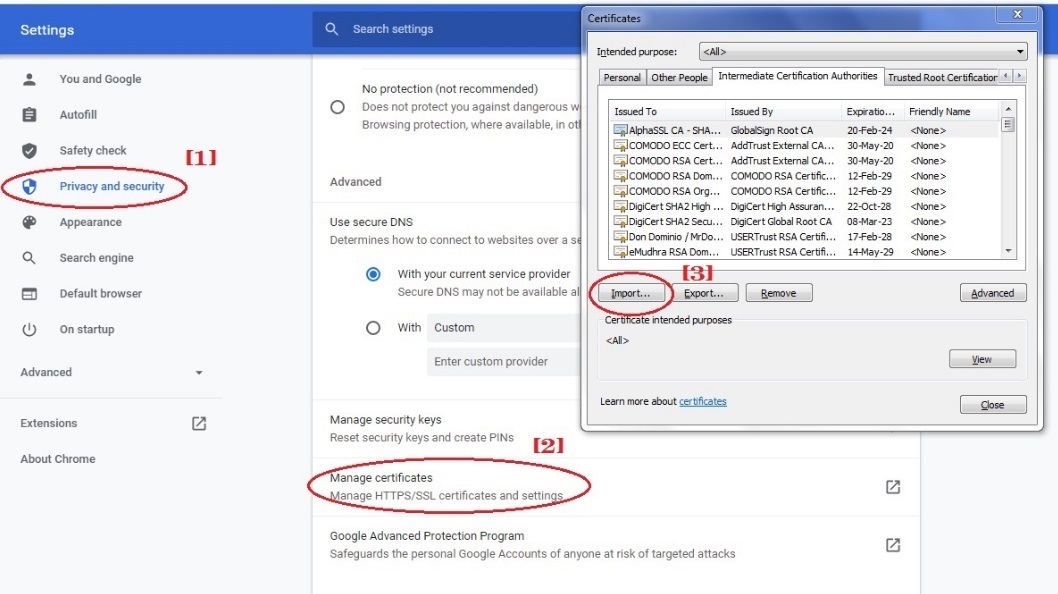
Go to Settings > Privacy and security > Security > Manage Certificates > Intermidiate Certification Authorities > Click Import button and import the CE certificate![]()
Follow the steps below to install CE certificate in Morzilla Firefox:
Type ‘about:preferences’ in the browser > Privacy and Security > Certificates > Certificates Manager > Authorities > Click Import button and import the CE certificate![]()
In Explicit Proxy mode, only the network devices in the CE network that have explicit proxy settings (automatic configuration) will be proxied for by the CE. All other traffic would pass undetected and unscanned by CE. HTTPs sites will be proxied and scanned only when SSL Decryption option is enabled in CE.
Explicit Mode can be enabled to support both user authentication for selected users in the CE network (Explicit Proxy + User Authentication mode) or it can be deployed to be implemented for all the users in the CE network (Explicit Proxy + No User Authentication mode).
SSL Decryption should be enabled in Explicit Proxy mode to intercept HTTPs traffic. When SSL Decryption is enabled, client devices should download the certificate by clicking 'Download Certificate' and install it as a trusted certificate in their devices to avoid service disruption. When SSL Decryption is disabled, CE only proxies for HTTP traffic.
How to setup Eplicit Proxy in the Crystal Eye appliance to enable proxy services for both HTTP and HTTPs Traffic?
Step 1: In the Web Proxy Server application page, click the Edit button in the Authentication section.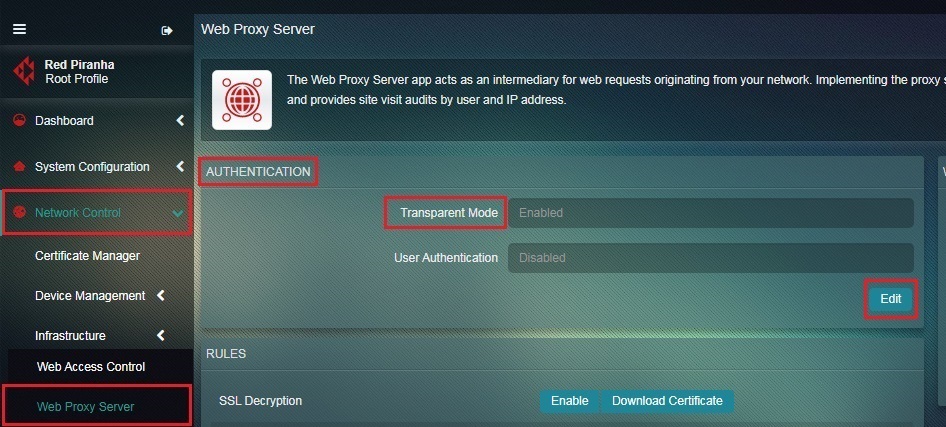
Step 2: You will now be directed to the Authentication page. Select Explicit Proxy + No User Authentication from the dropdown.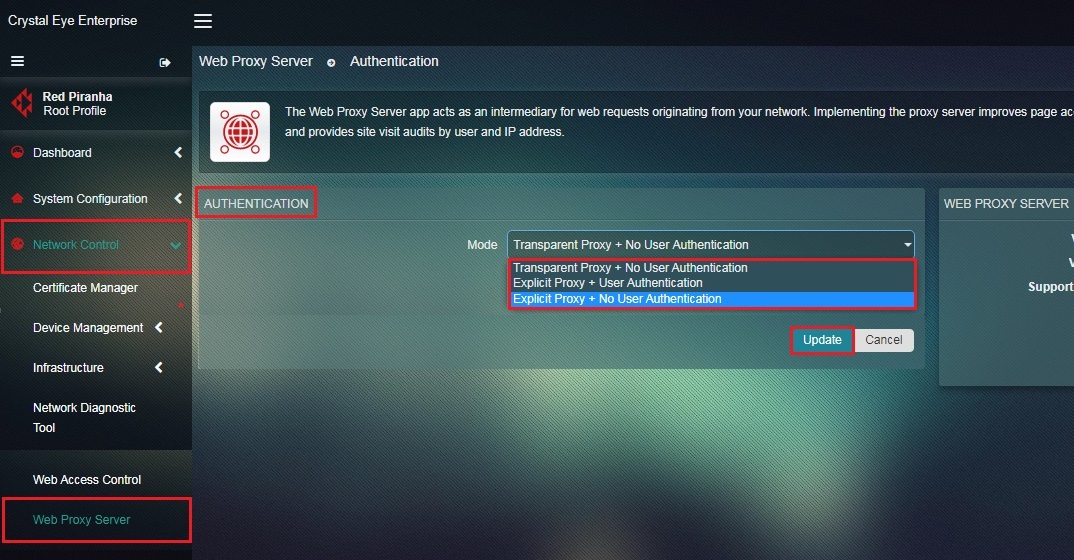
Note: As per requirements, the Crystal Eye administrator can opt for user authentication mode or no user authentication for users. When no user authentication is selected then the explicit web proxy is allpied for all the users in the network.
Important: In order to enable proxy services for HTTPs traffic in explicit mode, CE provides an option to enable ‘SSL Decryption’ in the Web Proxy Server. When this option is enabled, CE proxies for all the HTTPs traffic as well. Thus network users should have CE certificates installed in the trusted chain in their devices for accessing the internet. It must also be ensured that the CE certificates are installed in the browser to allow enabling of proxy services for HTTPs traffic.
Follow these steps below to enable proxy services for HTTPs traffic:
Step 3: To enable proxy service for HTTPs traffic in Eplicit Proxy mode, click the Enable button in the SSL Decryption column under the Rules section. 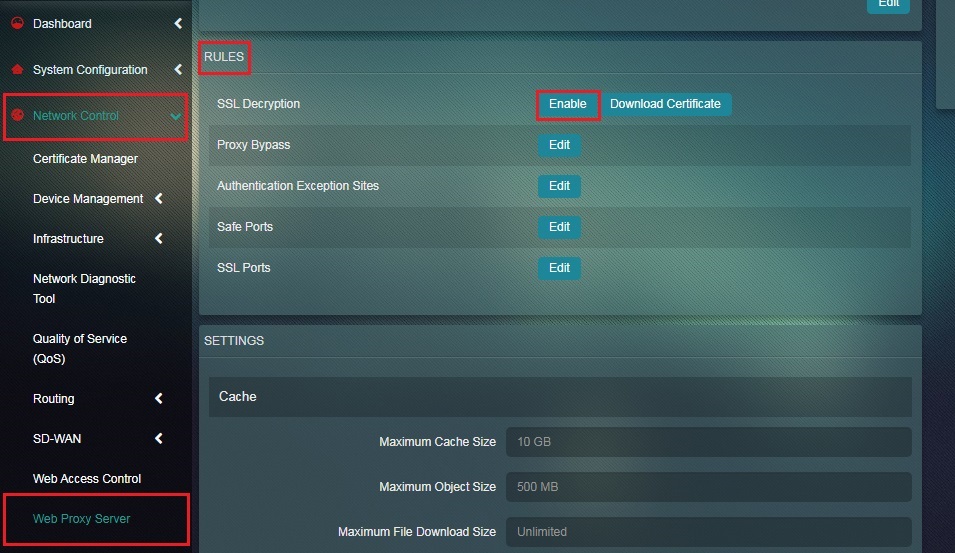
Step 4: Click the Download Certificate button in the SSL Decryption column under Rules section.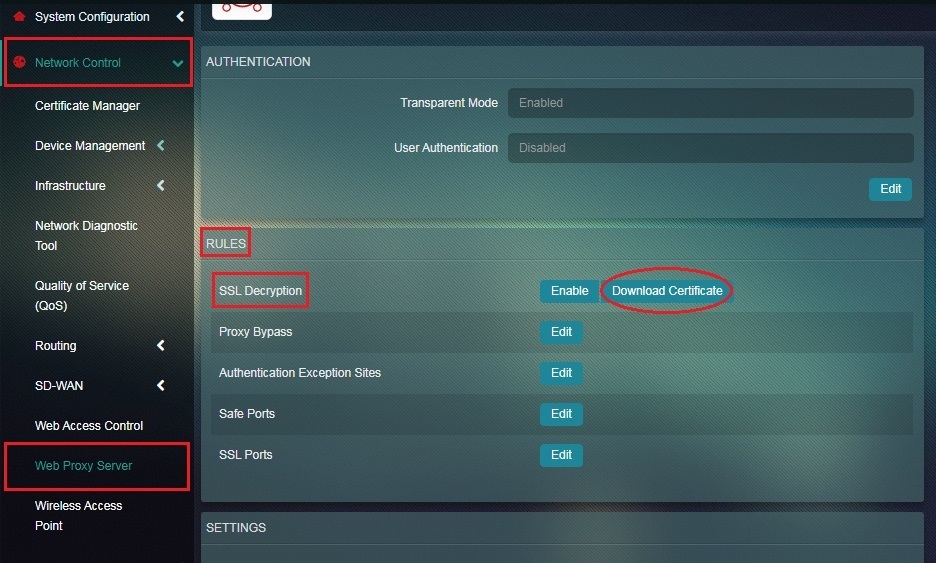
Step 5: Install the CE Certificate to the browser and ensure that the browser proxy has been set to ‘Automatic’ if you are using a Laptop. Read below to know how to install certificates and set the browser to aurtomatically detect proxy settings in Google Chrome and Morzilla Firefox browsers.
Follow the steps below to install CE certificate and set the browser to aurtomatically detect proxy settings in Google Chrome:
Go to Settings > Privacy and security > Security > Manage Certificates > Intermidiate Certification Authorities > Click Import button and import the CE Certificate 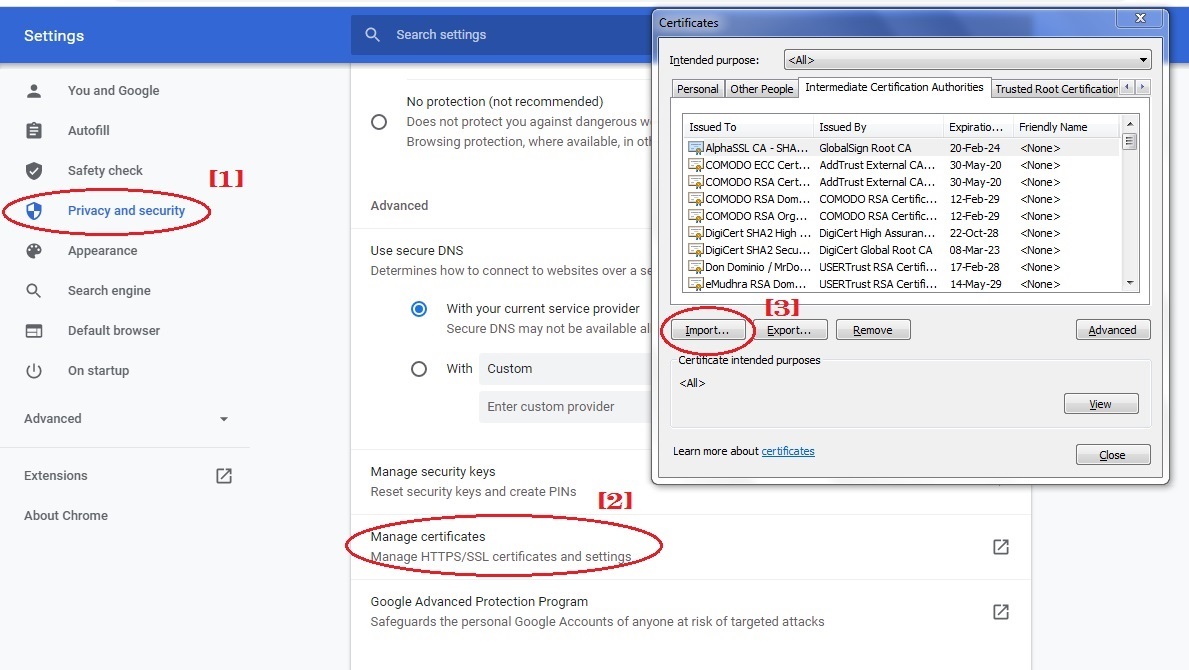
Note: Ensure that the browser is set up to automatically detect proxy settings.
Follow the steps below to install CE certificate in Morzilla Firefox:
Type ‘about:preferences’ in the browser > Privacy and Security > Certificates > Certificates Manager > Authorities > Click Import button and import the CE certificate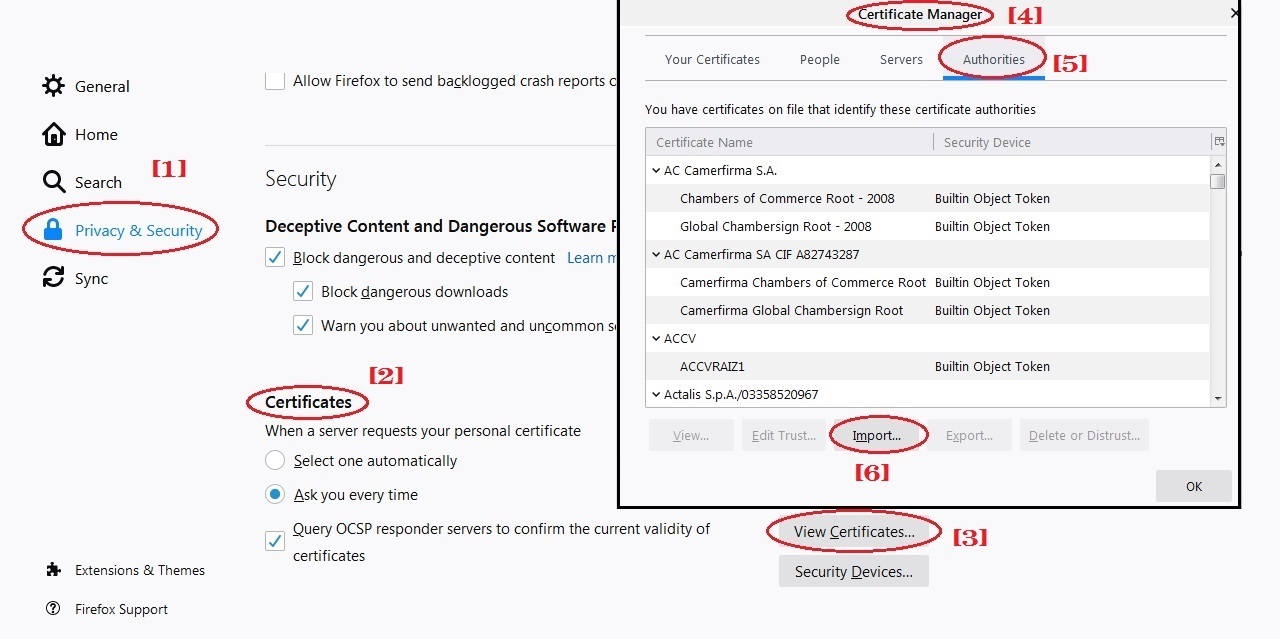
Note: Ensure that the browser is set to automatically detect proxy settings (Go to Network Settings > Select Auto-detect proxy settings for this network)
The Crystal Eye appliance can be integrated with a Microsoft Active Directory server to assign CE web proxy policies to AD users.
This feature allows Crystal Eye administrators to assign authentication based Explicit web proxy policies to AD users. This also means that when the users access their browsers in the Crystal Eye network through their devices they will be prompted to authenticate via AD user credentials. The user will be assigned the web proxy policy once the username and password is fed in.
Access the knowledge base article below to know how to assign authentication based Explicit web proxy policies to AD users after syncing with the the Crystal Eye appliance:
How to Assign Explicit Web Proxy Policies to Active Directory Users Synced with the CE appliance?
There are certain cases, like certificate pinning, where servers do not honour requests from an intermediate proxy server. This can appear as loss of connectivity to the CE network user. Or, there might be servers which the clients do not want to establish proxy connections to. In such cases, CE gives an option to bypass proxy for sites, groups and IP addresses.
How to bypass proxy for a website or a pre-configured group of websites?
User can either add individual sites or select one of the pre-configured groups in CE to bypass proxy for the end users.
Step 1: In the Web Proxy Server page click the Edit button of Proxy Bypass under the Rules section.
Step 2: Click the Add dropdown button and select Add by Site if it’s a single site and select Add by Group if you want to bypass a site group.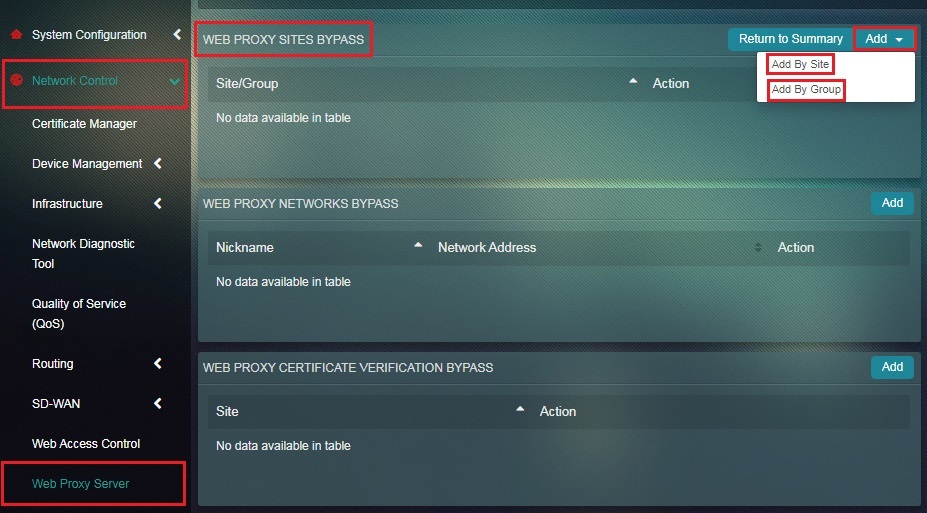
Note: The list of pre-configured websites groups that can be bypassed are Apple Store, Dropbox, Google Suite, Microsoft Services, Slack, and Whatsapp.
How to bypass web proxy for a network?
This feature allows CE administrators to bypass the IP address of servers or clients so that they are ignored by the proxy server. Once the IP address is bypassed all the traffic going to and fro these IPs will not be scanned by Crystal Eye’s web proxy.
Step 1: In the Web Proxy Server app page, click the Edit button of the Proxy Bypass under the Rules section.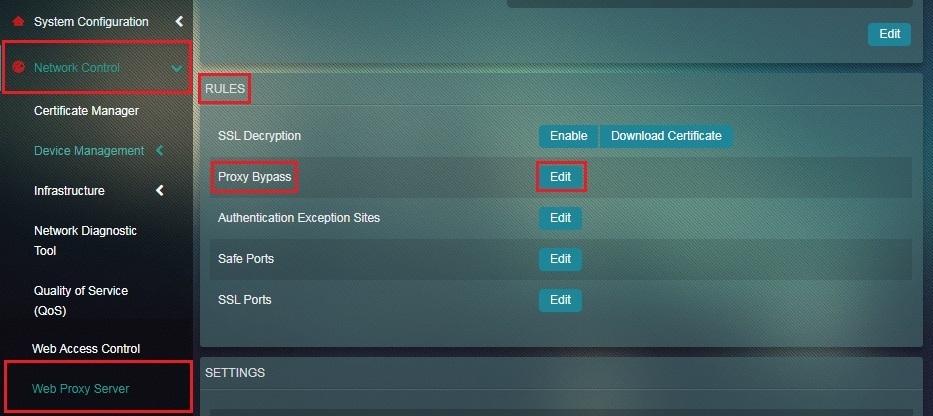
Step 2: You will now see the Proxy Bypass dashboard. Click the Add button in the Web Proxy Networks Bypass section. 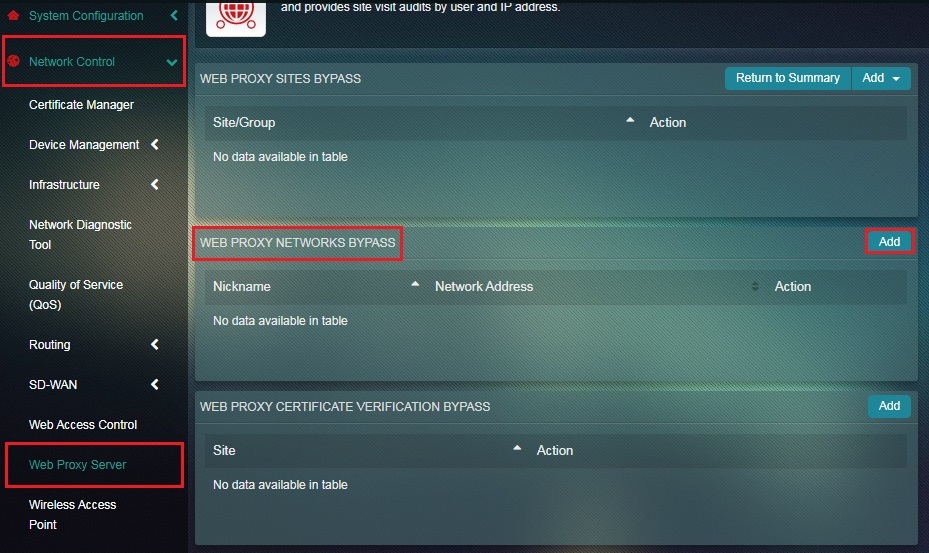
Step 3: Now, enter the Network Address and the Nickname of the website.
How to bypass web proxy for Certificate Verification?
Step 1: In the Web Proxy Server application page, click the Edit button next to Proxy Bypass.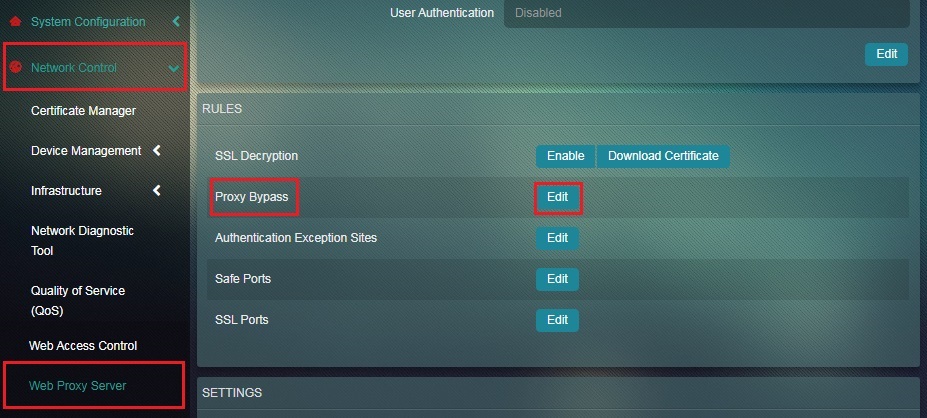
Step 2: You will now see the Proxy Bypass dashboard. Click the Add button in the Web Proxy Certificate Verification Bypass section. 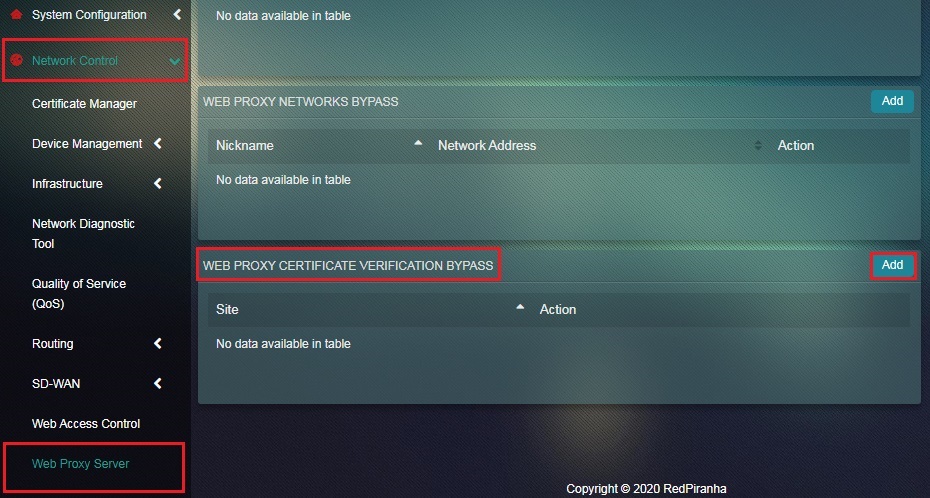
Step 3: Now, enter the website address in the Sites textbox.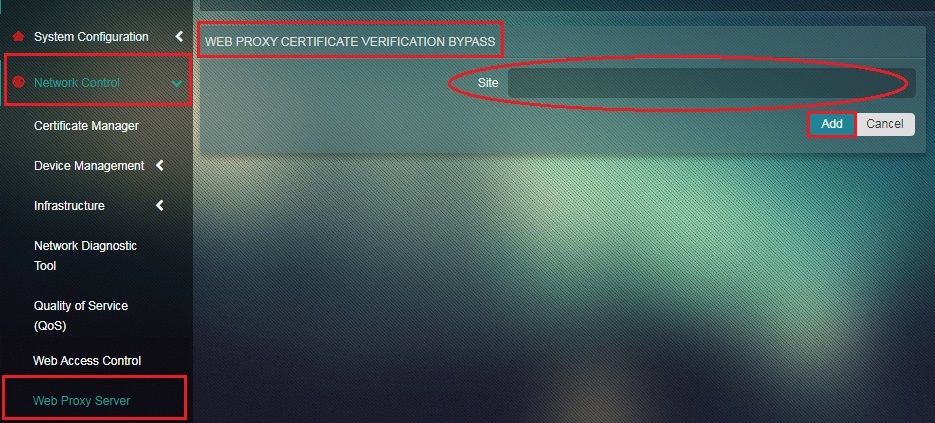
This feature of the Web Proxy Server app is generally used when the User Authentication mode is enabled following which web users need to use used access credentials to browse the internet. When the website or network address is added to the exception list, user can access it without credentials.
How to Add a Website or a Network Address to the Authentication Exception Sites List?
Step 1: In the Web Proxy Server app page, click the Authentication Exception Sites Edit button in the Rules section.
Step 2: You will now see the Authentication Exception Site dashboard. Click the Add button. 
Step 3: Enter the Website Domain Name or the Network Address in the textbox and click the Add button.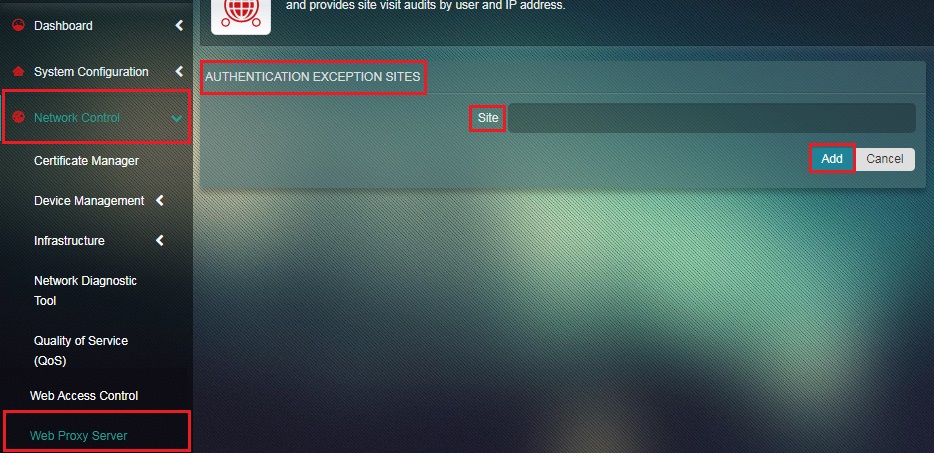
Note: On completing step 3 you will be able to view and will be automatically directed to on the Authentication Exception Sites dashboard where the list of bypassed websites and networks can be viewed.
The Safe Port is one of the most useful features of web proxy as it enables CE administrators to allow standard and non-standard HTTP ports.
In default configurations of Crystal Eye the following HTTP ports are filtered by web proxy
| Port | Description |
|---|---|
| 21 | File Transfer Protocol |
| 210 | ANSI Z39.50 |
| 280 | http-mgmt |
| 443 | HTTP |
| 488 | |
| 591 | FileMarker 6.0 and above |
| 70 | Gopher Protocol |
| 777 | |
| 80 | HTTP |
| 81 | TorPark, Onion Routing |
| 82 | TorPark Control |
| 83 | MIT ML Device, networking file system |
How to allow HTTP ports using the Safe Port rule of the Web Proxy Server application?
Step 1: In the Web Proxy application page, click the Edit button next to Safe Ports in the Rules section.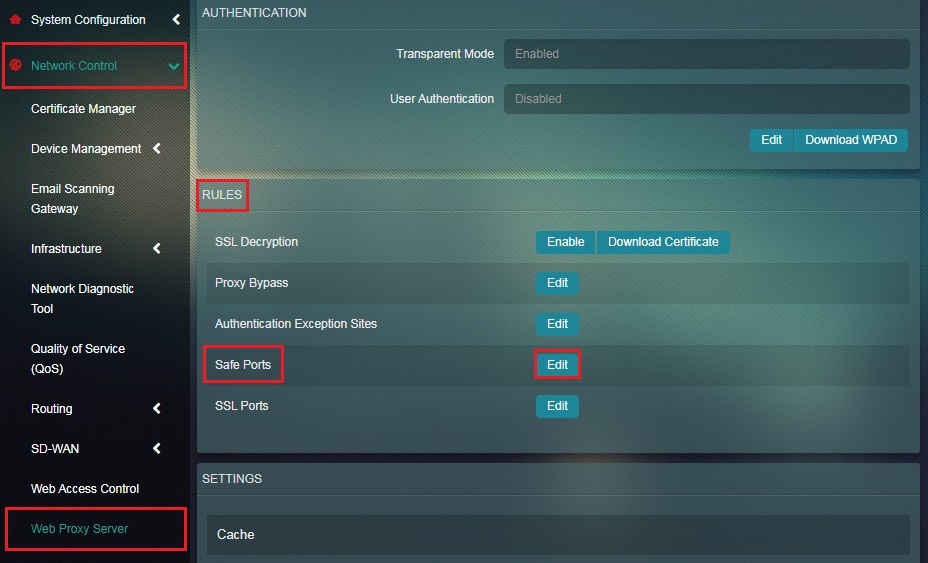 Step 2: You will now see the safe ports page. Click the Add button.
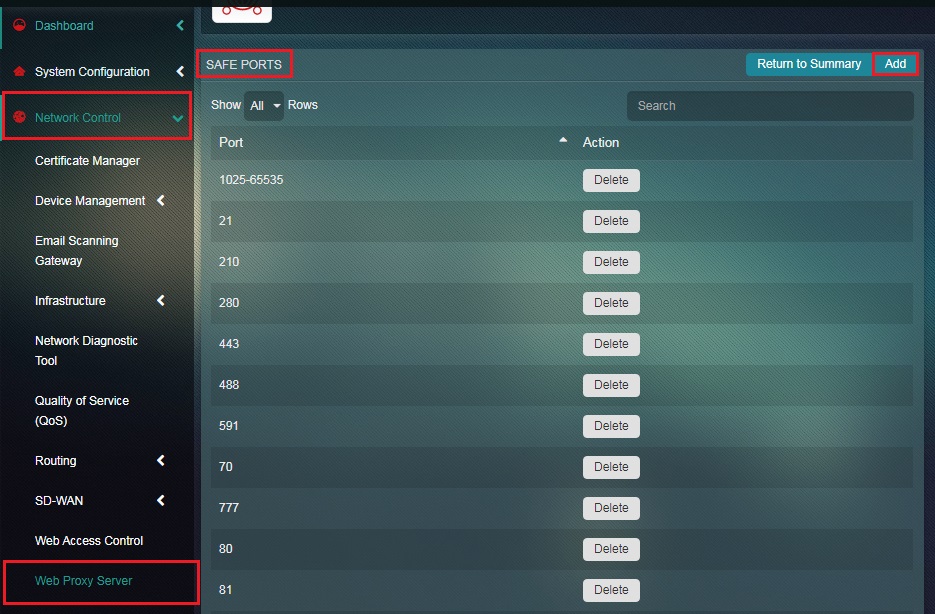 Step 3: You will now be directed to the Add Port page. Enter the port in the textbox and click the Add button.
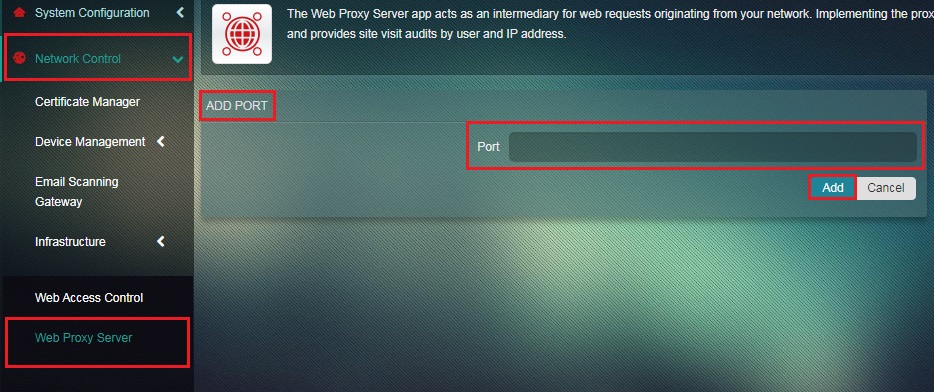
The SSL Port rules in the Web Proxy app are used by CE administrators to allow standard and non-standard HTTPS Ports.
In default configurations of Crystal Eye the following HTTPS ports are filtered by web proxy
| Port | Description |
|---|---|
| 81 | |
| 443 | SSL-used to transfer web pages securely using encryption (Default port for https) |
How to allow HTTPS ports using the SSL Ports rule of the Web Proxy Server application?
Step 1: In the Web Proxy application page, click the Edit button next to SSL Ports in the Rules section.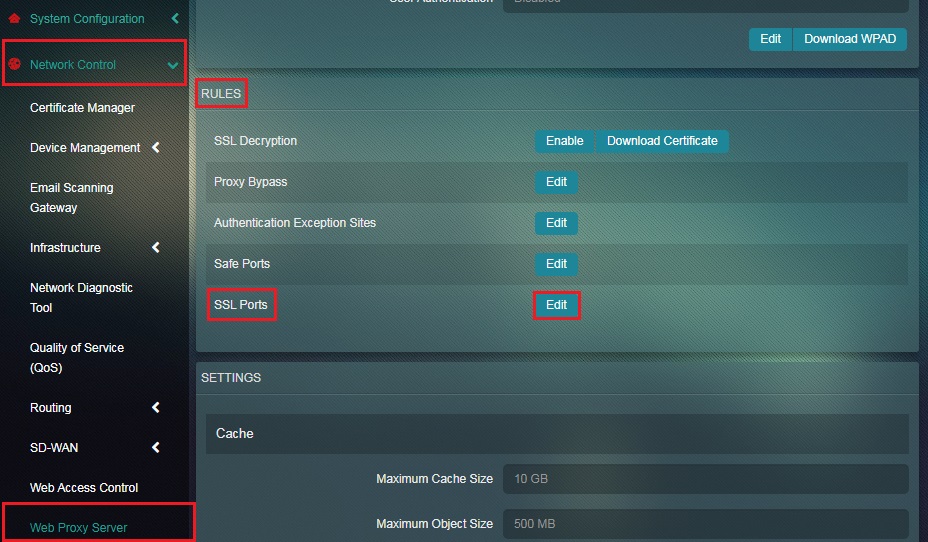 Step 2: You will now see the SSL ports page. Click the Add button.
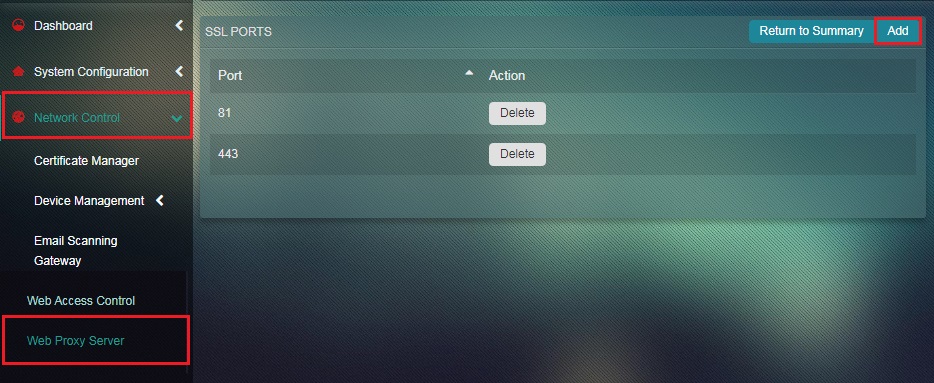 Step 3: You will now be directed to the Add Port page. Enter the port in the textbox and click the Add button.
 Step 4: You will now be directed to the SSL Ports page. Click the Return to Summary button.
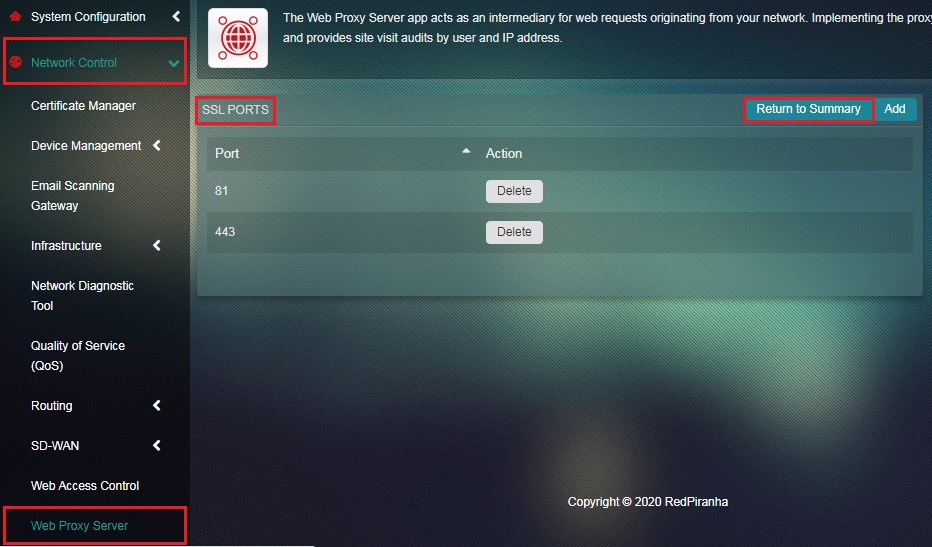 Step 5: You will now be directed to the Web Proxy application page. Now click the Edit button next to Safe Ports in the Rules section.
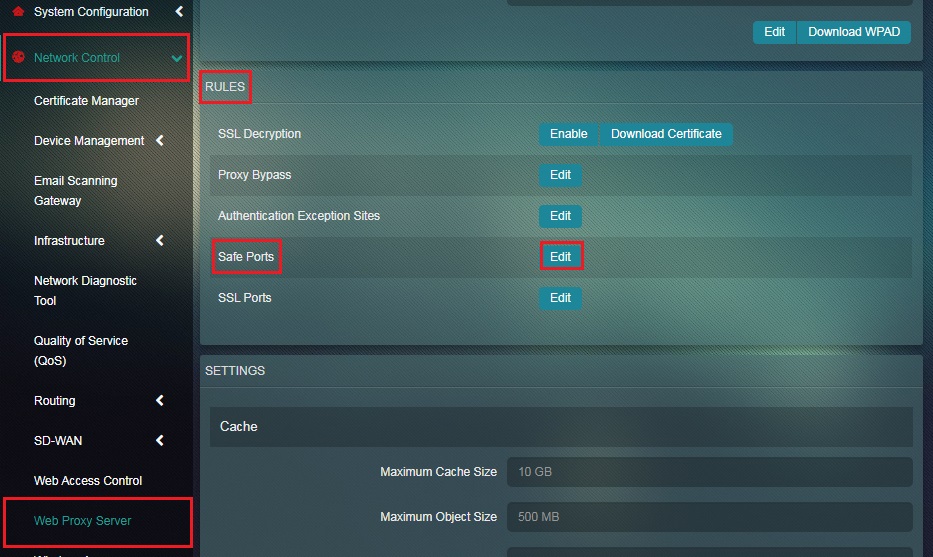 Step 6: You will now see the Safe Ports page. Click the Add button.
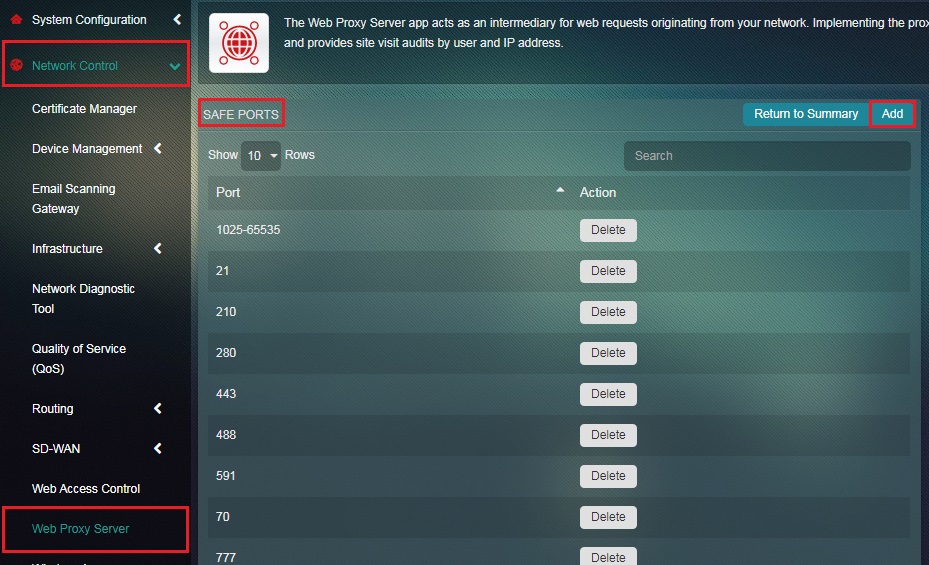 Step 7: You will now see the Add port page. Enter the port number in the textbox and then Add button.
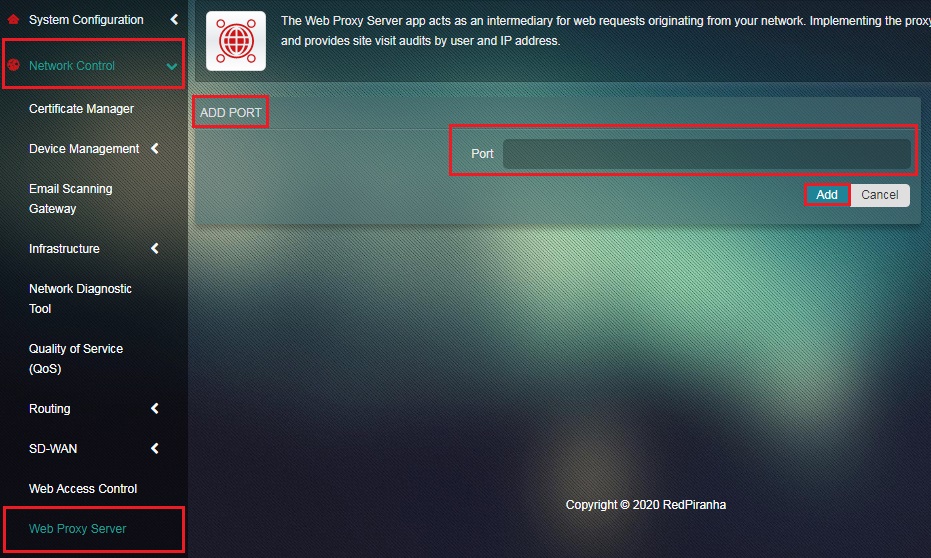 Step 8: You will now see the Safe Ports page. Click the Return to Summary button.
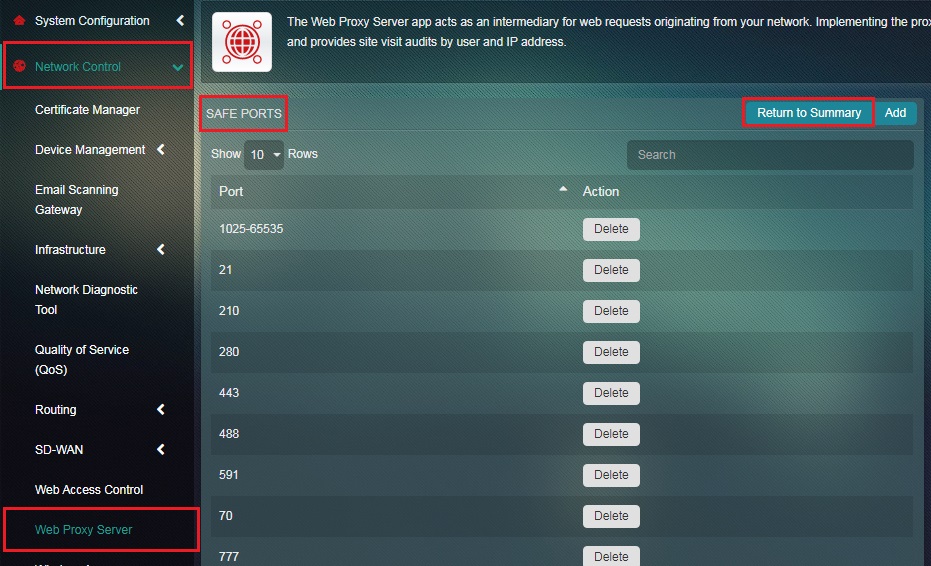 Step 9: You will now be directed to the Web Proxy Server application page. Click the Enable button next to SSL Decryption in the Rules section.
Note: Here we have enabled SSL Decryption to enable the proxy service for HTTPs traffic so that the added port is allowed by CE. This must be done when CE runs on both Transparent Proxy Mode and Explicit Proxy Mode.
Step 10: Click the Download Certificate button in the SSL Decryption column under the Rules section.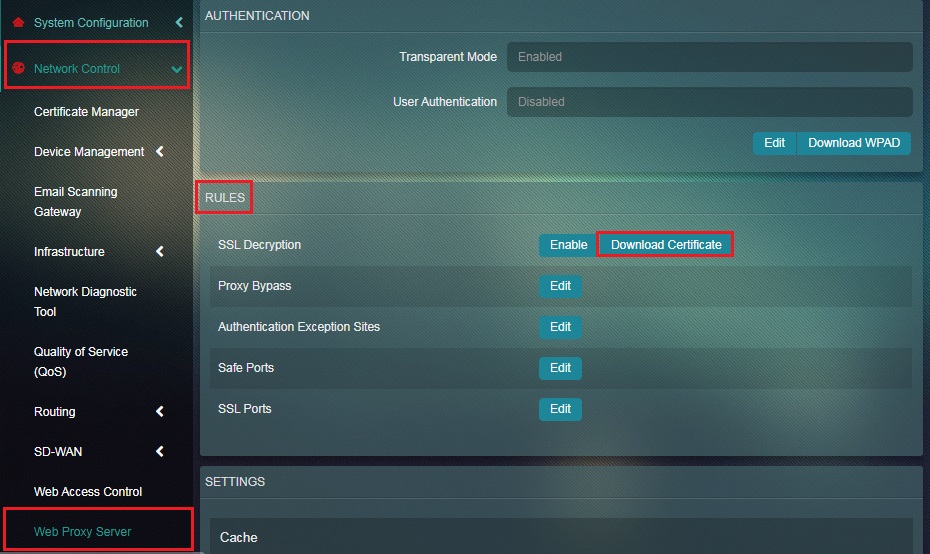 Step 11: Install the CE Certificate to the browser and ensure that the browser proxy has been set to ‘Automatic’ if you are using a Laptop. Read below to know how to install certificates and set the browser to aurtomatically detect proxy settings in Google Chrome and Morzilla Firefox browsers.
Follow the steps below to install CE certificate and set the browser to aurtomatically detect proxy settings in Google Chrome:
Go to Settings > Privacy and security > Security > Manage Certificates > Intermidiate Certification Authorities > Click Import button and import the CE Certificate
Note: Ensure that the browser is set up to automatically detect proxy settings.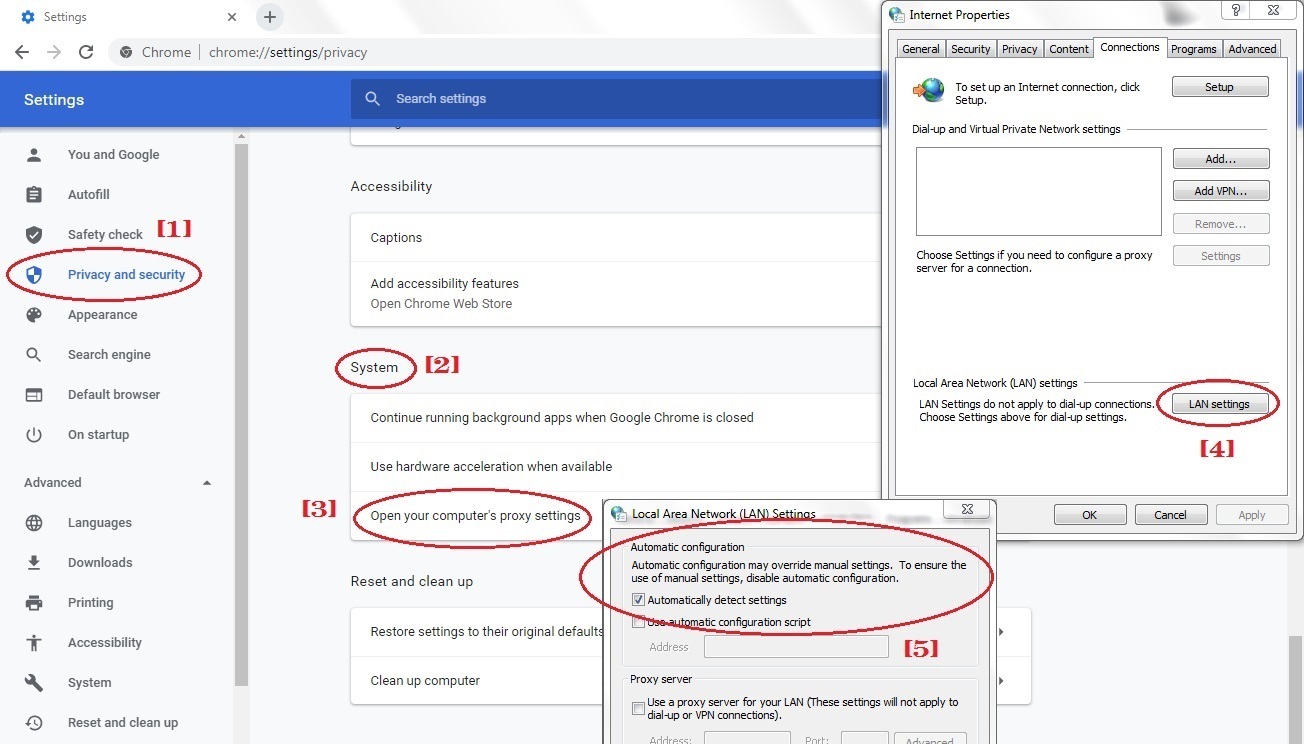
Follow the steps below to install CE certificate in Morzilla Firefox:
Type ‘about:preferences’ in the browser > Privacy and Security > Certificates > Certificates Manager > Authorities > Click Import button and import the CE certificate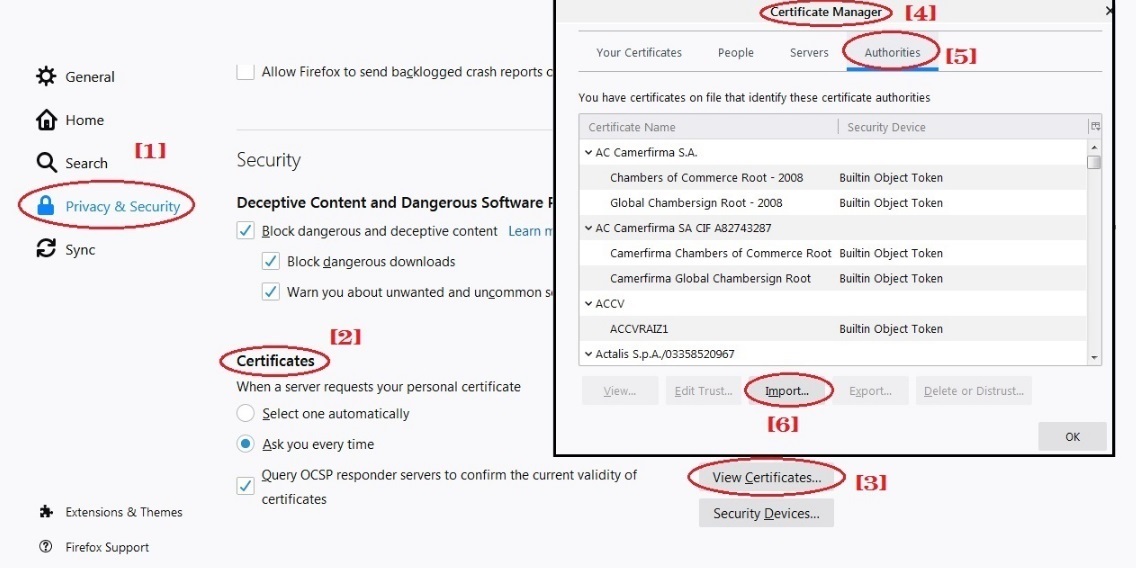
Note: Ensure that the browser is set to automatically detect proxy settings (Go to Network Settings > Select Auto-detect proxy settings for this network)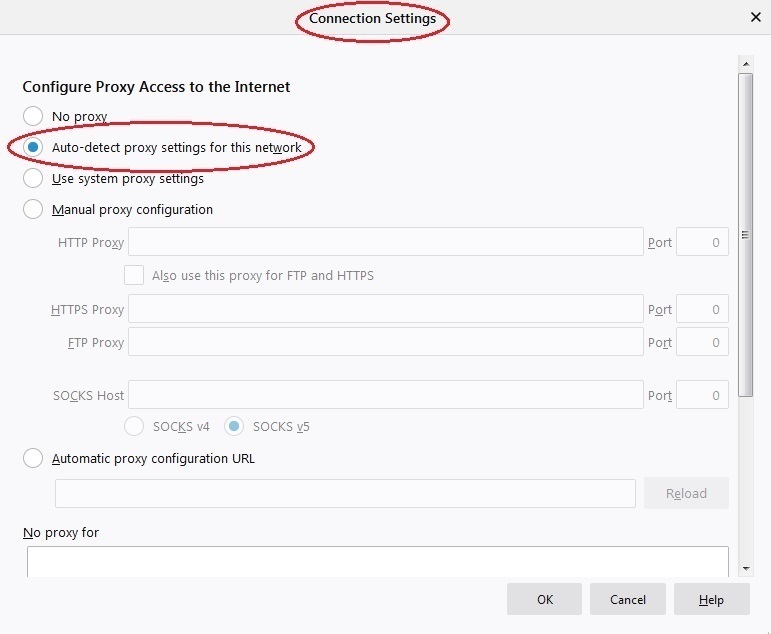
Cache settings can be configured to determine the Maximum Cache Size, Maximum Object Size, and Maximum File Download Size.
Maximum Cache Size relates to the hard disk size of the Crystal Eye Box that would be used dedicatedly as a proxy server to cache resources from the source servers. This should normally be at least several Gigabytes, up to several hundred Gigabytes depending on network size and number of users.
Maximum Object Size relates to size of any file that goes through the proxy server. Ideally, all files are made to pass through the proxy server when the transparent mode is enabled. However, if the file size exceeds the Maximum Object Size then the file will still pass through the proxy server but will not get cached. But there could be scenarios where the file size of one file cached in the proxy server occupies more than 90% of the disk space. Such cases can be easily countered by the administrator by defining the maximum limits of the object size or the file size.
Maximum File Download Size relates to the limit that can be set for file downloading. After setting this parameter, any file that exceeds the download file size limits will automatically not download.
Note: The default setting of Crystal Eye defines Maximum Cache Size as 10 GB, Maximum Object Size as 500 MB and Maximum File Download Size as Unlimited. If the default settings have been changed and the administrator wishes to restore default setting it can be done by clicking the Reset Cache button under the Settings section.
How to Configure Cache Settings in Crystal Eye?
Step 1: In the Web Proxy Server app page, click the Edit button under the Settings section. 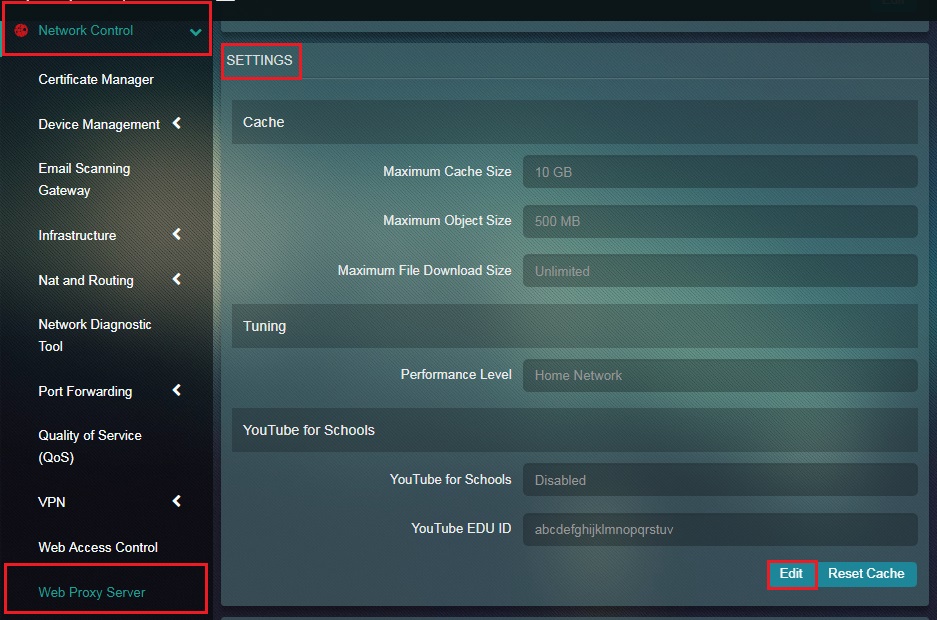
Step 2: You will now see the editable version of the Settings section. Select the Maximum Cache Size from the dropdown.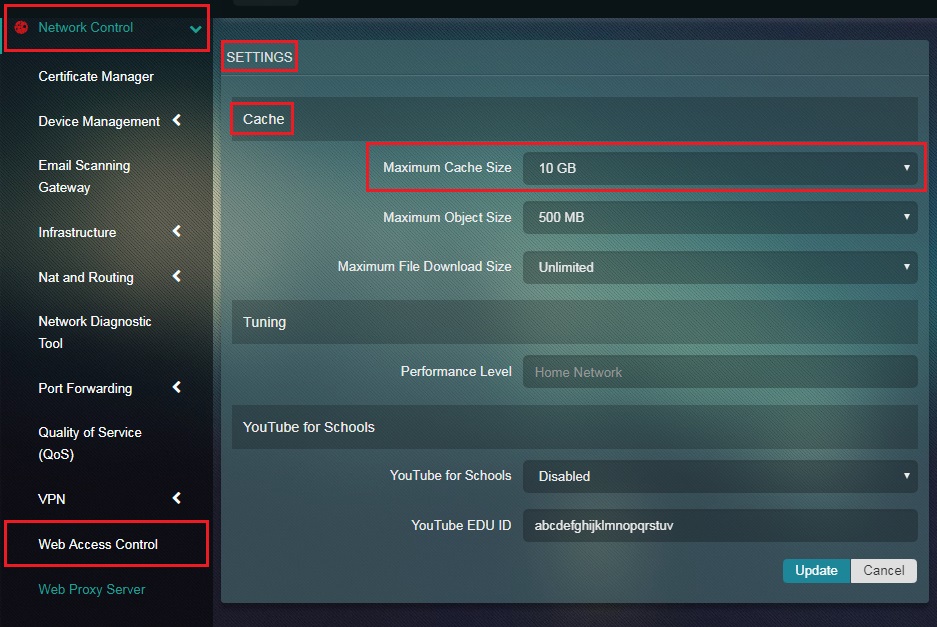
Note: The administrator will have the option to set the Maximum Cache Size with the lowest being 100 MB and the highest being 90 GB.
Step 3: Select the Maximum Object Size from the dropdown.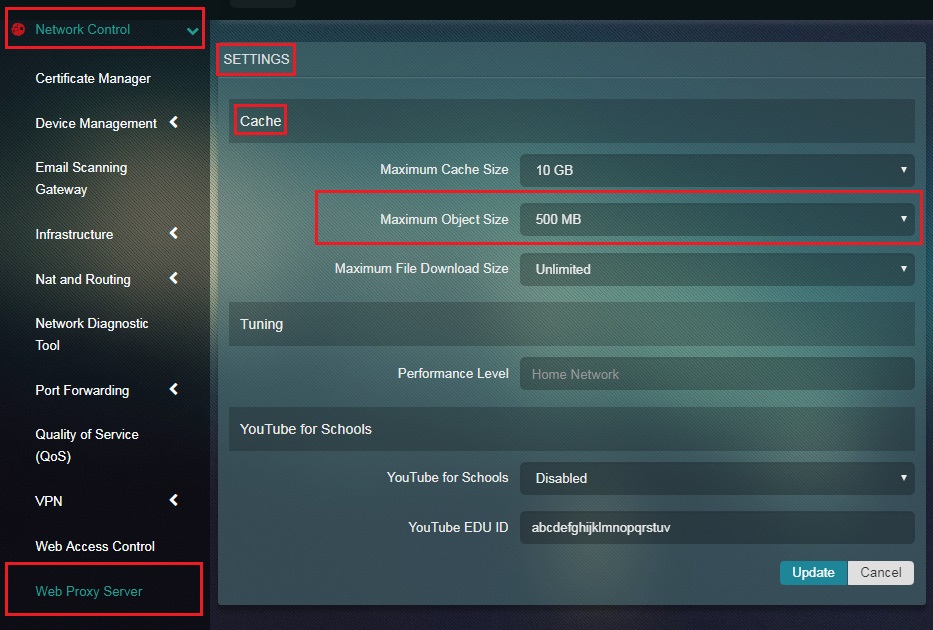
Step 4: Select the Maximum File Download Size from the dropdown.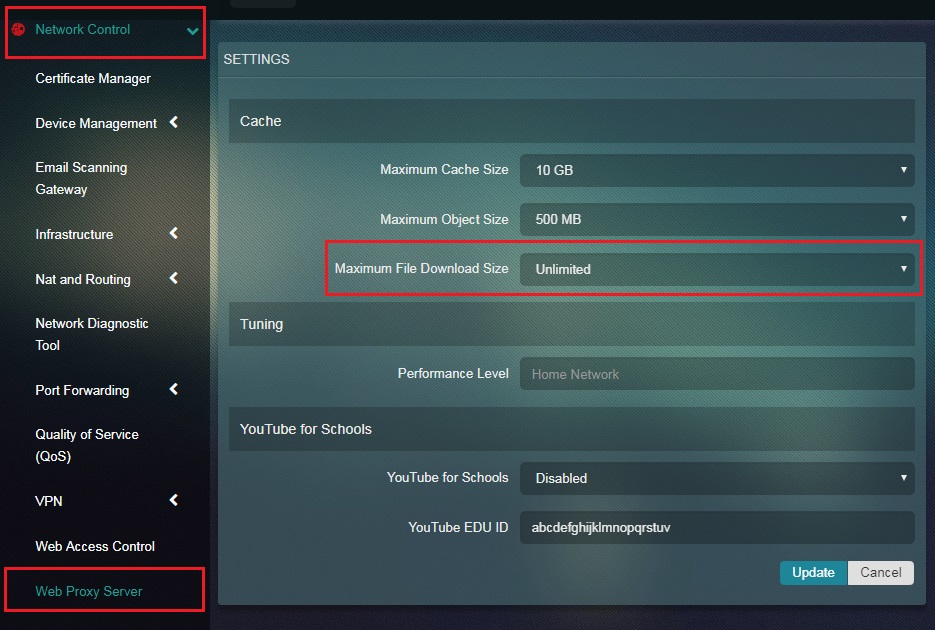
Note: The administrator will have the option to set the Maximum File Download Size with the lowest being 1 MB and the highest being Unlimited.
YouTube for School is an advanced network setting that is specially designed for schools allowing students and teachers to access educational content. The entire system has special features that give special access to YouTube EDU Videos. The best part of this specially designed system is that it limits access to other non-educational videos.
The Web Proxy Server app makes it possible for the network settings to be done so that the content accessed on YouTube for Schools flows through the Crystal Eye platform.
How to Enable/Disable You Tube?
Step 1: In the Web Proxy Server app page, click the Edit button under the Settings section. 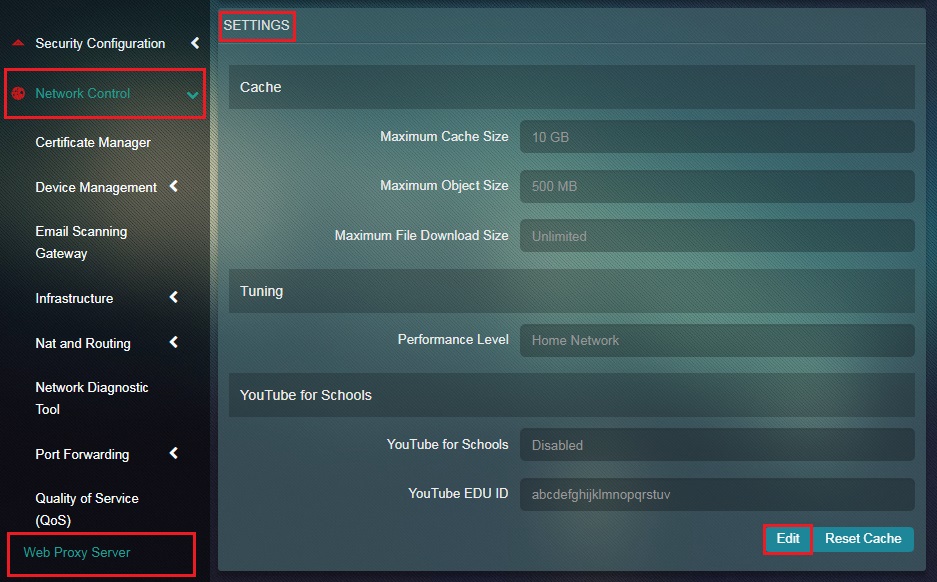 Step 2: You will now see the editable version of the Settings section. Select Enable/Disable from the dropdown, enter the YouTube EDU ID and click the Update button.
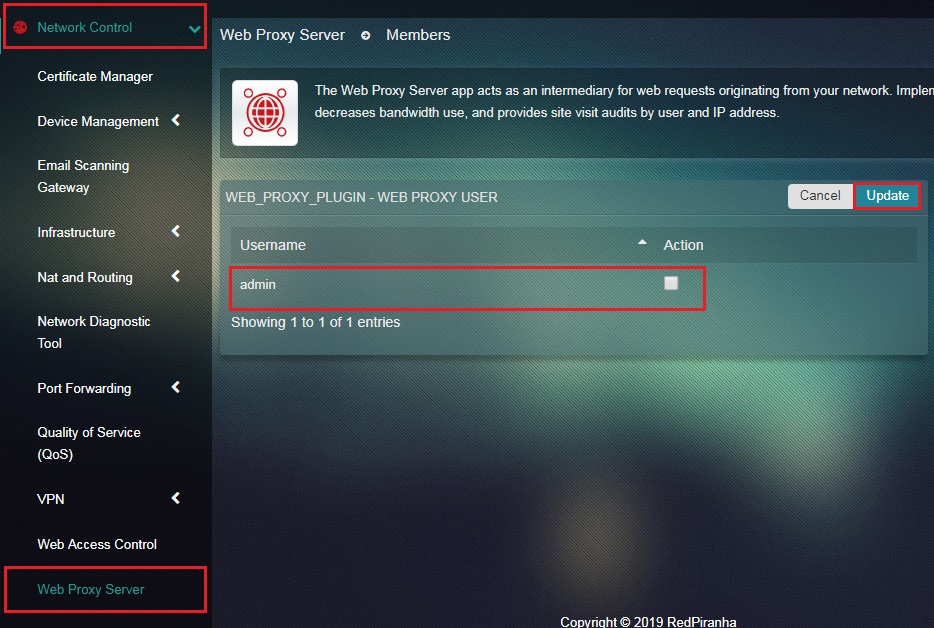
The App Policies section of the Web Proxy Server app allows administrators to include and exclude web proxy users. The Web Proxy User dashboard shows the list of the existing users with a selection tick box against each one of them. The administrator can easily select the Web Proxy Users from the dashboard and save the settings.
Note: In order to include new users, the administrators will have to add them through the Users app. The newly added users will then appear in the Web Proxy User dashboard.
How to Select Web Proxy Users from the Web Proxy Server App?
Step 1: In the Web Proxy Server app page, click the Edit Members button under the App Policies section.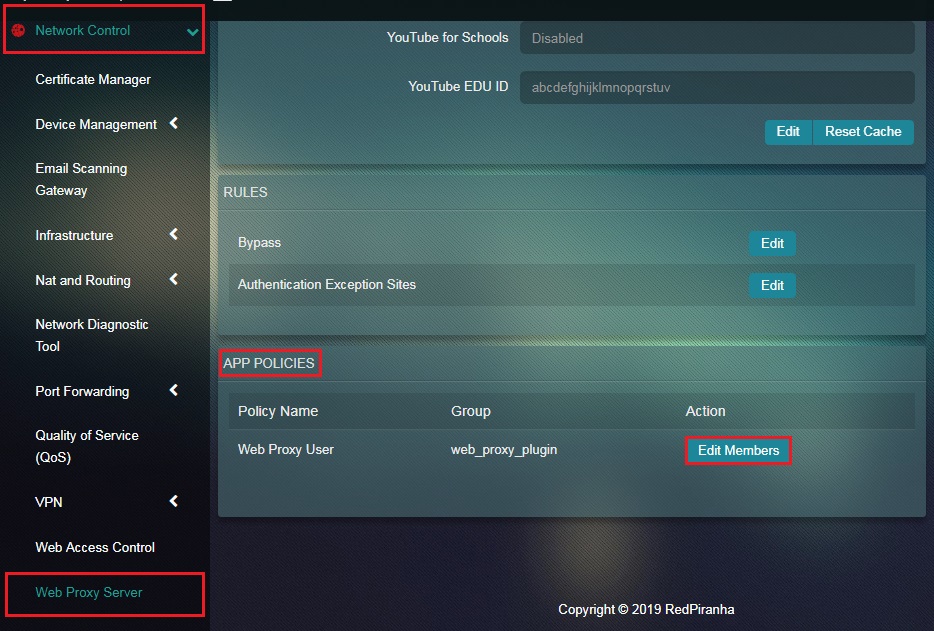 Step 2: You will now see the Web Proxy User dashboard. Select the Users by selecting the tick box against it and click the Update button.