Quality of Service (QoS)
Overview
The Quality of Service (QoS) app has both advanced and basic capabilities to allocate bandwidth to applications operating on the local network. This app has excellent network feature that allows administrators to prioritize certain types of Internet traffic. Enabling QoS decreases the likelihood that at any given time, a single user or device might degrade network performance by saturating available bandwidth.
On the other spectrum, the QoS app can be used to create Upstream and Downstream Priority Class Rules. While formulating these rules the administrator can define the bandwidth priority levels at the scale of 1 to 7. As a default feature, crystal eye determines bandwidth priority levels for some common services and protocols such as, ICMP, DNS, FTP, SSH, VOIP and VPN. .
Navigate to Quality of Service (QoS)
Left-hand Navigation Panel > Network Control > Quality of Service (QoS) .jpg) |
|---|
Global Settings
The Global Settings of the QoS app involves configuring the app and then enabling the QoS Engine. The can only be used after enabling these settings.
How to Configure QoS App?
Step 1: In the QoS app page, click the Configure QoS button.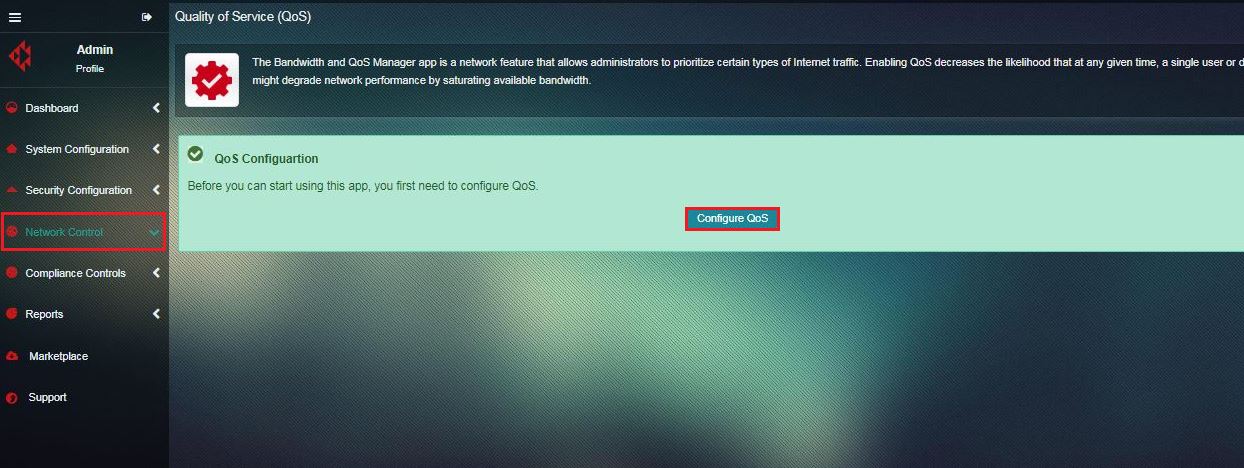
How to Enable QoS Engine?
Step 1: In the QoS app page, click the Enable Engine button under the External Network Interfaces section.
QoS Bandwidth Reservation
The main functionality of the QoS app is to facilitate Bandwidth Management both at a micro and macro level. Crystal Eye is integrated with the functionality of defining the bandwidth priority levels. However, CE also provides the flexibility for an administrator to assign a bandwidth reservation percentage level for upstream and downstream. This percentage distribution of bandwidth reservation is done for each Priority Level. For instance, the highlighted upstream and downstream bandwidth percentage in the screenshot below determines the volume of the upstream and downstream bandwidth under Priority Level 1. 
Note: The upstream and downstream bandwidth reservation percentage assigned by the administrator to different priority levels may change as per the traffic of the bandwidth. If VoIP services have been given Priority Level 1 and there is no VoIP traffic then some other service can use the reserved bandwidth of VoIP services.
How to Assign QoS Bandwidth Reservation?
The following steps would essentially help an administrator to assign an Upstream and Downstream Bandwidth Reservation Percentage for a Particular Priority Level.
Step 1: In the QoS app page, click the QoS Bandwidth Reservation button.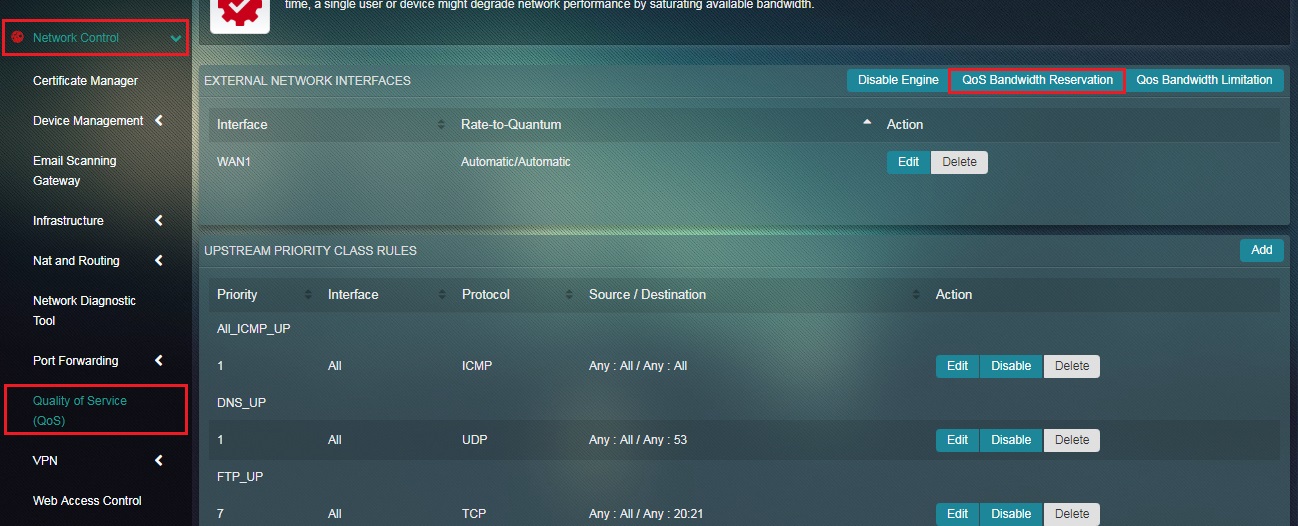 Step 2: You will now see the QoS Bandwidth Reservation page. Click the Add button.
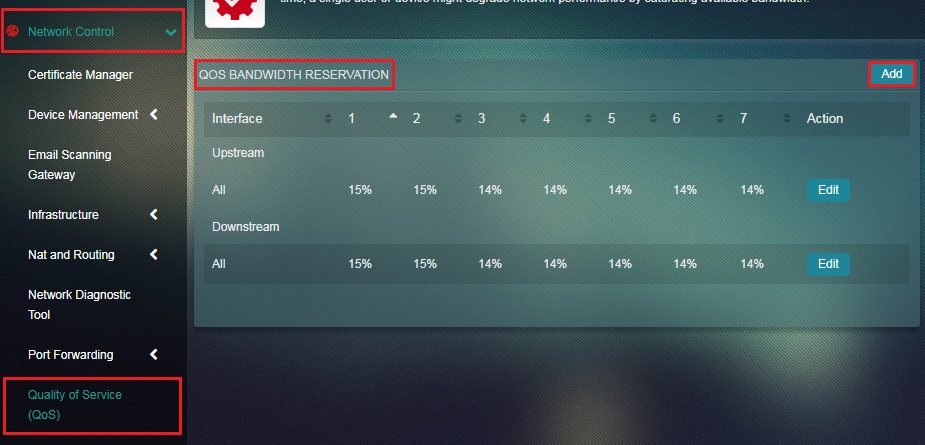 Step 3: Select the desired configuration modes such as Ramp, Equalize, Reset and click the Add button.
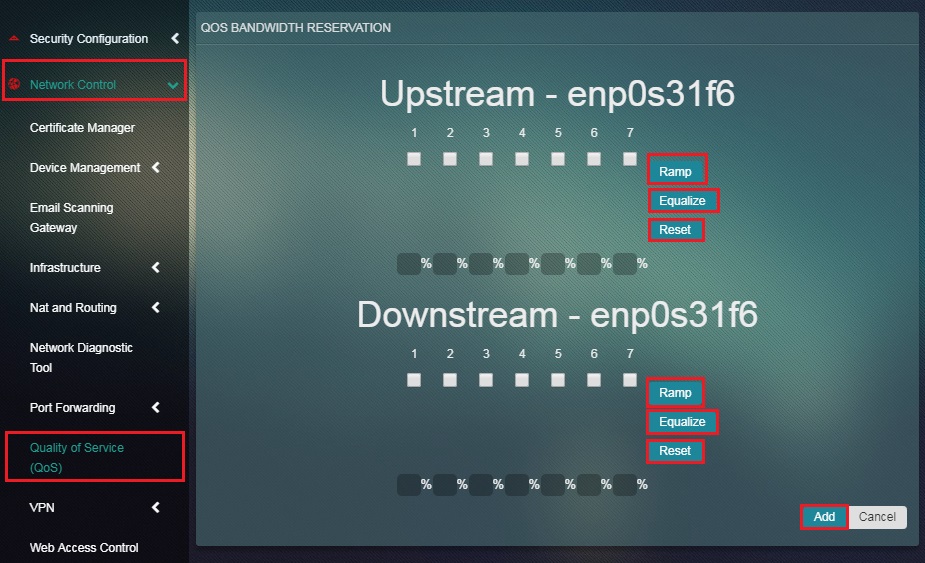
Note: The three configuration modes - Ramp, Equalize and Reset determines the percentage distribution of Bandwidth Reservation for priority levels 1 to 7.
QoS Bandwidth Limitation
The main functionality of the QoS app is to facilitate Bandwidth Management both at a micro and macro level. Crystal Eye is integrated with the functionality of defining the bandwidth limitation levels. However, CE also provides the flexibility for an administrator to assign a bandwidth limitation percentage level for upstream and downstream. Percentage limitation of bandwidth reservation is done for each Priority Level. For instance, the highlighted upstream and downstream bandwidth percentage in the screenshot below determines the limitations of the upstream and downstream bandwidth under Priority Level 1. 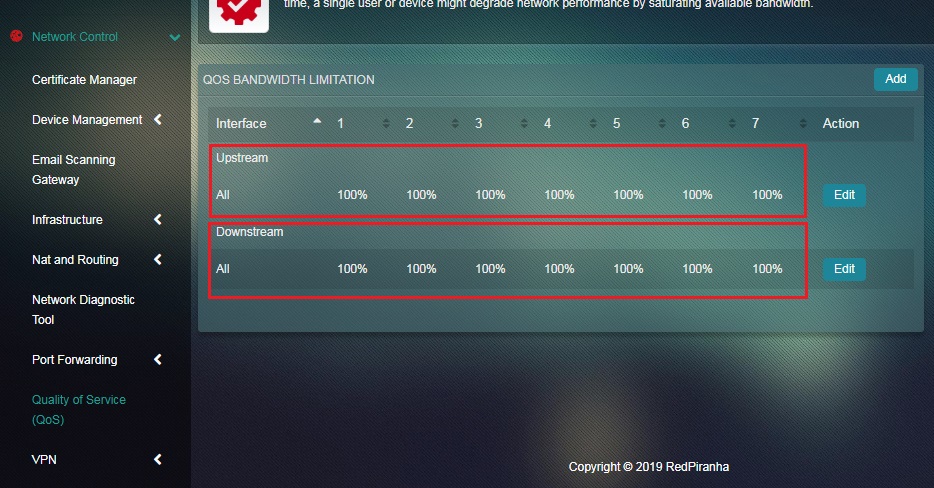
How to Assign QoS Bandwidth Limitation?
The following steps would essentially help an administrator to assign an Upstream and Downstream Bandwidth Limitation Percentage for a Particular Priority Level.
Step 1: In the QoS app page, click the QoS Bandwidth Limitation button. Step 2: You will now see the QoS Bandwidth Limitation page. Click the Add button.
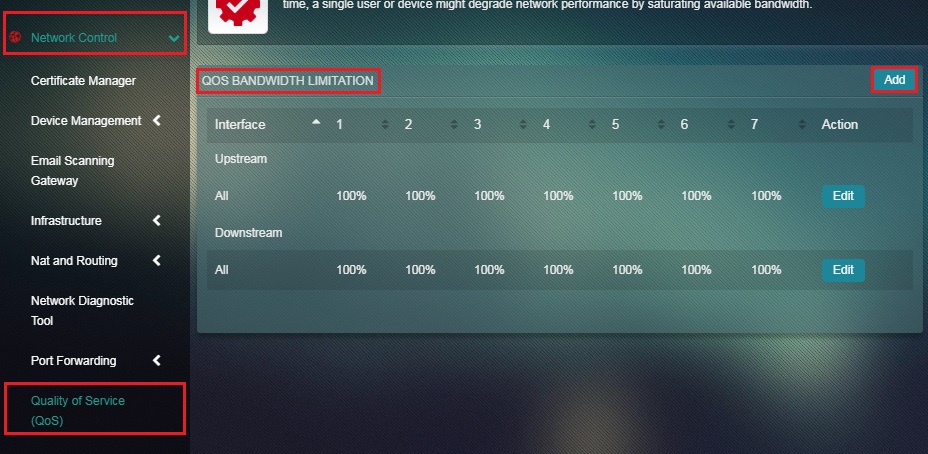 Step 3: Enter the desired percentage levels of Upstream and Downstream limitation in the textboxes and click the Add button.
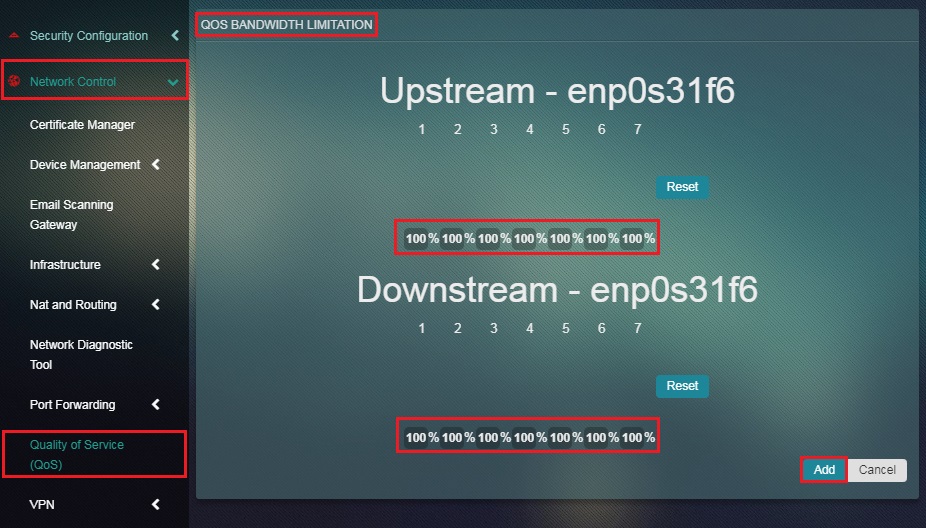
Configuring Upstream & Downstream Priority Class Rule
The Upstream and Downstream Priority Class Rule can be used to set up a Bandwidth Management Rule. The functionality of such a rule is to enforce bandwidth regulations by defining priority levels (1 to 7) for various services. It is quite common for network administrators to set high priority for a particular IP Address. Based on the requirement of the business, an administrator can easily set a priority level for a particular service. The priority levels can be set at a granular level by providing Source IP Address, Source Port, Destination Address and Destination Port. All these parameters needs to be configured both for Upstream Bandwidth in the Upstream Priority Class Rules section and Downstream Priority Class Rules section.
Note: As a default feature, crystal eye determines bandwidth priority levels for some common services such as, ICMP, DNS, FTP, SSH, VOIP and VPN. It is recommended not to change these settings.
| ICMP | DNS | FTP | SSH | VoIP | VPN | |
|---|---|---|---|---|---|---|
| Upstream Priority | 1 | 1 | 7 | 2 | 1 | 3 |
| Downstream Priority | 1 | 1 | 7 | 2 | 1 | 3 |
How to Add Upstream & Downstream Priority Class Rule?
Adding Upstream & Downstream Priority Class Rule can be directly correlated with bandwidth management.
The concept of adding Upstream and Downstream Priority Class Rule for a particular IP Address is explained with an example below:
Scenario/Example: In many cases, the Marketing Department of companies creates policy that prioritizes email traffic also known as SMTP traffic. Crystal Eye’s QoS app can be easily used to provide high priority to SMTP servers.
The following steps enumerates the procedures to be followed to provide high priority to the corporate SMPT server with the IP Address 1.0.9.8.7
Step 1: In the QoS app page, click the Add button under the Upstream Priority Class Rules section. 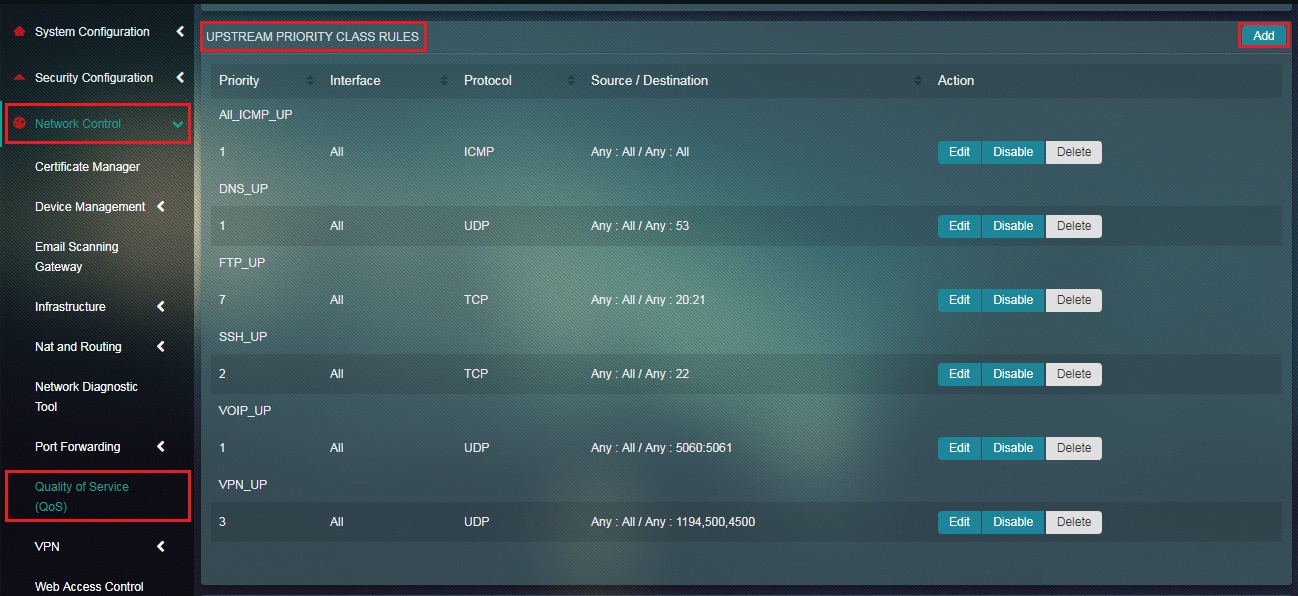 Step 2: You will now be directed to the Add Upstream Priority Class Rule page. Enter the Nickname of the Rule in the textbox.
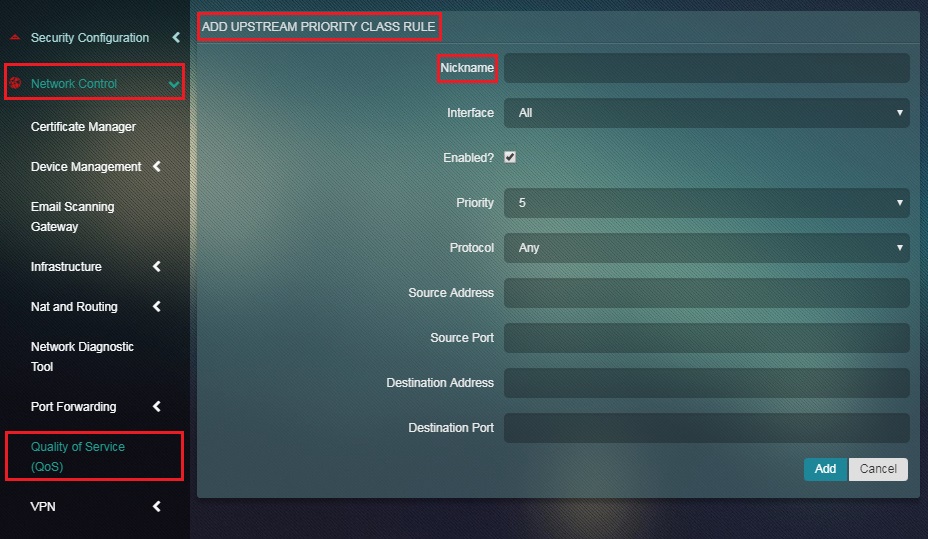
Note: In this case we have given the nickname as Marketing_Dept_SMTP
Step 3: Select the WAN interface for which the Upstream Priority Class Rule is applied for from the dropdown.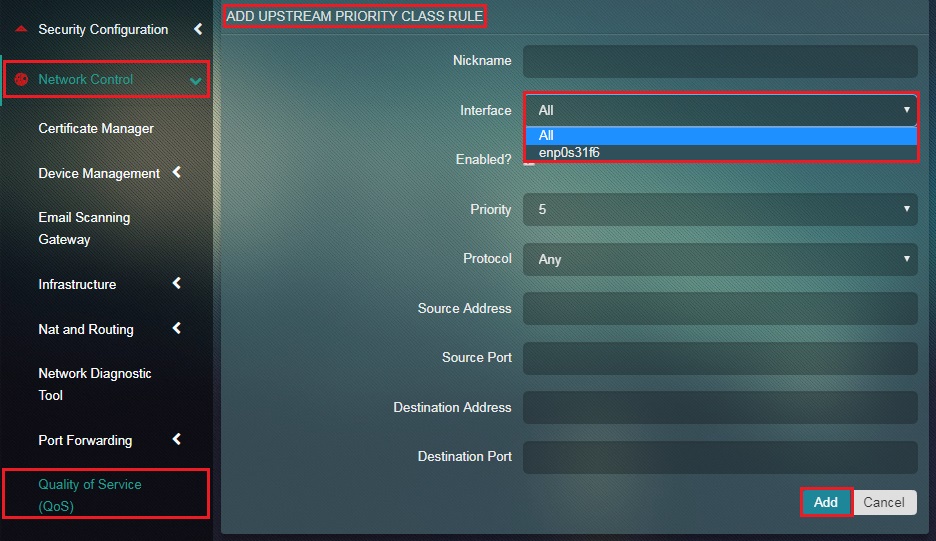
Note: Crystal Eye supports two internet connections. The administrator can either choose All or a particular WAN connection from the dropdown
Step 4: Select the Enable tick box.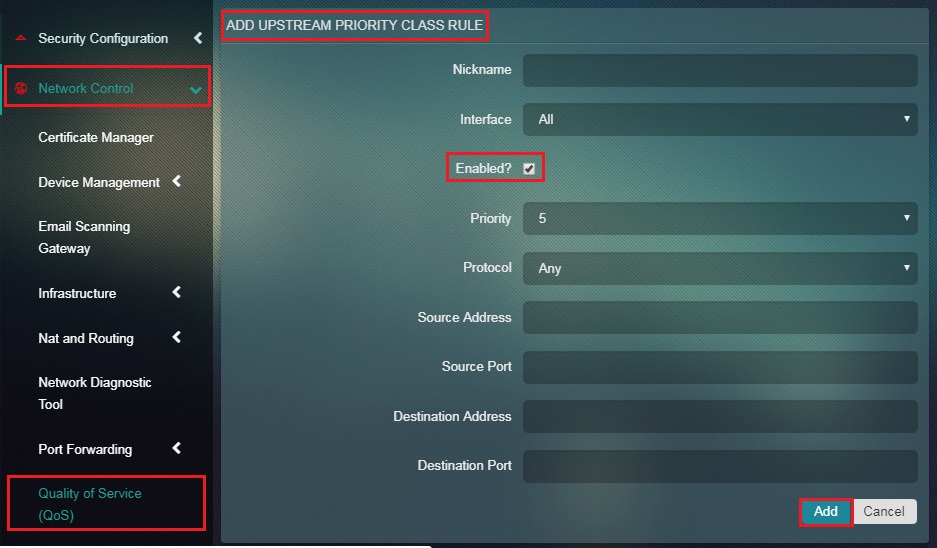 Step 5: Select the priority level with 1 being the highest and 7 being the lowest from the dropdown.
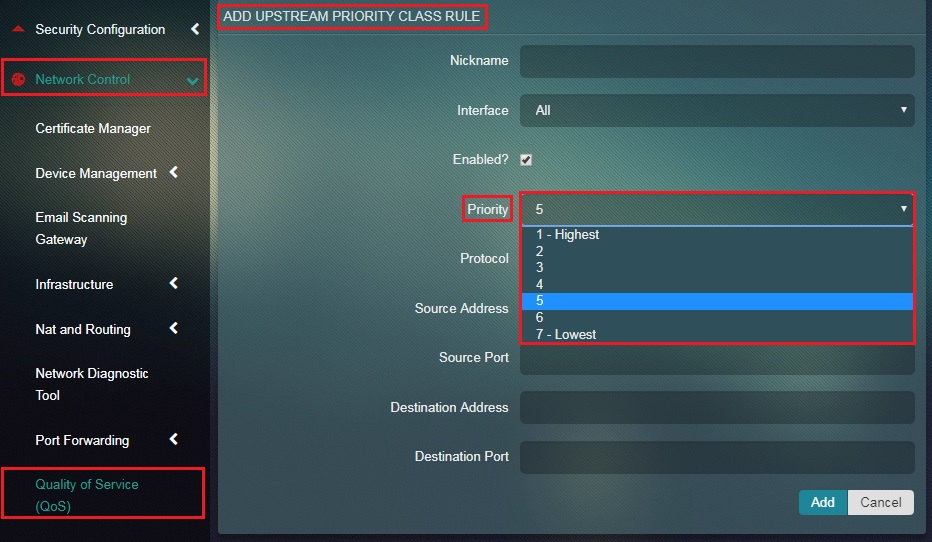
Note: In this case we have selected priority level 3
Step 6: Select the Protocol from the dropdown.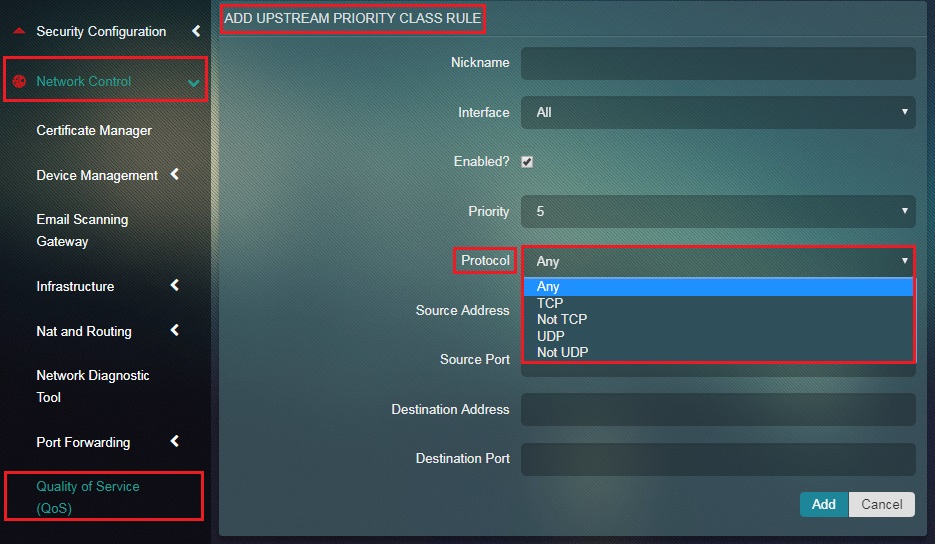
Note: The options available in the dropdown are Any, TCP, not TCP, UDP, and not UDP. However, in this case we will select Any
Step 7: Enter the Destination IP Address in the textbox and click the Add button. 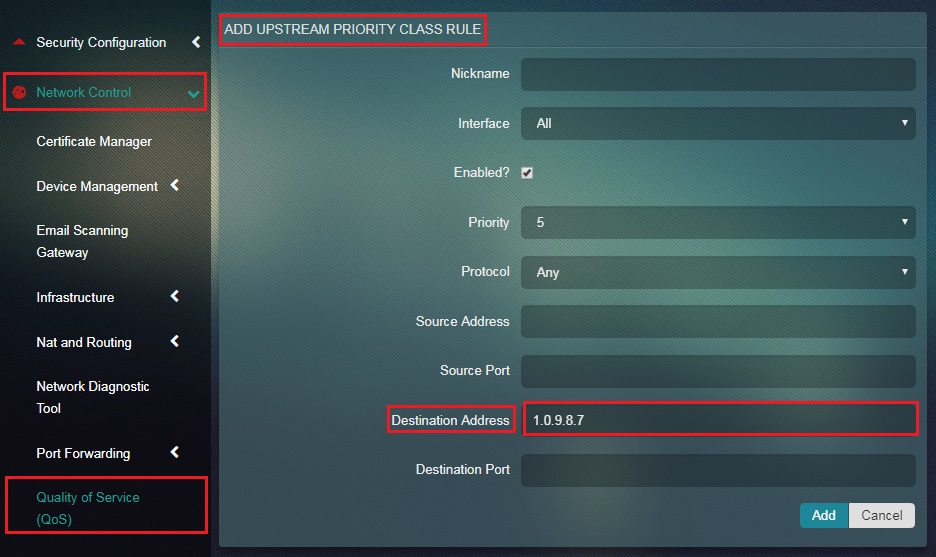
Note: In this case we will enter 1.0.9.8.7
Step 8: You will now see the QoS app page. Click the Add button under the Down Stream Priority Class Rules section.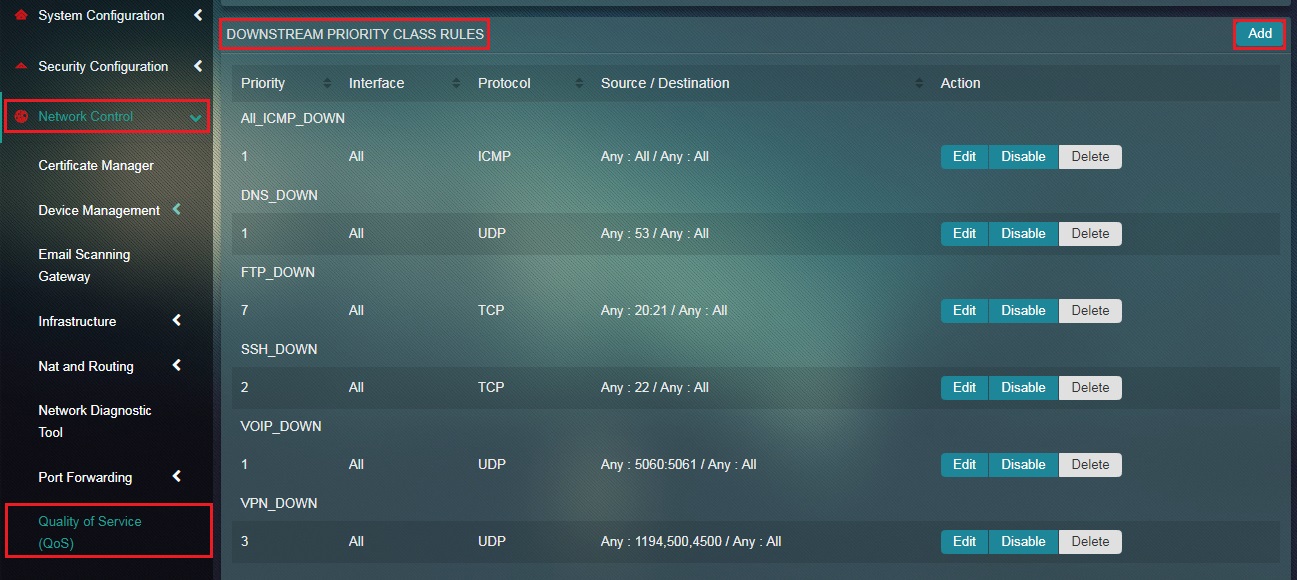 Step 9: You will now be directed to the Add Downstream Priority Class Rule page. Enter the Nickname of the Rule in the textbox.
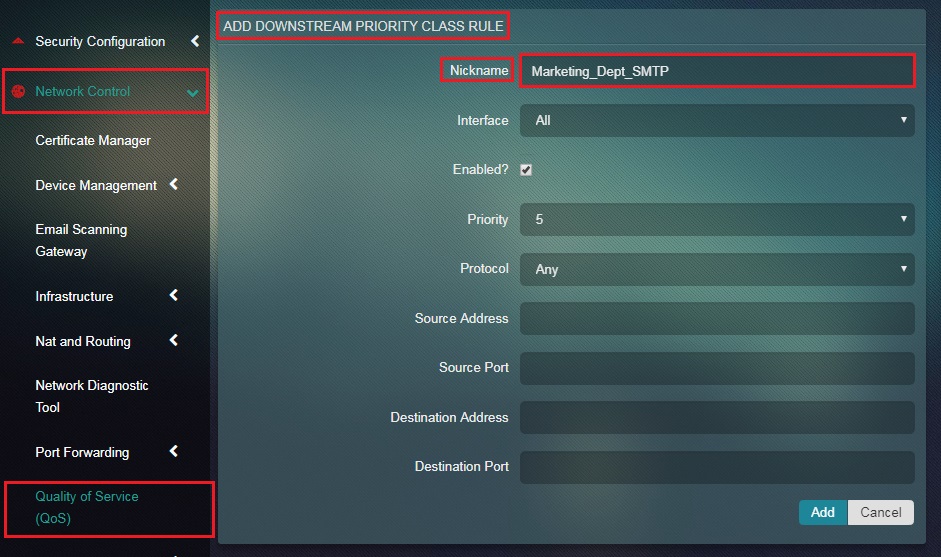
Note: In this case we have given the nickname as Marketing_Dept_SMTP
Step 10: Select the WAN interface for which the downstream Priority Class Rule is applied for from the dropdown. 
Note: Crystal Eye supports two internet connections. The administrator can either choose All or a particular WAN connection from the dropdown
Step 11: Select the Enable tick box.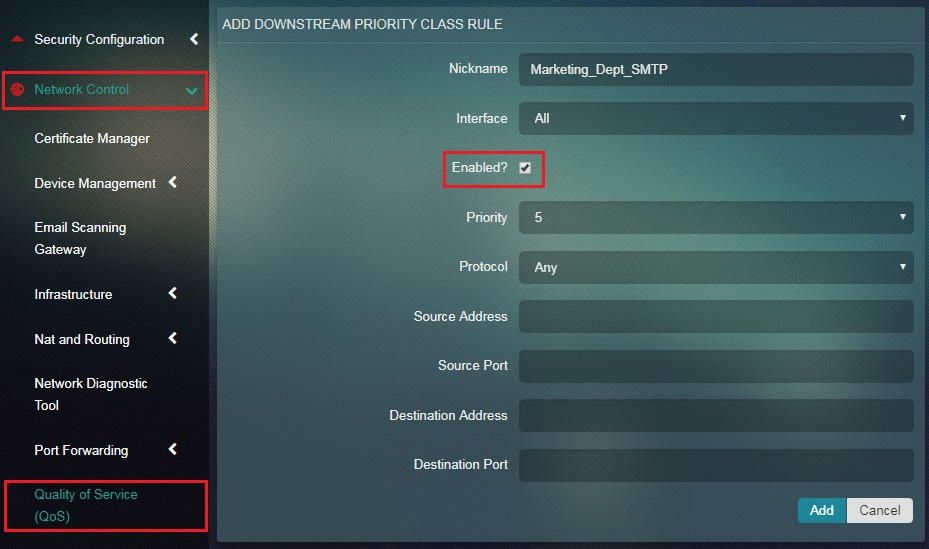 Step 12: Select the priority level with 1 being the highest and 7 being the lowest from the dropdown.
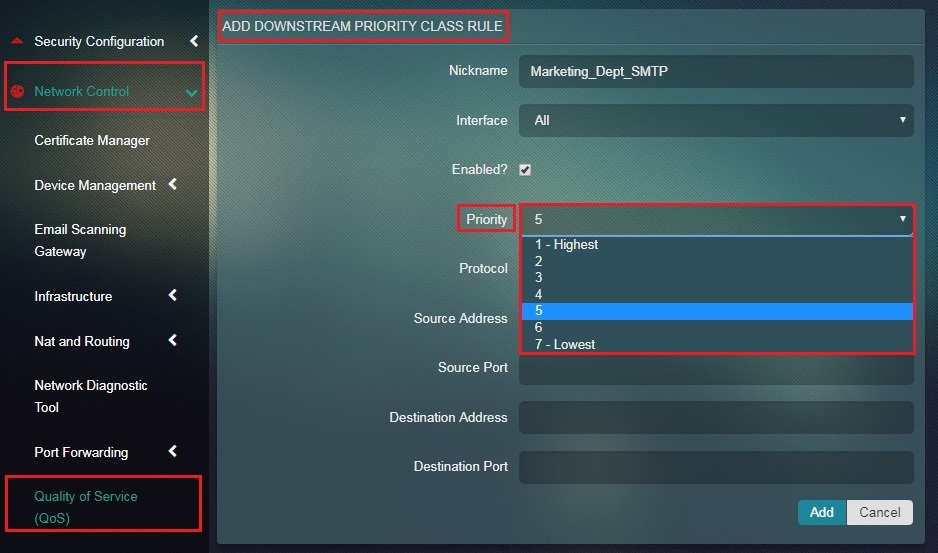
Note: In this case we have selected priority level 3
Step 13: Select the Protocol from the dropdown. 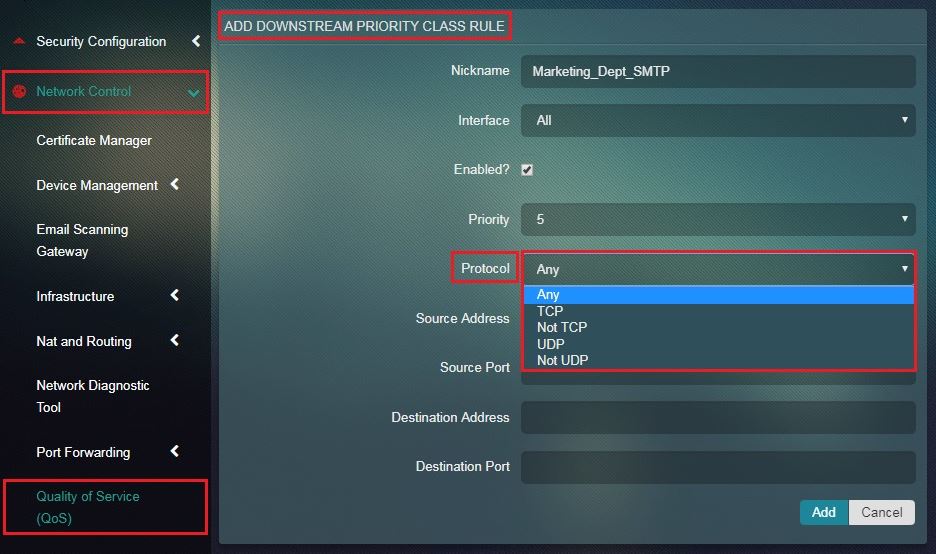
Note: The options available in the dropdown are Any, TCP, not TCP, UDP, and not UDP. However, in this case we will select Any
Step 14: Enter the Source IP Address in the textbox and click the Add button.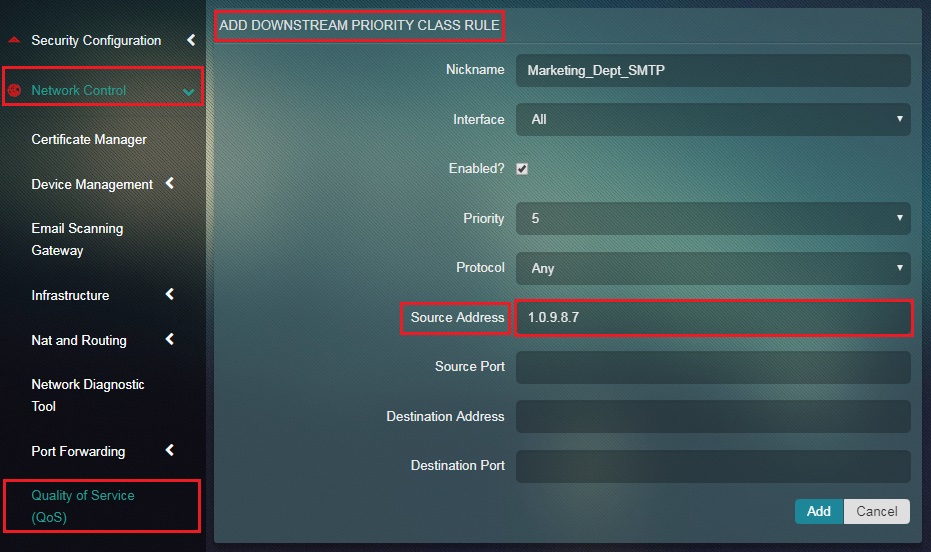
Note: As an example we will enter 1.0.9.8.7