DHCP Server
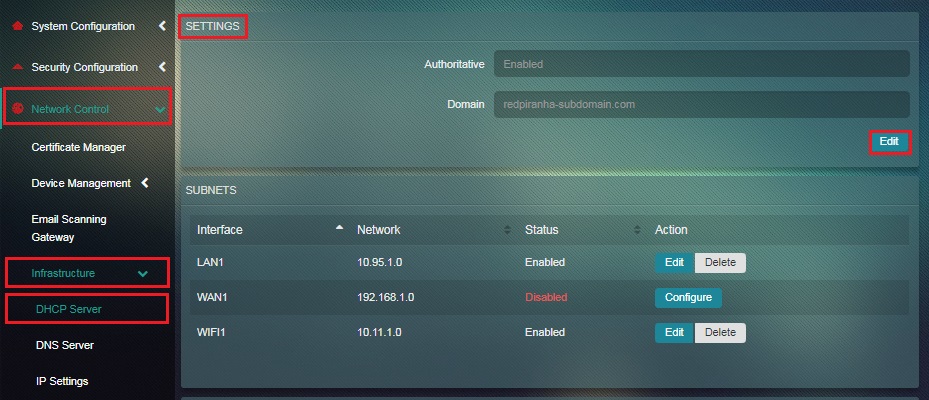
The Dynamic Host Configuration Protocol (DHCP) Server is an essential component of the network server and plays an important role in assigning the IP addresses, default gateways and other key network parameters. The DHCP Server app allows administrators to enable Authoritative mode which would help in ignoring DHCP requests originating from unknown leases. Normally if there is one DHCP server on a network segment, it should be authoritative – usually this will be the Crystal Eye appliance leases. The app interface also has a section for dealing with Subnet Configuration giving the much required leverage to the administrator for adjusting various settings such as Network Interface, Lease Time, Gateway, IP Range Start, IP Range End, DNS, WNS, TFTP, NTP, and WPAD. The Lease Table in the app page provides in-depth insights about each device connected to the Crystal Eye network. It provides the IP Address, MAC Address, Identifier, Vendor Name, and the Date at which the IP address expires (in case it’s a dynamic IP). In addition to all this, the administrator can assign a static or a dynamic IP address to a particular device connected to the Crystal Eye network.
Left-hand Navigation Panel > Network Control > Infrastructure > DHCP Server |
|---|
The DHCP Server app allows administrators to enable Authoritative mode which would help in ignoring DHCP requests originating from unknown leases.
How to Enable and Disable Authoritative Mode in the DHCP Server?
Step 1: In the Settings section of the DHCP app page, click the Edit button.
Step 2: You will now see the editable version of the Settings section. Enable/Disable Authoritative Mode using the dropdown and click Update.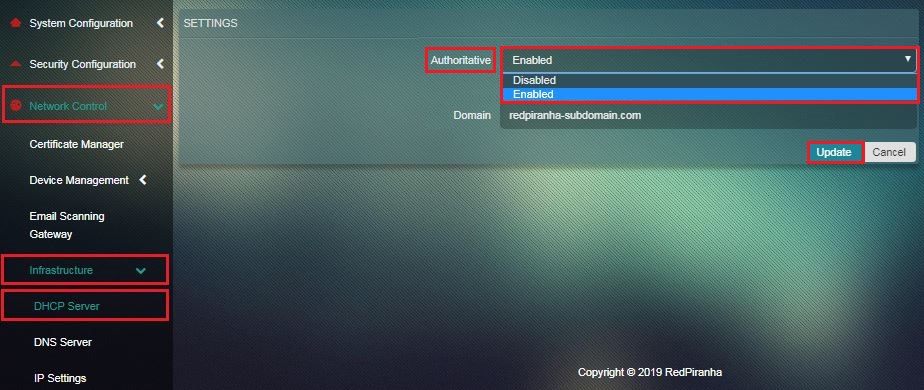
DHCP Server has a section for dealing with Subnet Configuration giving the much required leverage to the administrator for adjusting various settings such as Network Interface, Lease Time, Gateway, IP Range Start, IP Range End, DNS, WNS, TFTP, NTP, and WPAD.
The various parameters that can be adjusted under the Subnet Configuration ambit are as follows:
- Network Interface: This alpha-numeric code is assigned to each system and is auto-generated.
- Network: This is an IP address that is assigned to a device when it’s connected to the Crystal Eye network.
- Lease Time: This parameter can be adjusted to set the number of days after which a Dynamic IP address of the device would expire and change.
- IP Ranges: The administrator can assign the Start IP Range and the End IP Range of the selected network interface using this feature of the Crystal Eye. IP Ranges usually helps in assigning a list of IP’s to a particular subnet. In general in a LAN network, the first 99 IP addresses are particularly set aside for static IP addresses and the remaining slots from 100 to 254 are reserved for systems using DHCP servers.
- DNS Servers: The DNS server settings feature are used to assign an alternate DNS server. However, the server auto-configures the DNS settings for systems with the help of the existing DHCP on the Crystal Eye network.
- WINS Server: This functionality essentially allows the administrator to manage the Microsoft Windows Internet Naming Service (WINS) server on the network. When the LAN IP address of the Crystal Eye Box is entered in the WINS textbox the DHCP app auto configures and activates resource sharing of windows system through windows networking.
- TFTP Server: If you have a TFTP server on your network, you can specify the IP address in your DHCP configuration. Among other uses, TFTP is commonly used by VoIP phones.
- NTP Server: If you have an NTP (time) server on your network, you can specify the IP address in your DHCP configuration. Though most modern desktop systems are already configured with a time server, some devices and applications require a local NTP server available.
How to Configure Subnets of a Network Interface?
Step 1: In the DHCP Server app page, click the Edit button of the network interface under the Subnet section.
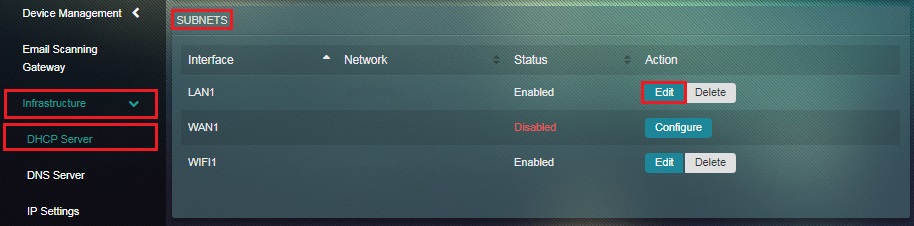 Step 2: You would now see the subnet settings of the selected network interface. Enter the desired Lease Time, Gateway, IP Range, DNS Server, WINS, TFTP, NTP and WPAD. After entering these details as per requirement, click the Update button.
Note: Detailed explanation regarding each adjustable parameter of Subnets are mentioned here
The Leases Table basically comprises of an array of networking based information pertaining to the devices connected to the Crystal Eye network. The administrator can also add MAC address and IP address of a new device that would be connected to the CE network. The search box integrated to the Lease table can be used to locate a given device with the help of its IP Address, MAC Address, Identifier, Vendor, and Dynamic IP Expiry Date. One of the most important functionality that can be leveraged here is that, it can be used to assign a dynamic or a static IP address for a particular device listed here in the Lease Table.
The administrator may want to assign a static IP for a device which has not yet been connected to the CE box. This might be required for instances where devices need a specific IP to function properly, but have not yet been added to the network. In such cases, a preconfigured device that has not yet been added to the CE network can have a static IP reserved for it before connecting to the CE network.
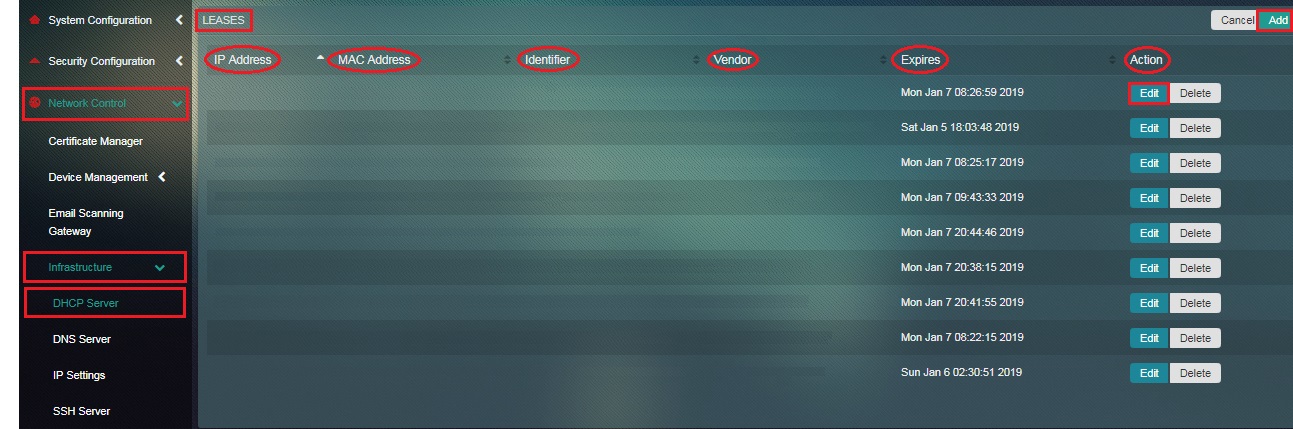
How to View the Detailed Report of the Leases Network?
Step 1: In the DHCP Server app page, click the Detailed Report button under the Leases section.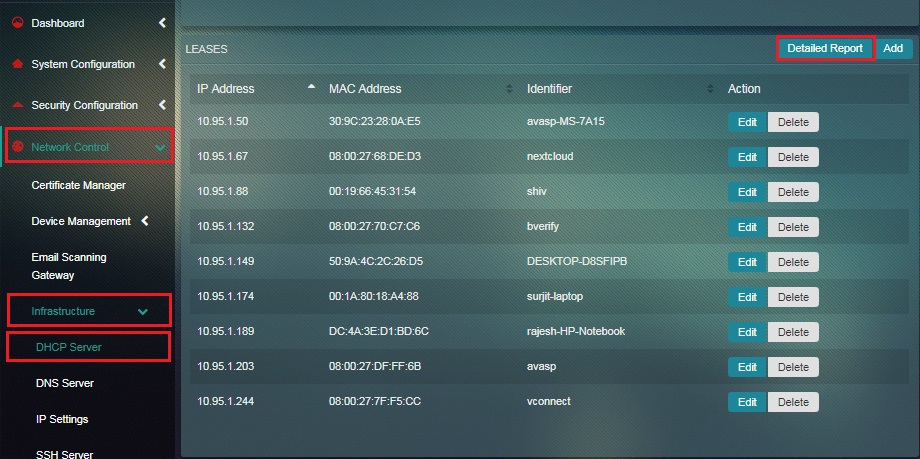 You will now have a detailed view of the Lease table with additional network related information of the devices connected to CE. The details that can be viewed are IP Address, MAC Address, Identifier, Vendor, and Expiry Date of the Lease. You can also Add a new device or Edit the details of the existing device.
How to Assign a Static IP Address to a Device Before Connecting it to the Crystal Eye Box ?
The administrator may want to assign a static IP for a device which has not yet been connected to the CE box. This might be required for instances where devices need a specific IP to function properly, but have not yet been added to the network.
In such cases, a preconfigured device that has not yet been added to the CE network can have a static IP reserved for it before connecting to the CE network. The administrator may follow these steps to reserve a static IP for a device that is not connected to the CE network but will be connected to the CE network in future.
Step 1: In the DHCP Server app page, click the Add button under the Lease section. 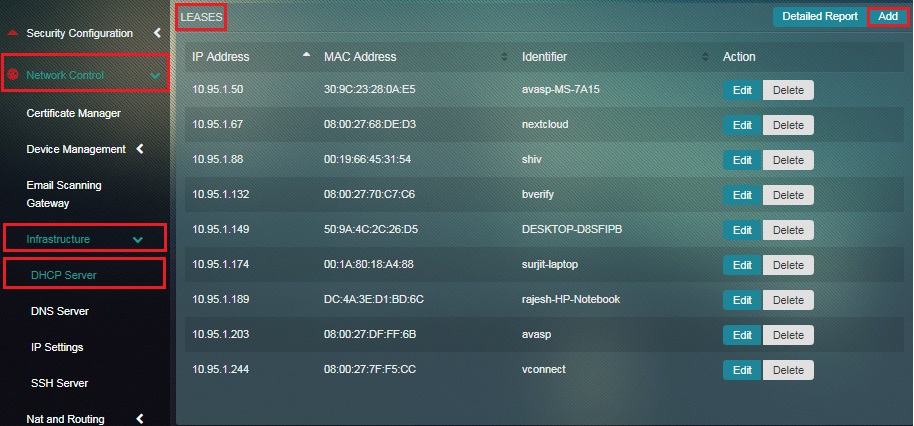 Step 2: You will now see the Static lease page. Enter the MAC and the IP Address of the device and click Add button.
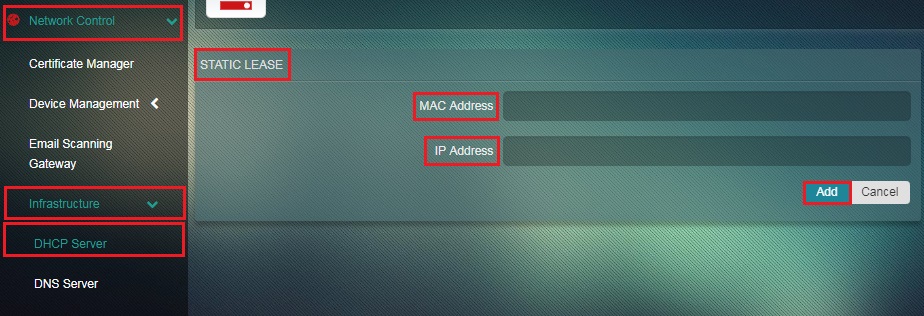
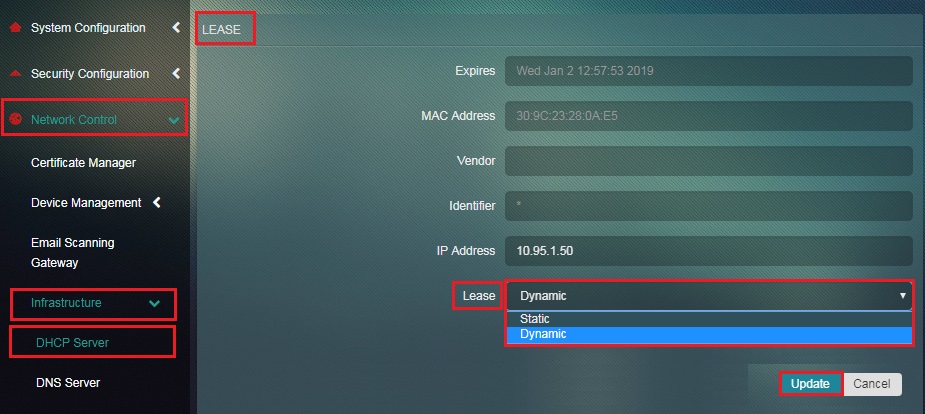
How to Assign a Dynamic or Static IP Address for Device After it is Connected to the Crystal Eye Network?
A device is given a Dynamic IP address by default as soon as it gets connected to the Crystal Eye Network. However, the administrator can assign a new dynamic IP address or a static IP address to the device by performing the following steps.
Step 1: In the DHCP server app page, click the Edit button of the desired device for which the IP address has to be changed. 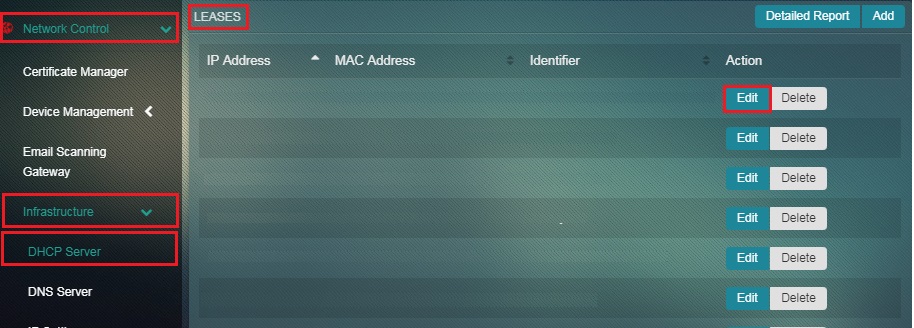 Step 2: You will now see the Lease page. Select Dynamic or Static from the Lease dropdown and click the Update button.