Intrusion Protection & Detection
The Intrusion Protection & Detection application is a rule-based IDS/IPS engine that utiliszes externally developed rule sets to monitor traffic and generates alerts accordingly.
The System implements a complete signature language to match on known threats, policy violations, and malicious behaviour. The IDS/IPS system will also detect many anomalies in the traffic it inspects. The Signatures are updated multiple times a day through the Red Piranha service delivery network and originally developed by Red Piranha’s threat intelligence/security operations centre.
The IDS/IPS system automatically detects protocols such as HTTP on any port and applies the proper detection and logging logic. This greatly helps with finding malware, and command and control channels. The system can log HTTP requests, log and store TLS certificates, extract files from flows, and store these to disk. The full packet capture (PCAP) support allows easy analysis. All this makes Crystal Eye a powerful engine for your Network Security Monitoring (NSM) ecosystem. The system also allows you to match against most aspects of an SSL/TLS exchange within the ruleset language, and you can also log all key exchanges for analysis. Great way to ensure make sure your network is not the victim of a less than reputable certificate authority.
The IDS/IPS engine features unified output functionality and pluggable library options to accept calls from other applications. The platform supports inline and passive traffic monitoring configuration capable of handling multiple gigabit traffic levels a multi-threaded engine, the Crystal Eye IDS IPS system offers increased speed and efficiency in network traffic analysis. In addition to hardware acceleration (with hardware and network card limitations), the engine is built to utilise the increased processing power offered by modern multi-core CPU chip sets.
The application has 3 switch views,
Left-hand Navigation Panel > Security Configuration Intrusion Protection & Detection 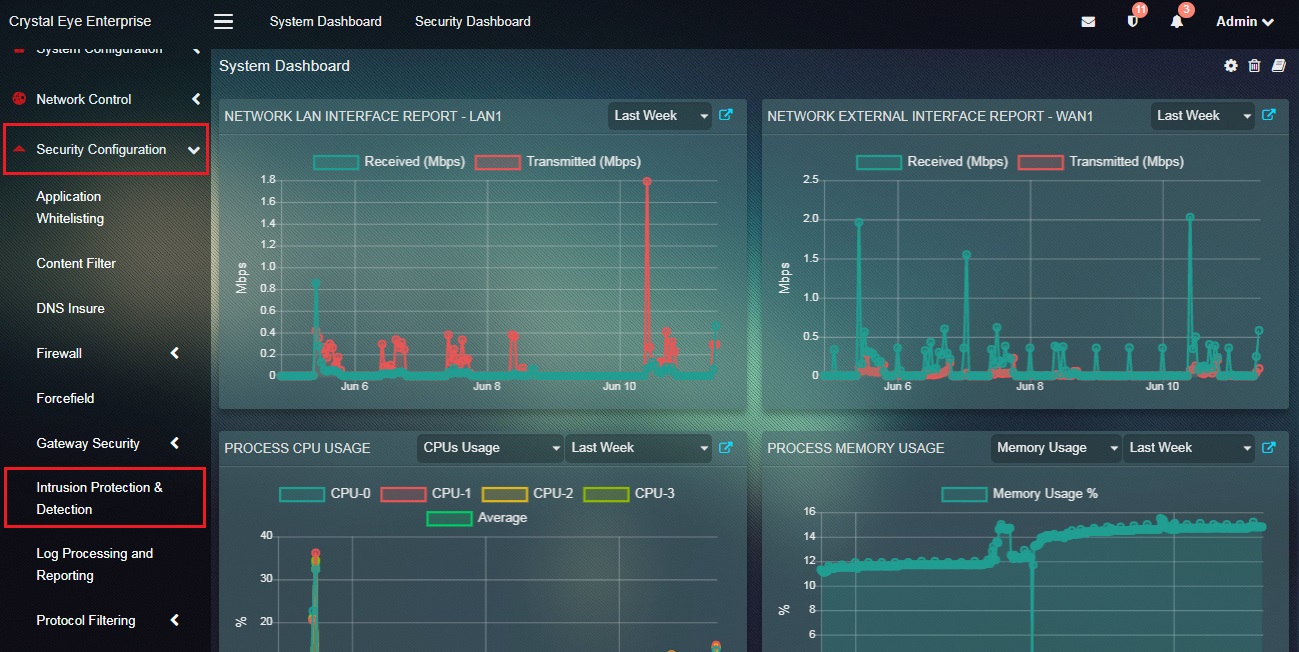 |
|---|
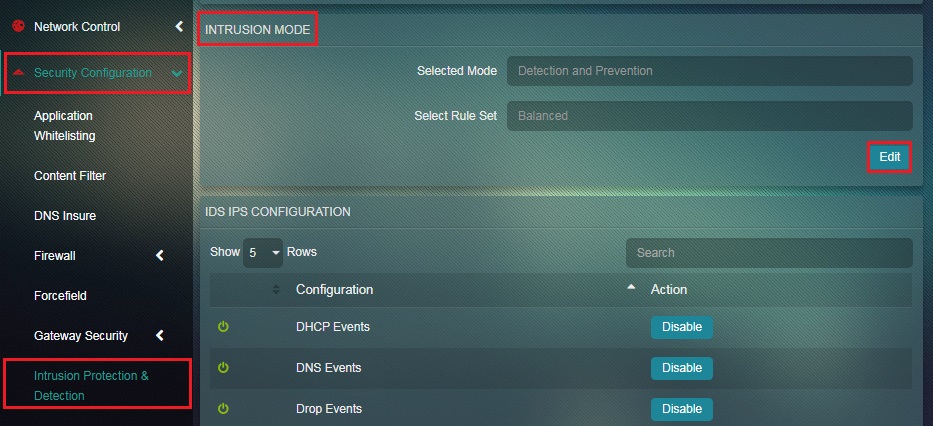
IDS/IPS Configuration Switch View has three sections namely, Intrusion Mode, IDS/IPS Configuration and Base Rule Set. The Intrusion Mode section allows administrators to select modes such as Detection, Prevention and NSM. Rule sets can also be selected from the Select Rule Set dropdown. The rule sets that can be opted here are Balanced Rule set, Security Rule Set, Ultra Rule Set, Connectivity Rule Set, Custom Rule Set, and WAF Rule Set. Another important aspect of the IDS/IPS Configuration Switch View is that, it consists of Base Rule Set dashboard providing details regarding the assigned rules such as:
- Last IDS/IPS Engine Update
- Last Rules Update
- Number of Categories
- Total Number of Rules
- Total Number of Rule Pass
- Total Number of Rules Alert
- Total Number of Rules Drop
- Total Number of Rules Reject
- Total Number of Rules Disabled
Left-hand navigation Panel > Security Configuration > Intrusion Protection & Detection > IDS/IPS Configuration button 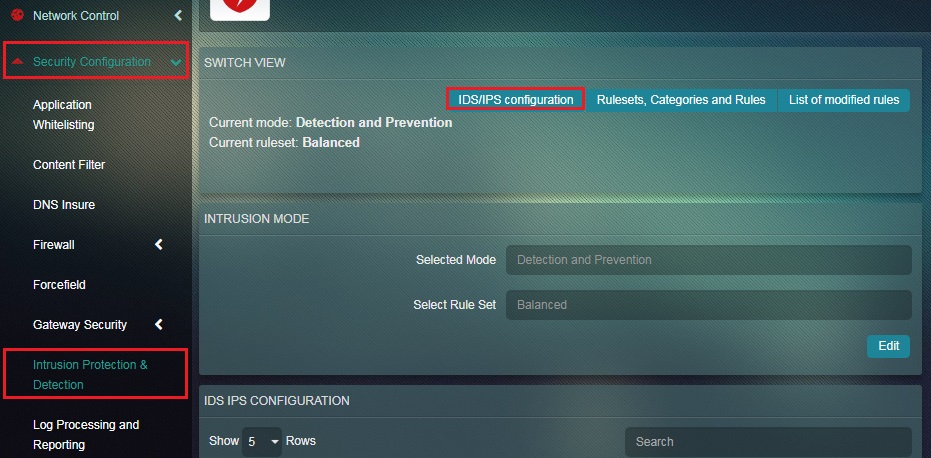 |
|---|
The Intrusion Protection and Detection System is a rule based IDS/IPS engine which essentially means that the application is programmed to detect and prevent cyber attacks based on pre-defined and customised rules.
The Crystal Eye administrator can either choose the IDS/IPS application to function in Detection mode, Prevention mode or Network Security Management mode. Detection & Prevention mode focuses on real–time traffic analysis and pocket logging on Internet Protocol (IP) networks. Whereas, Prevention mode focuses on blocking suspected attackers from accessing protected networks. The Network Security Management mode logs selective events like that of HTTP requests and DNS queries.
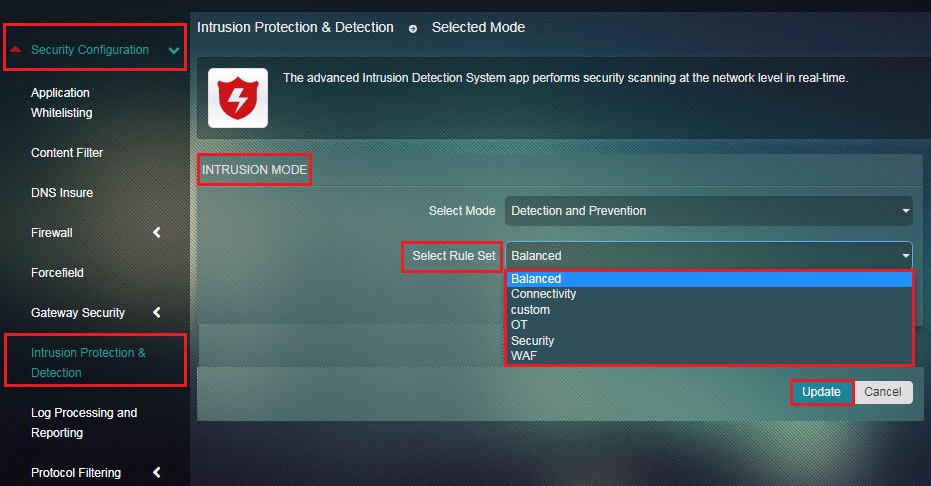
In addition to selecting intrusion mode, the CE administrator can also select pre-defined rule sets to enforce a strategy to counter cyber attacks. There are 6 rule sets to choose from namely, Balanced Rule Set (ideal for all), Security Rule Set, Ultra Rule Set, Connectivity Rule Set, Custom Rule Set, and WAF Rule Set.
Note: The IDS/IPS application runs on Detection Mode and Balanced Rule Set by default.
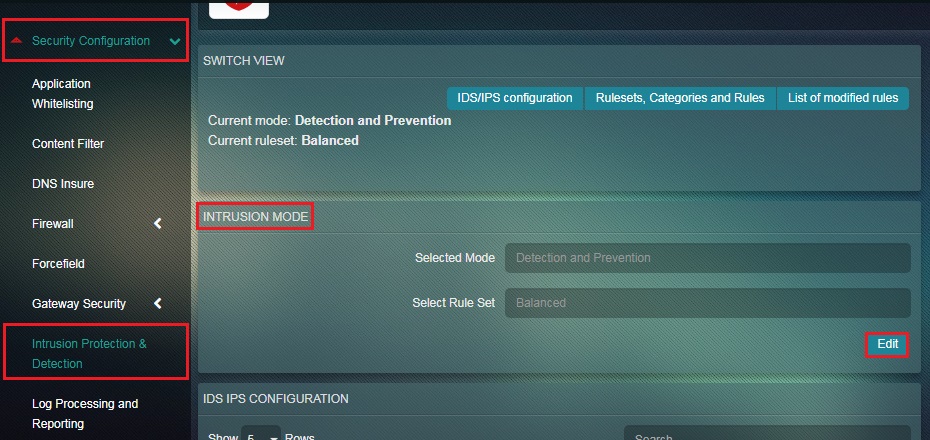
How to Select the Intrusion Mode in IDS/IPS Application?
Step 1: In the IDS/IPS Configuration Switch View page, click the Edit button of the Intrusion Mode section.
Step 2: You will now see the Intrusion Mode page. Select the desired mode from the Select Mode dropdown and click the Update button.
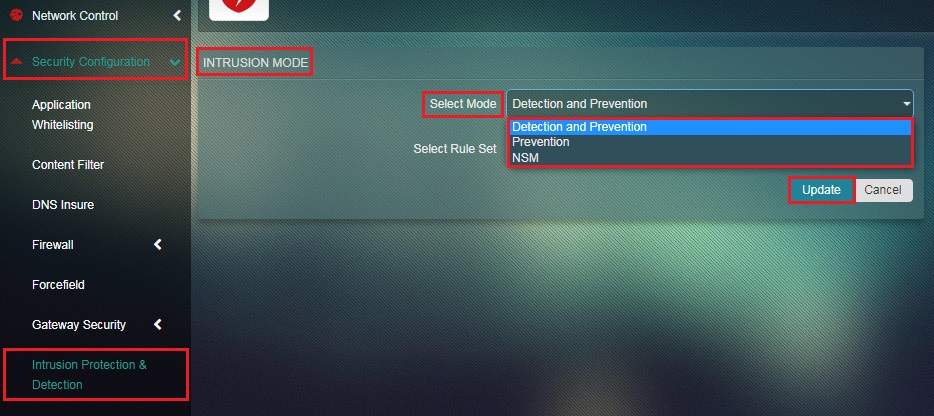
Note: The three options that a CE administrator can choose from to set the Intrusion Mode are Detection, Prevention and Network Security Monitoring.
How to Select Pre-defined Rule Sets to be Used by the IDS/IPS Applications?
Step 1: In the IDS/IPS Configuration page, click the Edit button under Intrusion Mode section.
Step 2: You will now see the Intrusion Mode page. Select the Rule Set from the dropdown.
The Crystal Eye administrator can ensure that a range of network events are logged and are retrievable for further analysis. These logged events provide a greater degree of network visibility and also help in network monitoring.
Note: The logs created on enabling these network related events are saved and can be retrieved through the Forensic Logging application. The event logs can then be analysed for further analysis.
Logs are created for the following events:
- DHCP Events
- DNS Events
- Drop Events
- Files Events
- Flow Events
- HTTP Events
- IKEv2 Events
- Kerberos Events
- NFS Events
- SMB Events
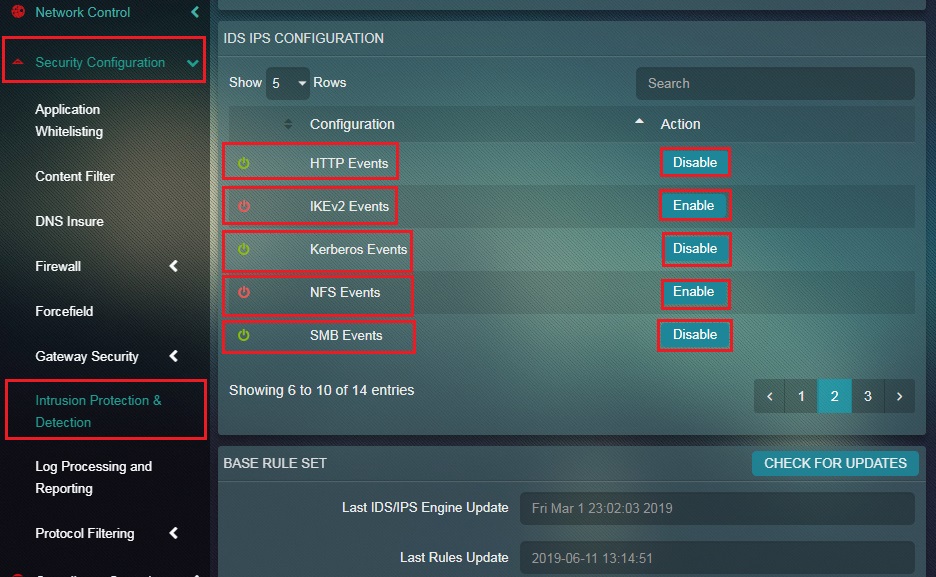
How to Enable/Disable IDS/IPS Events Logging?
Step 1: In the IDS/IPS Configuration Switch View page, enable/disable DHCP Events, DNS Events, Drop Events, Files Events, Flow Events, HTTP Events, IKEv2 Events, Kerberos Events, NFS Events and SMB Events.
Parameters that Can be Monitored in the Base Rule Set Dashboard The Base Rule Set Dashboard makes the following information available to an administrator:
- Last IDS/IPS Engine Update
- Last Rules Update
- Number of Categories
- Total Number of Rules
- Total Number of Rule Pass
- Total Number of Rules Alert
- Total Number of Rules Drop
- Total Number of Rules Reject
- Total Number of Rules Disabled
Note: The Latest updated list can be seen by clicking the Check for Updates button.
In the Rule Sets, Categories and Rules section the Crystal Eye administrator can create customised rules in the Local Rule section to counter cyber attacks. In addition to this, the CE appliance also receives pre-defined rules through Red Piranha’s Service Delivery Network (originally developed by Red Piranha’s Security Operations Team). These pre-defined rules are deployed in the CE appliance based on the Rule Set selected in the Intrusion Mode section.
All in all, the Rule Sets, Categories and Rules section helps administrators to Add Rule, Enable/Disable Rule, Search SID and Convert the rule to Pass, Alert, or Drop.
Left-hand navigation Panel > Security Configuration > Intrusion Protection & Detection > Rule sets, Categories and Rules Switch View 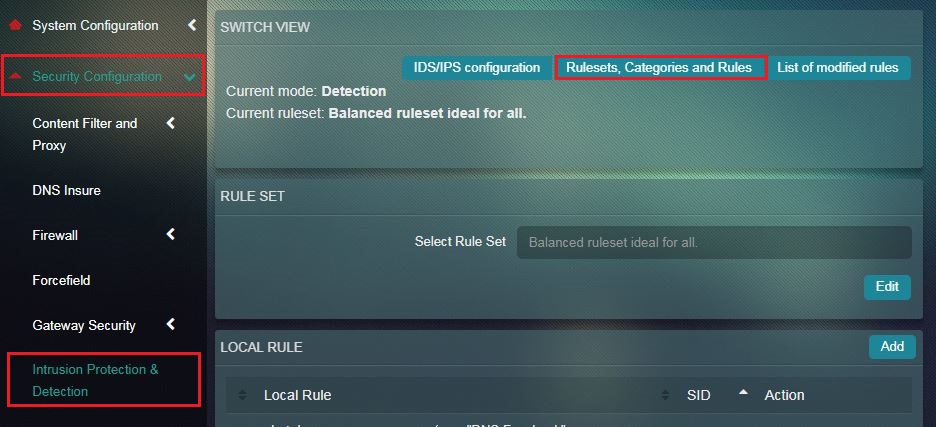 |
|---|
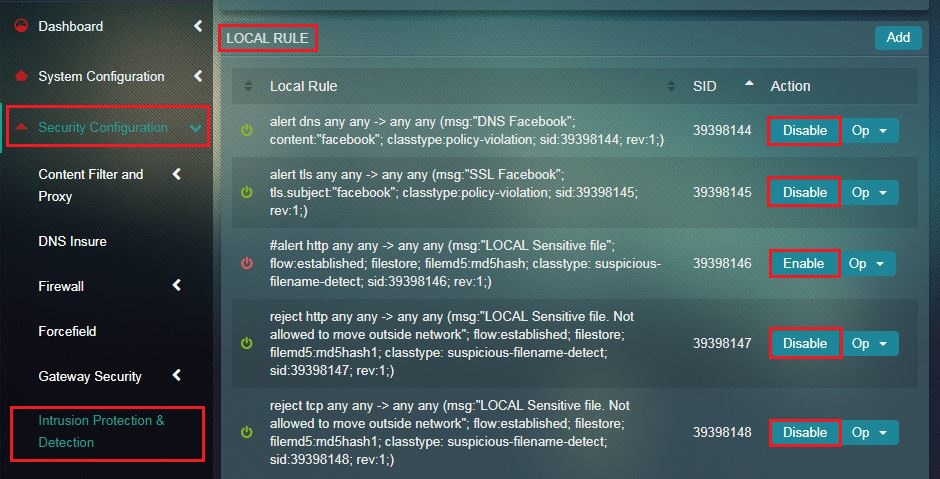
The Local Rules section allows administrators to add customised rules which are specific to a particular CE appliance.
These rules can be converted to Pass, Alert, Drop and Reject further defining the nature of the rules as discussed below:
- Convert to Pass: After conversion of the rule action to Pass, if a signature matches, the packets are allowed by this rule and continue to be processed by subsequent rules in order.
- Convert to Drop: Post conversion of the rule to Drop, if a signature matches then the packet will be stopped and will not be allowed to move further into the network.
- Convert to Reject: Post conversion of the rule to Reject, if a signature matches then the packet will not go through, and both the sender and receiver will receive a reject packet.
- Convert to Alert: Post conversion of the rule to alert, if a signature matches on detection the packet will generate an alert. In addition, the packet will not be treated as a threat)
Note: If there is a requirement, the local rules can be enabled or disabled
How to Add a New IDS/IPS Local Rule?
Step 1: In the Rule sets, Categories and Rules Switch View page, click the Add button of the Local Rule section.

Step 2: You will now see the Rule section. Select the desired action to be taken if the data packet matches the rule in Action if Packet Matches Rule dropdown.
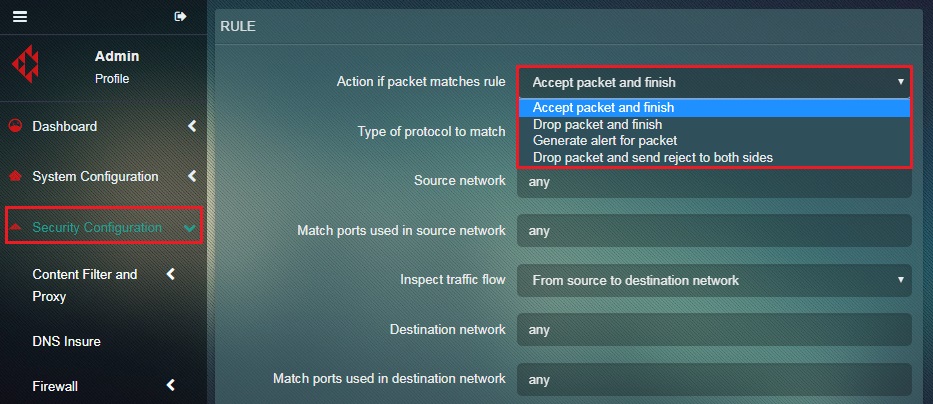
Note: An administrator may select one of the four options from the Action if Packet Matches Rule dropdown which are Accept Packet and Finish, Drop Packet and Finish, Generate Alert for Packet, and Drop Packet and Send Reject to Both Sides.
Step 3: Select the desired type of protocol to match from the Type of Protocol to Match dropdown in the Rule section. 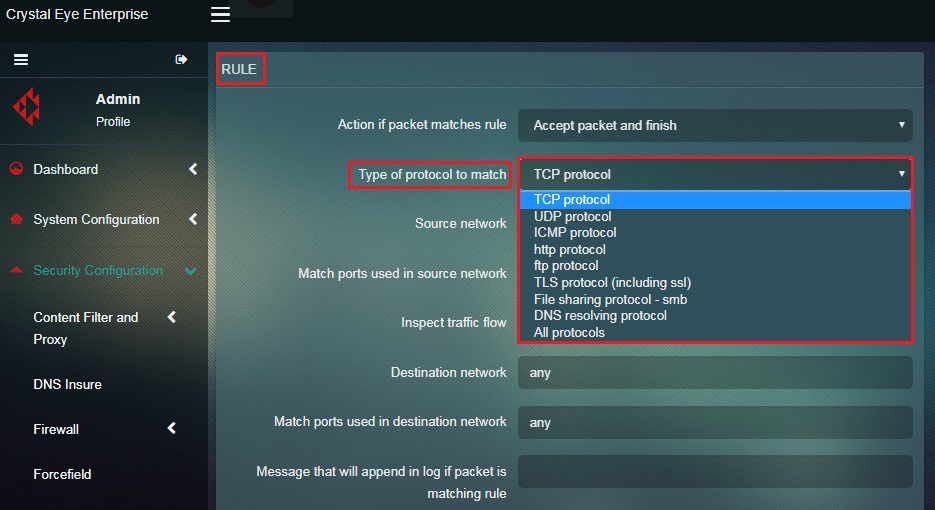
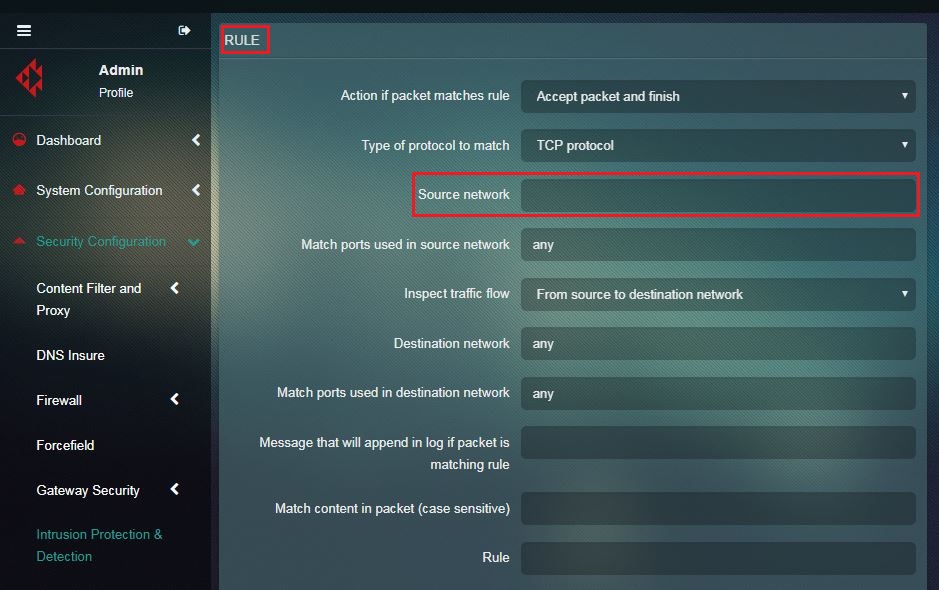
Step 4: Enter the source network in the Source Network text box in the Rule section.
Step 5: Enter the ports that are required to match with the ones used in the source network in the Match Ports Used in Source Network text box.
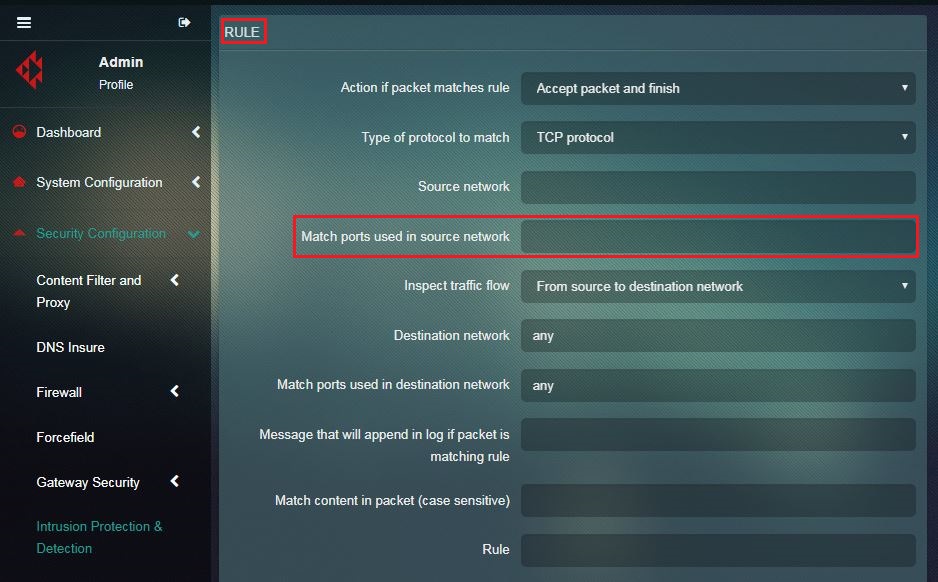
Step 6: Select the length at which the traffic must be inspected from the Inspect Traffic Flow dropdown.
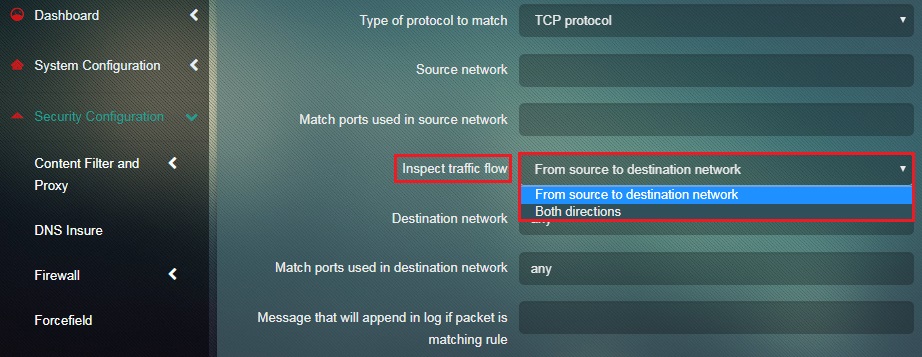
Note: The administrator has two options to choose from to define the length at which the traffic flow must be inspected. The dropdown options are From Source to Destination Network and Both Directions.
Step 7: Enter the destination network in the in the Destination Network text box.
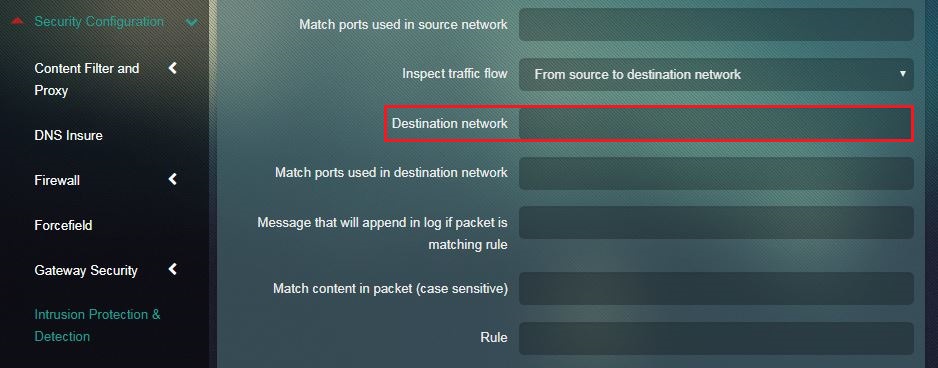
Step 8: Enter the ports that are required to match with the ones used in the destination network in the Match Ports Used in Destination Network text box.
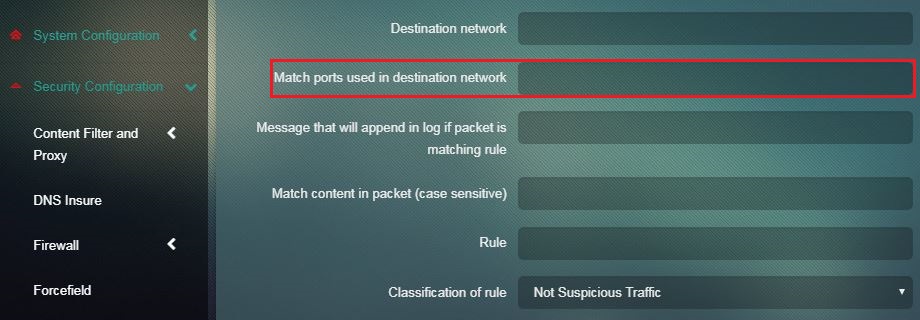
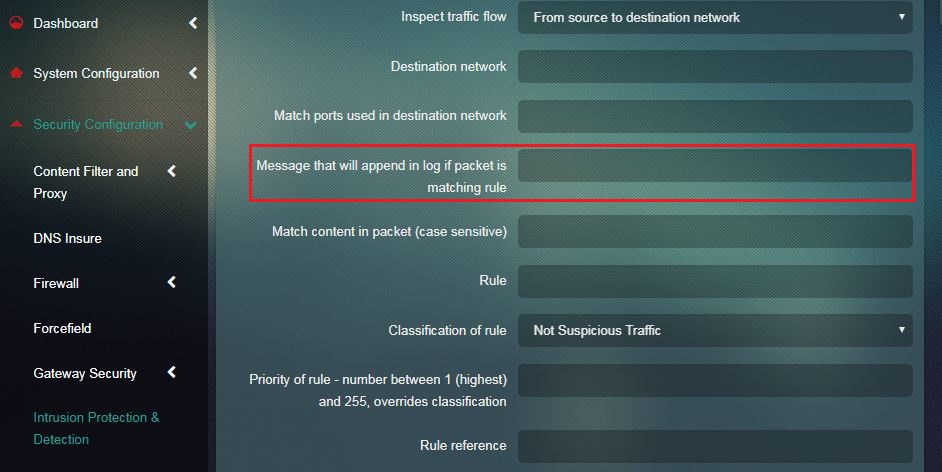
Step 9: Enter the Message that will Append in the Log if Packet Matches the Rule in the text box.
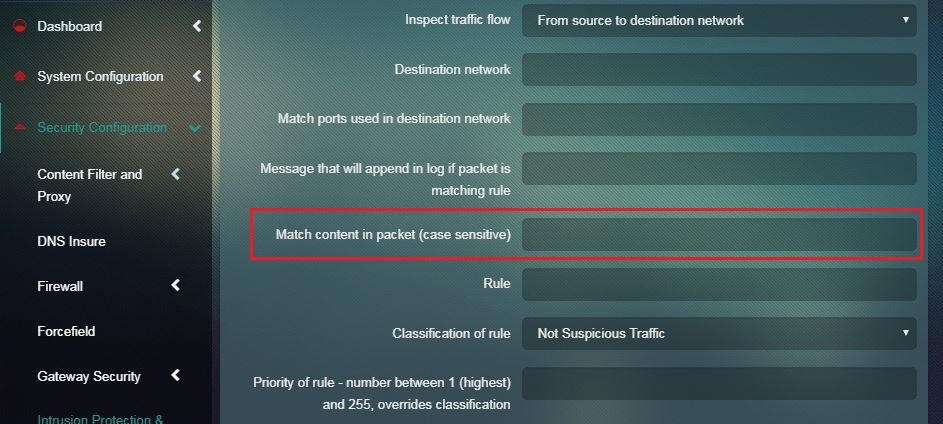
Step 10: Enter the content that is required to be matched in a data packet in the Match Content in Packet (Case Sensitive) text box.
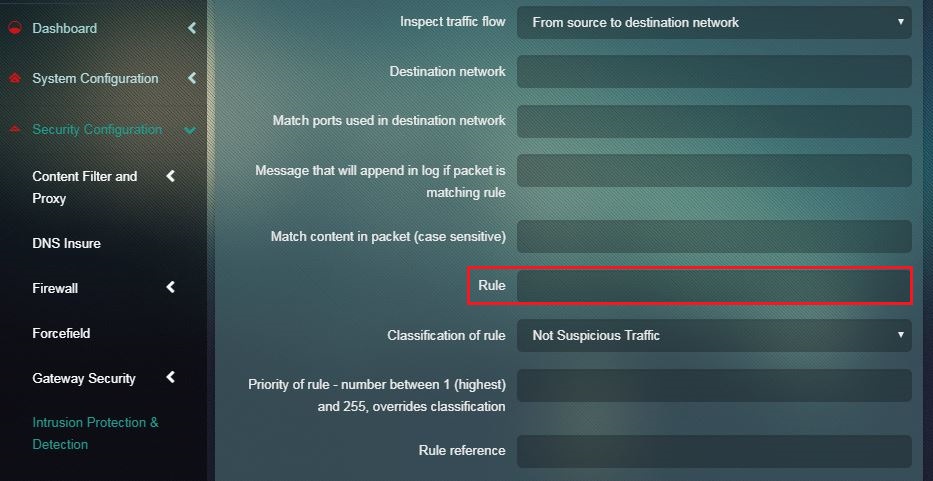
Step 11: Enter the rule in the Rule text box.
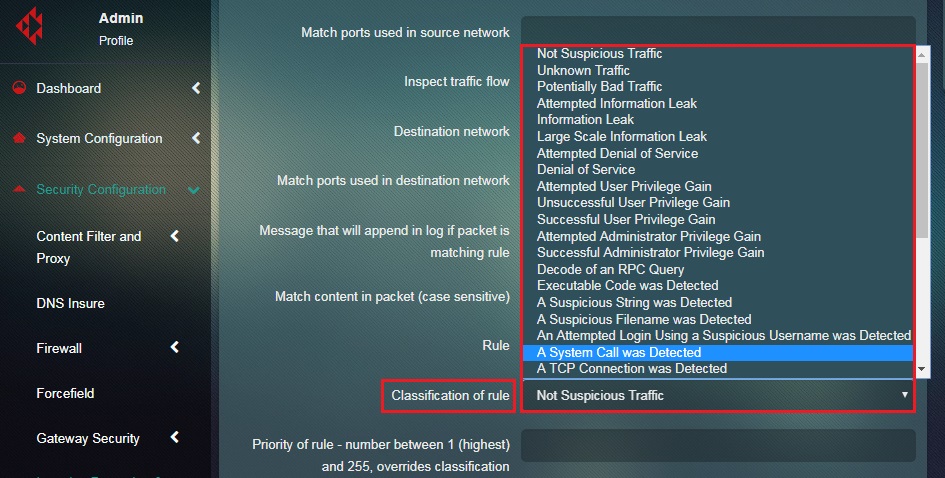
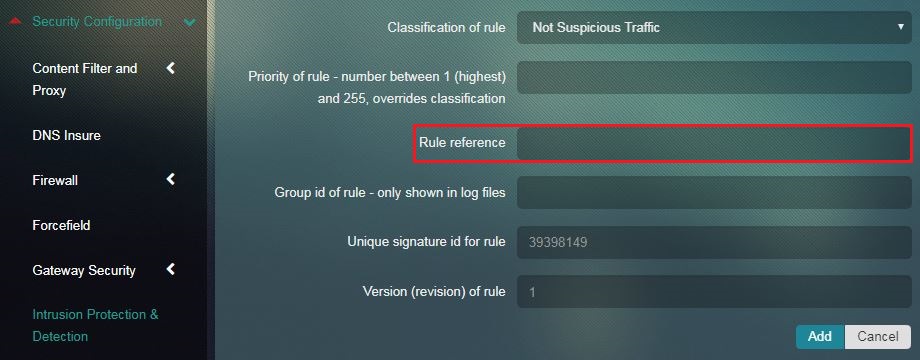
Step 12: Sought out the rule type by selecting the Classification of Rule from the Dropdown.
Step 13: Enter the priority code of the rule at the scale of 1-255 with 1 being the highest in the text box.
Note: Assigning or determining the priority of the rule at the scale of 1-255 essentially overrides classification.
Step 14: Enter the desired reference of the rule in the Rule reference text box.
Step 15: Enter the Group ID of Rule in the text box.
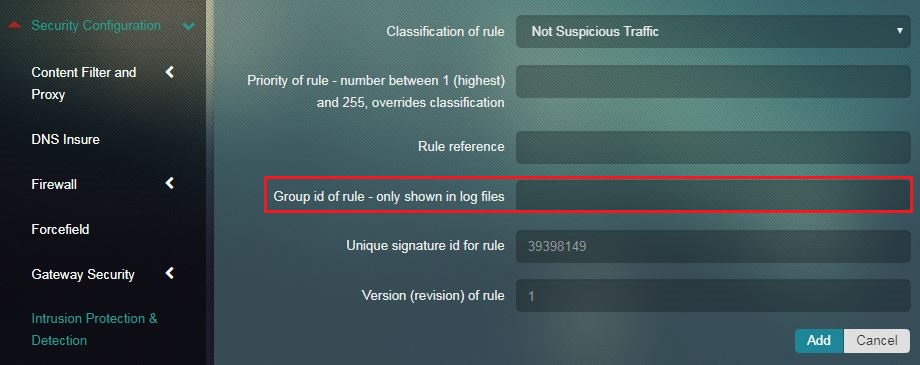
Note: The assigned Group ID of the Rule is displayed in the log files.
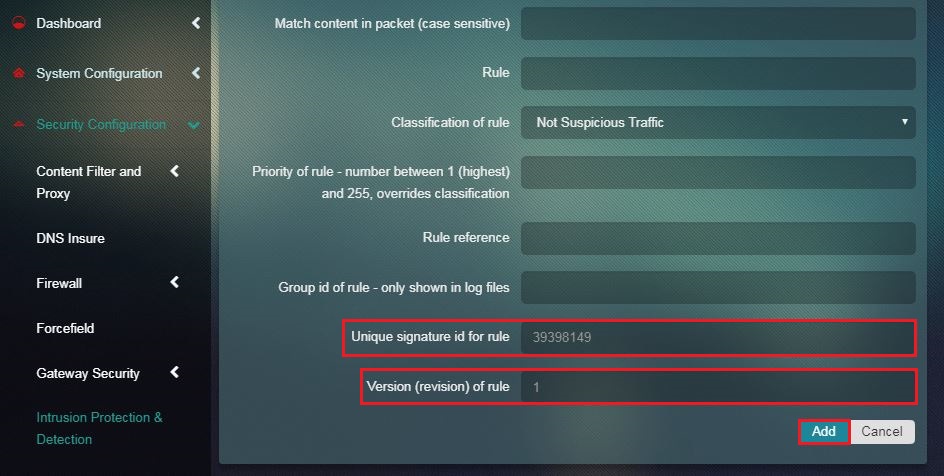
Step 16: Click the Add button to create the Local Rule. The Unique Signature ID for Rule and Version (revision) of Rule will be mentioned in the respective text boxes in the respective boxes.
All Local Rules are specific to the CE appliance it is created in. These rules are customised according to requirements and can be easily enabled and disabled from the Local Rule section.
How to Enable/Disable Local Rule?
Step 1: In the Rule sets, Categories and Rules Switch View page, click the Enable/Disable button of the Local Rule section.
As we know Local Rules are those rules that are custom made and are specific to a particular Crystal Eye appliance. However, the characteristics of these specially created rules can be changed. These rules can be converted to Pass, Alert, Drop and Reject further defining the nature of the rules as discussed below.
Convert to Pass: After conversion of the rule action to Pass, if a signature matches, the packets are allowed by this rule and continue to be processed by subsequent rules in order.
Convert to Drop: Post conversion of the rule to Drop, if a signature matches then the packet will be stopped and will not be allowed to move further into the network.
Convert to Reject: Post conversion of the rule to Reject, if a signature matches then the packet will not go through, and both the sender and receiver will receive a reject packet.
Convert to Alert: Post conversion of the rule to alert, if a signature matches on detection the packet will generate an alert. In addition, the packet will not be treated as a threat)
How to Convert Local Rule to Pass, Drop, Reject or Alert?
Step 1: In the Rule sets, Categories and Rules Switch View page, click the Operations dropdown of the Local Rule section.

Step 2: You will now see a dropdown list with the options Convert to Pass, Convert to Drop, Convert to Reject and Convert to Alert. Click the desired option to convert local rule.
Note: The following changes will occur in the behaviour of a Local Rule on selecting Convert to Alert, Convert to Drop, Convert to Reject and Convert to Pass:
-
Convert to Pass: After conversion of the rule action to Pass, if a signature matches, the packets are allowed by this rule and continue to be processed by subsequent rules in order.
-
Convert to Drop: Post conversion of the rule to Drop, if a signature matches then the packet will be stopped and will not be allowed to move further into the network.
-
Convert to Reject: Post conversion of the rule to Reject, if a signature matches then the packet will not go through, and both the sender and receiver will receive a reject packet.
-
Convert to Alert: Post conversion of the rule to alert, if a signature matches on detection the packet will generate an alert. In addition, the packet will not be treated as a threat)
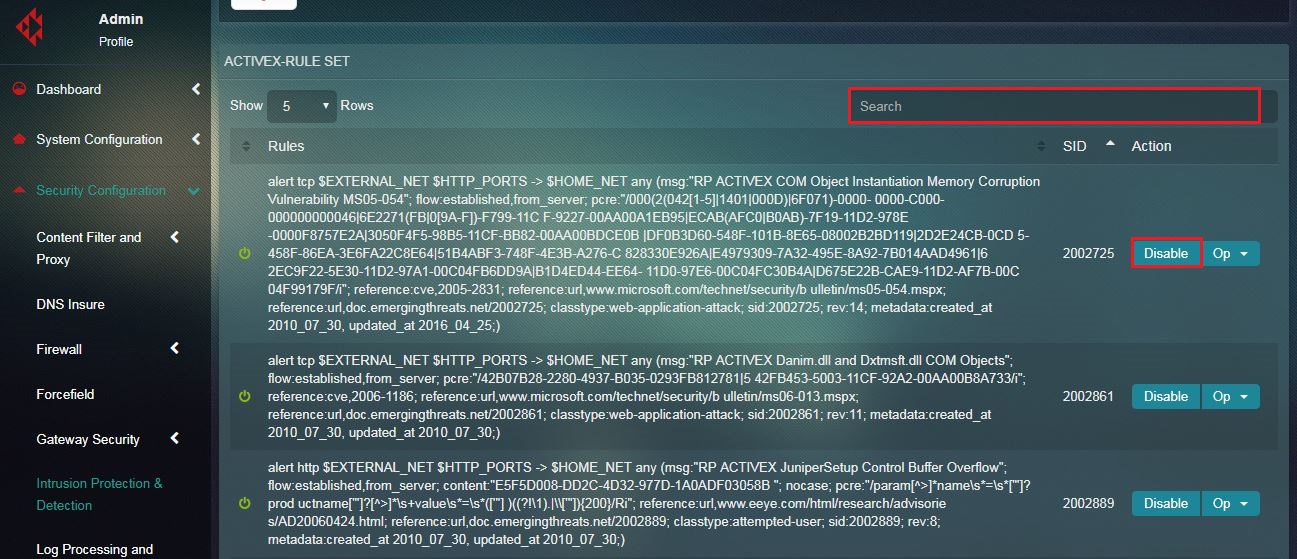
All Local Rules and the rules updated through Red Piranha’s SDN can be searched and detected with the help of SID search box.
How to Search Rule with the Help of Signature Identity (SID)?
Step 1: In the Rule sets, Categories and Rules Switch View page, Enter the SID in the text box and click the Search button.
.JPG)
Note: Both Local Rules and the Rules Updated through Red Piranha’s SDN can be searched using the SID Search bar.
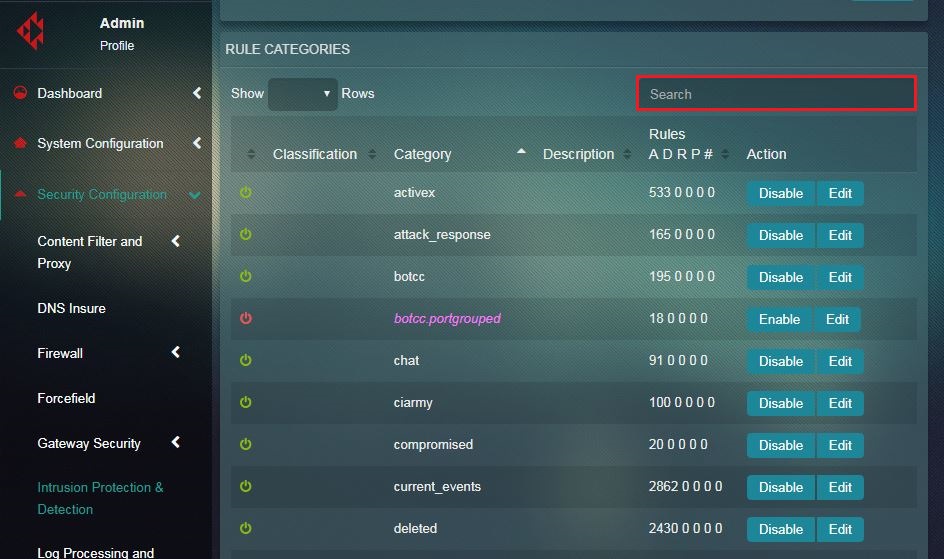
All the rule sets that we see in this section are developed by Red Piranha’s Security Operation’s Team. These rule sets are classified under categories such as, attack response, chat, dns, scada, p2p etc. Each rule set has an Edit button next to the rule set category name which leads to the rules. The CE administrator can either disable the entire category or can even disable a particular rule belonging to a specific category. Apart from this the rules can be modified or converted to Pass, Drop, Reject or Alert.
How to Search and Enable/Disable Rule Categories?
Step 1: In the Rule sets, Categories and Rules Switch View page, Enter the Rule Category name in the Search box.
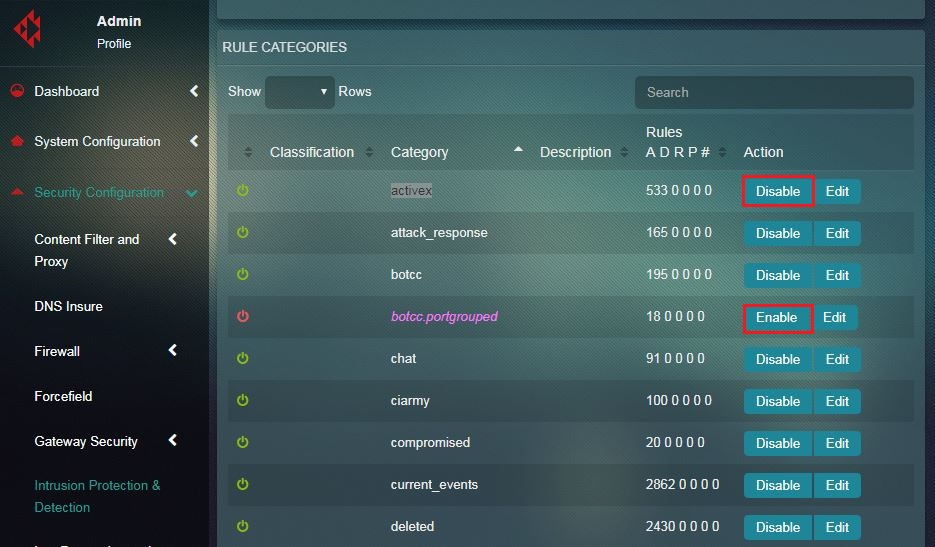
Step 2: In order to enable/disable a rule category, click the Enable/Disable button in the Rule Category section.
How to Search and Enable/Disable a Particular Rule Belonging to a Specific Rule Category?
Step 1: In the Rule sets, Categories and Rules Switch View page, click the Edit button placed against the desired Rule Category that needs to be edited in the Rule Categories section.
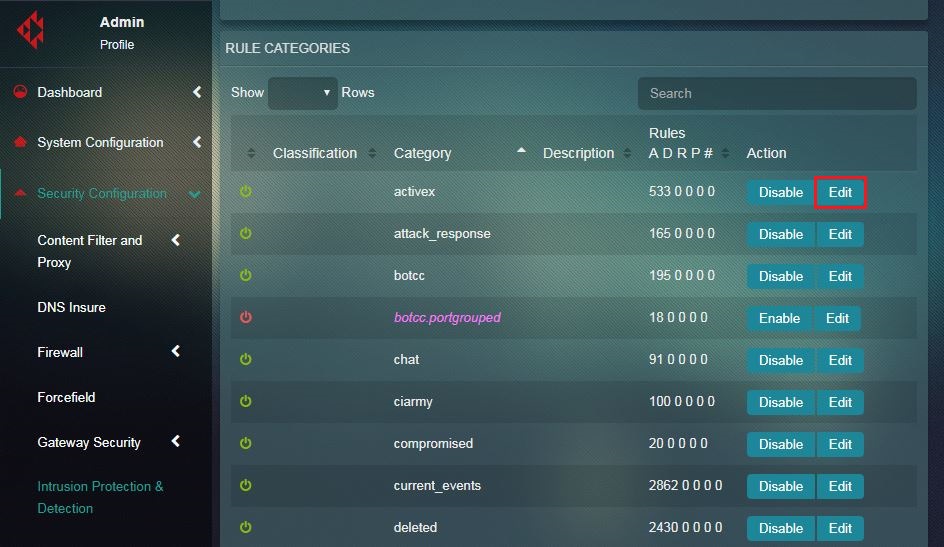
Step 2: You will now see the Rule Set section of the selected Rule Category in step 1. Click the enable/disable button to Enable or Disable the Rule and use the Search Bar to search a rule.
Note: After clicking the Edit button positioned against the Rule Category name in Step 1, you will be navigated to the Rule Set page of the selected Rule Category. The Rules that are displayed in the Rule Set section are those which belong to the selected rule category and are updated through Red Piranha’s Service Distribution Network -SDN.
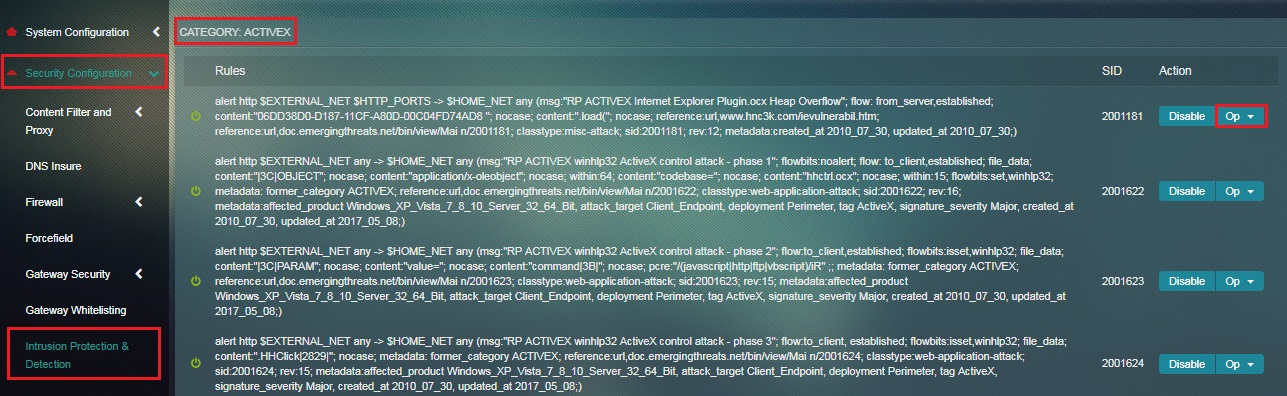
How to Convert a Particular Rule Belonging to a Specific Rule Category to Pass, Drop, Reject or Alert?
Step 1: In the Rule sets, Categories and Rules Switch View page, click the Edit button in the Rules Category section.

Note: Click the Edit button positioned against the Rule Category name that needs to be edited. The search bar can also be used to search for a specific rule category.
Step 2: You will now see the Rule Set section. Click the Operations dropdown button.
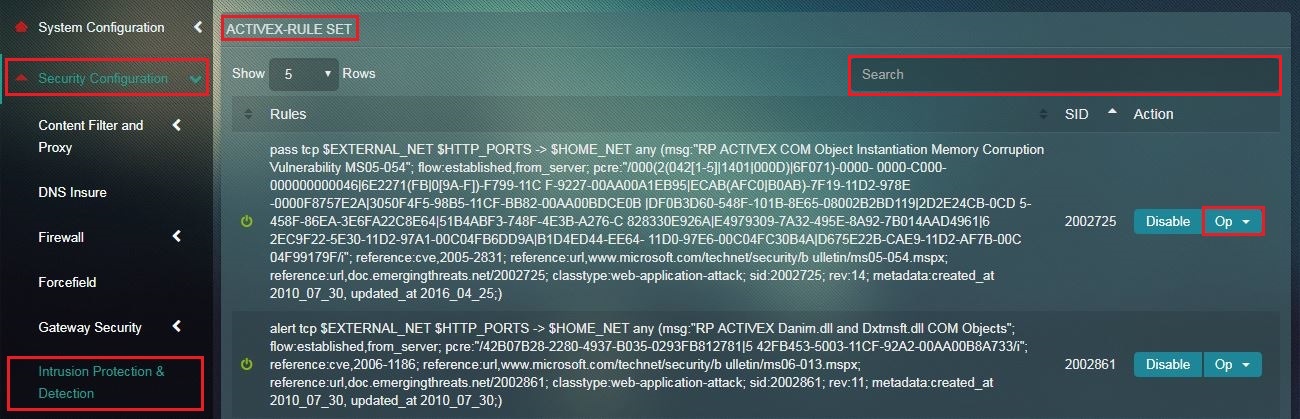
Note: The Rule Set section shows all the rules that have been categorized under a particular Rule Category.
Step 3: You will now see a dropdown list with the options Convert to Pass, Convert to Drop, Convert to Reject and Convert to Alert. Click the desired option to convert rule.
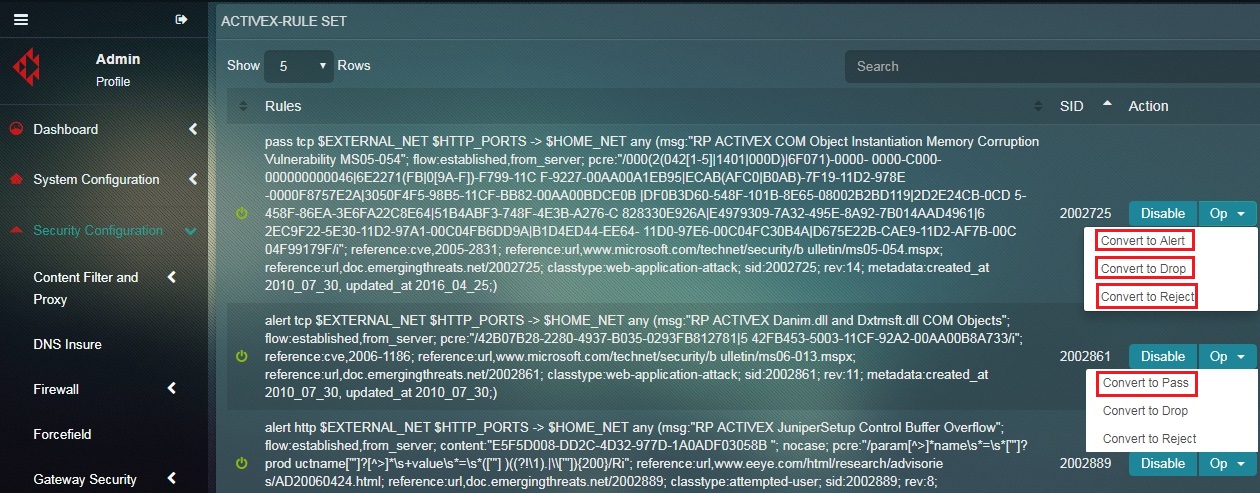
Note: The following changes will occur in the behaviour of a Rule on selecting Convert to Alert, Convert to Drop, Convert to Reject and Convert to Pass:
Convert to Pass: After conversion of the rule action to Pass, if a signature matches, the packets are allowed by this rule and continue to be processed by subsequent rules in order.
Convert to Drop: Post conversion of the rule to Drop, if a signature matches then the packet will be stopped and will not be allowed to move further into the network.
Convert to Reject: Post conversion of the rule to Reject, if a signature matches then the packet will not go through, and both the sender and receiver will receive a reject packet.
Convert to Alert: Post conversion of the rule to Alert, if a signature matches on detection the packet will generate an alert. In addition, the packet will not be treated as a threat
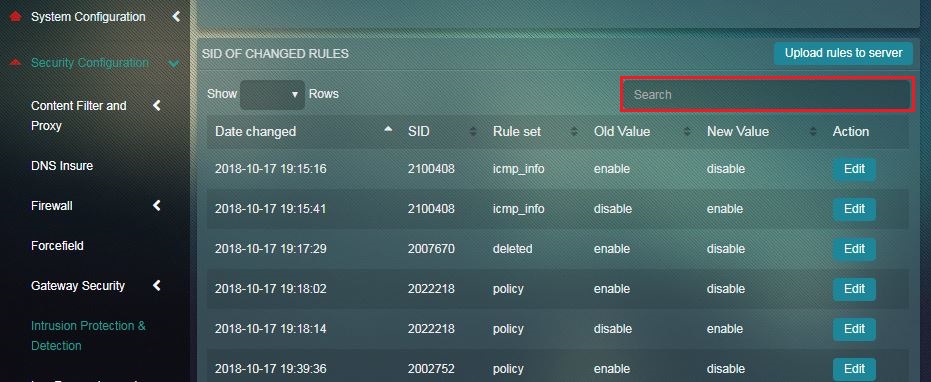
The List of Modified Rules Switch View consists of a log history of edited rules. These are the rules that are edited through Security Dashboard and the Rulesets, Categories, and Rules switch view. Every rule that is edited must be updated on Red Piranha servers so that it can be shared with the security operations team of Red Piranha for review and universal implementation purposes. This can be easily done by clicking Upload Rules to Server button.
The changes are replicated in a centralized dashboard and are put across in a tabular format which consists of Date Changed (the date and time on which the changes were made), the SID, Rule Set, Old Value (status before the changes were made), New Value (status after the changes were made), and Action (this column consists of the edit button just in case changes are to be made to the rule). The dashboard also has a Search bar that can be used to lookup for a SID or a Rule Set.
Left-hand navigation Panel > Security Configuration > Intrusion Protection & Detection > List of Modified Rules Switch View 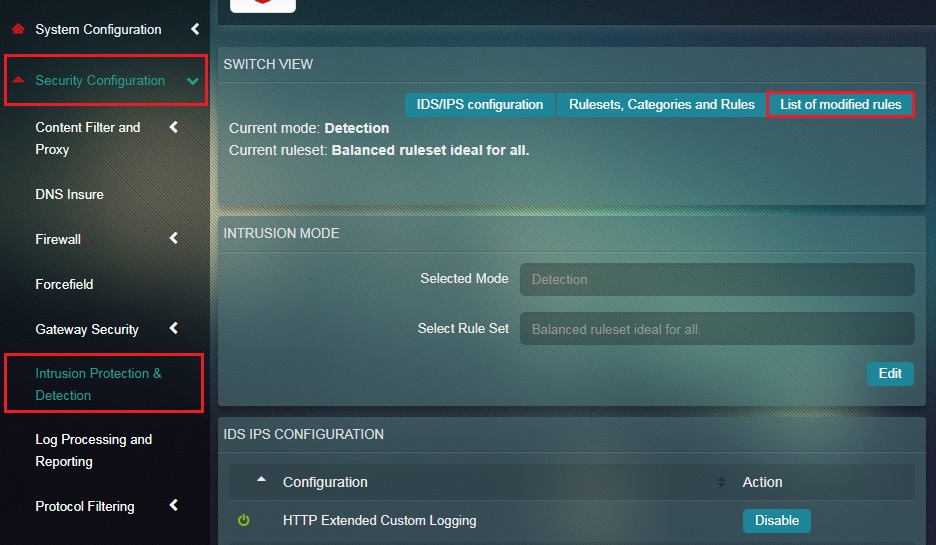 |
|---|
Step 1: In the List of Modified Rules Switch View page, click the Upload Rules to Server button. 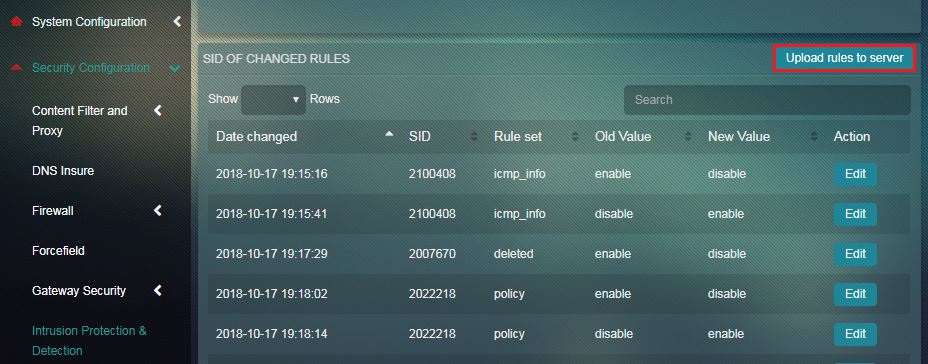
How to Search the Details of a Changed Rule with the Help of SID and Rule Set Name?
Step 1: In the List of Modified Rules Switch View page, enter the SID and Rule Set in the Search bar.