Crystal Eye Quick-Start Guide
The Crystal Eye appliance has phenomenal capabilities to offer protection against advanced cyber security threats by implementing high-end security policies that are meant to safe guard databases and computers running on the local area network (LAN). In order to install the Crystal Eye appliance successfully the CE administrator must first connect the CE box to the LAN networks and to the router. Once the physical set-up of the CE has been done, the administrator must open the browser of a computer which has been connected to the Crystal Eye appliance and access https://10.10.1.1:81. The administrator will then be directed to the CE login page where the default user credentials must be entered to finally access the ‘First Boot Configuration Wizard’.
Here the CE administrator will be presented with some configuration options. These options include various Network Based Settings, Registration of the Crystal Eye Box with Red Piranha’s online store, Automatic Software Updates, Basic Configuration settings such as Date and Time, Storage Manager, Incident and Event Services (SIEM), Risk Auditing Settings, and downloading of apps from the marketplace.
Every Crystal Eye appliance must have its LAN port connected to the computer in the LAN network and the WAN port connected to the router. By doing this the Crystal Eye appliance becomes the centre of the entire network providing flawless cyber security protection. Once the Crystal Eye appliance is physically set-up the CE administrator must access https://10.10.1.1:81 through the browser and enter the default log in credentials. The default admin credentials are username – admin and password – admin.
The CE administrator will now be directed to the web interface of the First Boot Configuration Wizard. The wizard would essentially help to configure the Crystal Eye appliance at the start level. The configuration options that the CE administrator will come across are Network Based Settings, Registration of the Crystal Eye Box with Red Piranha’s online store, Automatic Software Updates, Basic Configuration settings such as Date and Time, Storage Manager, Incident and Event Services (SIEM), Risk Auditing Settings, and downloading of apps from the marketplace.
The following steps explain the various configuration settings that is done by the CE administrator during the ‘First Boot Configuration Wizard’.
The Network Settings is the first section of the wizard and allows the user to change the default admin password, and view and edit various network interface settings. The administrator can edit various network interface parameters such as WAN IP, LAN IP and Restart DHCP Server. The DNS server section is meant to run DNS performance tests and edit DNS server. However, we strongly recommend against editing the DNS IP as Red Piranha has its own DNS server called the DNS.Insure.
Step 1: The first step of the wizard will be to read the details provided in the Getting Started page. Read the Getting Started page and click the Next button.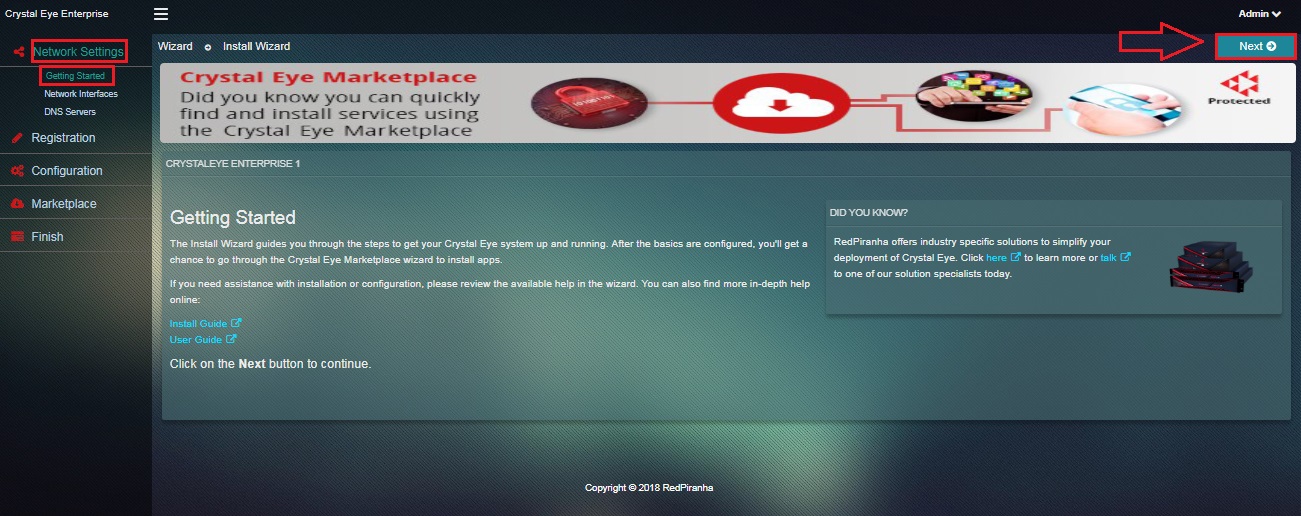 .
.
Step 2: On the Change Password page, change the default password to the new one, click Change Password button and then click the Next button.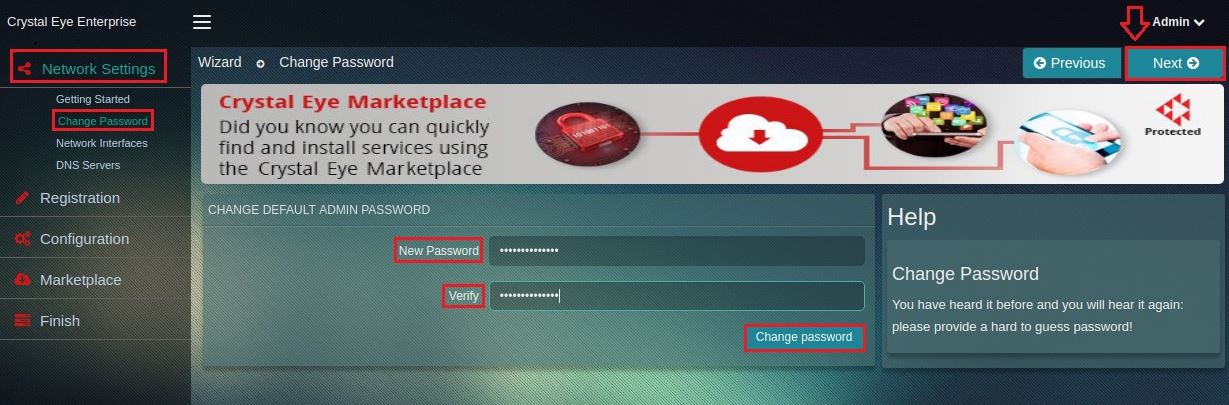
Note: We recommend using minimum 8 characters long password with alphanumeric and special character(s) included.
Step 3: Network Interface page will show you current network status for LAN and WAN ports under the Settings section. Click the Next button.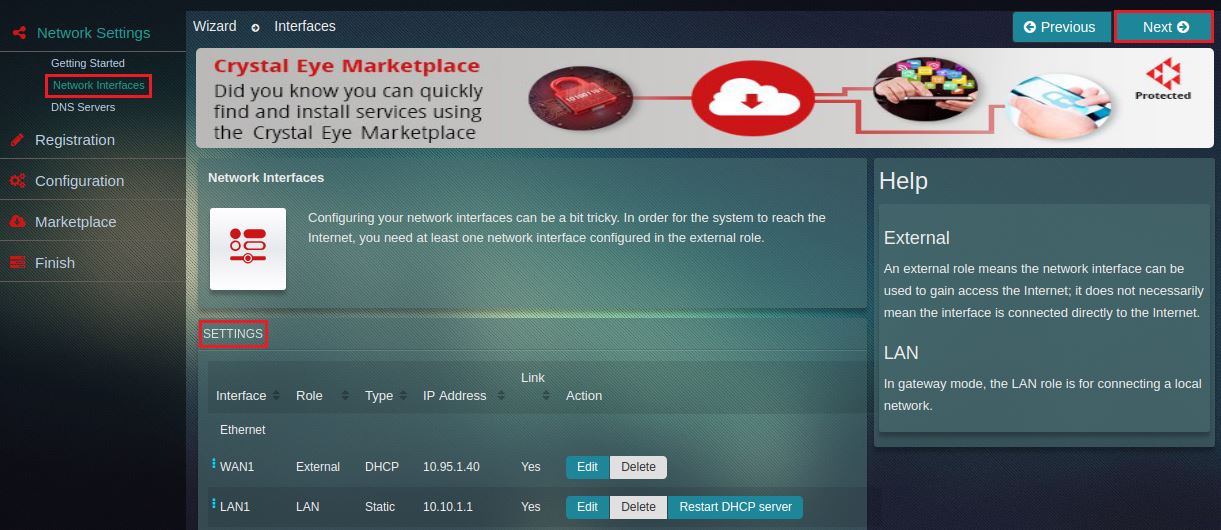
Note: If there is a requirement to change the LAN IP addresses, we recommend you not to edit them here. Complete the registration process and then make the required edits in the IP Settings application.
Step 4: You will now see the DNS Configuration page. Please wait while Crystal Eye runs a DNS test and once the test is completed, you will see a success message. Now, proceed to the next page by clicking the Next button. 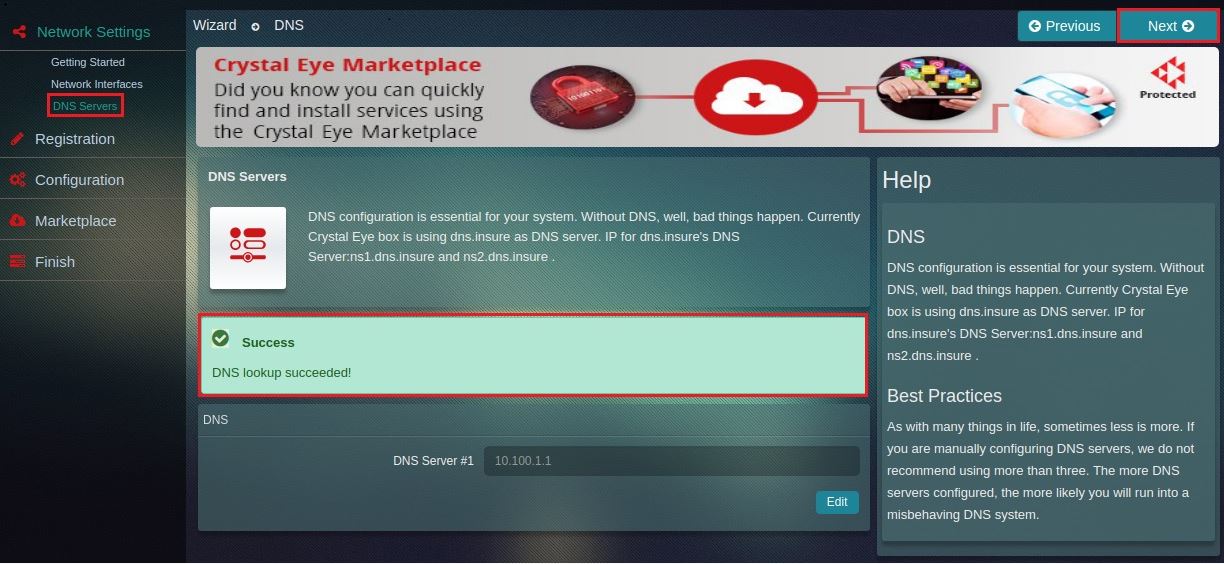
Note: Crystal Eye runs its own DNS server called DNS.Insure, henceforth, it is recommended not to edit the existing DNS IP
The Registration section allows the administrator to register the CE box with the Red Piranha Store so that it has access to the Marketplace. The Marketplace is where the applications and its latest versions are found.
Step 5: You will now be directed to the System Registration page. Click the Register System button to access the Registration form page. 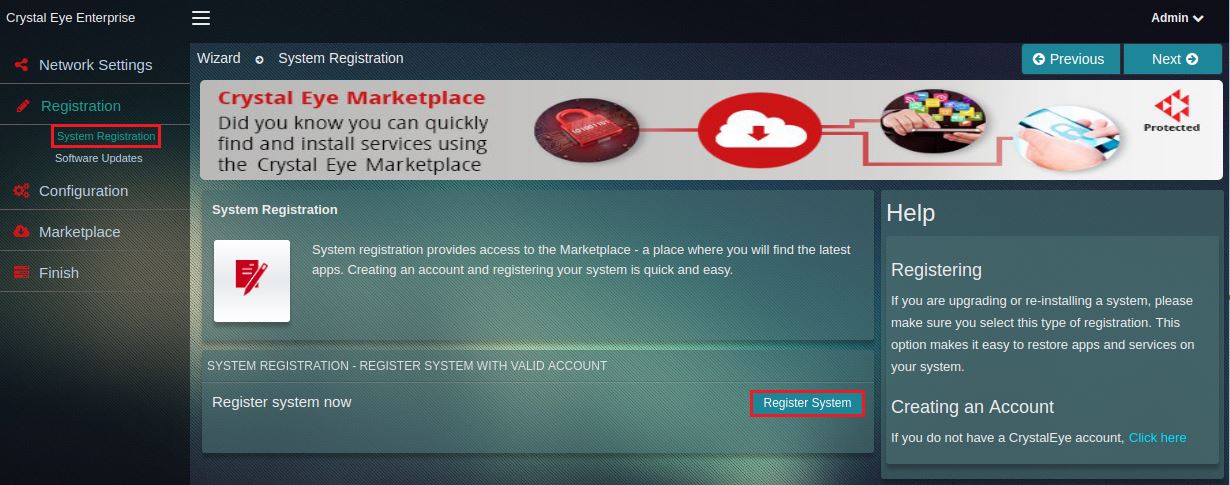
Note: In the Registration Form page you can register your device, but before you register the device, you will have to create an account at Red Piranha's store website. To do so go to Login > Sign up
Step 6: After you have generated your Red Piranha Account e-mail and Password at Red Piranha store, enter them in the System Registration form page in the respective text boxes. 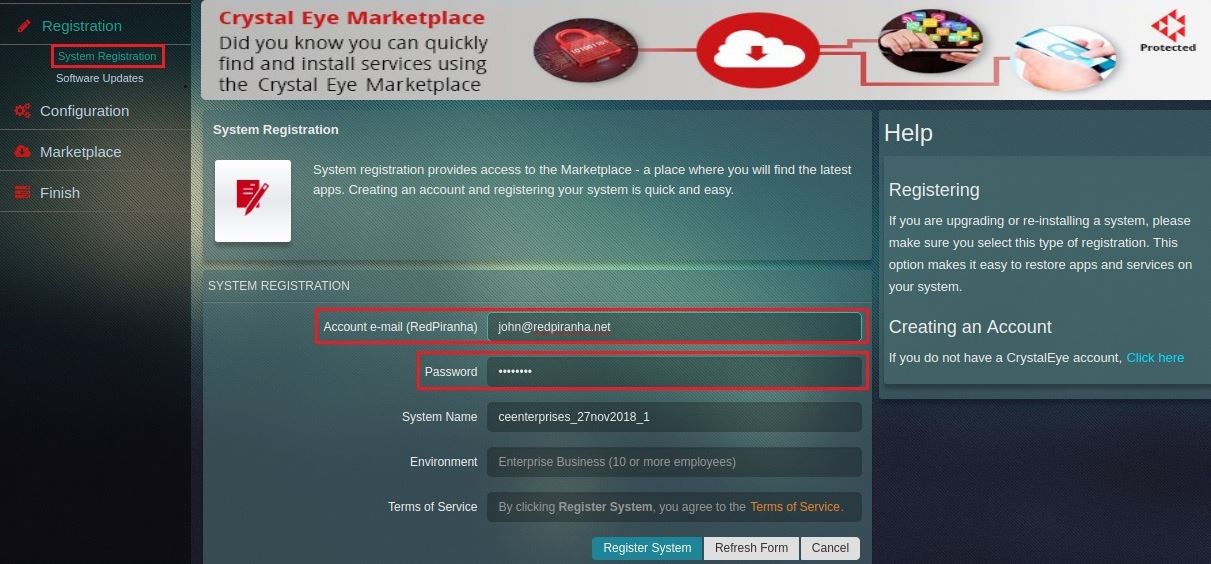
Step 7: Now, assign a system name, enter it in the System Name textbox, click the Register System button and then finally click the Next button to proceed.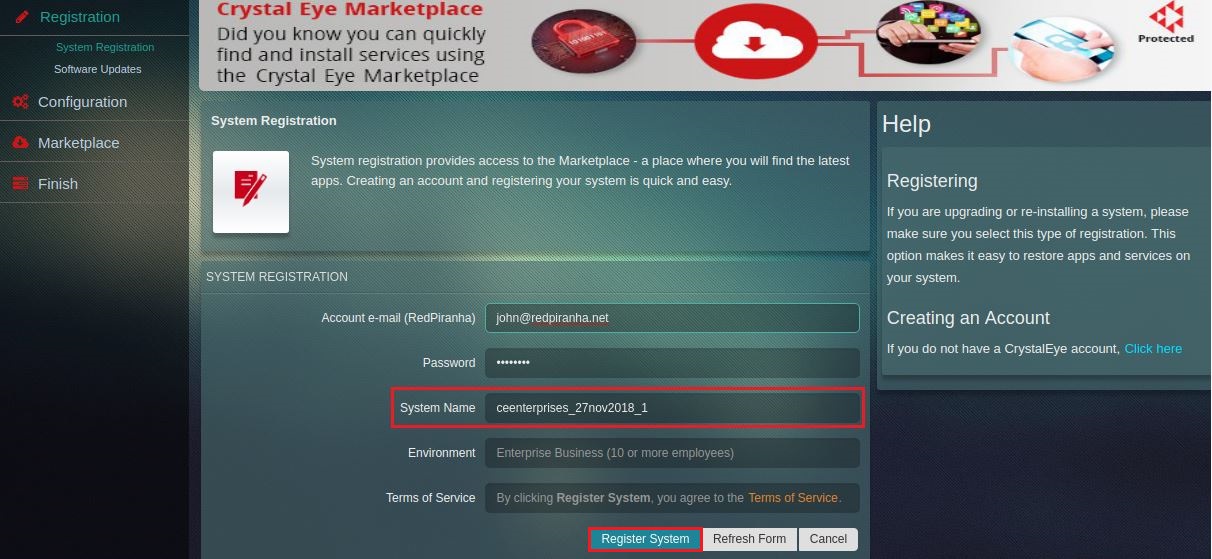
Note: Use a single word for the system name.This can include ‘underscore’s ( _ ) and dash’es (-) but not empty spaces.
Step 8: You will now see the final stage of the System Registration process when the Crystal Eye Box automatically connects to the SIEM. Click the Next button after the CE is connected to the SIEM. 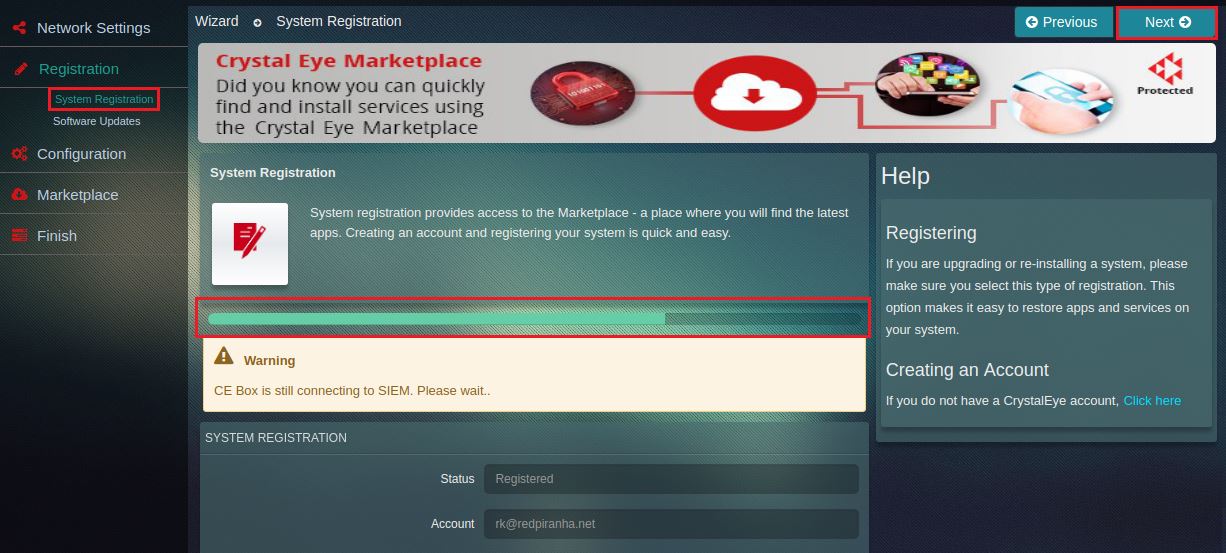
Now that the network is configured, the system will prompt the user to load some critical updates to the core Crystal Eye system in the instance that the latest version is not installed.. The system is programmed not to allow the user to proceed until the latest version of the software is installed.
Step 9: In the Available Updates section, click the Update All button and then click the Next button to proceed. 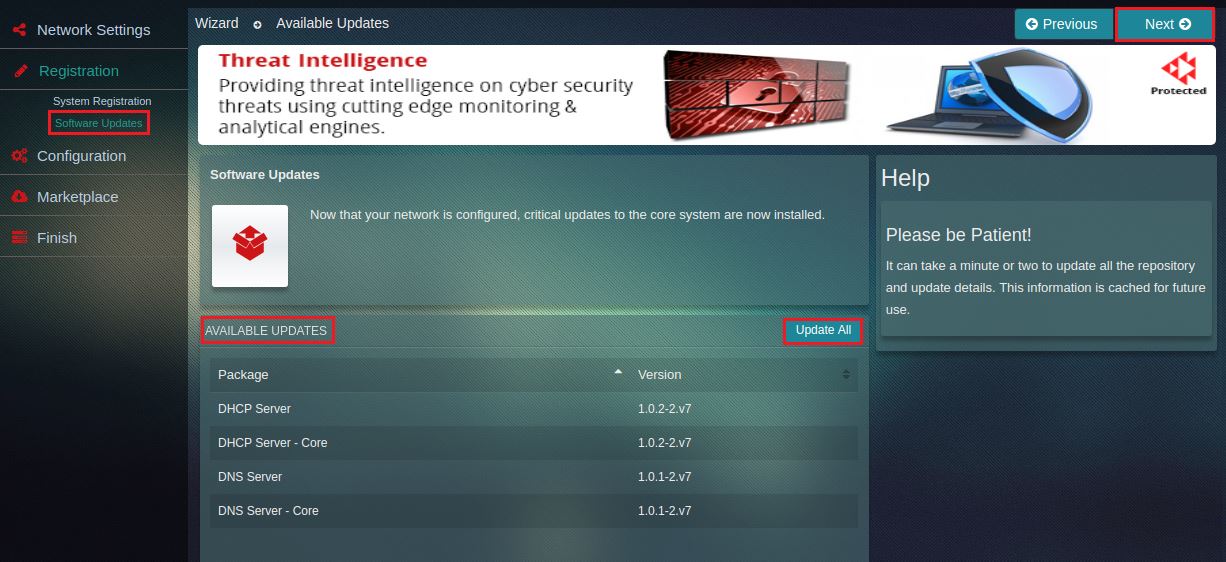
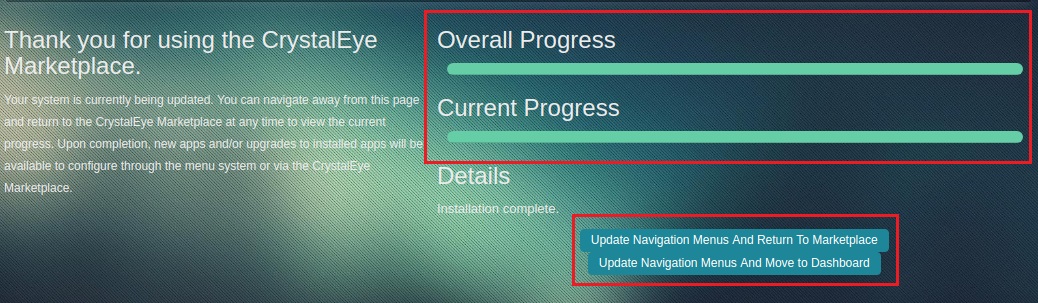
Note: After the software update is initiated, you will be able to see the Overall Progress and the Current Progress bar. The system will notify that the latest software updates are installed once the installation process is completed.
The Configuration section allows the administrator to manage critical settings such as assigning date and time, managing storage of user data, setting incident and event services (SIEM), and detecting risks.
The Date and Time setting plays vital role in rolling out time specific functionalities of applications and services in the Crystal Eye. The configuration process includes setting up the correct time zone information and an accurate clock. The administrator can easily select the time zone from the relevant dropdown and enable automatic synchronization of the date and time.
Step 10: In the Settings Section of the Date and Time page, select the Time Zone from the dropdown and click the Next button.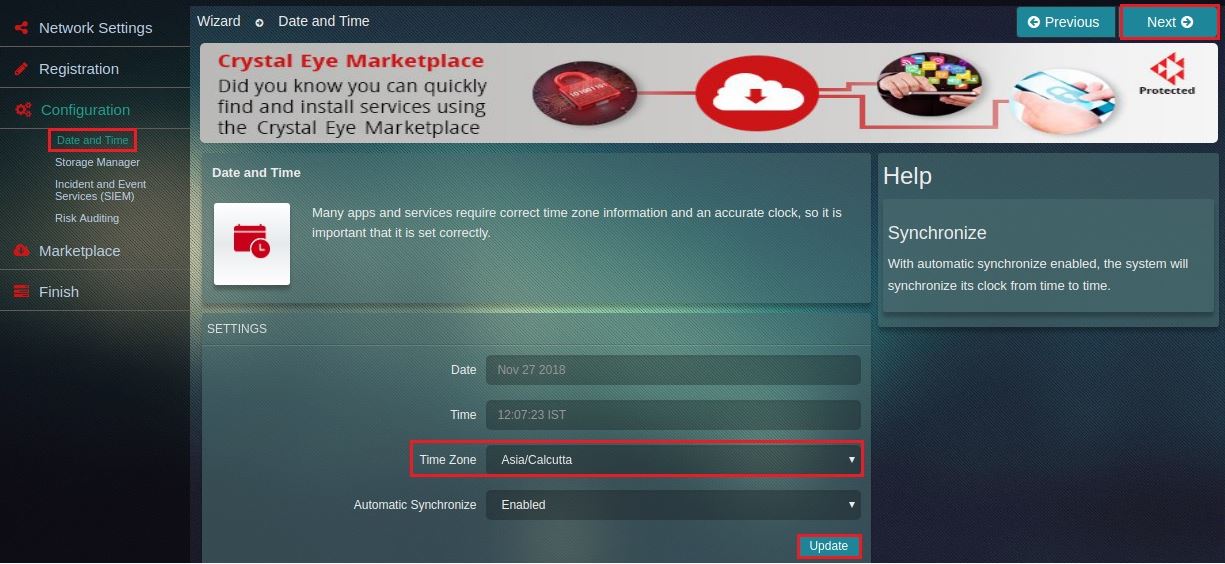
Crystal Eye requires significant storage space for user data. The Storage Manager provides a way to isolate this user data on a separate partition in the Crystal Eye appliance.
Step 11: View details regarding the System Storage and click the Next button. 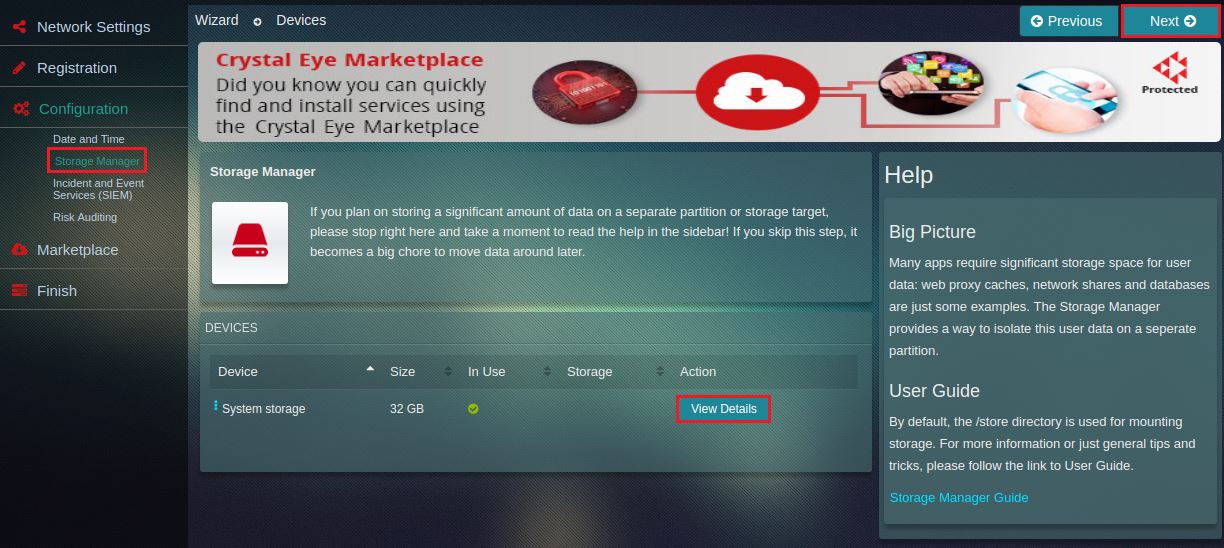
The Incident and Event Services (SIEM) section of the first boot configuration wizard helps to manage various settings that defines the levels of security analysis done by Red Piranha’s Security Operations Team. Crystal Eye offers three security service levels namely, Level – 1 Gold, Level 2 - Silver and Level 3 - Platinum. The system would also prompt the user to feed in the primary and secondary contact details which would be used to contact the users by Red Piranha Security Operations Team for various security related correspondences.
Step 12: In the Incident and Event Services (SIEM) section, select appropriate SIEM Level according to your subscription, click the Update button._1.jpg)
Note: The Incident and Event Services (SIEM) application allows administrators to select the service levels of the SIEM. Based on these service levels selected by the user, various types of security related analytical services (as per service level agreement) are provided by Red Piranha’s Security Operations Team. Crystal Eye offers three service levels namely, Level – 1 Silver, Level 2 - Gold and Level 3 - Platinum. The SIEM agent (installed in the Crystal Eye appliance) analyses data from system log files and forwards it real time to the SIEM Server for further analysis and action. However, this process may vary according to the service levels opted which could either be Silver, Gold or Platinum.
Step 13: Now scroll down, enter the Contact Details, click the Submit button and then click the Next button. _2.jpg)
The Risk Auditing feature audits system/process for critical security controls and indentifies risks. This section facilitates quick security controls assessment which helps in identifying various risks that have a negative impact on the company/business/organization.
Step 14: In the Risk Auditing page, click the Select Critical Security Controls button. 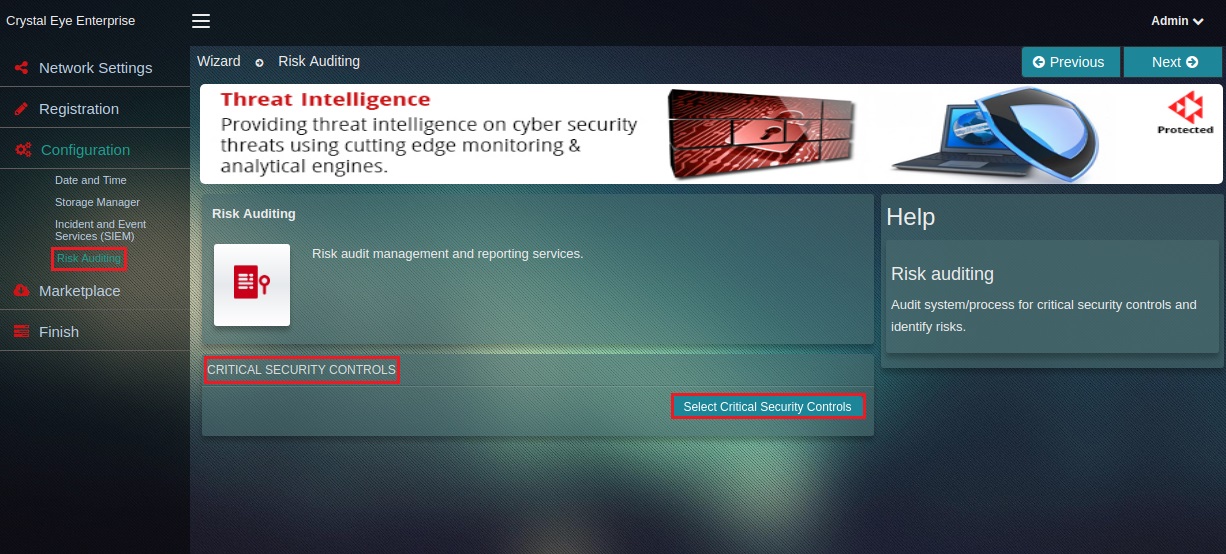 Step 15: You will now see the Critical Security Controls questionnaire page. Enter the Asset Name for which the risk needs to be assessed, Select Controls and click the Submit button.
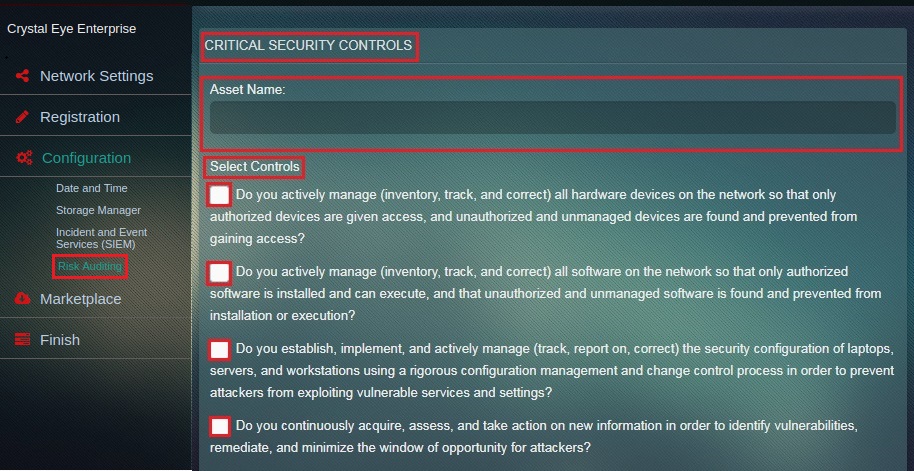
Note: If the tick box against the question is selected then the answer is considered as “Yes”. However, if the tick box is not selected then the answer is “No”. A risk will be created for each “No” and result in creation of related risk which can be tracked using the Risk Auditing application. The risk mitigation plan can then be created and implemented accordingly.
The Marketplace section is where you can add new apps and services to your system. Apps available in the Marketplace have gone through a stringent quality control process to ensure the quality and security of each submission.
Step 16: In the Marketplace page, click the Select button under the By Category section and then hit the Next button. 
Note: If you click the Select button under the Skip Wizard section and then click the Next button, the first boot configuration wizard will be completed and you will see the System Dashboard.
Step 17: You will now see the Application Selection page. Click the Select for Install button under the applications of your choice and click the Next button. 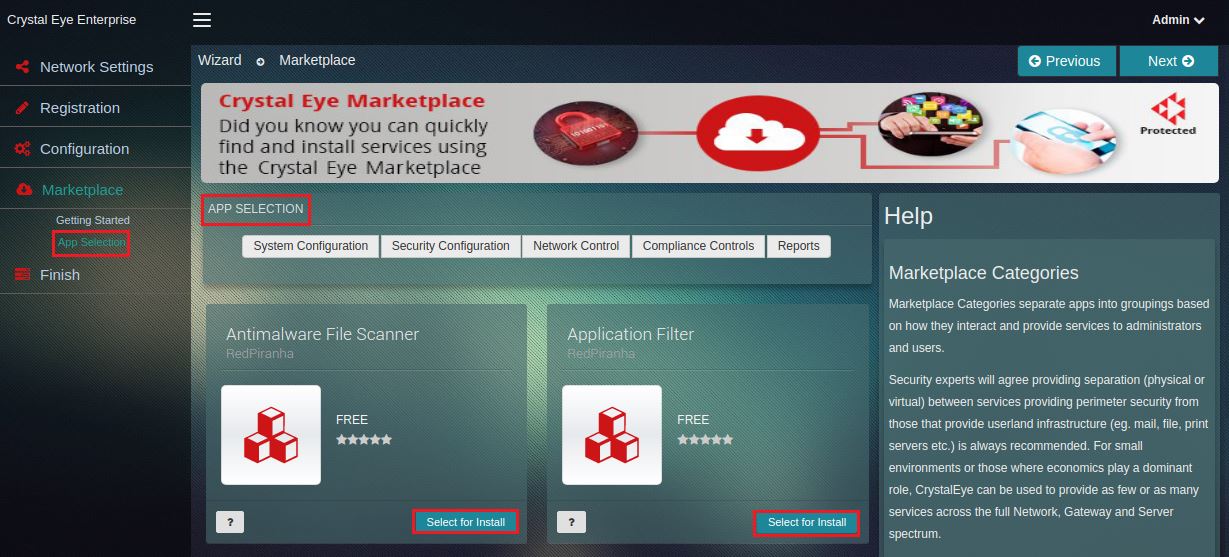
Note: The Crystal Eye has a fixed number of applications that are pre-installed. However, the non-default applications must be installed for further usage.
The Finish section provides an overview of the applications that have been selected for final installation. The administrator can review the apps and delete the one’s not required on this page.
In this section, you will see an installation table for all the apps that you have selected. You may review the apps that you want to install here.
Step 18: In the Application Review page, click the Download and Install button to proceed with the installation of the apps. 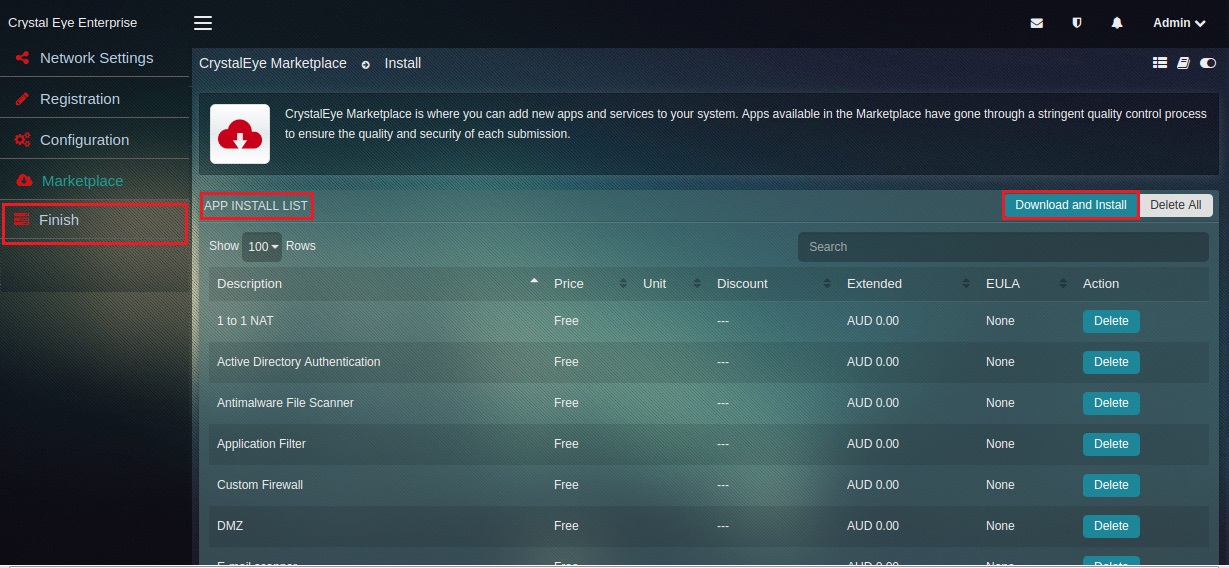
Note: Once the download and install button is clicked, you will see the progress bar. After the selected applications are installed, you will have the option to Update Navigation Menu and Return to Marketplace or Update Navigation Menu and Move to the Dashboard.