Vulnerability Scanning
The Vulnerability Scanning application is a comprehensive vulnerability assessment system that is built to detect and flag known and potential security weaknesses in servers and user devices located in the Crystal Eye network or elsewhere.
The application has enhanced capabilities to perform vulnerability scan of:
- Servers and user devices in the Crystal Eye network,
- Servers or user devices located outside the Crystal Eye network, or
- Specific website page
Note: It must be ensured that ICMP is enabled on the devices in the CE network before the vulnerability scan is initiated.
The application is programmed to scan all default port types. However, the Crystal Eye administrator can also specify the custom ports to be scanned. The fully automated system of the Vulnerability scanning application enables CE administrators to identify security loopholes in the network and classify weaknesses that might lead to a security incident. It helps in predicting the effectiveness of the various countermeasures taken in order to secure networks and also helps in remediating any risks that are targeted towards external facing servers deployed in the Crystal Eye network.
Note: Vulnerability Scanning is a paid service. However, on opting for an annual eCISO service the Crystal Eye user is entitled for a free vulnerability scan at the end of each quarter.
However, the Crystal Eye user is entitled for four free vulnerabilities scan (on vulnerability scan each quarter of the year) if the eCISO
There are three types of scanning that a CE administrator can opt for namely, Deep – Non Destructive Full and Slow Scan, Default – Non Destructive Full and Fast Scan and Ultimate – Full and Fast Scanning Including Destructive. The Vulnerability Scanning application has an automated scheduler which can be used to trigger a vulnerability scan on a specified date and time.
Note: Once the vulnerability scan is completed it takes upto 3 business days for the report to be available at Red Piranha’s client dashboard.
Crystal Eye’s Vulnerability Scan is conducted in two major phases. The first phase relates to the opted scanning type, where the CE administrator specifies whether the scan is to be done on a specific CE network or on network devices located outside the CE network. Apart from this, the Vulnerability Scanning application can also be configured to scan a web page.
Left-hand Navigation Panel > Compliance Controls > Vulnerability Scanning Application |
|---|
The Vulnerability Scanning application needs to be configured before it is used to scan CE networks or assets deployed outside the CE network.
How to Configure Vulnerability Scanning Application?
Step 1: In the Vulnerability Scanning application page, click the Configure Vulnerability Scanning button.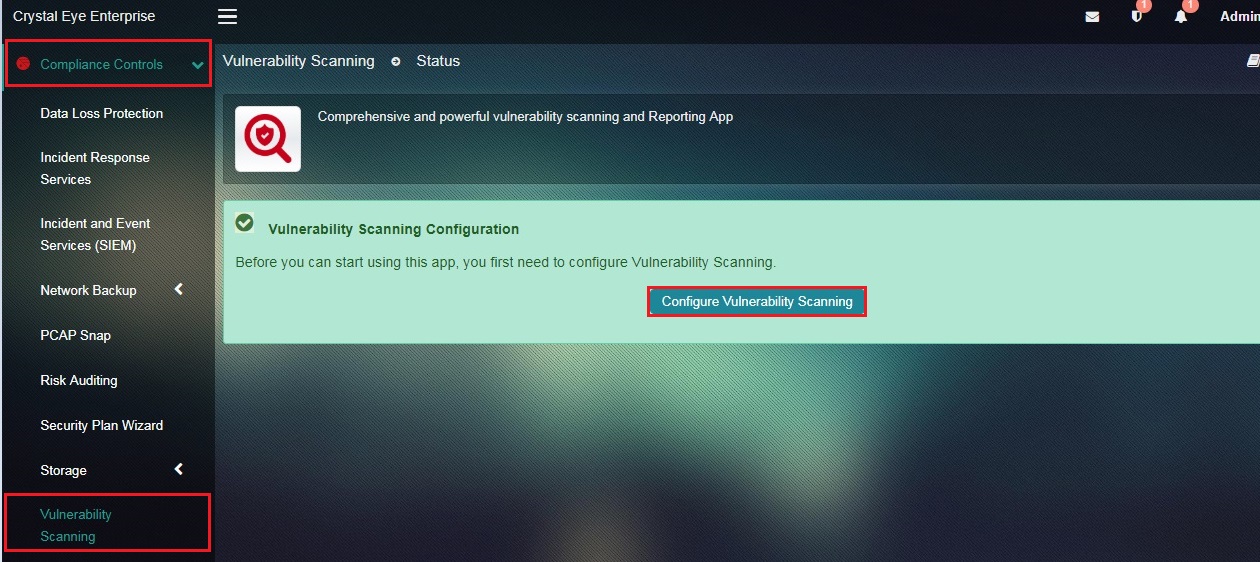
Note: It might take about 30-50 minutes for the Vulnerability Scanning application to be configured. Once the configuration process starts the following message is displayed.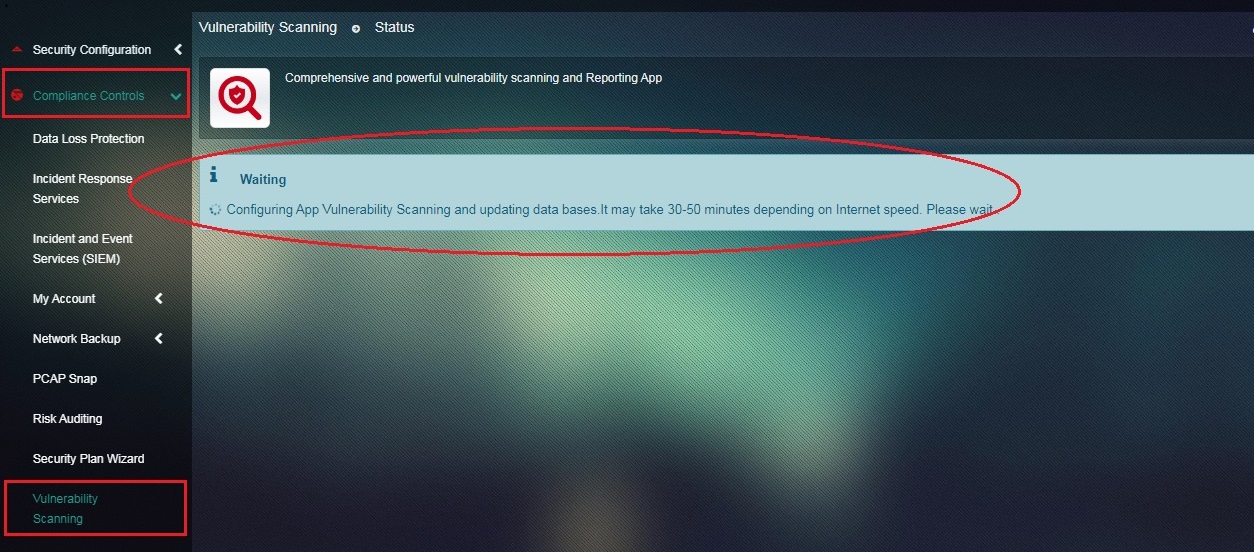
In order to initiate a vulnerability scan a Crystal Eye administrator must first define the Schedule Type. There are three schedule types supported by Crystal Eye namely, Crystal Eye (Entire Network), Scan Custom Location, and Scan Web Page.
If the schedule type is selected as Crystal Eye (Entire Network) then the vulnerability scanning application would scan all the servers and user devices connected to the Crystal Eye appliance.
Scan Custom Location is selected when there is a requirement to scan external servers and user devices. The CE administrator would have to provide the IP address of the external server or user devices while scheduling the scan.
The CE administrator might opt for Scan Web Page schedule option if a particular website needs to be scanned for known and potential vulnerabilities.
Note: The Vulnerability application GUI also provides the option to exclude Hosts from the scheduled vulnerability scan. Please be advised that this option to exclude hosts only exists when a Crystal Eye (Entire Network) schedule type has been initiated.
Another important aspect about this application is that the CE administrator can define whether to scan default ports or custom ports. The CE administrator can opt for various scanner types while scheduling vulnerability scans such as Deep – Non Destructive Full and Slow Scan, Default – Non Destructive Full and Fast Scan and Ultimate – Full and Fast Scanning Including Destructive.
Based on the policy requirements of the organisation, the Crystal Eye administrator can also specify whether vulnerability scans is to be scheduled on a one time basis, weekly basis or a monthly basis. Based on how the CE administrator chooses to repeat the schedule of the vulnerability scan a specific date and time can be scheduled.
How to Add a New Vulnerability Scan Schedule?
Step 1: In the Vulnerability Scanning application page, click the Add button in the Schedules section.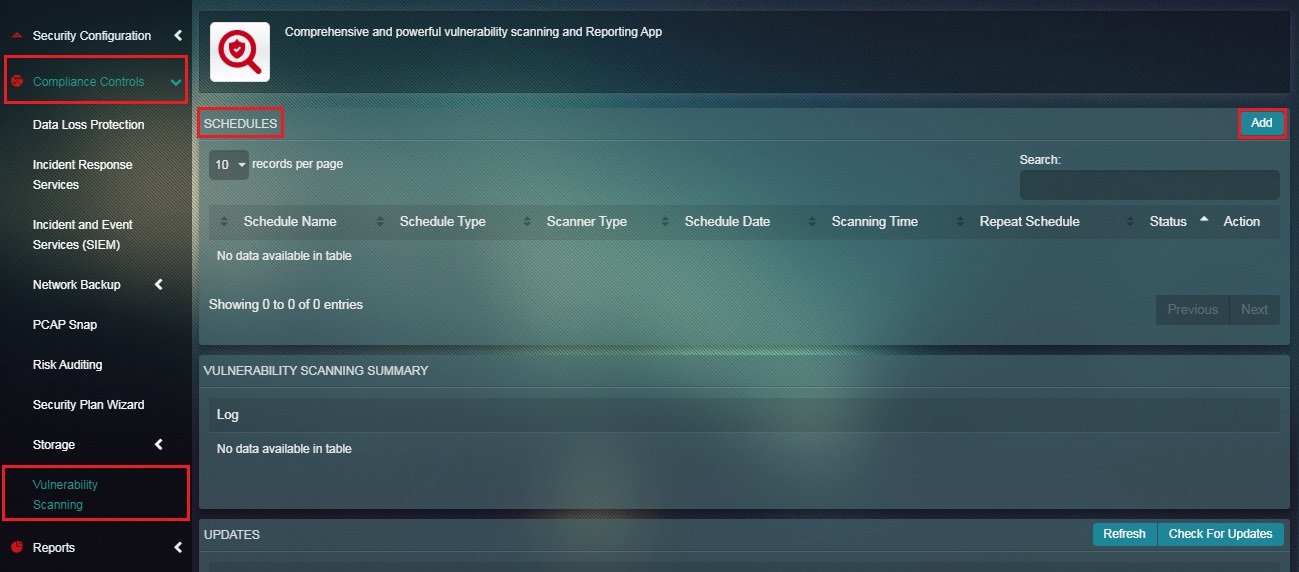
Step 2: You will now see the Add New Vulnerability Schedule page. Enter the Schedule Name in the text box.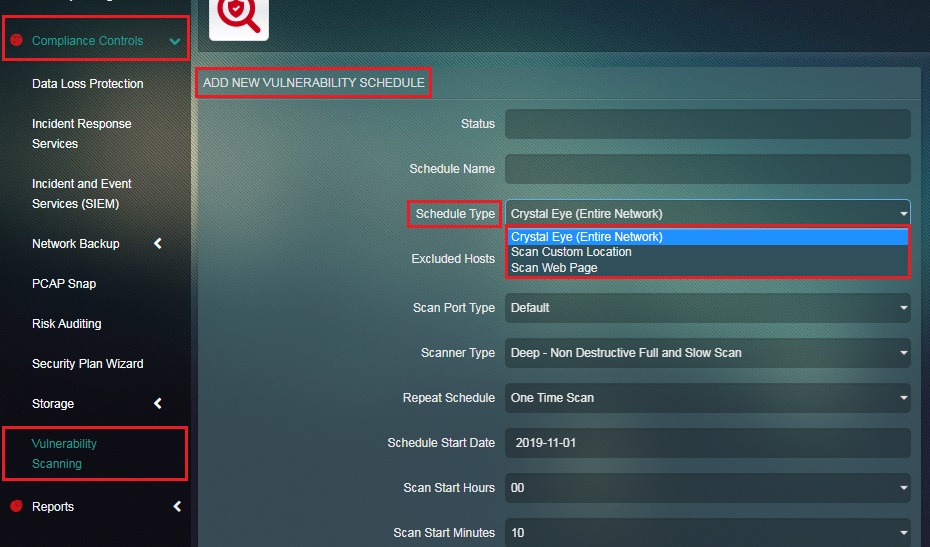
Note: The Schedule Type feature of Crystal Eye’s Vulnerability Scanning application is such that the CE administrator can opt to run a vulnerability scan on the Entire Crystal Eye network, a custom location in the external zone of the CE or a particular web page.
Step 3: Select the Scan Port Type from the dropdown so as to specify whether to scan a default ports or a custom port.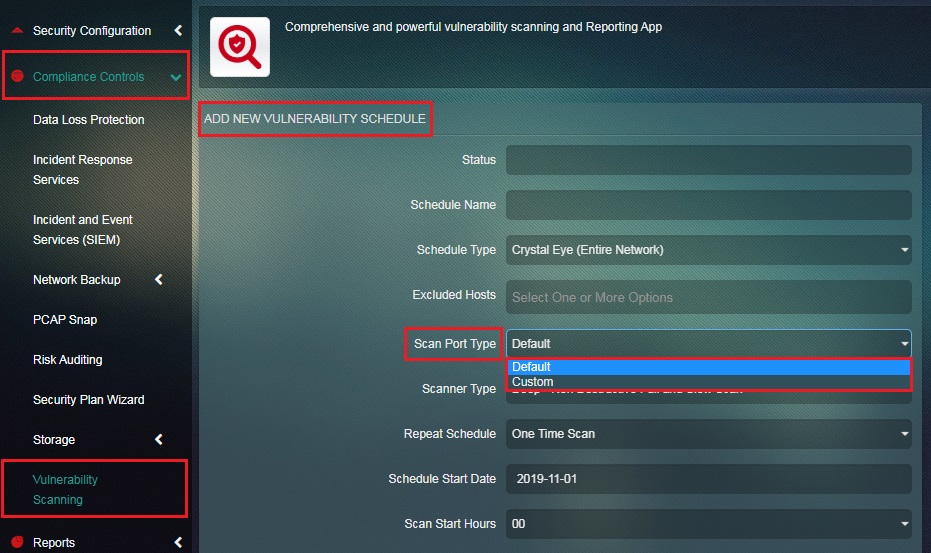
Note: If you select Custom from the dropdown, the Custom Ports textbox will appear below. Please be advised that the writing format to be followed while entering the TCP port range and port details is T:3-5 and T:6 whereas, the writing format to be adhered while entering UDP port range and ports in the text box is U:7-9 and U:10.
Step 4: Select the Scanner Type from the dropdown.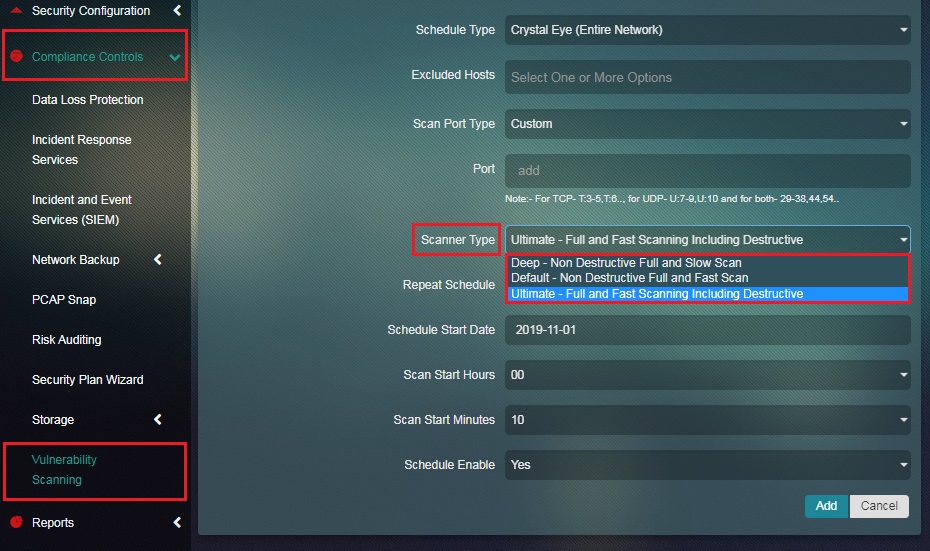
Note: The scanner type is the depth to which the vulnerability scan would be done. The 3 scanner types that can be selected are Deep – Non Destructive Full and Slow Scan, Default – Non Destructive Full and Fast Scan and Ultimate – Full and Fast Scanning Including Destructive.
Step 5: Select from the dropdown and specify whether it’s a One Time Scan, Weekly Scan or a Monthly Scan. 
Note: If One Time Scan option is selected then a start date and time must be specified. Likewise, if Weekly Scan is selected then the CE administrator must specify the start date, end date, days of the week, and time. However, if the CE administrator’s wishes to select Monthly Scan option then the start date, end date, month date, time must be selected.
Step 6: After specifying the date, time, and day, click the Add button.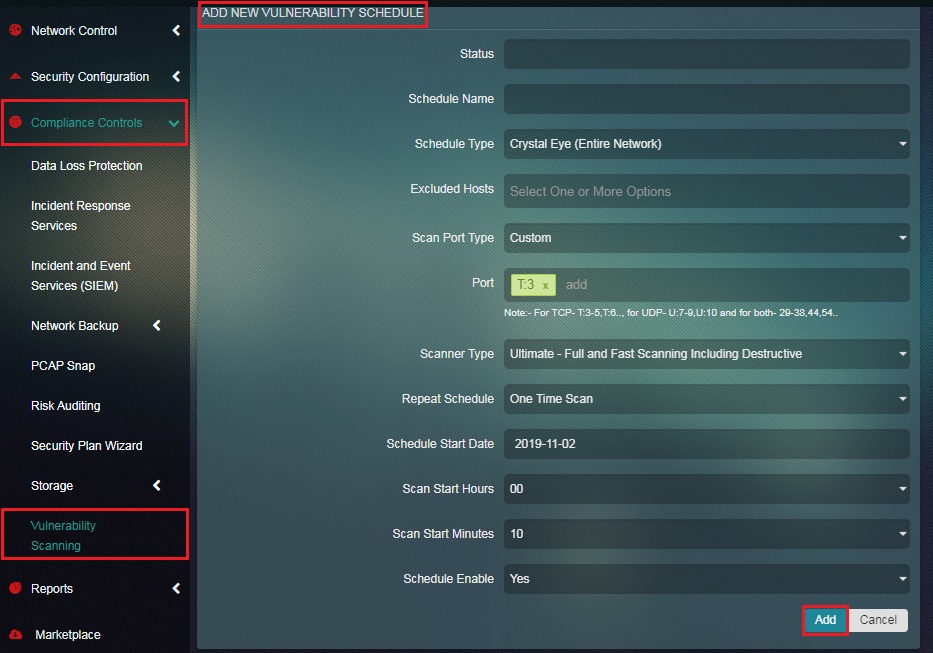
Step 7: You will now be directed to the Vulnerability Scanning application page. The vulnerability scan details would appear in the Schedules section. 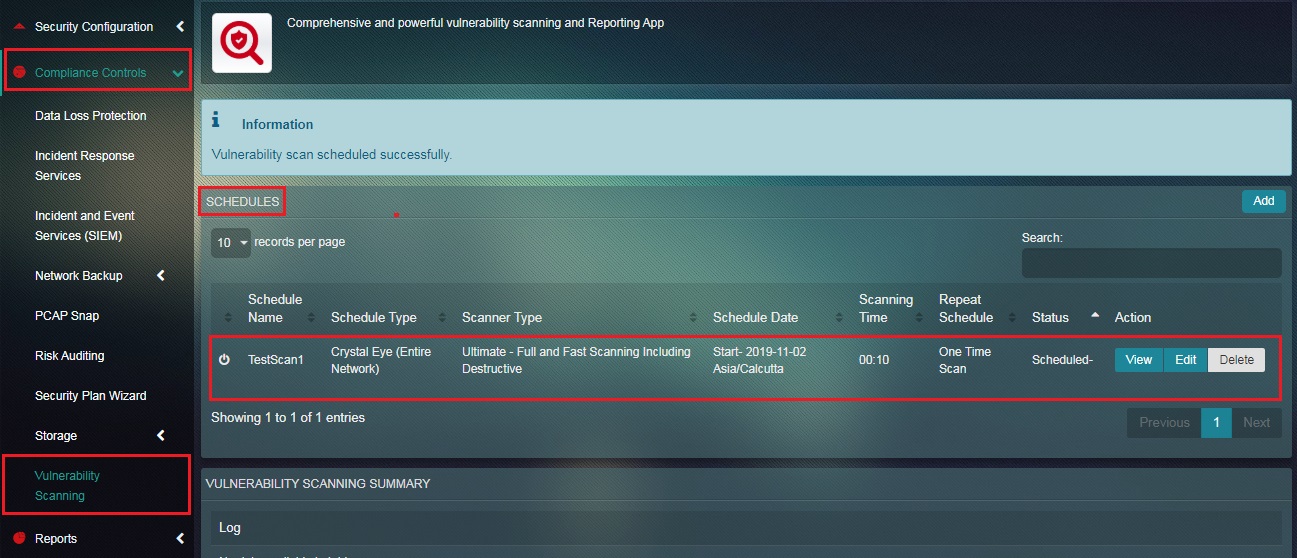
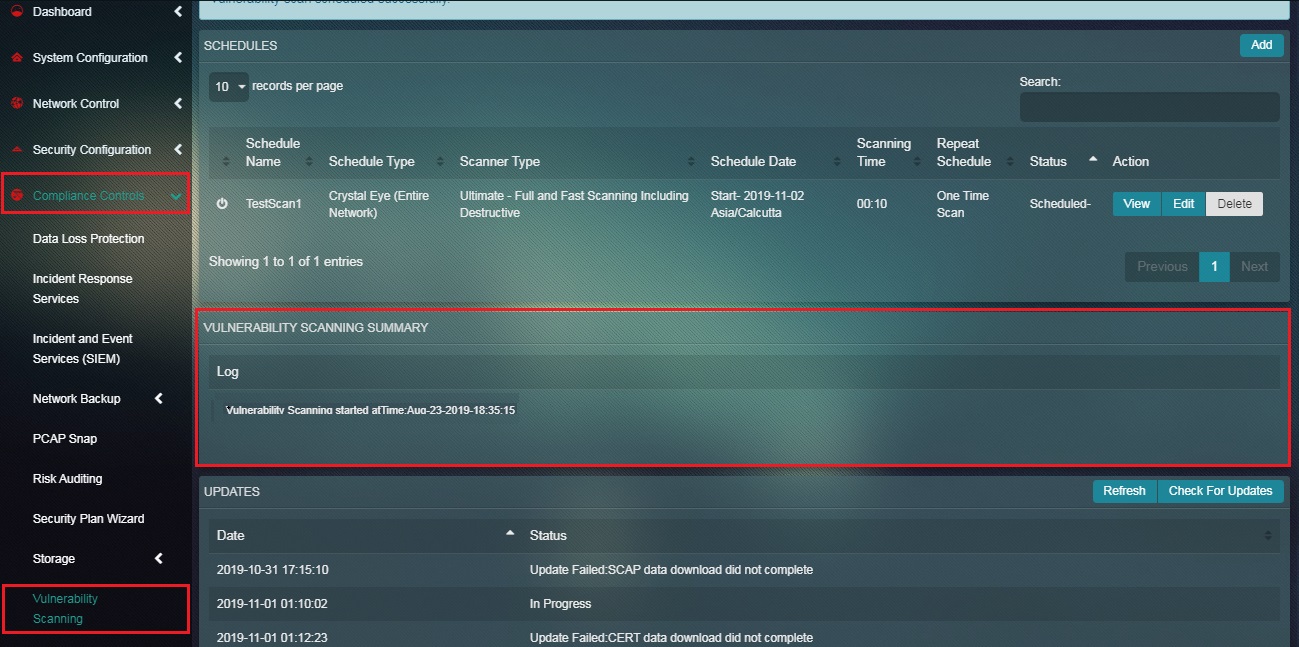
Note: Once the Vulnerability Scan has been scheduled the Status section will show whether the scan is ‘Scheduled’, ‘Running’, or ‘Completed’. Refer to the screenshot below.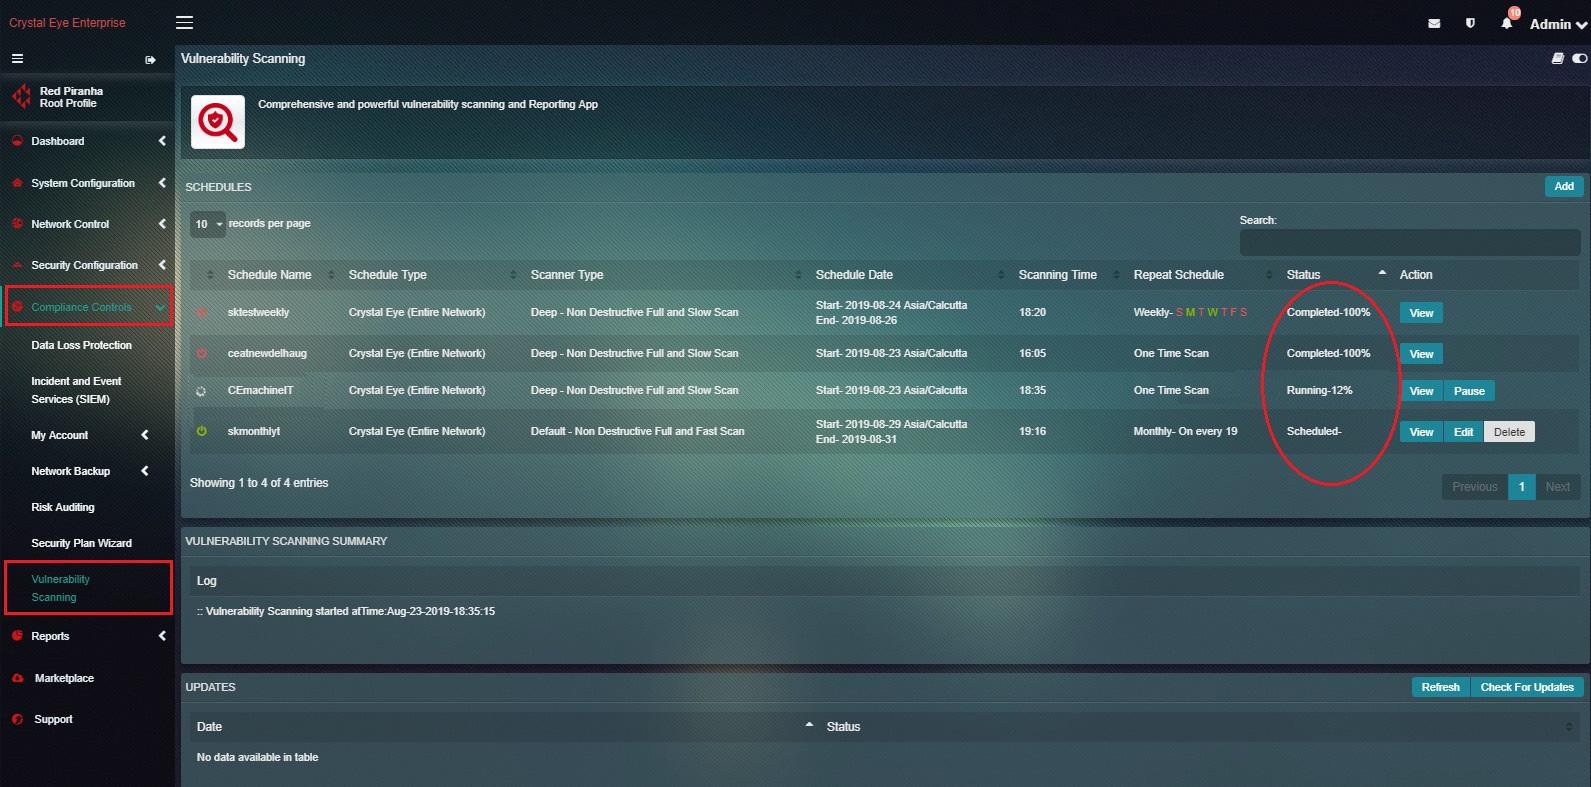
The Vulnerability Scan Report appears in Red Piranha’s client dashboard after the scan is completed. However, it must be noted that it takes 3 business days for the report to be generated and made available for download.
The report can be downloaded in PDF format from Red Piranha’s client dashboard. The dashboard can be accessed using the same user credential that was used while registering the Crystal Eye appliance.
Note: The report can either be viewed on the client dashboard or it can be downloaded in PDF format.
The key components of Crystal Eye’s Vulnerability Scan Reports are:
- Network Risk Tracker Table & Graph
- Scan Bar Chart
- Asset Table
- CVE Table
- Synopsis Table
- Vulnerabilities Table
How to View the Vulnerability Scan Reports in the Client Dashboard?
Step 1: Go to https://www.redpiranha.net/
Step 2: Click the Store button on the homepage navigation panel
Step 3: You will now be directed to Red Piranha’s Store Website. Click the Login button on the top-right corner of the web page.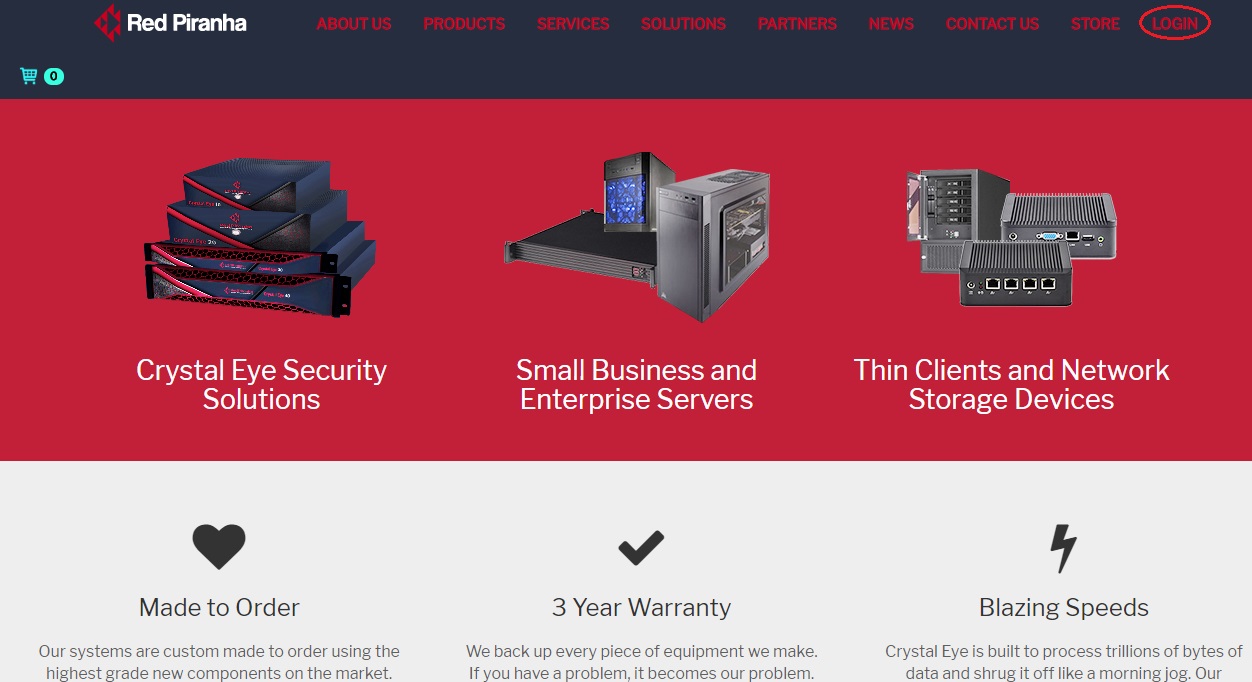
Step 4: You will now see a Login pop-up box. Enter your user credentials and click the Login button. 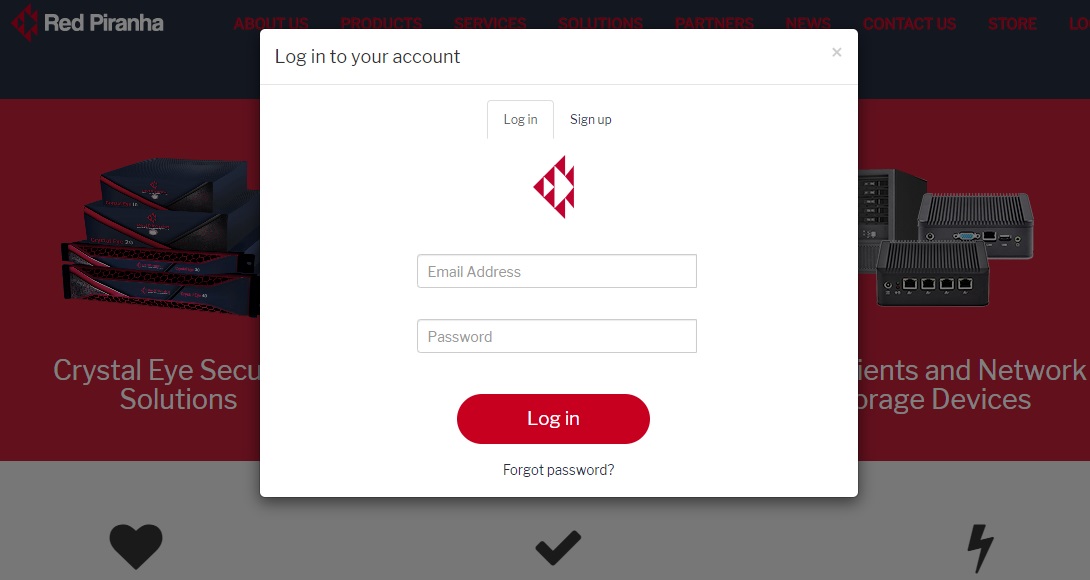
Note: Enter the email account and password that was used while registering the Crystal Eye appliance. You may re-generate the password through the forgot password feature just in case you lost/forgot it.
Step 5: Select Client Dashboard from the Welcome dropdown.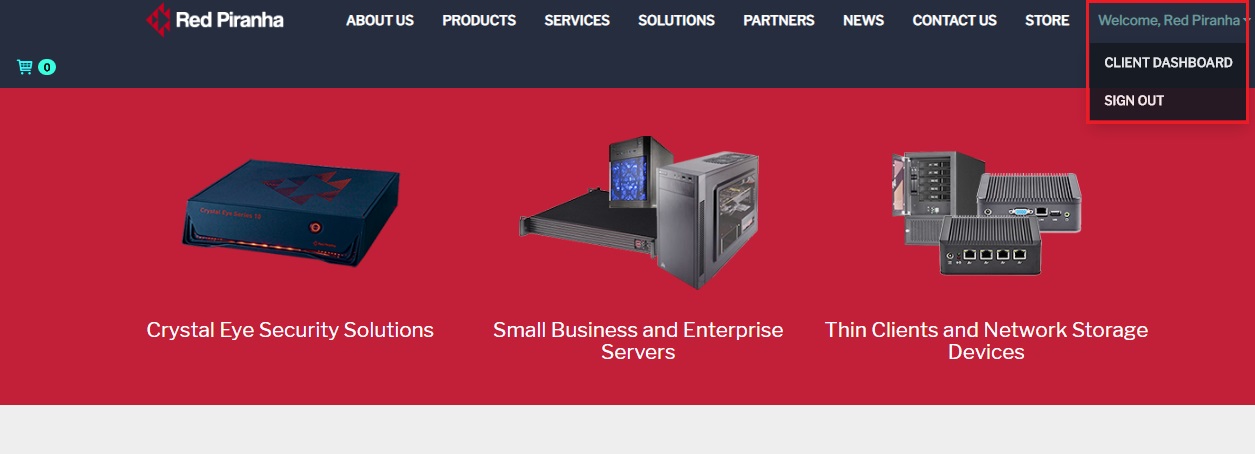
Step 6: You will now be directed to the Client Dashboard. Click the Devices button. 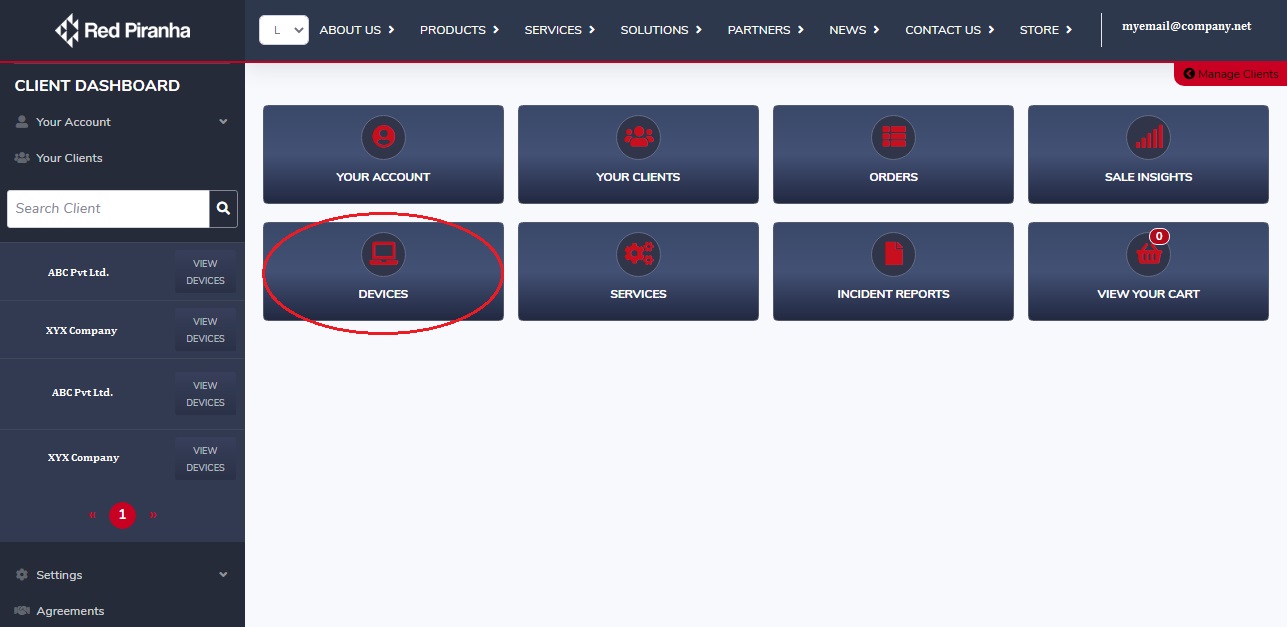
Step 7: You will now see the list of devices. Click the View button next to the device name where the vulnerability scan was scheduled. 
Step 8: You will now see the Vulnerability Scan Report in the schedules section of the dashboard. Click the View Report button to get the report displayed on the dasshboard.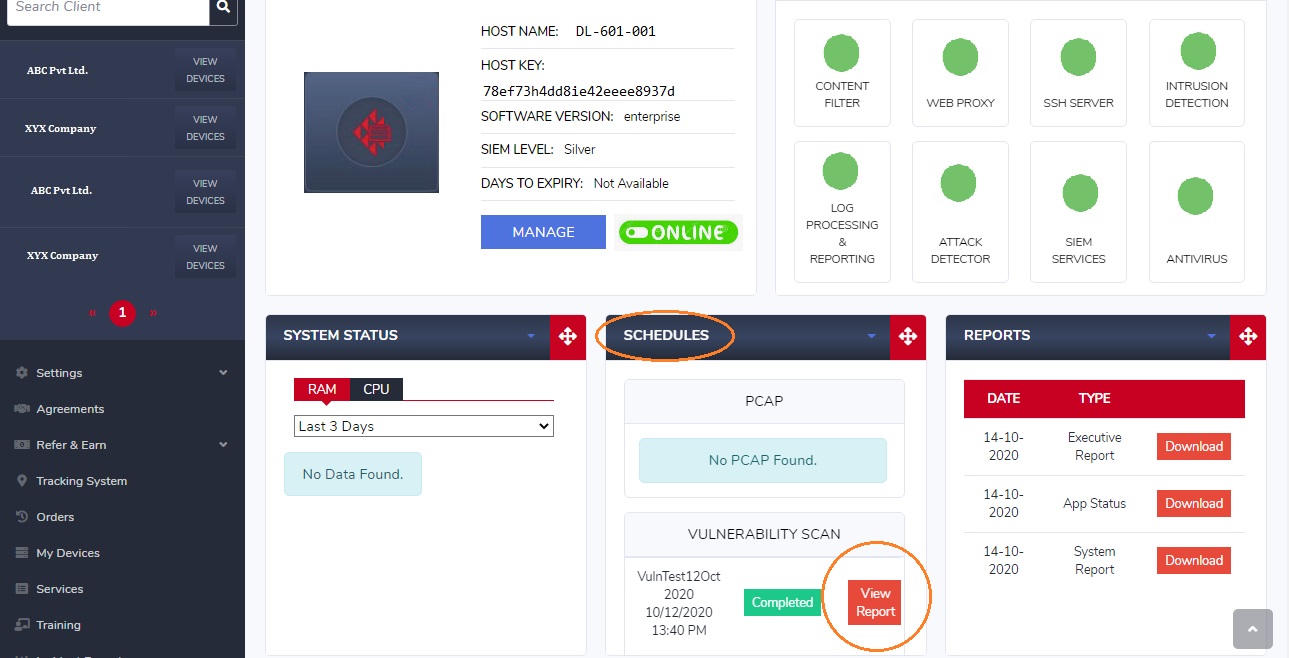
The Vulnerability Scanning Logs provides a comprehensive view of the date and time at which a scan was initiated or stopped. Apart from this the scan schedule details is also displayed as and when it is done.
The screenshot below shows an example of the vulnerability scanning log details: